
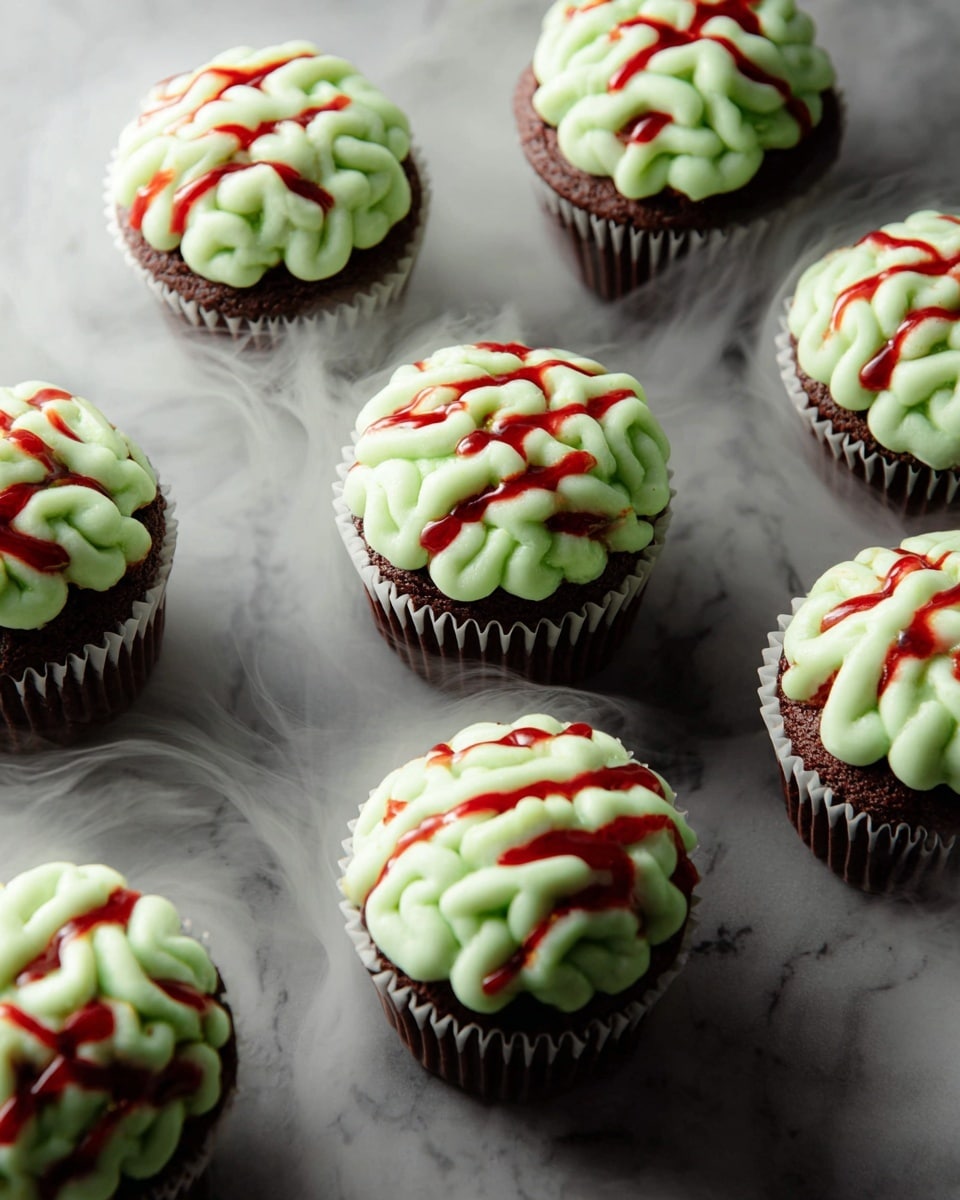
Okay, I have to tell you about this insanely fun and delicious treat I’ve been making lately — the Zombie Brain Cupcakes Recipe. If you’re craving something spooky yet totally scrumptious, this is your go-to. Seriously, these cupcakes are moist, rich, and that neon green brain frosting with just a touch of red “blood” gel makes them outright irresistible. I love how they get all those creepy little squiggles that look just like brains – trust me, everyone always asks me how I do it. Keep reading and I’ll walk you through every step to nail this fan-freaking-tastic recipe.
Why You’ll Love This Recipe
- Spooky Fun & Delicious: Perfect for Halloween or any quirky occasion where you want to impress with a creepy twist.
- Moist & Flavorful Cupcakes: The cocoa and buttermilk combo keeps them rich but tender.
- Easy Yet Impressive Frosting Technique: You don’t need fancy tools to create the brain effect — I’ll show you how.
- Family Favorite: My kids and friends go crazy for these, and they’re a hit every time I bring them out.

Ingredients You’ll Need
All the ingredients here come together in a way that’s familiar but with a fun twist to bring those zombie brains to life. The key is getting the frosting just right and using neon green food coloring to make it pop. Remember, fresh ingredients always help — especially your butter and eggs for the best texture and flavor.
- All-purpose flour: The base for the cupcakes; make sure to measure properly for fluffiness.
- Granulated sugar: Sweetens perfectly and balances the cocoa.
- Unsweetened cocoa powder: Gives that deep chocolate flavor, which pairs beautifully with the spooky look.
- Baking powder: Helps the cupcakes rise.
- Baking soda: Pairs with acidic buttermilk to keep cupcakes tender.
- Kosher salt: Balances sweetness and enhances flavor.
- Buttermilk or whole milk: Buttermilk is my favorite here since it adds a nice tang and keeps the cake moist.
- Neutral oil: Keeps cupcakes soft without an overpowering taste.
- Large egg: Adds structure and richness.
- Pure vanilla extract: Elevates the chocolate flavor subtly.
- Boiling water: Helps bloom the cocoa for intense chocolatey goodness.
- Powdered sugar: For ultra smooth frosting that pipes beautifully.
- Unsalted butter: Room temperature for creamy frosting.
- Neon green liquid food coloring: The star of the show for that eerie brain color.
- Red decorating gel: For the perfect bloody drizzle effect.
Variations
I love how versatile this Zombie Brain Cupcakes Recipe is — you can tailor it whether you want it classic chocolate, dairy-free, or even a little more colorful. I’ve played around with a few variations over the years, and it’s always a hit no matter what.
- Dairy-Free Version: I swapped buttermilk for almond milk and used a dairy-free butter substitute for frosting; still got that brainy look with delicious flavor.
- Red Velvet Twist: Add some red food coloring and a dash of vinegar for a different take that plays with the Halloween theme too.
- Spicy Kick: My adventurous side added a pinch of cayenne to the batter — surprisingly good and unexpected!
- Chocolate Ganache Drizzle: Sometimes I swap the red gel for dark chocolate ganache to make for a rich, eerie effect.
How to Make Zombie Brain Cupcakes Recipe
Step 1: Prep & Mix Your Cupcake Batter
First things first — you want to preheat your oven to 350°F and line a muffin tin with cupcake liners. This sets you up for success and avoids sticking. Now, toss your dry ingredients (flour, sugar, cocoa powder, baking powder, baking soda, salt) into a large bowl and whisk together until they’re nice and uniform.
Next, add in the wet ingredients: buttermilk, oil, beaten egg, and vanilla. Whisk everything gently but thoroughly until smooth. Now, here’s the trick that makes the cupcakes super moist — stir in the boiling water last. The batter will be thin, but that’s perfect. You’re unlocking extra chocolate flavor and moisture!
Step 2: Bake Until Perfection
Fill each cupcake liner about two-thirds full with the batter — roughly a quarter cup each. Don’t overfill; I’ve learned the hard way that spilling over makes a mess and weird shapes. Pop them in the oven and bake for 18 to 20 minutes. You’ll know they’re done when a toothpick inserted in the center comes out clean. Let them cool completely before frosting — patience here really pays off for the best results!
Step 3: Whip Up That Creepy Brain Frosting
In a mixer fitted with a whisk attachment, beat together your powdered sugar, room temperature butter, vanilla, and salt. This step is where you get that ultra smooth, bright white frosting. Don’t rush — usually, 2 to 3 minutes on medium-high speed is perfect.
Now for the fun part: add your neon green liquid food coloring a few drops at a time and keep beating until it’s evenly tinted with that vibrant zombie-green color. You want it bright, but not too runny.
Step 4: Pipe Your Brains and Add the Spooky Touch
Transfer your green frosting to a large piping bag fitted with a small round tip — this is key for those detailed squiggles that look like brain folds. Start by piping a small mound on the cupcake top, about the size of a quarter. Then, pipe two straight vertical lines side by side down the center. Finally, add those squiggly lines on either side, loosely mimicking the convolutions of a brain.
Last but definitely not least, drizzle some red decorating gel over the creases. It sinks into the frosting grooves and looks like the freshest zombie blood — don’t you love that little dramatic touch? If you’re not serving right away, pop these in the fridge to keep them fresh.
Pro Tips for Making Zombie Brain Cupcakes Recipe
- Use Room Temperature Butter: For frosting, softened (not melted) butter whips up best and gives that creamy, bright white base before coloring.
- Don’t Skip Boiling Water: It really helps the cocoa “bloom,” making these the most tender, flavorful cupcakes I’ve ever made.
- Practice Your Piping: I recommend practicing the brain squiggles on parchment paper to get comfy before decorating cupcakes.
- Chill Before Serving: Refrigerate cupcakes to let frosting firm up and make cleanup easier (plus, the neon green color really pops once chilled).
How to Serve Zombie Brain Cupcakes Recipe
Garnishes
I keep the garnishes simple because the frosting itself steals the show, but a few times I’ve added edible glitter to give the brains a slimy sheen — so fun! You could also place a plastic eyeball or a candy spider on top if you want to up the creep factor for a Halloween party.
Side Dishes
I like pairing these cupcakes with a strong cup of coffee or a cold glass of milk. For themed events, a bright green punch or “witch’s brew” style cocktail really brings the table together.
Creative Ways to Present
My favorite way is to arrange the cupcakes on a big platter lined with faux cobwebs or moss. Sometimes I line up a few gummy worms wiggling out of the frosting for an extra gross-out effect. It’s a total crowd-pleaser and always sparks conversation.
Make Ahead and Storage
Storing Leftovers
I store leftover cupcakes in an airtight container in the fridge, especially because of the buttercream frosting — it keeps them fresh up to 3 days. Just let them come to room temperature a bit before eating for the most flavor.
Freezing
I’ve frozen these cupcakes (without frosting) successfully by wrapping them tightly in plastic wrap and foil. When ready to use, thaw in the fridge overnight and frost fresh on the day you want to serve – that way the frosting keeps that signature bright green color and texture.
Reheating
Since these are cupcakes, reheating isn’t really necessary. But if you want a warm bite, I pop one in the microwave for about 10-15 seconds without frosting (frosting can melt quickly), then add fresh frosting or eat as is. Be careful not to overheat or you’ll get melted brains!
FAQs
-
Can I use regular food coloring instead of neon green liquid food coloring?
Absolutely! Regular gel or liquid food coloring works fine, but neon green gives that extra vibrant, glowing effect that really sets these cupcakes apart visually. Just start with small amounts and add more until you reach your desired color intensity.
-
What if I don’t have buttermilk — can I substitute?
Yes! If you don’t have buttermilk, you can easily make a substitute by adding a tablespoon of lemon juice or white vinegar to a cup of milk and letting it sit for 5 minutes. This mimics the acidity of buttermilk and keeps the cupcakes tender.
-
How do I pipe the brain squiggles if I don’t have special tips?
No worries! A small round tip is easiest, but you can cut a tiny hole in a plastic sandwich bag or use a zip-top bag with the corner snipped just a bit. Practice on parchment paper first to get your technique down — a little wavy back-and-forth motion is all it takes.
-
Can I make these cupcakes ahead of time?
Definitely. The cupcakes can be baked a day or two in advance and stored in an airtight container. Frost them the day you want to serve for best freshness and appearance. This helps save time on your busy party day!
Final Thoughts
Honestly, I absolutely love how this Zombie Brain Cupcakes Recipe turns out every single time — it’s the perfect combo of creepy fun and delicious chocolate goodness. When I first tried it, I was blown away by how easy the frosting technique is and how much personality it gives to simple cupcakes. I’m confident you’ll enjoy making and sharing these as much as I do. So go ahead, channel your inner mad baker and whip up some brainy delights that’ll have everyone talking!
Print
Zombie Brain Cupcakes Recipe
- Prep Time: 30 mins
- Cook Time: 20 mins
- Total Time: 2 hrs
- Yield: 12 cupcakes
- Category: Dessert
- Method: Baking
- Cuisine: American
Description
These Zombie Brain Cupcakes are delightfully spooky treats perfect for Halloween or any creepy celebration. Rich, moist chocolate cupcakes are topped with a vibrant neon green buttercream frosting piped to resemble a brain, finished with eerie red gel drizzles that mimic dripping blood. Fun to make and impressively spooky, these cupcakes combine classic flavors with creative decoration for a chillingly delicious dessert.
Ingredients
Cupcakes
- 1 1/4 cups (150 g) all-purpose flour
- 1 cup (200 g) granulated sugar
- 1/2 cup (40 g) unsweetened cocoa powder
- 1 tsp baking powder
- 1/2 tsp baking soda
- 1/2 tsp kosher salt
- 1/2 cup (120 ml) buttermilk or whole milk
- 1/4 cup neutral oil
- 1 large egg, beaten
- 1/2 tsp pure vanilla extract
- 1/4 cup boiling water
Frosting & Assembly
- 4 cups (455 g) powdered sugar, sifted
- 1 1/2 cups (3 sticks) unsalted butter, room temperature
- 1 tsp pure vanilla extract
- 1/4 tsp kosher salt
- 2 to 3 drops neon green liquid food coloring (or more as needed)
- Red decorating gel, for drizzling
Instructions
- Prepare the Oven and Tin: Preheat your oven to 350°F (175°C) and line a standard 12-cup muffin tin with paper liners to ensure easy cupcake removal and cleanup.
- Mix Dry Ingredients: In a large bowl, whisk together the all-purpose flour, granulated sugar, unsweetened cocoa powder, baking powder, baking soda, and kosher salt until well combined and aerated.
- Add Wet Ingredients: To the dry mixture, add buttermilk (or whole milk), neutral oil, beaten egg, and vanilla extract. Whisk these ingredients until the batter is smooth and even without lumps.
- Incorporate Boiling Water: Carefully pour in the boiling water and whisk thoroughly until the batter is fully combined and smooth; this step helps to create a moist cupcake texture.
- Fill Cupcake Liners: Using a 1/4 cup (60 ml) measure, fill each cupcake liner about two-thirds full with batter to allow room for rising.
- Bake the Cupcakes: Place the muffin tin in the oven and bake for 18 to 20 minutes, or until the cupcakes have risen and a toothpick inserted into the center comes out clean.
- Cool Completely: Remove the cupcakes from the oven and allow them to cool fully in the pan for about 1 hour before frosting to prevent melting the frosting.
- Make the Frosting: In a large bowl using a stand mixer fitted with the whisk attachment (or an electric mixer), beat powdered sugar, unsalted butter, vanilla extract, and kosher salt on medium-high speed for 2 to 3 minutes until the frosting is bright white and very smooth.
- Tint the Frosting: Add 2 to 3 drops of neon green liquid food coloring to the frosting. Beat again until the color is fully incorporated and adjust with more drops to achieve a vibrant green shade.
- Prepare Piping: Transfer the tinted frosting to a large piping bag fitted with a small round tip to achieve precise piping details.
- Pipe the Brain Design: Pipe a small mound of frosting (about the size of a quarter) onto the top of each cupcake. Then pipe two straight vertical lines side by side down the middle, followed by squiggly lines on either side to mimic the folds of a brain.
- Add the Bloody Effect: Drizzle red decorating gel over the piped frosting, letting it settle into the creases to create a dripping blood effect that enhances the zombie theme.
- Store Properly: Refrigerate the cupcakes if not serving immediately to keep the frosting firm and fresh until ready to enjoy.
Notes
- Use fresh buttermilk or whole milk to ensure the best texture and flavor in the cupcakes.
- If neon green food coloring is not available, mix blue and yellow food colorings to achieve a similar effect.
- Make sure the cupcakes are completely cooled before frosting to avoid melting the buttercream.
- Red decorating gel can be found in baking supply stores or online and is essential for the bloody effect.
- These cupcakes can be stored in the refrigerator for up to 3 days; bring to room temperature before serving for best taste.
- For a dairy-free version, substitute butter with vegan butter and use a plant-based milk.
Nutrition
- Serving Size: 1 cupcake
- Calories: 390
- Sugar: 35 g
- Sodium: 150 mg
- Fat: 22 g
- Saturated Fat: 13 g
- Unsaturated Fat: 8 g
- Trans Fat: 0 g
- Carbohydrates: 45 g
- Fiber: 3 g
- Protein: 4 g
- Cholesterol: 55 mg


