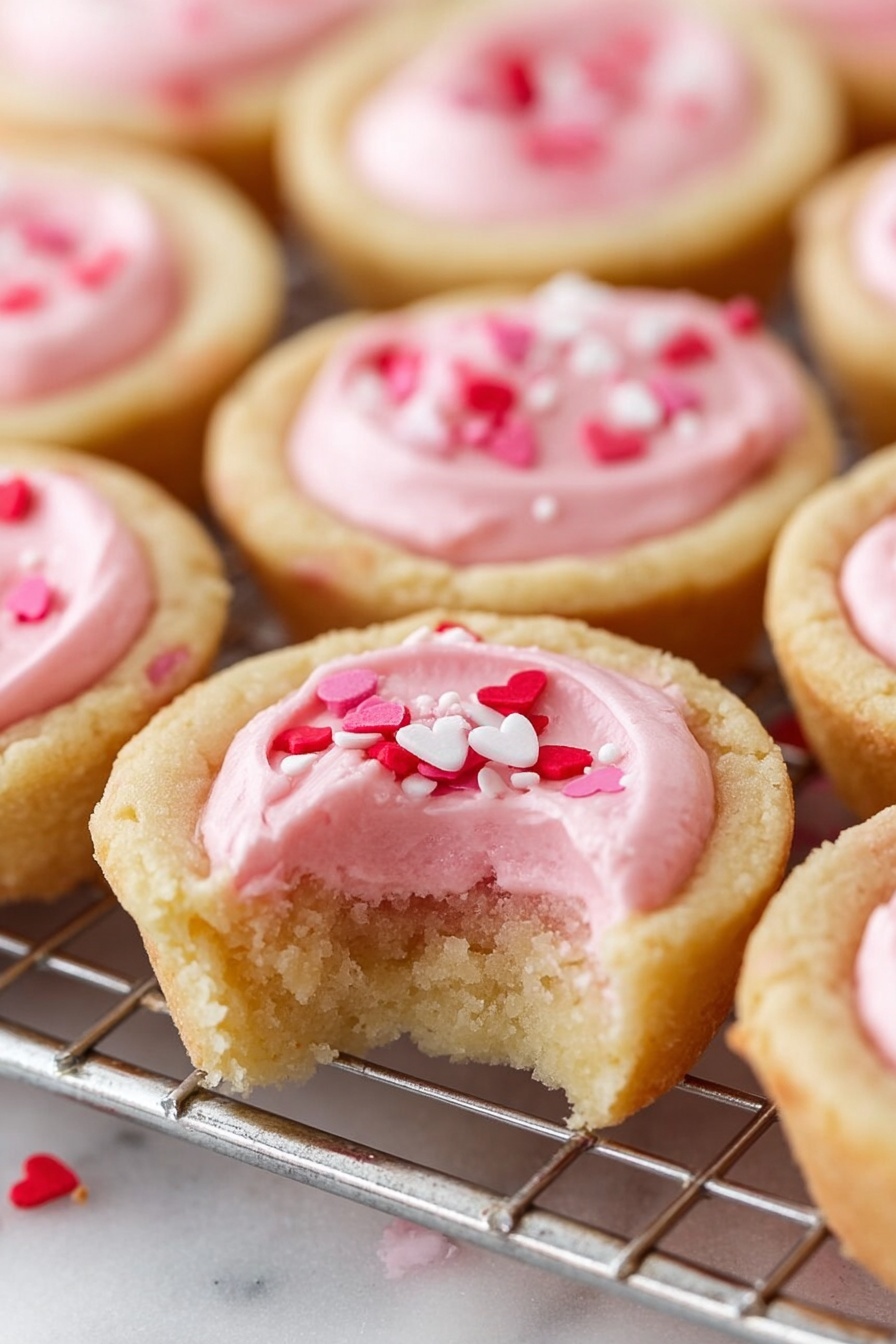
If you’re looking for a fun, sweet treat that’s as delightful to make as it is to eat, you’ve got to try my Sweet Cookie Cups with Buttercream Frosting Recipe. These little cookie cups filled with creamy frosting are a total crowd-pleaser – whether it’s for a family gathering, a party, or just a cozy night in. I absolutely love how they combine the crisp edges of a perfectly baked sugar cookie with the soft, melt-in-your-mouth buttercream on top. Trust me, keep reading because these are fan-freaking-tastic and super easy to make!
Why You’ll Love This Recipe
- Easy to Make: The simple dough recipe and straightforward steps make this a fantastic bake for beginners and pros alike.
- Customizable: You can swap in your favorite extracts or food coloring to match any season or celebration.
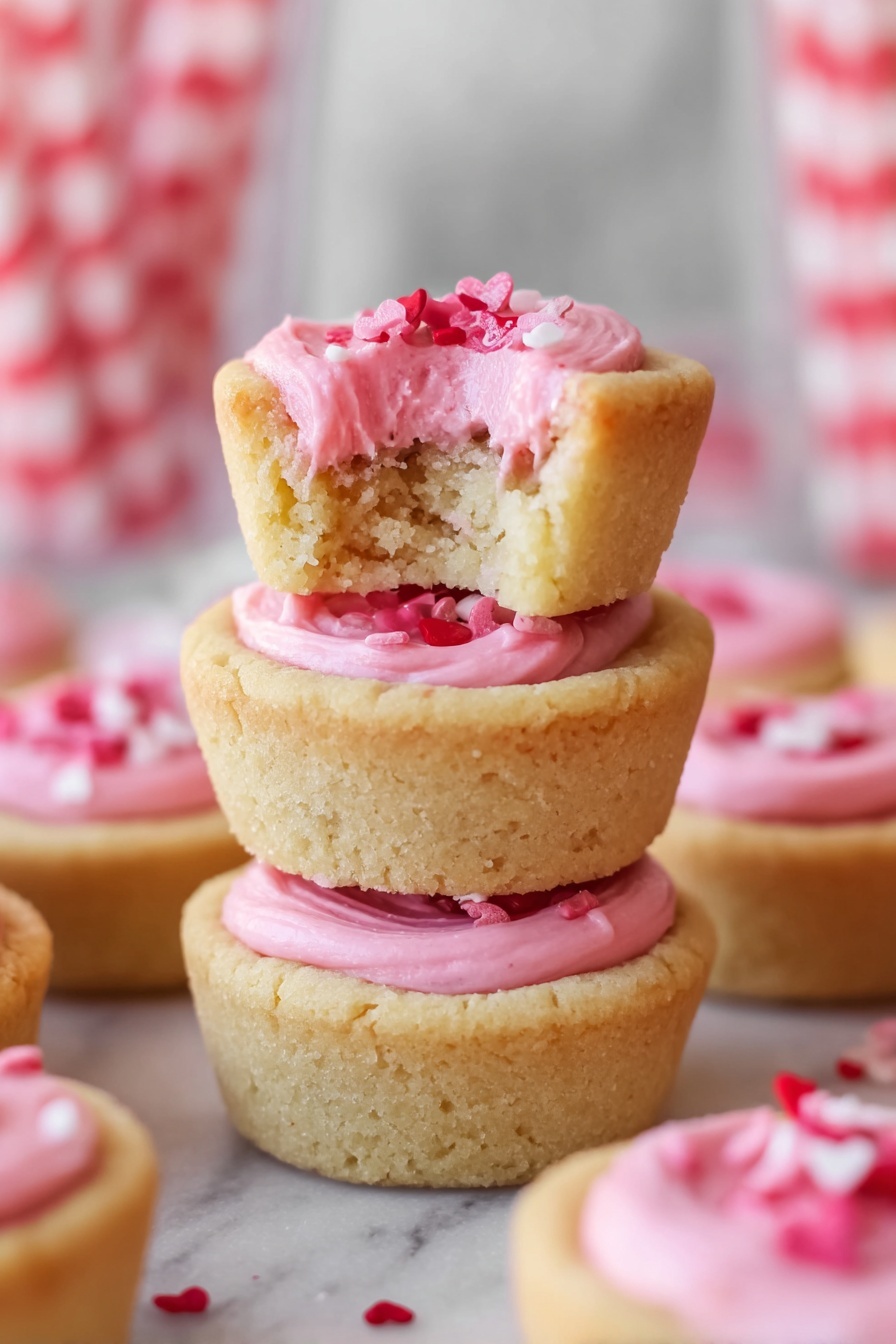
- Perfect Size: These mini cookie cups are bite-sized, making them ideal for parties and sharing.
- All-Time Favorite: My family goes crazy for these, and they always disappear fast—no leftovers here!

Ingredients You’ll Need
The ingredients for this Sweet Cookie Cups with Buttercream Frosting Recipe are pantry-friendly and come together so well. You’ll love how simple staples turn into an impressive dessert with a few little tricks.

- Salted Butter: Using salted butter adds just the right touch of savory to balance the sweetness.
- Sugar: Regular granulated sugar helps get those crisp edges in the cookie base.
- Egg: It binds the dough nicely, keeping the cookie tender yet sturdy.
- Vanilla Extract: Essential for that classic warm, sweet aroma – don’t skip it!
- Almond Extract (optional): A little goes a long way to add a subtle nutty depth if you’re feeling fancy.
- Baking Powder: Just enough leavening to give the cookies a light texture without puffing them too much.
- Flour: All-purpose flour gives structure and the right chewiness to the cookie cups.
- Powdered Sugar: This is for the buttercream frosting—ensures smooth, creamy texture.
- Milk or Heavy Cream: Helps get the frosting to a perfectly spreadable consistency.
- Food Coloring (optional): Fun for matching any party theme or adding a pop of color!
- Sprinkles (optional): Because life’s better with sprinkles on top, right?
Variations
I love making this recipe my own by switching up flavors or making it fit dietary needs. The cookie cups are so versatile that you can easily tweak them without losing that special magic.
- Gluten-Free Version: I swapped the all-purpose flour for a gluten-free blend once; the texture was surprisingly spot-on and still delicious.
- Flavored Frosting: Try mixing in some lemon zest or cocoa powder into the buttercream – a total game changer.
- Mini Fruit Toppings: Fresh berries on top add a refreshing burst and look gorgeous.
- Vegan Adaptation: You can use plant-based butter and egg replacer and dairy-free milk to make these vegan-friendly.
How to Make Sweet Cookie Cups with Buttercream Frosting Recipe
Step 1: Prepare Your Cookie Dough Base
Start by preheating your oven to 350°F and greasing 36 mini muffin cups with cooking spray—that’s key to getting those little cookie cups out easily later. In your mixer, cream the softened butter and sugar until they’re nice and fluffy. This step is where the magic begins, so don’t rush it! Next, add the egg, vanilla, and almond extract if you’re using it, mixing until smooth. Then mix in the baking powder and flour until the dough comes together. It’ll be soft but manageable, perfect for shaping.
Step 2: Shape and Bake the Cookie Cups
Use rounded tablespoons to scoop about 1-inch balls of dough and place one in each muffin tin cup. Flatten them gently with your fingers, no need to press too hard or form a deep cup yet. Bake them for about 10 minutes or until you see beautiful golden edges—this gives you that crisp edge with a softer center. When they come out of the oven, press the cap of a bottle gently into the center of each warm cookie to form the “cup.” Doing this while warm helps shape it perfectly without cracking. Let them cool for about five minutes in the pan, then transfer to a wire rack to finish cooling.
Step 3: Make the Buttercream Frosting and Assemble
While the cookies cool, whip up that dreamy buttercream! Beat the softened butter until creamy, then gradually add powdered sugar and vanilla. Pour in the milk or heavy cream and beat until you get a smooth, spreadable texture—you can add a touch more milk if you want it lighter or thinner. If you’re feeling festive, stir in some food coloring. Fill a piping bag or a trusty resealable baggie with the frosting, snip off a tip, and pipe the frosting right into each cooled cookie cup. Finally, sprinkle with some colorful sprinkles for that joyful touch. It’s as fun as it is delicious!
Pro Tips for Making Sweet Cookie Cups with Buttercream Frosting Recipe
- Don’t Overflatten the Dough: Press gently when flattening so the cookie stays soft in the middle but crisp on edges.
- Form the Cups While Warm: I learned pressing the cookie with a bottle cap while warm is much easier and prevents cracking.
- Adjust Frosting Consistency: Add milk gradually to get the buttercream just right for piping—it shouldn’t be too stiff or runny.
- Use Room Temperature Ingredients: Having butter and eggs at room temp helps everything combine smoothly and evenly.
How to Serve Sweet Cookie Cups with Buttercream Frosting Recipe
Garnishes
My go-to garnishes are always classic colorful sprinkles—they add such a playful vibe. But I also love experimenting with mini chocolate chips or edible glitter for a touch of sparkle. For a fresher feel, tiny pieces of fresh berries or chopped nuts give beautiful texture and flavor contrast. Don’t shy away from combining textures and colors; it makes serving these even more exciting!
Side Dishes
Since these cookie cups are sweet and rich, I often serve them alongside a light fruit salad or a refreshing cold milk glass. If you want to elevate the experience, pairing them with hot tea or coffee works beautifully. For parties, a platter of these with fresh fruit and a cheese board creates a nice balance of flavors.
Creative Ways to Present
Once, I arranged these cookie cups in a tiered dessert stand for a bridal shower—everyone loved the elegant yet playful look. You can also package them in cute little boxes tied with ribbon to give as gifts! Another fun idea is to pipe the frosting in swirls and add themed toppers or edible flowers for special occasions like birthdays or holidays.
Make Ahead and Storage
Storing Leftovers
I store leftover cookie cups in an airtight container in the fridge to keep the buttercream nice and fresh. They usually keep well for up to 3 days, which is perfect for enjoying a little treat throughout the week without any loss of flavor or texture.
Freezing
If you want to make these ahead in bulk, they freeze wonderfully! I freeze the baked cookie cups without frosting, then thaw and pipe the buttercream just before serving. This keeps the cookie fresh and the frosting creamy, so you’re ready to impress whenever the craving hits.
Reheating
For a warm cookie experience, I gently reheat the unfrosted cookie cups in the oven at 300°F for a few minutes before frosting them. If reheating frosted cups, I recommend serving them chilled or at room temperature to keep the frosting intact and delicious.
FAQs
-
Can I use store-bought sugar cookie dough for this Sweet Cookie Cups with Buttercream Frosting Recipe?
Absolutely! Using store-bought dough is a great shortcut and still makes delicious cookie cups. Just follow the recipe instructions for shaping, baking, and frosting your cookie cups as usual.
-
What can I use if I don’t have a bottle cap to form the cups?
No worries – you can gently press the cookie centers with the back of a small spoon or even your thumb (careful to avoid cracking). The key is to do this while the cookies are warm and soft right out of the oven.
-
Can I make the buttercream frosting ahead of time?
Yes! Buttercream frosting keeps well in an airtight container in the fridge for up to a week. Just bring it back to room temperature and give it a quick whip before piping.
-
How do I prevent the cookie cups from cracking when forming the cup shape?
The best tip is pressing gently while the cookies are still warm out of the oven. Also, avoid flattening the dough too thin before baking, so the centers stay flexible enough to shape without breaking.
Final Thoughts
This Sweet Cookie Cups with Buttercream Frosting Recipe has become one of my all-time favorites to bake and share. It’s the kind of treat that brightens up any occasion and always gets compliments. I love how straightforward it is, yet the final result feels so special and homemade. You’re going to impress your friends and family with these bite-sized delights, and honestly, it’s such a joy to make them. Give this recipe a try—I promise you’ll fall in love, just like I did!
Print
Sweet Cookie Cups with Buttercream Frosting Recipe
- Prep Time: 30 minutes
- Cook Time: 12 minutes
- Total Time: 42 minutes
- Yield: 36 mini cookie cups
- Category: Dessert
- Method: Baking
- Cuisine: American
Description
Delightfully sweet and perfectly portioned, these Sugar Cookie Cups combine soft, buttery sugar cookie dough baked into mini muffin tins and filled with creamy buttercream frosting. Easy to make from scratch or using store-bought dough, they’re a fun treat for parties, holidays, or any sweet craving.
Ingredients
Sugar Cookie Dough:
- 3/4 cup salted butter, softened
- 3/4 cup sugar
- 1 egg
- 1 teaspoon vanilla extract
- 1/4 teaspoon almond extract (optional)
- 1/2 teaspoon baking powder
- 2 cups all-purpose flour
Buttercream Frosting:
- 1/4 cup salted butter, softened
- 1 1/3 cups powdered sugar
- 1/2 teaspoon vanilla extract
- 1 tablespoon milk or heavy whipping cream
- Food coloring (optional)
- Sprinkles (optional)
Instructions
- Preheat and Prepare: Preheat your oven to 350°F (175°C) and generously grease 36 mini muffin cups with cooking spray to prevent sticking.
- Mix Butter and Sugar: In a stand mixer bowl, beat the softened butter and sugar together until the mixture is smooth and well combined, creating a creamy base for the dough.
- Add Flavorings: Stir in the egg, vanilla extract, and almond extract (if using) until fully incorporated, ensuring the dough has a rich, aromatic flavor.
- Incorporate Dry Ingredients: Add the baking powder and flour to the wet mixture and gently stir until the dough comes together without overmixing, developing the perfect texture.
- Form Dough Balls: Using rounded tablespoons (about 1 inch diameter), scoop and roll the dough into balls. Place one ball in each mini muffin cup and flatten slightly with your fingers.
- Bake Cookie Cups: Bake in the preheated oven for approximately 10 minutes or until the edges turn golden brown, indicating doneness.
- Shape the Cups: Immediately after baking, press the center of each cookie with the cap of a bottle (such as a vanilla extract bottle) to form a small indentation, creating the cookie cups.
- Cool Cookies: Let the cookie cups cool for 5 minutes in the pan before transferring them to a wire rack to cool completely, preserving their shape and texture.
- Prepare Frosting: In a clean stand mixer bowl, beat the softened butter until smooth. Gradually add powdered sugar and vanilla extract, stirring well to combine.
- Adjust Frosting Consistency: Add milk or heavy cream and beat until the frosting reaches a smooth, pipeable consistency. Add an extra 1/2 to 1 tablespoon milk if necessary and optionally mix in food coloring.
- Pipe Frosting: Transfer the frosting to a piping bag or resealable baggie, then pipe it into the cooled cookie cups neatly.
- Decorate: Finish by topping each cookie cup with sprinkles if desired, adding a fun and festive touch.
Notes
- You can simplify this recipe by using store-bought sugar cookie dough and frosting—follow the same shaping, baking, and assembling instructions.
- To prevent cookies from cracking during baking, do not over-flatten the dough balls before baking.
- Customize the frosting colors and sprinkles to match any occasion or theme.
- These cookie cups can be stored in an airtight container at room temperature for up to 3 days for freshness.
Nutrition
- Serving Size: 1 mini cookie cup
- Calories: 110
- Sugar: 8g
- Sodium: 55mg
- Fat: 6g
- Saturated Fat: 3.5g
- Unsaturated Fat: 2g
- Trans Fat: 0g
- Carbohydrates: 14g
- Fiber: 0.3g
- Protein: 1g
- Cholesterol: 15mg


