
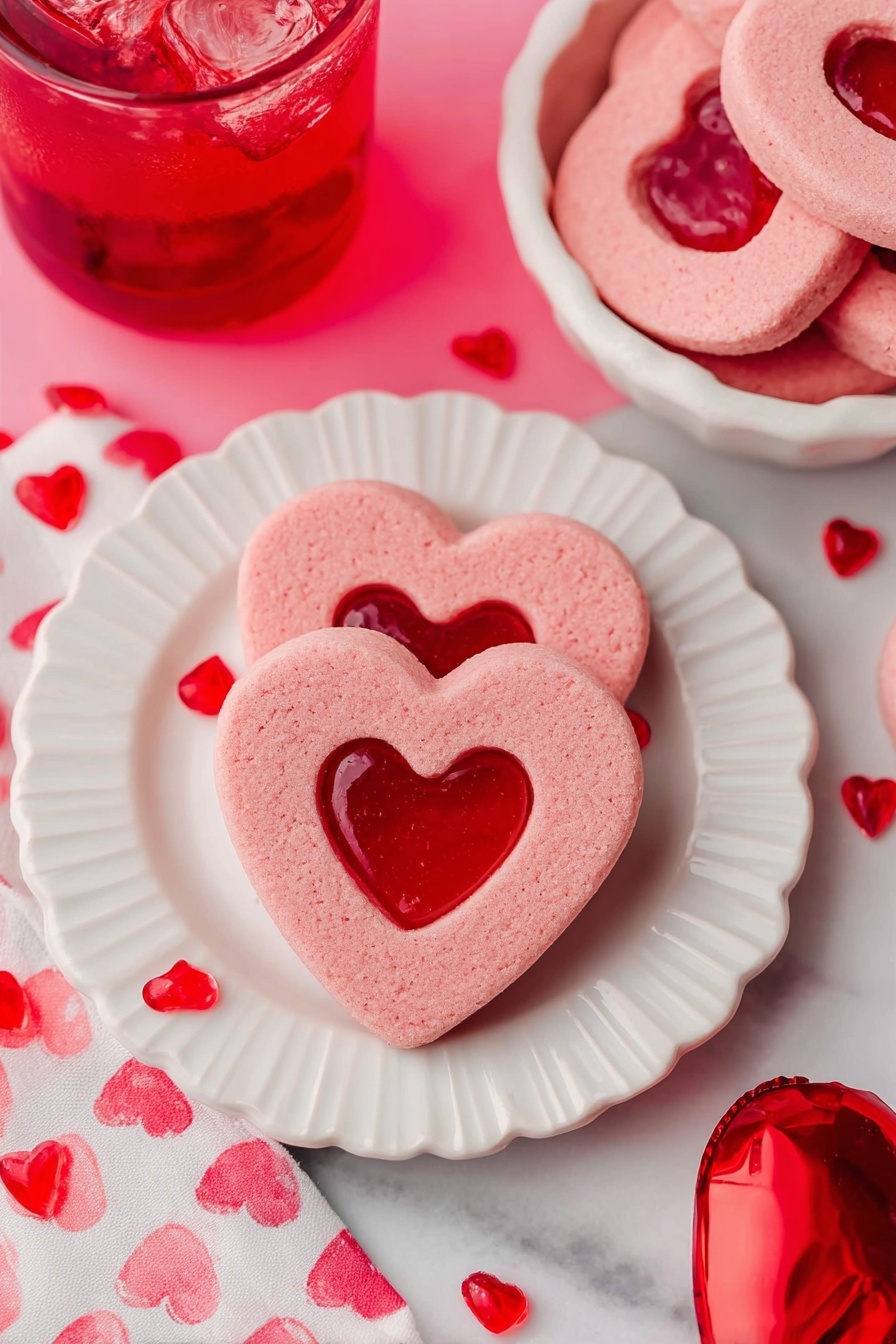
If you’re looking for a charming, colorful treat to brighten up Valentine’s Day or just want to wow your friends with a unique cookie, you’re going to adore this Stained Glass Valentine Cookies Recipe. These cookies combine buttery, tender sugar cookie dough with a glossy, candy “window” that catches the light beautifully—like little edible stained glass masterpieces. I couldn’t wait to share this because it’s one of those recipes that feels fancy but is actually super approachable. Plus, the way the candy melts inside gives it such a fun and magical effect!
Why You’ll Love This Recipe
- Eye-Catching Presentation: The translucent candy “windows” make these cookies a beautiful centerpiece for any celebration.
- Simple Ingredients: With pantry staples and some colorful hard candies, you’ll have these cookies on your table in no time.
- Kid-Friendly and Fun: Great baking project to do with little helpers—crushing candies and cookie cutting is always a blast!
- Versatile Flavor: The soft vanilla cookie pairs perfectly with the sweet, slightly tart candy centers for a perfect balance.

Ingredients You’ll Need
The magic of this Stained Glass Valentine Cookies Recipe really starts with getting your dough just right—smooth, flavorful, and tinted with that lovely Valentine’s red. And the hard candies? They melt down to glossy, colorful centers that give these cookies their name and charm.
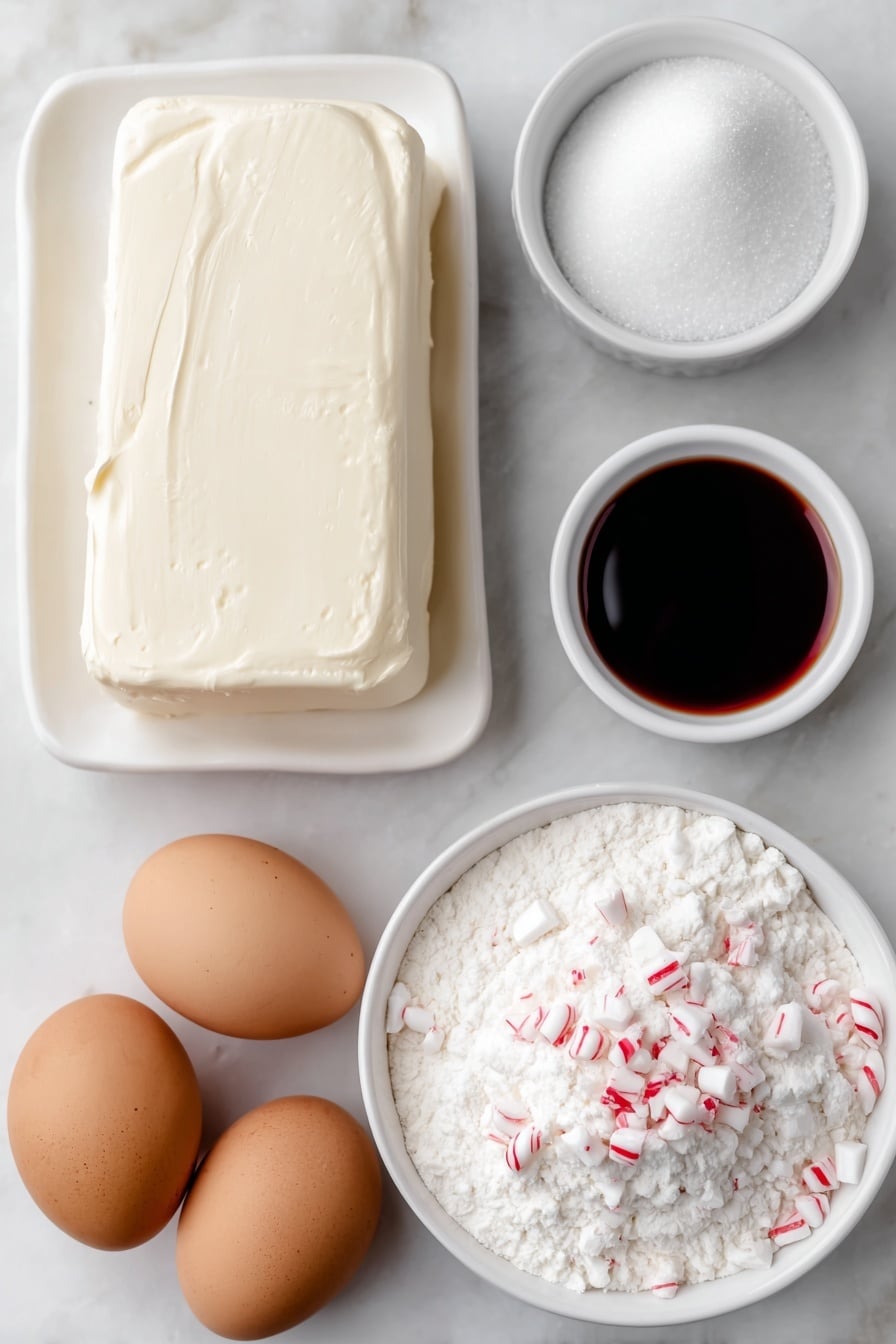
- Unsalted Butter: Room temperature butter creams easily and keeps the cookie dough tender.
- Granulated Sugar: Adds sweetness and helps create tender cookies with just the right texture.
- Sea Salt: A pinch enhances the flavor and balances the sweetness—don’t skip it!
- Eggs: Bring moisture and help bind the ingredients for a soft, buttery dough.
- Vanilla Extract: Adds warmth and depth, making these cookies taste homemade in the best way.
- Red Gel Food Coloring: I love gel because it gives vibrant color without watering down the dough.
- All-Purpose Flour: The backbone of the cookie structure, use a little extra for rolling so your dough won’t stick.
- Hard Candy: Crushed into tiny pieces, these melt and form the “stained glass” centers that light up the cookies.
Variations
I love how you can make this Stained Glass Valentine Cookies Recipe your own by switching up the candy colors or even infusing new flavors into the dough. Baking is all about making it fun and personal, so don’t be shy about trying your own spin!
- Different Candy Colors: I once used green and white peppermints for a Christmas version, and my family went crazy for it!
- Mini Cookie Cutters: I sometimes use smaller heart or star shapes within larger shapes to create double stained glass levels—so pretty for parties.
- Almond Extract Swap: Try swapping vanilla with almond extract for a subtle nutty twist.
- Gluten-Free Version: I experimented with gluten-free flour blends that worked really well, just watch the dough texture and chill it longer.
How to Make Stained Glass Valentine Cookies Recipe
Step 1: Cream Butter and Sugar Until Fluffy
Start by beating your softened unsalted butter with granulated sugar and sea salt using a stand mixer with the paddle attachment. I love creaming it about three minutes until it’s light and fluffy—that’s what gives the cookies their tender texture. Make sure to scrape down the bowl a couple of times so everything’s well combined, because uneven mixing can lead to crumbly dough later.
Step 2: Add Eggs, Vanilla, and Color
Next up, add the beaten eggs and vanilla extract. Mix until it’s all nicely incorporated. Now comes the fun part: the red gel food coloring. I add mine drop by drop, stirring in between until I get a vibrant candy-apple red that’s perfect for Valentine’s Day. Don’t overdo it though; too much food coloring can change the dough’s texture.
Step 3: Incorporate Flour Gradually
Slowly add your all-purpose flour while mixing on medium-low speed. You want your dough to be soft but not sticky—kind of like playdough. This step can take a couple of minutes, so be patient. If your dough feels too tacky, sprinkle in a little extra flour, but don’t overdo it, or your cookies might get dry.
Step 4: Chill the Dough Thoroughly
Wrap your dough ball tightly in plastic wrap and let it chill in the fridge for at least two hours. This is a key step I discovered after some trial and error—it firms up the dough so it’s easier to roll and cut, and it stops your cookies from spreading too much during baking. If you want, divide the dough into two smaller balls so it’s easier to work with.
Step 5: Roll Out and Cut Shapes
Once chilled, lightly flour your clean countertop and rolling pin—trust me, this extra flour saves your sanity by preventing sticking! Roll the dough to about ¼ inch thickness, keeping it even so your cookies bake uniformly. Use a large heart-shaped cutter for the cookie outline, then a smaller cutter to remove the center “window.” Keep those little centers because you can bake them as mini cookies later or fold them back into the dough.
Step 6: Fill Cutouts with Crushed Candy
Fill the hollow center of each cookie with crushed hard candy pieces. I actually learned that crushing candy finely makes the “stained glass” smoother, so don’t just break it up randomly. Spread the pieces evenly and keep them level with the cookie dough—too much candy in one spot can spill over during baking. My favorite candies to use are traditional red and white peppermints, but you can get creative here.
Step 7: Bake and Cool Completely
Bake your cookies at 350°F for 10 to 12 minutes. Keep a close eye starting around the 10-minute mark—the edges should just begin to turn golden, and the candy should be completely melted and glossy. I always let the cookies cool completely on the baking sheet before moving them to prevent cracking or breaking. Seeing those translucent candy windows firm up is honestly so satisfying!
Pro Tips for Making Stained Glass Valentine Cookies Recipe
- Don’t Skip Chilling: I once skipped chilling and the dough was super sticky and impossible to cut. Chilling firms it up for cleaner cuts and less spreading.
- Use Gel Food Coloring: Regular liquid dyes can make dough too wet. Gel food colors provide rich hues without changing texture.
- Even Candy Pieces: Crushing your candy into smaller, uniform pieces helps them melt more evenly and looks polished.
- Cool Completely Before Moving: I’ve learned that letting cookies cool fully on the tray prevents the delicate stained glass from cracking.
How to Serve Stained Glass Valentine Cookies Recipe
Garnishes
I like to dust these cookies lightly with a little powdered sugar just before serving—it adds a soft snowy contrast without hiding the shine of those candy centers. Sometimes I add tiny edible glitter or a thin drizzle of white chocolate for extra flair, especially when giving as gifts.
Side Dishes
This recipe pairs beautifully with a hot cup of tea or a rich cup of coffee. For Valentine’s Day, I’ve served them alongside raspberry jam and fresh strawberries which brings out the fruity notes and makes the whole snack feel extra festive.
Creative Ways to Present
For a sweet presentation, I like arranging these cookies on a heart-shaped platter layered with fresh rose petals or doilies—makes a charming gift or dessert centerpiece. Wrapping them individually in clear treat bags with a cute ribbon also makes for a lovely party favor or Valentine’s gift.
Make Ahead and Storage
Storing Leftovers
I store leftover cookies in an airtight container at room temperature for up to a week. Just a heads up—if you live somewhere humid, the candy windows might get a little sticky, so try to keep them in a cool, dry place.
Freezing
These cookies freeze well! I pop them into a single layer on a baking sheet first, freeze until firm, then transfer to a freezer bag to avoid breakage. When you’re ready, thaw them at room temperature—no sogginess, just fresh-tasting goodness.
Reheating
If you want to refresh the cookies, especially if the candy centers have dulled, a quick 5-8 minute bake at 300°F helps restore a slight crispness and shine. Just watch closely so they don’t burn.
FAQs
-
Can I use any kind of hard candy for the stained glass centers?
You can use a variety of hard candies, but I recommend classic peppermint or fruit-flavored mints because they melt evenly and have vibrant colors. Avoid candies with fillings or chocolate as they won’t create that clear stained glass effect.
-
Why do I need to chill the cookie dough?
Chilling the dough firms it up, making it easier to roll and cut without sticking or tearing. It also helps the cookies keep their shape better while baking, which is crucial to hold the stained glass centers neatly.
-
What if my candy overflows during baking?
This usually happens if you add too much crushed candy or mound it unevenly. Be sure to fill the cutout level with the dough surface and distribute the candy in an even layer to prevent overflow.
-
Can I make these cookies ahead of time?
Absolutely! You can prepare the dough, chill it up to two days in advance, or fully bake the cookies a day ahead and store them in an airtight container at room temperature.
Final Thoughts
Making this Stained Glass Valentine Cookies Recipe has become one of my go-to ways to add a special touch to holidays—not just Valentine’s Day, but birthday parties and even winter festivities. I love how the colorful candy windows catch the light and how kids (and adults!) get excited watching the candy melt in the oven. If you haven’t tried it yet, I hope you’ll whip up a batch soon—you’ll be amazed at how simple ingredients come together to create something so pretty and delicious. Happy baking, friend!
Print
Stained Glass Valentine Cookies Recipe
- Prep Time: 30 minutes
- Cook Time: 10 minutes
- Total Time: 2 hours 40 minutes
- Yield: 24 cookies
- Category: Dessert
- Method: Baking
- Cuisine: American
Description
These Stained Glass Valentine Heart Cookies feature colorful melted candy centers surrounded by soft, buttery red sugar cookie dough. Perfect for Valentine’s Day, these charming cookies showcase a beautiful stained-glass effect when baked, making them both visually stunning and delicious. The dough is infused with vanilla and lightly tinted with red gel food coloring for a festive look, while the crushed hard candies melt to create translucent candy ‘windows’.
Ingredients
Cookie Dough
- ¾ Cup unsalted butter, at room temperature
- ¾ Cup granulated sugar
- ¼ Teaspoon sea salt
- 2 eggs, at room temperature and beaten
- 1 ½ Teaspoons vanilla extract
- Red gel food coloring (amount to desired shade)
- 2 ½ Cups + ¼ Cup all-purpose flour
Filling
- 2 Cups hard candy, crushed into small pieces
Instructions
- Prepare the Cookie Dough: Using a stand mixer fitted with the paddle attachment, cream together softened butter, granulated sugar, and sea salt until smooth and creamy, about 3 minutes. Scrape down the sides as needed and continue mixing.
- Add Eggs and Vanilla: Mix in the beaten eggs and vanilla extract until fully combined, about 1 minute.
- Incorporate Flour and Color: Gradually add 2 ½ cups of the all-purpose flour while mixing on medium-low speed until well blended. As you add the flour, drop in a few drops of red gel food coloring until you achieve your desired shade of red.
- Chill the Dough: Wrap the dough tightly in plastic wrap, forming a ball (or divide into two smaller balls for easier handling), and chill in the refrigerator for at least 2 hours to firm up.
- Preheat the Oven: Set your oven to 350°F (177°C) and line a baking sheet with parchment paper.
- Prepare for Rolling: Remove the dough from the fridge. Lightly flour a clean countertop and turn the dough out onto it.
- Roll Out Dough: Sprinkle a little flour on top of the dough and use a rolling pin to roll it out evenly to about ¼ inch thickness, adding flour as needed to prevent sticking.
- Cut Out Cookie Panes: Use a large cookie cutter to cut out heart-shaped “panes” of dough. Transfer the cutouts to the prepared baking sheet.
- Create Candy Windows: Use a smaller cookie cutter to cut out the centers from the larger hearts, removing these smaller shapes carefully. Save the smaller cutouts to bake separately or to re-roll into additional cookies.
- Fill with Crushed Candy: Fill each cookie cutout’s center with crushed hard candy, spreading it into an even, level layer without mounding to prevent overflow.
- Bake the Cookies: Bake the cookies for 10 to 12 minutes until the edges turn lightly golden and the candy centers have fully melted and formed translucent stained-glass windows.
- Cool Completely: Remove the cookies from the oven and allow them to cool completely on the baking sheet. This ensures the candy centers harden without breaking.
Notes
- Crush candy evenly into small pieces to ensure smooth, even melting of the centers.
- Do not overfill with candy; keep it level with the dough to avoid overflow during baking.
- Work quickly when rolling and cutting dough; if it becomes too soft, chill it again to maintain clean cuts.
- Always line baking sheets with parchment paper to prevent melted candy from sticking and for easy cleanup.
Nutrition
- Serving Size: 1 cookie
- Calories: 150
- Sugar: 15g
- Sodium: 60mg
- Fat: 7g
- Saturated Fat: 4.5g
- Unsaturated Fat: 2g
- Trans Fat: 0g
- Carbohydrates: 20g
- Fiber: 0.5g
- Protein: 2g
- Cholesterol: 30mg


