
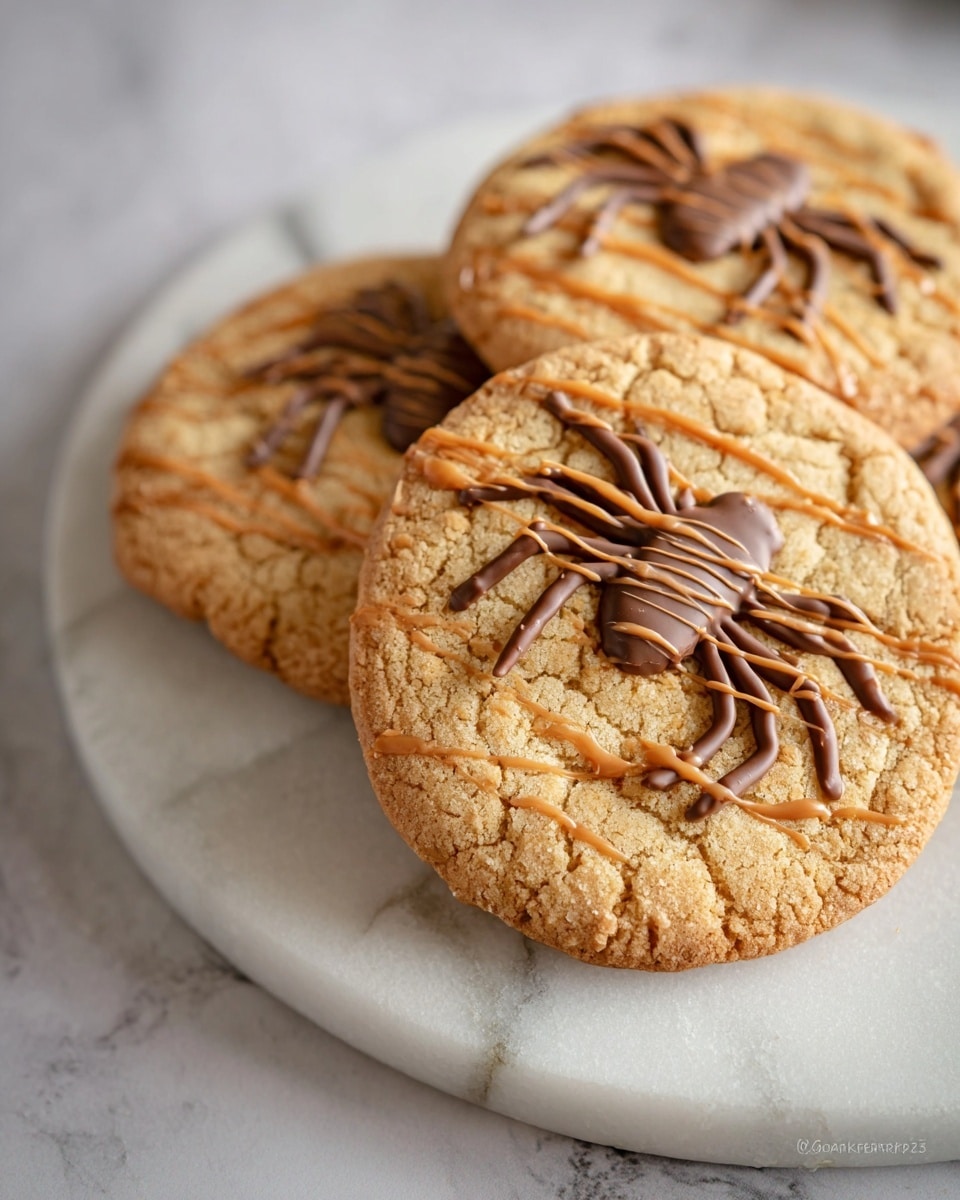
If you’re on the hunt for a fun twist on a classic, you’ve got to try this Spider Chocolate Chip Cookies Recipe. They’re not just your everyday chocolate chip cookies—these cuties come with cute little spider leg designs made from melted chocolate, and trust me, they’re as playful as they are delicious. I love these cookies because they bring a little whimsy to cookie time, perfect for parties, Halloween, or just surprising your family with a sweet little smile on their plates.
Why You’ll Love This Recipe
- Fun and Festive: The chocolate spider legs instantly make these cookies a playful treat, perfect for celebrations or any happy moment.
- Gluten-Free Friendly: Using a gluten-free 1-to-1 baking flour means they’re safe and tasty for friends avoiding gluten.
- Loaded with Chocolate: Double the chocolate chips – inside and on top – guarantees every bite is a chocolate lover’s dream.
- Quick and Easy: From mixing to decorating, you’ll have these ready in about 20 minutes total, making them perfect for last-minute baking sessions.

Ingredients You’ll Need
These ingredients come together like old friends, with trusty gluten-free flour and a blend of extracts that lift the flavors beautifully. I always recommend using quality chocolate chips—they make a huge difference here!
- Gluten-free 1-to-1 baking flour: This is your base to keep the cookies soft yet sturdy; I prefer brands that bake true to regular flour.
- Baking soda: Gives your cookies a gentle rise with a perfect texture.
- Real Salt: Adds just the right balance to make the sweetness pop.
- Brown sugar: Packed brown sugar gives moisture and that classic chewy texture I love.
- Granulated sugar: Balances the brown sugar with a little crispness on the edges.
- Butter: Using real butter makes these cookies rich and flavorful—don’t skip it!
- Gluten-free vanilla extract: A touch of vanilla adds warmth and depth.
- Gluten-free almond extract: It’s a subtle nutty twist that takes the flavor up a notch without overpowering it.
- Eggs: They bind everything together and help with that soft chewiness.
- Chocolate chips: You’ll need a decent amount for mixing in plus some extra for topping—because why not?
Variations
One of the best things about this Spider Chocolate Chip Cookies Recipe is how flexible it is. I like tweaking it for different occasions; it’s a great base for creativity.
- Nut-Free Version: If your family is sensitive to nuts, simply skip the almond extract—the cookie still shines brilliantly without it.
- Vegan Twist: I haven’t tried this recipe fully vegan yet, but swapping butter for vegan margarine and eggs for a flax egg can work; just expect a slightly different texture.
- Spice it Up: A pinch of cinnamon or a dash of espresso powder in the dough adds a cozy warmth and depth in flavor not everyone expects, but I love.
- Seasonal Decoration: Instead of spider legs, I’ve drizzled colored white chocolate for holidays or added festive sprinkles on top.
How to Make Spider Chocolate Chip Cookies Recipe
Step 1: Whip Up the Sweet Base
Start by preheating your oven to 350°F—it’s key to have it ready so your dough isn’t waiting around. In a stand mixer or with a trusty hand mixer, beat together the brown sugar, granulated sugar, softened butter, and vanilla extract until you get this perfectly smooth, creamy mix. It’s really important not to rush here; that smooth texture helps your cookies be evenly soft.
Step 2: Eggs and Extracts Magic
Next, add the almond extract, then crack in your eggs one at a time, mixing gently on low speed so everything combines without overbeating. This keeps your dough tender and ensures the cookies don’t turn out tough.
Step 3: Dry Meets Wet
In a separate bowl, combine your gluten-free flour, baking soda, and salt. Slowly add these dry ingredients to your wet mix, stirring until just combined—over-mixing is a common mistake I’ve learned to avoid, or your cookies get a bit too dense.
Step 4: Chocolate Chip Time
Fold in 1 to 2 cups of chocolate chips, as much as you want to make each bite decadent. Then drop spoonfuls of dough onto greased cookie sheets, pushing 1–2 extra chips onto the top of each—this is what you’ll turn into your spider body later!
Step 5: Bake and Cool
Bake for 9 to 11 minutes. You’ll want edges just set but centers still soft—cookies continue to firm up after you pull them from the oven, so don’t overbake. After baking, cool them on the sheet for a few minutes before moving to a wire rack.
Step 6: Draw your Spiders
While cookies cool, melt ½ cup of chocolate chips in the microwave (about 1 minute), stirring half-way through to avoid burning. Pour the melted chocolate into a piping bag with a tiny hole cut at the tip. Once the cookies are cool, carefully pipe spider legs radiating from the chocolate chips on top. This decorating step sets these cookies apart — it’s the fun finale that makes everyone smile!
Pro Tips for Making Spider Chocolate Chip Cookies Recipe
- Room Temperature Ingredients: I always make sure my butter and eggs are at room temp to get the best mix and cookie texture.
- Gentle Mixing: Mix until just combined once dry ingredients go in—I used to overmix and ended up with tougher cookies before I realized this.
- Use a Cookie Scoop: For even cookies that bake uniformly, a cookie scoop helps you portion dough perfectly every time.
- Chocolate Melting Care: Melt the chips slowly and in short bursts to prevent burning — stirring frequently helps a ton.
How to Serve Spider Chocolate Chip Cookies Recipe
Garnishes
I like to keep it simple and let the cookies steal the show, but sometimes I sprinkle a little flaky sea salt on top before baking for that salty-sweet crunch. For an extra festive touch, a dusting of powdered sugar after piping adds a little spiderweb magic.
Side Dishes
Serve these cookies with cold milk for the classic combo, or if you’re feeling fancy, try them alongside a scoop of vanilla ice cream or a dollop of whipped cream for an indulgent treat that your guests will rave over.
Creative Ways to Present
I once laid out a “spider web” placemat and placed these cookies on top, with little plastic spiders scattered around—it was a big hit during Halloween! Another time, I stacked a few in a cellophane bag tied with orange ribbon for gifting neighbors—it looked so cute and festive.
Make Ahead and Storage
Storing Leftovers
I usually store these cookies in an airtight container at room temperature, and they stay soft and delicious for up to 4 days. If you want to keep that freshly baked feel longer, placing a slice of bread in the container helps maintain moisture.
Freezing
These freeze beautifully! Just scoop your cookie dough onto parchment-lined trays, freeze until firm, then transfer dough balls to a labeled zip-top bag. When ready, bake from frozen, adding a minute or two to baking time—super convenient for quick cookie cravings.
Reheating
If cookies get a little stale, a 10-second zap in the microwave or reheating gently in a warm oven refreshes them nicely. Just be careful not to overdo it or they’ll dry out again!
FAQs
-
Can I use regular flour instead of gluten-free flour?
Absolutely! This Spider Chocolate Chip Cookies Recipe works well with standard all-purpose flour if gluten is not a concern for you. Just swap it one-to-one, and you may find the texture even a bit more familiar if you grew up on classic recipes.
-
How do I make the spider legs look neat?
Using a piping bag with a small cut tip works best. If you don’t have one, a small plastic sandwich bag with a tiny snip in the corner can do the trick. Practice on parchment paper first if you’re nervous—once you get the hang of drawing fine lines with melted chocolate, it’s fun and surprisingly easy!
-
Can I prepare the dough ahead of time?
Yes, you can! The dough can be made and refrigerated for up to 2 days before baking, which actually deepens the flavors. Just bring it back to room temperature before scooping and baking for the best results.
-
What’s the secret to chewy cookies?
My secret is using a good ratio of brown sugar to granulated sugar and not overbaking—pull them out when the edges are set but centers still look a bit soft.
Final Thoughts
This Spider Chocolate Chip Cookies Recipe holds a sweet little spot in my heart because it balances deliciousness with playful creativity. Every time I make them, I see how a simple cookie can brighten up a regular day or add an extra spark to a special occasion. I can’t wait for you to try these and maybe even invent your own spiderly designs—baking should be fun, after all! So preheat that oven, grab your chocolate chips, and get ready to make some magic (and maybe a few adorable spiders) in your kitchen.
Print
Spider Chocolate Chip Cookies Recipe
- Prep Time: 5 minutes
- Cook Time: 11 minutes
- Total Time: 16 minutes
- Yield: 18 cookies
- Category: Dessert
- Method: Baking
- Cuisine: American
- Diet: Gluten Free
Description
Spider Chocolate Chip Cookies are a fun and festive gluten-free treat perfect for Halloween or any occasion. These soft and chewy cookies are packed with chocolate chips and decorated with melted chocolate to create spider legs, making them both delicious and visually appealing. Made with gluten-free ingredients, they cater to those with gluten sensitivities without compromising on flavor or texture.
Ingredients
Dry Ingredients
- 2 ¼ cups gluten-free 1-to-1 baking flour
- 1 teaspoon baking soda
- 1 teaspoon Real Salt
Wet Ingredients
- 1 cup brown sugar, packed
- ½ cup granulated sugar
- 1 cup butter
- 1 teaspoon gluten-free vanilla extract
- ½ teaspoon gluten-free almond extract
- 2 eggs
Chocolate
- 1-2 cups chocolate chips
- ½ cup chocolate chips (for melting and decorating)
Instructions
- Preheat Oven: Preheat your oven to 350°F (175°C) to prepare for baking the cookies.
- Mix Sugars and Butter: In a stand mixer, beat together the brown sugar, granulated sugar, butter, and vanilla extract until the mixture is smooth and creamy.
- Add Extracts and Eggs: Add the gluten-free vanilla and almond extracts. Then add eggs one at a time, mixing on low speed after each addition to ensure thorough incorporation.
- Combine Dry Ingredients: In a separate bowl, whisk together the gluten-free flour, baking soda, and Real Salt until evenly combined.
- Mix Wet and Dry Ingredients: Gradually add the dry ingredients to the wet ingredients, mixing until the dough is well combined without overmixing.
- Add Chocolate Chips: Fold in 1 to 2 cups of chocolate chips gently to distribute evenly throughout the dough.
- Prepare Cookie Sheets: Grease cookie sheets lightly to prevent sticking. Drop spoonfuls of dough onto the sheets, spacing them to allow for spreading.
- Top with Extra Chips: Press 1 to 2 additional chocolate chips onto the top of each cookie to enhance chocolate flavor and for decoration.
- Bake Cookies: Bake in the preheated oven for 9 to 11 minutes until the edges are golden but the center remains soft.
- Cool Cookies: Allow the cookies to cool on the baking pan for a few minutes to set, then transfer them to a wire rack to cool completely.
- Melt Chocolate for Decoration: While cookies cool, melt ½ cup of chocolate chips in a microwave-safe bowl for 1 minute, stirring halfway through to ensure smoothness.
- Draw Spider Legs: Pour the melted chocolate into a piping bag and snip a very small tip. Once the cookies are completely cooled, use the melted chocolate to draw spider legs radiating outward from the chocolate chips on top of each cookie.
- Serve and Enjoy: Let the chocolate set for a few minutes, then serve your festive Spider Chocolate Chip Cookies and enjoy the spooky fun!
Notes
- Ensure cookies are completely cool before decorating with melted chocolate to prevent it from melting off.
- Use gluten-free vanilla and almond extracts to keep the recipe fully gluten-free.
- Adjust the number of chocolate chips to your taste for more or less chocolate intensity.
- For darker chocolate spider legs, use semi-sweet or dark chocolate chips.
- Store cookies in an airtight container at room temperature for up to 5 days.
- These cookies freeze well; freeze unbaked dough balls or baked cookies for later enjoyment.
Nutrition
- Serving Size: 1 cookie
- Calories: 180
- Sugar: 14g
- Sodium: 140mg
- Fat: 9g
- Saturated Fat: 5g
- Unsaturated Fat: 3g
- Trans Fat: 0g
- Carbohydrates: 24g
- Fiber: 2g
- Protein: 2g
- Cholesterol: 35mg


