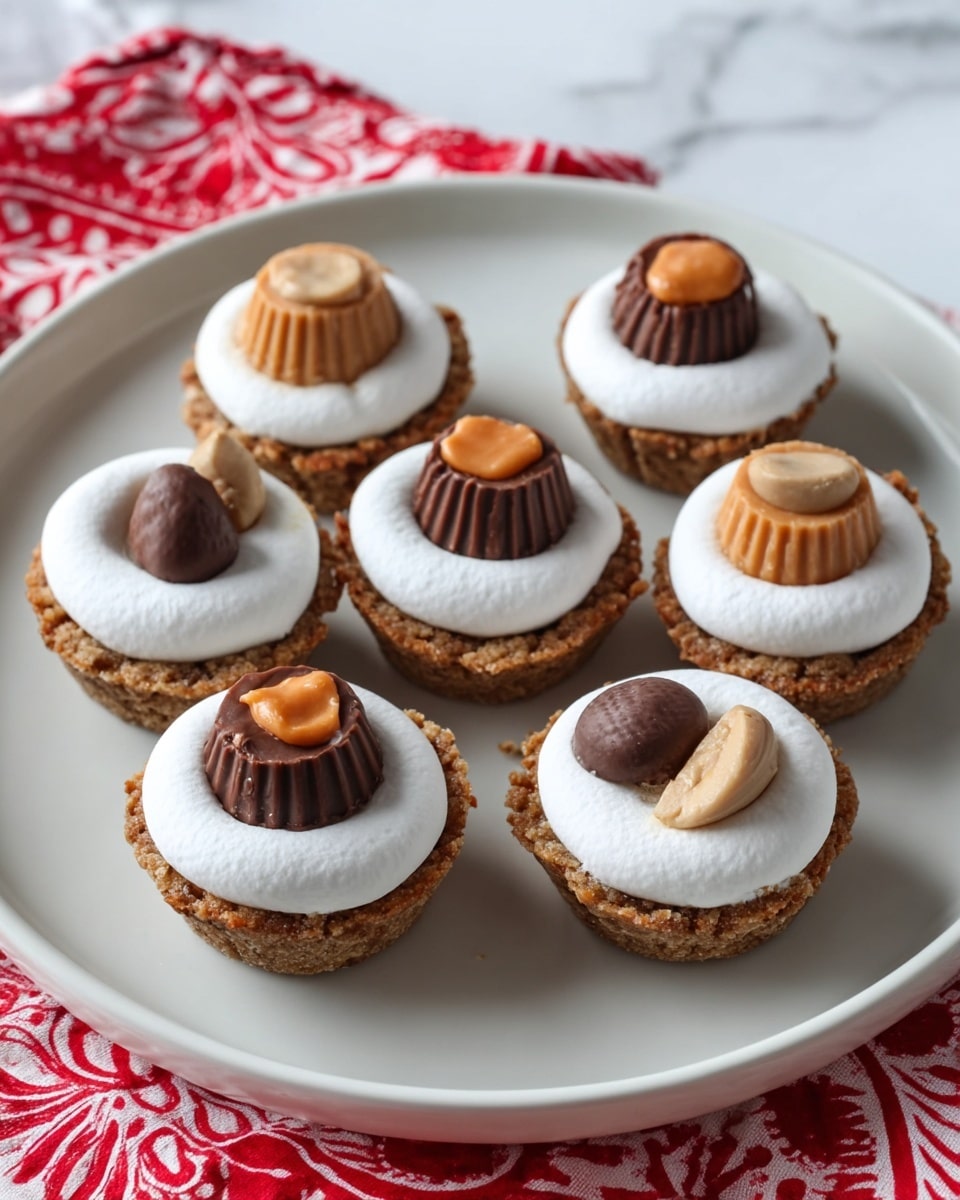
If you’re looking for a dessert that hits all the right nostalgic notes and is a total crowd-pleaser, you’ve got to try this S’mores Cookie Cups Recipe. I absolutely love how these little pockets of cookie dough, toasted marshmallows, and melty chocolate come together—you’ll find they’re fun to make and even better to eat. Trust me, once you try these, they’ll be your go-to when you want something sweet that captures that classic campfire magic without the need for an actual campfire.
Why You’ll Love This Recipe
- Perfect Bite-Sized Treats: Each cookie cup is the perfect little package of gooey marshmallow and chocolate — no mess, no fuss.
- Super Easy to Make: With simple ingredients and straightforward steps, you’ll be amazed at how quickly these come together.
- Great for Parties: Whether it’s a kids’ birthday or a cozy get-together, these are always a hit and perfect for sharing.
- Customizable: You can swap chocolates or add extras to make these cookie cups uniquely yours.

Ingredients You’ll Need
The magic of this S’mores Cookie Cups Recipe starts with a balanced mix of cookie dough, graham crackers, marshmallows, and chocolate. It’s that combo that really nails the s’mores vibe—just like those summer campfire treats but much easier to whip up in your kitchen. Pro tip: Use fresh marshmallows and your favorite chocolate candies for the best melty texture.
- All-purpose flour: Gives your cookie cups structure without being too dense.
- Graham cracker crumbs: This is what adds that authentic s’mores crunch and flavor, so don’t skip it!
- Baking powder & baking soda: Help the cookie dough rise just right for that perfect bite.
- Salt: Enhances all the sweet flavors for a balanced taste.
- Unsalted butter: Makes the dough rich and tender, so make sure it’s softened to blend well.
- Sugar & light brown sugar: Brown sugar adds moisture and depth, while white sugar ensures crispness.
- Eggs: Bind everything together and keep the cookie cups chewy.
- Vanilla extract: A little goes a long way in building flavor.
- Large marshmallows: Cut in half to fit perfectly into each cup for that ooey-gooey center.
- Chocolate candies (Kisses, pumpkin Kisses, or mini Reese’s cups): Pick your favorite chocolate that melts easily — the ultimate finish to this treat.
Variations
I love how versatile this S’mores Cookie Cups Recipe is—so you can always tweak it to fit your mood or dietary needs. Over time, I’ve tried a bunch of fun twists, and I encourage you to do the same! Baking should be playful, right?
- Gluten-Free Version: Swap the all-purpose flour for a gluten-free blend and use gluten-free graham cracker crumbs, and you’re good to go without losing that classic texture.
- Chocolate Variety: I sometimes switch out the standard milk chocolate candies for dark chocolate or caramel-filled ones for extra indulgence.
- Nutty Twist: Add a sprinkle of chopped toasted nuts on top before baking for a crunchy surprise that my family went crazy for.
- Mini S’mores Cups: Use mini marshmallows whole if you want smaller, bite-sized treats for parties, which are perfect for little hands.
How to Make S’mores Cookie Cups Recipe
Step 1: Preheat and Prepare Your Ingredients
Start by preheating your oven to 350°F. This is key because baking at the right temperature ensures the cookie cups come out perfectly golden and the marshmallows get that ideal puff without burning. Meanwhile, gather all your ingredients so you’re not scrambling mid-recipe – it really helps keep things moving smoothly.
Step 2: Mix the Dry Ingredients
Grab a large bowl and whisk together the all-purpose flour, graham cracker crumbs, baking powder, baking soda, and salt. I find that this dry mix is what really gives the cookie cups that authentic s’mores crunch and chew, so whisk well to combine everything evenly.
Step 3: Cream Butter and Sugars
In a separate large bowl, beat the softened butter with the white and light brown sugar using a stand or hand mixer on medium-high speed for about 3–4 minutes until it’s light and fluffy. I used to rush this part until I realized how important it is for lightness and texture—don’t skip the fluffiness!
Step 4: Add Eggs and Vanilla
Next, add the eggs one at a time, beating well after each addition, followed by the vanilla extract. The eggs help bind all the ingredients while adding richness, and the vanilla brightens the flavor beautifully.
Step 5: Combine Wet and Dry Ingredients
Reduce your mixer speed to low and gradually add the dry ingredient mixture. Mix until just combined—this keeps the cookie cups tender and prevents overmixing which can make the dough tough.
Step 6: Scoop and Shape
Using about ½ tablespoon of dough for each, scoop the cookie dough into the cups of a nonstick mini muffin pan. Then, use your thumb or the back of a small spoon to make a nice indentation in the center of each ball of dough. This little nest will hold the marshmallow perfectly.
Step 7: Bake Then Add Marshmallows
Bake the cookie cups for 8 minutes. Once you take them out, quickly place a half marshmallow (cut side down) into each indentation. Pop the pan back in for another 2 minutes until the marshmallows puff just a bit. Watching them bubble up with that toasted gloss is so satisfying.
Step 8: Top with Chocolate and Cool
Remove the pan from the oven again, and while the marshmallows are still warm, press a chocolate candy into the center of each marshmallow. This melts the chocolate slightly without making a mess. Let the s’mores cookie cups cool in the pan for about 15 minutes before carefully removing them. Your patience here will pay off with the perfect shape and texture.
Pro Tips for Making S’mores Cookie Cups Recipe
- Softened Butter:** Make sure your butter is softened but not melted for the best creaming results and dough texture.
- Don’t Overfill:** Use just about ½ tablespoon of dough per cup so your cookie cups hold their shape and don’t overflow.
- Timing is Key:** Adding marshmallows too early can make them melt too much; baking 8 minutes then adding marshmallows ensures they puff just right.
- Cooling Stage:** Let cookie cups cool before removing so they firm up and won’t break apart during handling.
How to Serve S’mores Cookie Cups Recipe

Garnishes
I like to sprinkle a little extra graham cracker crumbs or a tiny pinch of sea salt on top after adding the chocolate piece—it amps up the flavor and adds a nice touch of contrast. Sometimes a light drizzle of melted chocolate looks pretty too. These little details make it look like you really went the extra mile, and your guests will notice!
Side Dishes
These cookie cups are decadent on their own, but when paired with a scoop of vanilla ice cream or a fresh fruit salad like strawberries or raspberries, they’re next-level indulgent. For a party, I love setting out milk or a chocolate milkshake to complement the sweet, toasty flavors.
Creative Ways to Present
For birthdays or special occasions, I like placing the cookie cups into mini paper cupcake liners and arranging them on a rustic wooden board with fresh flowers and little signs that say “S’mores Time.” Another fun idea I tried was stacking them into a tiered dessert tray—it instantly made the table look festive and inviting.
Make Ahead and Storage
Storing Leftovers
I store leftover s’mores cookie cups in an airtight container at room temperature. They stay fresh and chewy for about 3 days, though in my house they never last that long! If you want to keep the marshmallows soft, avoid refrigerating them.
Freezing
If you want to prep these ahead for parties or snacks, freeze the baked cookie cups after they’ve cooled completely. I place them on a baking sheet first to freeze individually, then transfer them to a freezer-safe container or bag. They freeze beautifully for up to a month—just thaw at room temperature before serving.
Reheating
When reheating leftovers, I like to pop them in a 300°F oven for about 5 minutes to warm through and refresh the gooey marshmallow and chocolate melt, which makes them taste freshly baked again. Avoid microwaving as it can make the cookie too soft or marshmallow rubbery.
FAQs
-
Can I use different types of chocolate for the S’mores Cookie Cups Recipe?
Absolutely! Feel free to swap in any chocolate candies you love. Milk chocolate works classic, but dark chocolate, peanut butter cups, or even white chocolate can add delicious variety. Just pick chocolates that melt easily for the best gooey effect.
-
What’s the best way to prevent marshmallows from burning?
Bake the cookie dough first for 8 minutes, then add the marshmallows and bake just 2 more minutes. This short time softens and puffs up the marshmallows without burning them—trust me, I learned this the hard way the first time I tried!
-
Can I make these cookie cups ahead of time?
Yes! You can prepare the cookie cups and freeze them after baking. Just thaw and warm slightly before serving to enjoy that fresh-baked taste and melty center. They store well for up to a month frozen.
-
Do I need a mini muffin pan to make S’mores Cookie Cups Recipe?
A mini muffin pan works best for shaping these treats into perfect cups, but if you don’t have one, you could try regular muffin tins and adjust dough amounts, though the results may be larger and less uniform.
Final Thoughts
This S’mores Cookie Cups Recipe really takes me back to those cozy campfire nights, but with way less mess and way more deliciousness! I love sharing these at family gatherings because they get devoured every time, plus they’re easy enough that even a beginner baker can pull them off confidently. Honestly, once you try them, you’ll understand why my family goes crazy for this recipe. So grab your mini muffin pan and let’s get baking—you won’t regret it!
Print
S’mores Cookie Cups Recipe
- Prep Time: 30 minutes
- Cook Time: 10 minutes
- Total Time: 40 minutes
- Yield: 72 cookie cups
- Category: Dessert
- Method: Baking
- Cuisine: American
Description
S’mores Cookie Cups are delightful mini treats that combine the classic flavors of graham cracker, chocolate, and toasted marshmallows into a bite-sized cookie cup. Perfect for parties or an indulgent snack, these cookies feature a crisp, buttery base with a gooey marshmallow center topped with your favorite chocolate candy.
Ingredients
Dry Ingredients
- 2 cups all-purpose flour
- 2 1/2 cups graham cracker crumbs
- 1/2 teaspoon baking powder
- 1/2 teaspoon baking soda
- 1/2 teaspoon salt
Wet Ingredients
- 1 cup unsalted butter, softened
- 1 cup sugar
- 1 cup light brown sugar, lightly packed
- 2 large eggs
- 1 teaspoon vanilla extract
Toppings
- 36 large marshmallows, cut in half
- 72 chocolate candies (Kisses, pumpkin Kisses*, mini Reese’s cups)
Instructions
- Preheat Oven: Begin by preheating your oven to 350°F (175°C) to ensure it is properly heated when you place the cookie cups inside.
- Mix Dry Ingredients: In a large bowl, whisk together the all-purpose flour, graham cracker crumbs, baking powder, baking soda, and salt until evenly combined to form your dry base mix.
- Prepare Wet Ingredients: In a separate bowl, using a portable electric mixer or stand mixer, beat the softened unsalted butter, sugar, and light brown sugar on medium-high speed for 3 to 4 minutes until the mixture is light and fluffy. This process incorporates air for texture.
- Add Eggs and Vanilla: Beat in the eggs and vanilla extract until fully incorporated, ensuring a smooth batter.
- Combine Mixtures: Reduce mixer speed to low and gradually add the dry ingredient mixture to the wet ingredients. Mix just until combined to avoid overworking the dough, which can cause toughness.
- Form Cookie Cups: Scoop about 1/2 tablespoon of cookie dough into each cup of a nonstick mini-muffin pan. Use your thumb to press an indentation into the center of each cookie to make a small well for the marshmallow.
- Initial Bake: Bake the cookie cups for 8 minutes in the preheated oven. This step sets the cookie base but does not fully cook the marshmallow topping.
- Add Marshmallows: Remove the pan from the oven. Place a half marshmallow, cut side down, into the indentation of each cookie cup. This placement allows the marshmallow to slightly melt and puff.
- Bake Marshmallow Top: Return the pan to the oven and bake for an additional 2 minutes until the marshmallows are slightly puffed and soft.
- Top with Chocolate: Remove the pan from the oven and while the marshmallows are still warm, gently press a piece of chocolate candy into each marshmallow to create the classic s’mores combination.
- Cool and Store: Allow the cookie cups to cool in the pan for about 15 minutes to set before removing them. Store in an airtight container to maintain freshness.
Notes
- You can use your favorite chocolate candies such as milk chocolate Kisses, pumpkin Kisses, or mini Reese’s cups for variety.
- Do not overmix the dough once the flour mixture is added to avoid tough cookies.
- Ensure marshmallows are placed cut side down for better melting and puffing.
- Cool cookies completely before storing to prevent sogginess.
- These mini cookie cups make perfect bite-sized treats for parties or holiday gatherings.
Nutrition
- Serving Size: 1 cookie cup
- Calories: 110
- Sugar: 9g
- Sodium: 75mg
- Fat: 6g
- Saturated Fat: 3.5g
- Unsaturated Fat: 2g
- Trans Fat: 0g
- Carbohydrates: 13g
- Fiber: 0.5g
- Protein: 1.2g
- Cholesterol: 20mg


