
If you’re looking for a snack that’s insanely simple yet incredibly tasty, you’re going to absolutely love this Salami Cream Cheese Roll-Ups Recipe. I stumbled upon this gem a while back, and it quickly became my go-to for parties, quick bites, or when I just want something satisfying without much fuss. The creamy tang of the cheese combined with the spicy kick from the salami and the briny pop of capers is just, well, fan-freaking-tastic. Stick with me—I’ll walk you through all my tips for making it perfect every time!
Why You’ll Love This Recipe
- Super Easy to Prepare: Just a few ingredients and minimal effort get you a show-stopping appetizer.
- Perfect Party Pleaser: Your guests will keep coming back for these bite-sized flavor bombs.
- Customizable: You can swap herbs, try different salami, or add extras to make it truly your own.
- Make-Ahead Friendly: Prepare hours in advance and keep it chilled until ready to serve—stress-free entertaining!

Ingredients You’ll Need
All you need for this Salami Cream Cheese Roll-Ups Recipe is a handful of simple, flavorful ingredients that complement one another effortlessly. Here’s the scoop on what makes each one work beautifully and what to keep in mind when shopping.
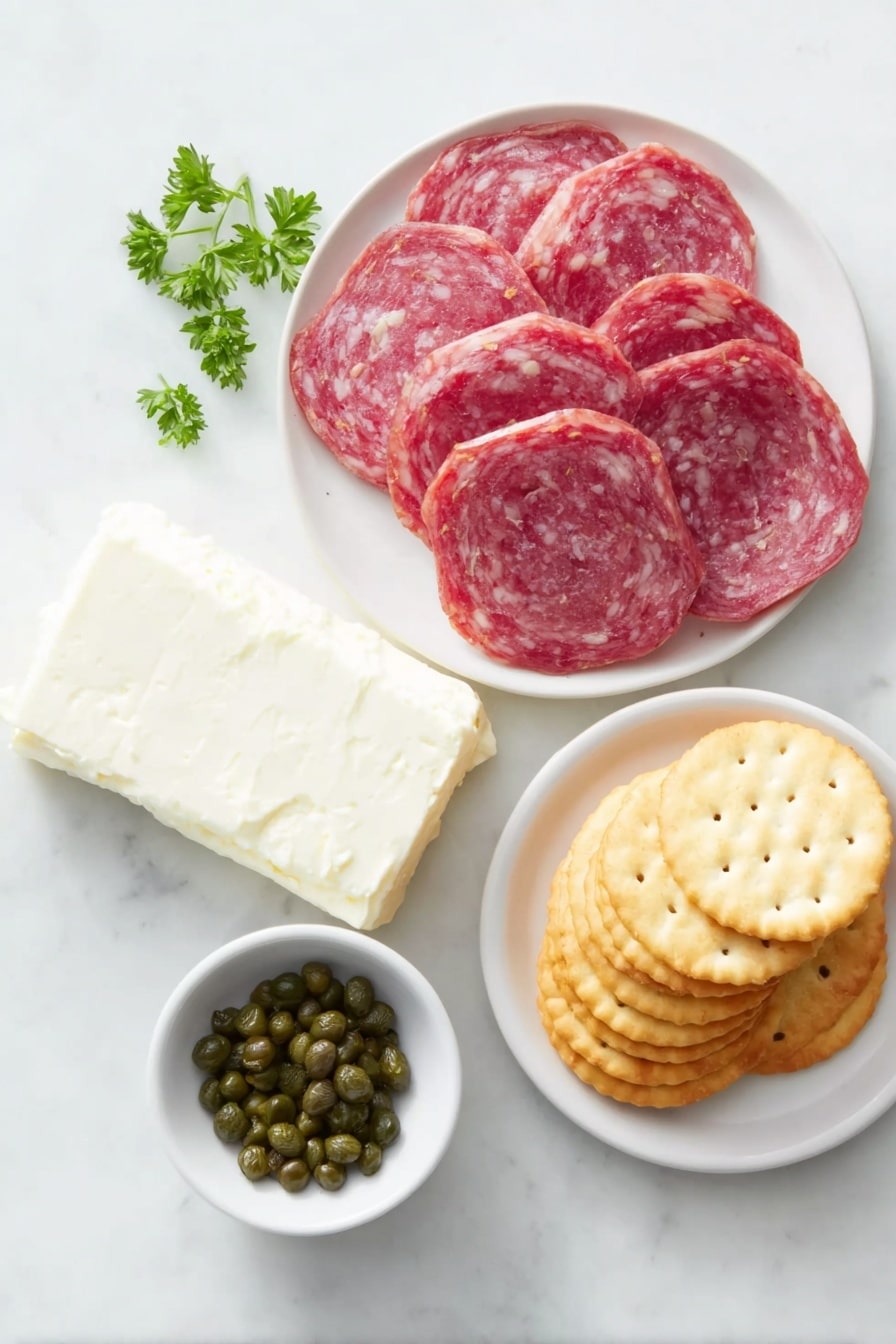
- Cream Cheese: I always reach for a good-quality block like Philadelphia because it’s smooth, creamy, and rolls well when cold.
- Sliced Salami: Large round slices work best here; they’re easier to handle and create neat rolls. I like hot salami for a bit of kick.
- Baby Capers: These tiny bursts of brine add a nice contrast to the richness of the cream cheese.
- Fresh Herbs: Parsley or basil bring freshness and color. Totally optional but highly recommended for that little herbal zing.
- Crackers: For serving, choose sturdy crackers like Jatz that hold up well to the roll-ups without crumbling.
Variations
I love how versatile this Salami Cream Cheese Roll-Ups Recipe is—you can easily switch things up to suit your taste or what’s in your fridge. Don’t hesitate to get creative; you’ll find it’s forgiving and utterly delicious every time.
- Herb Swap: Sometimes I swap parsley for fresh dill or chives—each brings a unique flavor that’s delightful.
- Cheese Variations: For a twist, try mixing cream cheese with a bit of goat cheese or adding shredded mozzarella.
- Meat Options: If you’re not a salami fan, thinly sliced prosciutto or turkey slices make excellent alternatives.
- Extra Crunch: Adding finely chopped nuts like walnuts or pistachios inside the roll-up gives a lovely texture contrast.
How to Make Salami Cream Cheese Roll-Ups Recipe
Step 1: Roll Out the Cream Cheese Into a Rectangle
Start with cold cream cheese—this is key because softened cheese can get messy and sticky. I like to place the block of cream cheese between two large pieces of cling wrap and then roll it out with a rolling pin until it’s roughly 13 by 9 inches. If you don’t have a rolling pin, no worries! I discovered that using your hands with a bit of pressure and an unopened can to shape it works just as well. Just keep it firm enough to hold its shape for the next steps.
Step 2: Layer the Salami
Carefully peel off the top cling wrap, then cover the cream cheese rectangle evenly with overlapping slices of salami. I find slightly overlapping the slices helps hold the roll together better and packs flavor in every bite. Once it’s covered, place another piece of cling wrap on top and press down gently to help shape the roll—a great little trick I picked up to keep everything tight.
Step 3: Flip and Add Your Flavor Boosters
Here’s the fun part: flip the whole thing over so the cream cheese side is facing up and peel off the cling wrap. Now sprinkle your baby capers and chopped herbs across the cream cheese. The capers add this fantastic tang that brightens the richness of the cheese, and the herbs add freshness that just screams homemade love.
Step 4: Roll It Up Tightly
Starting from one of the long edges, carefully roll the cream cheese and salami into a tight log, peeling away the cling wrap as you go. This step might take a little patience, but rolling firmly helps prevent air bubbles—which means your roll-ups hold together beautifully when sliced. Once rolled, wrap it tightly in cling wrap, twist the ends like a candy wrapper, and pop it in the fridge for at least four hours or overnight. Trust me, chilling it well is a game-changer for firm slices.
Step 5: Slice and Serve
When you’re ready, unwrap and slice the roll into rounds about 1 cm thick. I like to use a sharp, thin knife and wipe it clean between cuts so each piece stays neat and pretty. Serve these little rounds with sturdy crackers, and watch how fast they disappear!
Pro Tips for Making Salami Cream Cheese Roll-Ups Recipe
- Firm Cheese Matters: Always use cream cheese straight from the fridge for easier shaping and less mess.
- Keep it Tightly Wrapped: Rolling tightly and chilling adequately is the secret to perfect slices that won’t crumble.
- Sharp Knife for Clean Cuts: Use a thin, sharp knife for slicing and clean it between cuts to keep edges neat.
- Don’t Skip the Chill Time: It might be tempting to dig in early, but chilling helps flavors marry and the rolls hold their shape.
How to Serve Salami Cream Cheese Roll-Ups Recipe

Garnishes
I like to add a few capers on top of each slice right before serving for extra visual appeal and flavor. A sprinkle of finely chopped herbs—especially parsley or basil—works wonders to brighten the plate. Sometimes, a tiny drizzle of good olive oil adds a subtle richness.
Side Dishes
These roll-ups pair perfectly with something light and refreshing like a crisp green salad or marinated olives. For bigger gatherings, I serve alongside a cheese board loaded with nuts, fruit, and crusty bread—it turns into a mini feast in no time.
Creative Ways to Present
For parties, I’ve laid out the slices in a spiral on a large serving platter with crackers arranged around the edges—it looks stunning and invites everyone to help themselves. I’ve also stuffed these roll-ups inside hollowed-out mini bell peppers for a colorful twist that wows guests visually and tastily.
Make Ahead and Storage
Storing Leftovers
Leftover roll-ups store beautifully in the refrigerator wrapped tightly in cling wrap or an airtight container. I’ve kept them fresh for up to 3 days without losing any flavor or texture, which is perfect for weekend snacking or meal prep.
Freezing
Freezing is possible but not my favorite method because the texture of cream cheese can be a bit affected upon thawing. If you do freeze, wrap the roll-up tightly first in cling wrap and then in foil or a freezer bag. Thaw overnight in the fridge and slice when completely softened but still cool.
Reheating
This is best served cold or at room temperature, so I usually just let leftovers sit at room temp for about 15 minutes before serving again. Avoid heating since the cheese will lose its creamy texture and the salami can become tough.
FAQs
-
Can I use other meats instead of salami for this recipe?
Absolutely! While salami is traditional and gives that spicy, robust flavor, thinly sliced prosciutto, turkey, or even ham can be excellent substitutes depending on your preference.
-
How far ahead can I make these roll-ups?
You can make the roll-ups up to 24 hours in advance. Just keep them tightly wrapped and refrigerated, and slice them right before serving for best freshness.
-
What if I don’t have a rolling pin?
No problem! Using your hands along with a sturdy can or bottle to gently press the cream cheese into a rectangle works just as well. Just keep the cheese cold and go slow to avoid breakage.
-
Can I make this recipe vegetarian?
Yes! Swap the salami for roasted vegetables like thinly sliced roasted peppers or grilled zucchini ribbons for a delicious vegetarian version that’s just as satisfying.
-
How do I prevent the roll-ups from falling apart when slicing?
Rolling the log tightly and chilling it for at least four hours ensures the roll holds firmly together. Also, use a sharp knife and slice gently, wiping the blade between cuts.
Final Thoughts
This Salami Cream Cheese Roll-Ups Recipe has become one of those trusted favorites for me—whether it’s a lazy Sunday snack or a last-minute addition to a get-together. I love how effortlessly it comes together but still looks and tastes so impressive. I really hope you give it a try and find yourself reaching for it again and again like I do. It’s a little hug in food form, perfect for sharing with friends or just treating yourself.
Print
Salami Cream Cheese Roll-Ups Recipe
- Prep Time: 10 minutes
- Cook Time: 0 minutes
- Total Time: 4 hours 10 minutes
- Yield: 30 pieces
- Category: Appetizer
- Method: No-Cook
- Cuisine: American
Description
A delicious and easy-to-make Salami Cream Cheese Roll that’s perfect for parties or as a savory snack. This recipe features creamy Philadelphia cream cheese rolled with flavorful large sliced salami, baby capers, and fresh herbs, served with crunchy crackers for a satisfying bite.
Ingredients
Main Ingredients
- 250 g / 8 oz cream cheese (Philadelphia, 1 block), cold
- 180 g / 6 oz sliced large salami
- 1/4 cup baby capers, drained
- 2 tbsp finely chopped parsley or basil (or other herb of choice, or omit)
- Crackers, to serve (Jatz recommended)
Instructions
- Prepare Cream Cheese: Place the cold cream cheese block on a large sheet of cling wrap on a flat surface.
- Cover and Roll Out: Cover the cream cheese with another piece of cling wrap. Use a rolling pin to gently roll it into a rectangle approximately 32 cm (13 inches) by 23 cm (9 inches).
- Remove Wrap and Layer Salami: Peel off the top cling wrap. Evenly cover the exposed surface of the cream cheese with the sliced large salami, slightly overlapping the slices.
- Press and Flip: Cover the salami layer with a fresh piece of cling wrap. Press down firmly and carefully flip the entire assembly over so the cream cheese side is now facing up.
- Remove Wrap and Add Toppings: Peel off the cling wrap from the top to expose the cream cheese. Sprinkle the surface with baby capers and finely chopped parsley or herbs of your choice.
- Roll the Log: Starting from the long edge, carefully roll the cream cheese and salami into a firm log shape, peeling away the cling wrap as you go to avoid wrinkles and air bubbles.
- Wrap and Chill: Wrap the finished roll tightly with the cling wrap, twisting the ends to secure it. Refrigerate for at least 4 hours to allow it to firm up and flavors to meld.
- Slice and Serve: Remove from the fridge, unwrap the roll and slice into round pieces approximately 30 slices total. Serve immediately with crackers such as Jatz.
Notes
- The large round salami from deli counters is preferred for ease of handling and better layering compared to small salami rounds. A spicy, hot salami adds extra flavor.
- If you don’t have a rolling pin, you can use your hands and an unopened can to gently press and shape the cream cheese. Slightly softened cream cheese is easier to roll.
- This clever recipe idea using cling wrap was inspired by the Salami Cream Cheese Roll Ups recipe from Sugar Apron.
- Nutrition values are calculated per piece, excluding crackers, assuming 30 slices per roll.
Nutrition
- Serving Size: 1 piece (approx.)
- Calories: 70
- Sugar: 0.5 g
- Sodium: 190 mg
- Fat: 6 g
- Saturated Fat: 3.5 g
- Unsaturated Fat: 2 g
- Trans Fat: 0 g
- Carbohydrates: 1 g
- Fiber: 0 g
- Protein: 3 g
- Cholesterol: 15 mg


