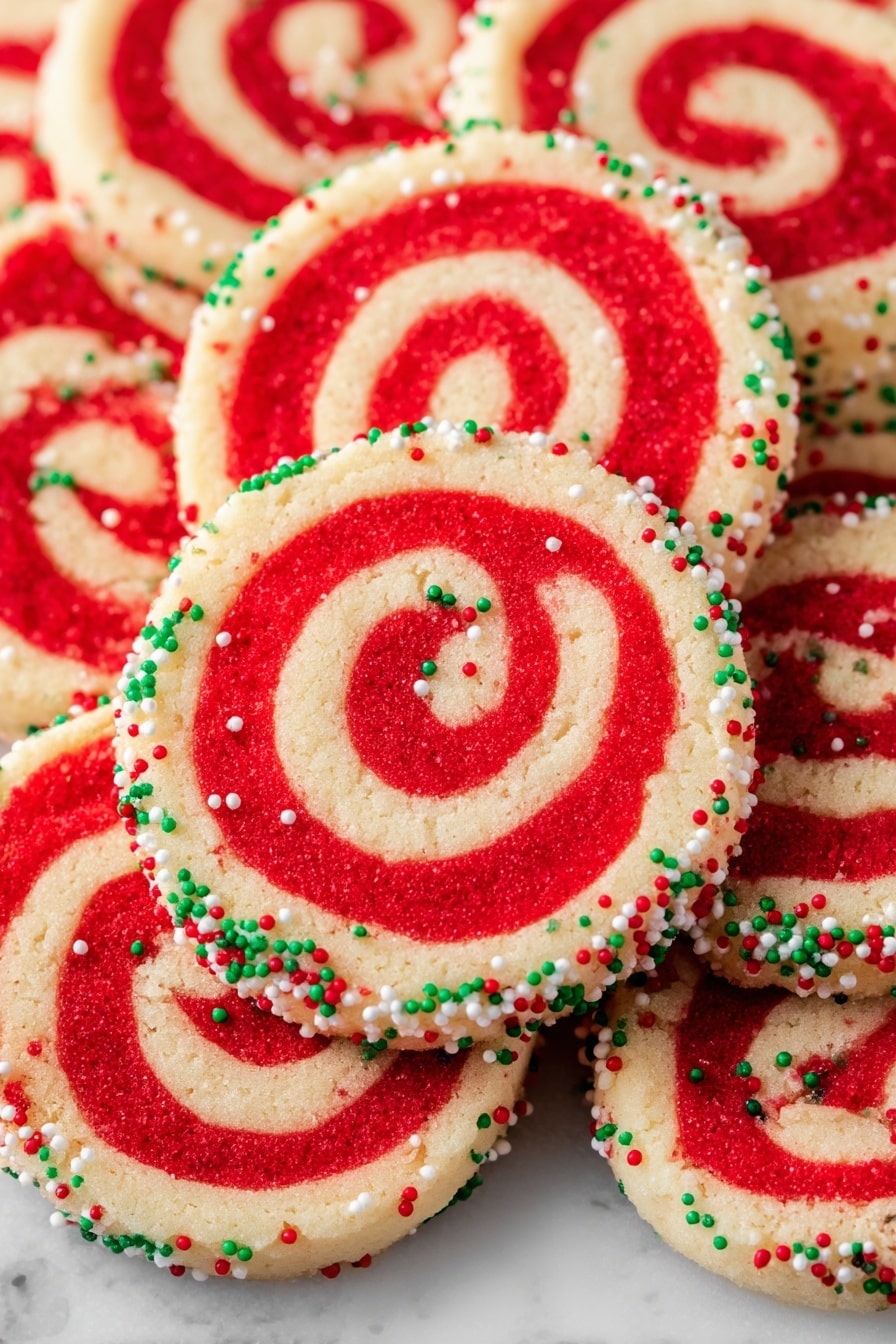
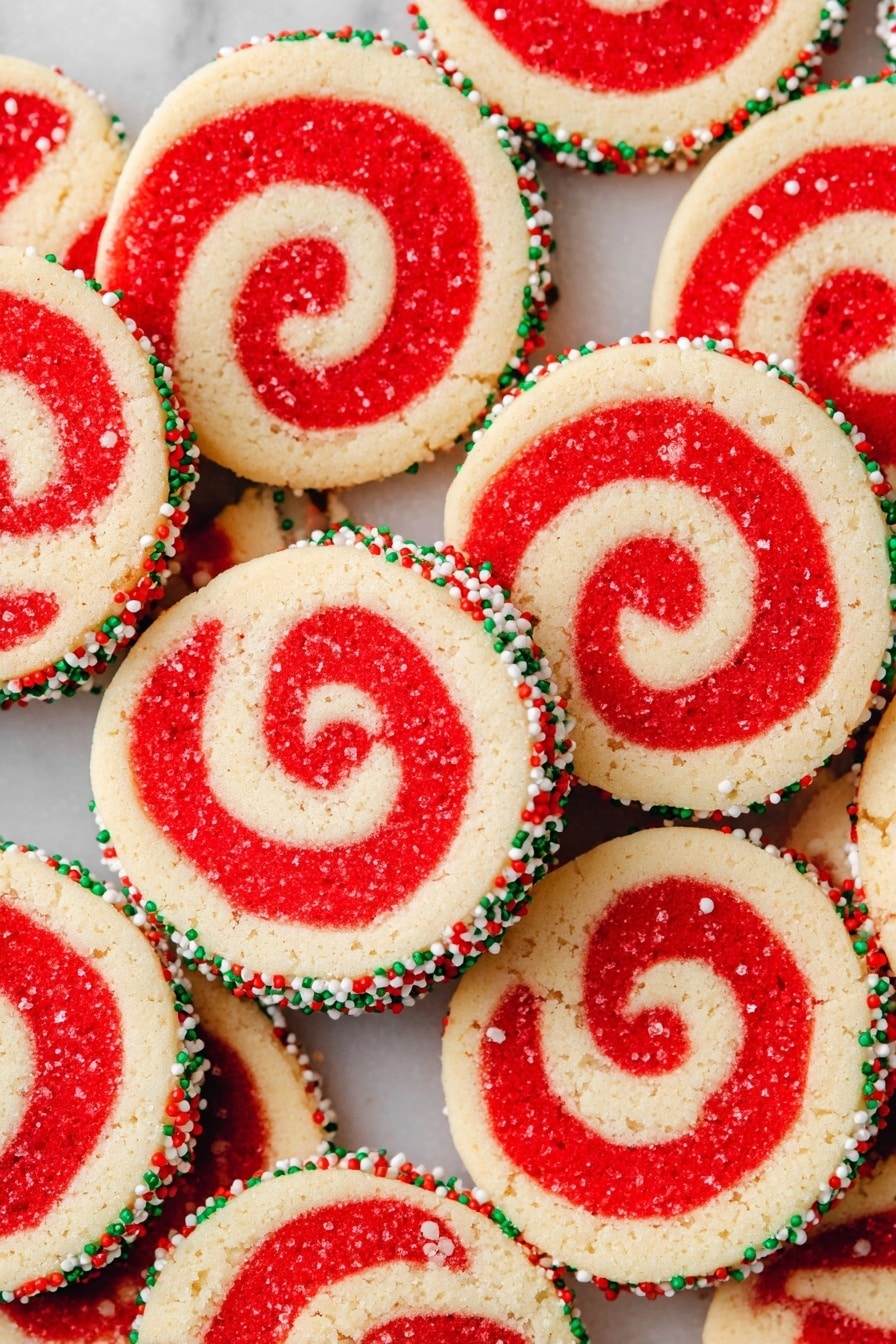
If you’re looking for a cookie that’s as festive as it is delicious, you’re going to want to try my Red Velvet Pinwheel Cookies Recipe. These charming spirals are not only eye-catching but melt-in-your-mouth tender with just the right touch of almond flavor. I absolutely love how this recipe rolls together classic red velvet flavors and a playful swirl—perfect for sharing (or sneaking a few before anyone sees!). Keep reading, and I’ll walk you through everything so you can nail these beauties on your very first try.
Why You’ll Love This Recipe
- Visually Stunning: The bold red swirl against a soft vanilla base makes these cookies a total show-stopper on any dessert table.
- Easy to Make: No fancy equipment needed—just simple steps that anyone can follow, even if you’re new to rolling dough.
- Family Favorite: My kids and friends always go crazy for these, and I bet your crew will too.
- Make-Ahead Friendly: Perfect for prepping in advance and baking when you want, saving you stress on busy days.

Ingredients You’ll Need
This Red Velvet Pinwheel Cookies Recipe relies on classic baking staples, but with little touches that bring out the best texture and flavor. I always recommend using good-quality butter and fresh almond extract to really make a difference in the final taste.

- All-purpose flour: Provides the perfect structure for these cookies—don’t swap it out for self-rising or cake flour!
- Baking powder: Gives just enough lift so the cookies aren’t too dense.
- Kosher salt: Enhances all the flavors and balances the sweetness.
- Unsalted butter: Softened to room temperature for the creamiest, fluffiest dough.
- Granulated sugar: Sweetens without overpowering, and helps with the tender crumb.
- Large egg: Adds moisture and binds everything together.
- Almond extract: My secret ingredient here—it gives a lovely nutty aroma that pairs beautifully with red velvet.
- Red food coloring: Use gel for the most vibrant and natural-looking color without altering dough texture.
- Sprinkles: Optional, but I love how they add a festive, playful edge to these cookies.
Variations
One of the things I adore about this Red Velvet Pinwheel Cookies Recipe is how easy it is to customize. Whether you want to dial up the festive factor or adapt it for dietary needs, I’ve got some suggestions based on what’s worked for me.
- Chocolate Twist: I sometimes mix a tablespoon of cocoa powder into the red dough for a richer chocolate flavor that pairs wonderfully with the almond.
- Nut-Free Version: Skip the almond extract and substitute with vanilla extract if you’re baking for nut allergies—still delicious but milder in aroma.
- Extra Festive: Swap sprinkles for finely chopped white chocolate chips or crushed peppermint candies around the edges during rolling for holiday occasions.
- Vegan Adaptation: Though I haven’t tried this myself yet, swapping butter for vegan margarine and using a flax egg might just do the trick—if you give it a go, let me know how it turns out!
How to Make Red Velvet Pinwheel Cookies Recipe
Step 1: Mix Your Dry and Wet Ingredients Separately
Start by whisking together the all-purpose flour, baking powder, and kosher salt in a medium bowl—this keeps everything evenly distributed and ensures each bite is perfectly balanced. In a large bowl, beat the softened butter and sugar with a handheld mixer for about 2 to 3 minutes until it’s light and fluffy; this step is so important because it creates that tender crumb we all love. Then mix in the egg and almond extract until fully incorporated.
Step 2: Divide and Color the Dough
Split the dough into two halves, leaving one plain in the bowl. Add red food coloring to the other half—start with a bit and mix well, adding more until you get the rich red hue you want. I recommend gel food coloring if you can get it, since it won’t thin the dough like liquid versions can. This is the fun part where your cookies start to come to life!
Step 3: Shape, Chill, and Roll Out Your Dough
Shape each dough portion into flat squares about ½ inch thick for easier rolling, then wrap them tightly in plastic wrap and refrigerate for about 30 minutes so they firm up. Once chilled, roll the red dough between parchment sheets into a rectangle about ¼ inch thick, then do the same with the white dough. Carefully invert the white dough onto the red dough, peel away the parchment on top, and gently press the layers together to seal.
Step 4: Roll the Dough Into a Log and Chill Again
Remove the top parchment and trim the sides of your layered dough rectangle so it’s nice and straight. Using the bottom parchment, roll the dough tightly into a log with the long side facing you. Rolling smoothly helps seal the edges, preventing any gaps in your pinwheel swirl. Wrap this log in plastic wrap and chill it in the refrigerator for at least an hour—overnight is even better if you have time.
Step 5: Slice, Decorate, and Bake
Preheat your oven to 350°F and line baking sheets with parchment paper. Place your sprinkles on a plate nearby. Using a sharp knife, slice the chilled dough log into ½-inch thick rounds. Roll the edges of each slice in sprinkles for a fun, colorful finish, then place them on the sheets about 2 inches apart. Bake for about 10 minutes, rotating your baking sheets halfway through to ensure even baking. Keep an eye out—the cookies are ready when the edges are set and just starting to turn golden.
Pro Tips for Making Red Velvet Pinwheel Cookies Recipe
- Use Gel Food Coloring: I learned that gel colors give you vibrant red without making the dough too sticky, unlike liquid dyes.
- Chill, Don’t Freeze Immediately: Chilling the dough log overnight helps the flavors meld and makes slicing cleaner and easier.
- Sharp Knife is Key: A serrated knife or well-sharpened blade helps you cut neat rounds without squishing the dough.
- Press Layers Gently: Don’t overwork the dough when layering—press gently to avoid mixing colors and keep distinct pinwheels.
How to Serve Red Velvet Pinwheel Cookies Recipe
Garnishes
I tend to keep it simple by using colorful sprinkles pressed onto the cookie edges before baking—adds a festive crunch and pop of color. Sometimes, I dust them lightly with powdered sugar just before serving for that bakery-style look. For holiday events, a drizzle of white chocolate on top elevates these cookies beautifully.
Side Dishes
Pair these pinwheel cookies with a classic glass of cold milk or a warm cup of peppermint tea for a cozy treat. They also shine alongside a scoop of vanilla ice cream or as part of a cookie platter with assorted holiday favorites—great when entertaining guests!
Creative Ways to Present
For parties, I’ve arranged the pinwheels standing upright in mason jars filled with colored sugar to keep them upright and display their pretty spirals. They also look adorable stacked in a clear cellophane bag tied with a velvet ribbon—perfect homemade gifts. Playing with presentation is so much fun and always gets compliments!
Make Ahead and Storage
Storing Leftovers
I store leftover Red Velvet Pinwheel Cookies in an airtight container at room temperature, layered between sheets of parchment to keep them from sticking. They stay fresh for up to a week—and honestly, they hardly last that long in my house!
Freezing
I’ve had great success freezing the dough log before slicing—just wrap it tightly in plastic and pop it in the freezer for up to a month. When I’m ready to bake, I thaw it overnight in the fridge and slice as usual. This hack makes holiday baking so much less stressful!
Reheating
If you want to enjoy a warm cookie, I gently reheat slices in a 300°F oven for 4-5 minutes right after baking or briefly microwave them for about 10 seconds. Just be careful not to overheat, or the texture becomes cakey instead of tender and crisp.
FAQs
-
Can I make Red Velvet Pinwheel Cookies without almond extract?
Absolutely! Almond extract adds a wonderful nutty note, but if you’re not a fan or need to avoid nuts, you can substitute with pure vanilla extract for a milder flavor that still tastes delicious. The cookies will still have that beautiful swirl and tender bite you want.
-
How thick should I roll the dough for the best pinwheel effect?
Rolling the dough to about ¼ inch thick before layering and rolling into a log works best. This thickness keeps your pinwheels defined without the cookies becoming too thin and crisp or thick and doughy once baked.
-
Can I use liquid food coloring instead of gel?
You can, but I don’t recommend it. Liquid food coloring can make the dough too sticky and affect texture. Gel coloring is more concentrated, giving you vivid color with less liquid, so your dough stays just right.
-
How do I prevent the layers from separating when rolling the log?
Make sure to gently press the white dough on top of the red one before rolling, and roll tightly using the parchment paper to help keep everything sealed. Also, chilling the dough firm before slicing helps maintain the swirl shape.
Final Thoughts
This Red Velvet Pinwheel Cookies Recipe has become a go-to for me whenever I want to impress friends or just treat the family to something a little extra special. It’s fun to make, easy to personalize, and the results are downright delicious. I hope you’ll enjoy baking and sharing these charming cookies as much as I do—they’re sure to become one of your favorites, too!
Print
Red Velvet Pinwheel Cookies Recipe
- Prep Time: 10 minutes
- Cook Time: 10 minutes
- Total Time: 2 hours 30 minutes
- Yield: 24 cookies
- Category: Baking
- Method: Baking
- Cuisine: American
Description
Delight in these festive Pinwheel Cookies featuring a vibrant red and white swirl, soft buttery texture, and a fun sprinkle-coated edge. Perfect for holiday celebrations or whenever you want a colorful homemade treat, these cookies combine classic almond extract flavor with a visually appealing design that’s sure to impress.
Ingredients
Dry Ingredients
- 2 1/4 cups (270 g) all-purpose flour
- 1 tsp baking powder
- 1/2 tsp kosher salt
Wet Ingredients
- 1 cup (2 sticks) unsalted butter, softened
- 1 cup (200 g) granulated sugar
- 1 large egg
- 3/4 tsp almond extract
- Red food coloring, as needed
Decorations
- Sprinkles, for decorating
Instructions
- Mix Dry Ingredients: In a medium bowl, whisk together the all-purpose flour, baking powder, and kosher salt until evenly combined to prepare your dry mix.
- Cream Butter and Sugar: Using a handheld mixer on medium-high speed, beat the softened butter and granulated sugar in a large bowl until the mixture becomes light and fluffy, about 2 to 3 minutes.
- Add Egg and Flavor: Beat in the large egg until fully incorporated, then add the almond extract and mix well to infuse the dough with a delicate almond flavor.
- Combine Ingredients: Gradually add the dry ingredients to the wet mixture and beat on medium-low speed just until combined to form your cookie dough.
- Divide and Color Dough: Split the dough into two equal parts. Leave one half in the bowl as is (white dough). Add red food coloring to the other half and mix thoroughly, adding more coloring as needed, until the dough reaches your desired shade of red.
- Shape Dough Squares: On a clean work surface, shape each portion of dough into a flat square approximately 1/2 inch thick. Wrap each square tightly in plastic wrap.
- Chill Dough Squares: Refrigerate the wrapped dough squares until firm, about 30 minutes, to make rolling easier.
- Roll Out Dough Layers: Place the red dough between two sheets of parchment paper and roll it out into a rectangle about 1/4 inch thick. Repeat this rolling process with the white dough on separate parchment sheets.
- Layer and Seal Dough: Remove the top parchment sheet from each dough layer. Carefully invert the white dough onto the red dough, gently pressing down to help the layers stick together evenly.
- Trim and Roll Log: Remove the top parchment from the layered dough. Trim the edges to create neat sides. With a long side facing you, use the bottom parchment to tightly roll the dough into a log shape, then roll it on the work surface a few times to seal the edges firmly.
- Chill Rolled Dough Log: Wrap the dough log tightly in plastic wrap and refrigerate until very firm, for at least 1 hour or up to overnight, to make slicing easier.
- Prepare for Baking: Position oven racks in the upper and lower thirds and preheat the oven to 350°F (175°C). Line two large baking sheets with parchment paper. Pour sprinkles onto a medium plate for decorating.
- Slice and Decorate Cookies: Using a sharp knife, slice the chilled dough log into rounds about 1/2 inch thick. Roll the edges of each cookie slice in sprinkles to coat them.
- Arrange on Baking Sheets: Place the cookie rounds on the prepared baking sheets, spacing them about 2 inches apart to allow for slight spreading.
- Bake Cookies: Bake the cookies in the oven for approximately 10 minutes, swapping the position of the baking sheets halfway through to ensure even baking. Cookies are done when edges are set and just starting to turn golden.
- Cool Cookies: Remove the baking sheets from the oven and let the cookies cool slightly before transferring them to a wire rack to cool completely.
Notes
- Chilling the dough adequately is essential to maintain the pinwheel shape and make slicing easier.
- You can adjust the intensity of the red coloring to your preference.
- Use a very sharp knife to slice the dough log to keep clean, even edges.
- Sprinkles add a festive touch but can be omitted or replaced with coarse sugar if desired.
- Store cookies in an airtight container at room temperature for up to one week.
Nutrition
- Serving Size: 1 cookie
- Calories: 120
- Sugar: 8g
- Sodium: 90mg
- Fat: 7g
- Saturated Fat: 4g
- Unsaturated Fat: 2g
- Trans Fat: 0g
- Carbohydrates: 13g
- Fiber: 0.3g
- Protein: 1g
- Cholesterol: 20mg


