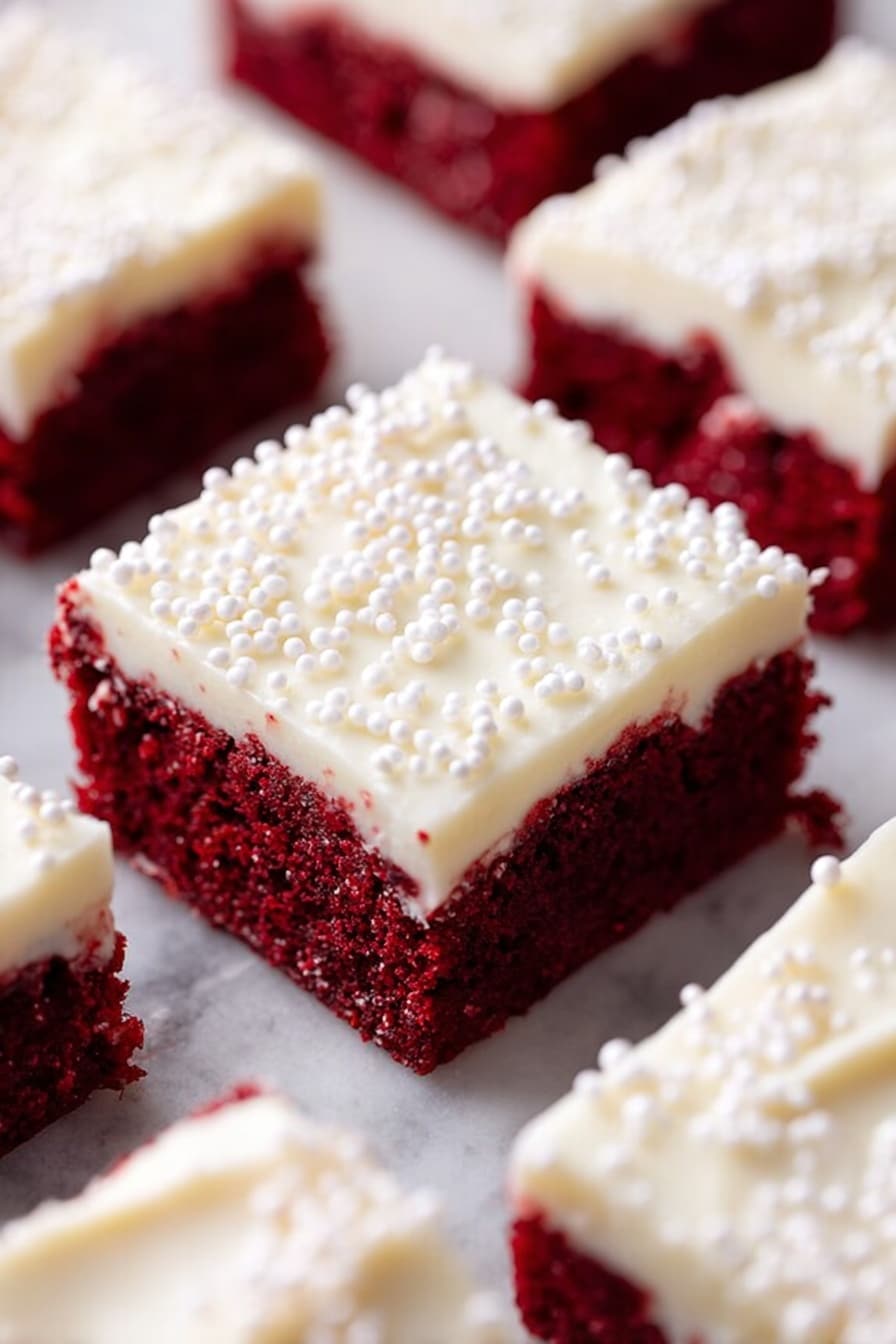
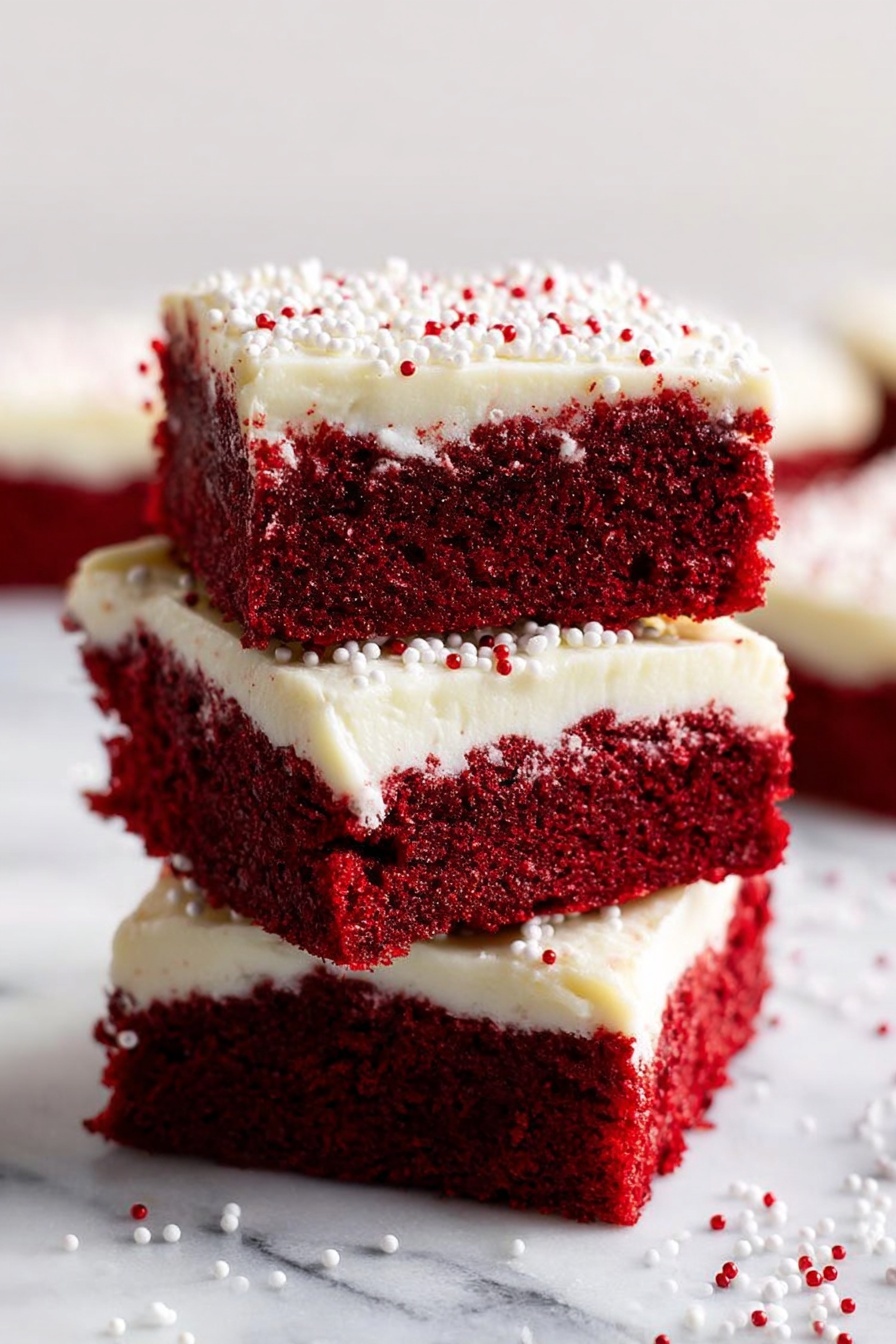
If you’re craving a dessert that’s rich, festive, and just downright irresistible, this Red Velvet Cookie Bars Recipe is exactly what you didn’t know you needed. I absolutely love how these bars combine the classic velvet flavor with the chewy satisfaction of a sugar cookie – and that cream cheese frosting? Total game changer. Stick with me, and I’ll share everything you need to make this fan-freaking-tastic recipe come to life in your kitchen.
Why You’ll Love This Recipe
- Simple Ingredients: You probably already have most of these in your pantry, making it easy to whip up any time.
- Perfect Texture: Chewy but tender cookie bars topped with creamy frosting—my family goes crazy for the contrast.
- Fast Baking: The whole recipe takes about 35 minutes, so it’s super quick for a homemade treat.
- Eye-Catching Color: That classic red velvet hue makes these bars a showstopper for holidays or special occasions.

Ingredients You’ll Need
All the ingredients here come together beautifully to create that red velvet vibe with a sugar cookie twist. Pro tip: using good-quality unsweetened cocoa really brings out the depth of flavor, and softened butter is your best friend for achieving the perfect dough texture.
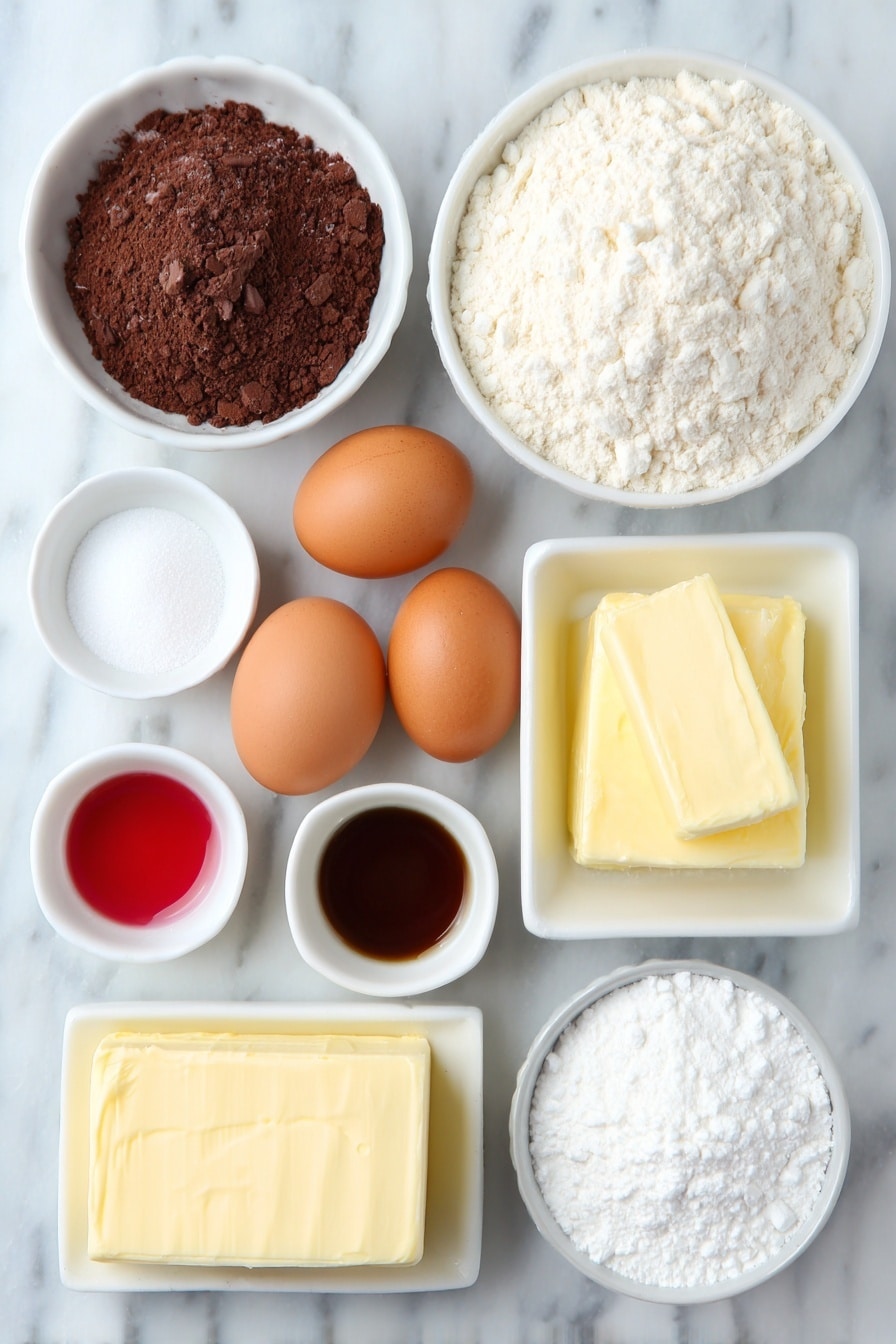
- All-purpose flour: The base for structure, I always sift it to keep things light.
- Unsweetened cocoa powder: Adds that subtle chocolate layer essential to red velvet, and I recommend Dutch-processed for smoothness.
- Salt: Balances sweetness and enhances flavors.
- Baking powder: The leavening agent that gives the bars a nice lift without fluffiness.
- Butter: Softened but not melted for easy creaming—this creates a lovely tender crumb.
- Sugar: Granulated for that classic sweetness and crisp edge.
- Eggs: They bind everything together and add moisture.
- Vanilla extract: Brings warmth and depth that complements cocoa perfectly.
- Red food coloring: The signature red velvet color that makes these bars festive and fun.
- Cream cheese: For the frosting, softened to blend smoothly and give that tangy richness.
- Powdered sugar: Sifted to create a silky cream cheese frosting.
Variations
I love playing around with this Red Velvet Cookie Bars Recipe to suit different moods and occasions. It’s so versatile that you can easily tweak it to make it your own. Here are a few ways I like to switch things up:
- Nutty twist: Sometimes I fold in chopped pecans or walnuts into the dough for a little crunch and added flavor.
- Spiced up: Adding a pinch of cinnamon or espresso powder gives the bars a sophisticated depth that’s great for fall.
- Chocolate drizzle: When I feel indulgent, I drizzle melted dark chocolate on top of the frosting for a decadent finish.
- Dairy-free adaptation: I’ve swapped the butter and cream cheese for vegan alternatives and the bars still turn out moist and delicious.
How to Make Red Velvet Cookie Bars Recipe
Step 1: Get Your Oven and Pan Ready
Preheat your oven to 350°F (175°C). I like to line my 9×13 inch baking pan with parchment paper or aluminum foil—sprayed lightly with cooking spray to ensure the bars pop out easily. This little prep move saves a lot of frustration later and helps you get clean, neat squares.
Step 2: Mix the Dry Ingredients
In a medium bowl, whisk together the all-purpose flour, unsweetened cocoa powder, salt, and baking powder. Combining these first helps evenly distribute the leavening and cocoa, so your cookie bars bake uniformly without any bitter cocoa pockets.
Step 3: Cream Butter and Sugar
In a large bowl, beat the softened butter and sugar together until it’s light and fluffy—usually about 2 to 3 minutes with an electric mixer. This process aerates the mix and is critical for the right texture.
Step 4: Add the Wet Ingredients
Beat in the eggs one at a time, followed by vanilla extract and red food coloring. I find that adding the food coloring here gives you a more vibrant color without overmixing the dough afterward.
Step 5: Combine and Press into Pan
Gradually add your dry ingredients to the wet, mixing just until a soft dough forms. Don’t overdo it—you want tender bars, not tough ones. Then, press the dough evenly into your prepared pan. I use my hands lightly dusted with flour to get an even layer.
Step 6: Bake and Cool
Bake for about 20 minutes. You’ll know it’s ready when the edges start to pull away from the pan and a toothpick inserted comes out clean. It’s important to let the bars cool completely before frosting—patience pays off with a silky frosting that doesn’t melt into the cookie!
Step 7: Make the Cream Cheese Frosting
Beat the softened cream cheese and butter together until smooth and creamy. Slowly add the sifted powdered sugar and vanilla extract, then beat until silky. Spread generously over the cooled bars and get ready to enjoy the magic.
Pro Tips for Making Red Velvet Cookie Bars Recipe
- Don’t Skip Softening Butter: If your butter is too hard or melted, your texture will suffer; I always soften it at room temperature for a few hours or gently warm it slightly to get that perfect cream.
- Use Gel Food Coloring: I learned that gel or paste colors give a more vibrant red without thinning the batter like liquid colorings do.
- Even Thickness Matters: Press the dough evenly with your hands to ensure uniform baking and consistent texture throughout the bars.
- Cooling Before Frosting: A hot or warm base will melt the frosting and make a mess, so I always wait at least an hour or two before spreading it on.
How to Serve Red Velvet Cookie Bars Recipe
Garnishes
I like to keep the garnishes simple because the bars are already eye candy on their own, but a light dusting of cocoa powder or some finely chopped white chocolate curls make for a lovely touch. For holiday dinners, a few fresh raspberries or a sprig of mint bring freshness and contrast that looks as good as it tastes.
Side Dishes
These bars pair wonderfully with a scoop of vanilla ice cream or a warm cup of coffee. At parties, I’ve served them alongside a simple fruit salad to balance sweetness, or even with whipped cream for an extra creamy bite.
Creative Ways to Present
For birthdays or Valentine’s Day, I cut the bars into hearts using cookie cutters and stacked them on a pretty platter. Another trick is layering them in clear jars with alternating frosting, making an adorable gift or dessert centerpiece that’s as fun to look at as to eat.
Make Ahead and Storage
Storing Leftovers
I store any leftover bars in an airtight container in the fridge to keep the cream cheese frosting fresh. They stay perfectly chewy and slice cleanly for up to 4 days. Trust me, though—they rarely last that long at my house!
Freezing
If I want to save some for later, I slice the un-frosted bars and freeze them individually on a tray. Once frozen, I stack them with parchment paper between layers in an airtight container or freezer bag. You can thaw and add fresh frosting when you’re ready to serve. This trick keeps them from sticking together and cuts down prep time later.
Reheating
Since these are cookie bars, reheating isn’t usually needed, but if you want to soften them up slightly, I pop a piece in the microwave for 10 to 15 seconds. If there’s frosting, just be careful not to overheat to avoid melting it messily.
FAQs
-
Can I make this Red Velvet Cookie Bars Recipe without food coloring?
Absolutely! If you prefer to skip the food coloring, the bars will have a subtle reddish hue from the cocoa and other ingredients but won’t be as vibrant. You can also try natural coloring options like beet powder if you want a brighter color without synthetic dyes.
-
What’s the best way to cut the bars cleanly?
Using a sharp knife warmed under hot water and wiped dry before slicing helps produce smooth, clean edges. Cutting when the bars are chilled slightly also minimizes crumbling and keeps the frosting intact.
-
Can I make the frosting ahead of time?
Yes, you can prepare the cream cheese frosting a day ahead and store it covered in the fridge. Just give it a quick stir or a brief whip before spreading on the bars for the best texture.
-
Is it possible to make this recipe gluten-free?
Definitely! Substitute the all-purpose flour with a gluten-free flour blend that’s designed for baking and include a binding agent like xanthan gum if your blend doesn’t already have one. The structure might be slightly different but still delicious.
Final Thoughts
This Red Velvet Cookie Bars Recipe has become my go-to when I want a quick but festive homemade dessert that impresses every time. The chewy texture combined with that creamy frosting makes for a comforting treat that feels like a celebration in every bite. I wholeheartedly recommend giving this recipe a try — whether it’s for an everyday indulgence or a special holiday dessert, you’ll be glad you did. Let me know how they turn out for you!
Print
Red Velvet Cookie Bars Recipe
- Prep Time: 15 minutes
- Cook Time: 20 minutes
- Total Time: 35 minutes
- Yield: 16 bars
- Category: Dessert
- Method: Baking
- Cuisine: American
Description
Delight in these luscious Red Velvet Sugar Cookie Bars, featuring a soft and tender cocoa-flavored sugar cookie base topped with a rich and creamy cream cheese frosting. Perfectly balanced with a hint of vanilla and a vibrant red hue, these bars are a festive treat ideal for holiday gatherings or any special occasion.
Ingredients
Cookie Dough
- 2 1/2 cups all-purpose flour
- 1/4 cup unsweetened cocoa powder
- 1/2 teaspoon salt
- 1 teaspoon baking powder
- 1 cup unsalted butter, softened
- 1 1/2 cups granulated sugar
- 2 large eggs
- 2 teaspoons vanilla extract
- 2 tablespoons red food coloring
Cream Cheese Frosting
- 8 ounces cream cheese, softened
- 1/2 cup unsalted butter, softened
- 2 cups sifted powdered sugar
- 1 teaspoon vanilla extract
Instructions
- Preheat and Prepare Pan: Preheat your oven to 350°F (175°C). Line a 9×13 inch baking pan with aluminum foil or parchment paper, then spray it with cooking spray to ensure the bars can be easily lifted out and cut cleanly after baking.
- Mix Dry Ingredients: In a medium bowl, whisk together the flour, unsweetened cocoa powder, salt, and baking powder. Set this dry mixture aside for later use.
- Cream Butter and Sugar: In a large mixing bowl, cream together 1 cup of softened butter and 1 1/2 cups sugar until the mixture is light and fluffy, about 2–3 minutes using an electric mixer on medium speed.
- Add Eggs, Vanilla, and Food Coloring: Beat in the eggs, vanilla extract, and red food coloring until the mixture is well combined and smooth, ensuring an even red hue.
- Combine Dry and Wet Ingredients: Gradually add the flour mixture to the wet ingredients, mixing until a soft dough forms. Avoid overmixing to keep the dough tender.
- Press Dough into Pan and Bake: Evenly press the dough into the bottom of the prepared 9×13 inch pan. Bake in the preheated oven for approximately 20 minutes, or until the edges start pulling away from the pan sides and a toothpick inserted into the center comes out clean.
- Cool Before Frosting: Allow the baked bars to cool completely in the pan before applying frosting to prevent melting and sliding.
- Prepare Cream Cheese Frosting: In a mixing bowl, beat together the softened cream cheese and butter until smooth and creamy. Add the sifted powdered sugar and vanilla extract, then beat until the frosting is light, fluffy, and well incorporated.
- Frost the Bars: Spread the cream cheese frosting evenly over the cooled cookie bars. Slice into 16 bars and serve.
Notes
- For easier slicing, chill the frosted bars in the refrigerator for 30 minutes before cutting.
- You can substitute gel or paste red food coloring for a more vibrant color without altering the texture.
- Make sure butter and cream cheese are softened to room temperature for smooth mixing.
- Line the pan with foil or parchment for easy removal and cleaner cuts.
- Store leftover bars in an airtight container in the refrigerator for up to 5 days.
Nutrition
- Serving Size: 1 bar
- Calories: 300
- Sugar: 25g
- Sodium: 150mg
- Fat: 18g
- Saturated Fat: 10g
- Unsaturated Fat: 7g
- Trans Fat: 0g
- Carbohydrates: 35g
- Fiber: 1g
- Protein: 3g
- Cholesterol: 55mg


