
If you’re looking for a dessert that’s both elegant and packed with flavor, you’ve come to the right place. This Raspberry Goat Cheese Cheesecake Recipe is one of my absolute favorites to make for special occasions and cozy weekend treats alike. It combines the tangy creaminess of goat cheese with the bright, fresh burst of raspberry, all resting atop a buttery, crumbly crust that’s just irresistible. Trust me, once you try it, you’ll understand why I keep making it over and over.
Why You’ll Love This Recipe
- Unique Flavor Twist: The goat cheese adds a creamy tanginess that balances beautifully with the sweet raspberry swirl.
- Crowd-Pleaser: I’ve served this cheesecake at plenty of gatherings, and my family goes absolutely crazy for it every time.
- Visual Wow Factor: The raspberry swirl not only tastes great but makes for a stunning presentation.
- Make-Ahead Friendly: You can prepare this cheesecake a day in advance, making life easier for busy hosts.

Ingredients You’ll Need
Each ingredient plays its part in making this Raspberry Goat Cheese Cheesecake Recipe shine. From the rich mix of cheeses for that perfect texture, to the fresh raspberries that give the dessert its vibrant swirl — and of course, the crust that holds it all together. A quick tip: use good-quality cheeses at room temperature for the best creaminess and avoid lumps.

- Unsalted butter: Using room temperature butter makes mixing easier and helps achieve that tender crust.
- Sugar: Gives sweetness not only to the crust but balances the tangy similarities in the filling and raspberry swirl.
- Honey: Adds a subtle floral sweetness that’s more interesting than just plain sugar.
- All-purpose flour: Provides just enough structure for the crust without making it tough.
- Salt: Enhances overall flavors — even desserts need a pinch!
- Cornstarch: Thickens the raspberry swirl so it doesn’t run all over the cheesecake.
- Fresh lemon juice: Adds bright acidity to the raspberry swirl, helping it pop.
- Raspberries: Fresh or frozen both work, but fresh gives a nicer texture and color.
- Cream cheese: A classic cheesecake component for that rich, smooth base.
- Goat cheese: This is what makes this recipe special – tangy, creamy, and adds depth.
- Mascarpone cheese: Softens the goat cheese’s bite while making the filling ultra silky.
- Sour cream: Adds creaminess and a slight tang to the filling, balancing sweetness nicely.
- Vanilla extract: Sweetens the flavors and provides that home-baked aroma.
- Eggs: Binds everything together and gives structure to your cheesecake.
- Optional honey for serving: A drizzle on top adds a gorgeous shine and hint of extra sweetness.
Variations
I love how versatile the Raspberry Goat Cheese Cheesecake Recipe is, and I encourage you to make it your own. Whether you want to swap out ingredients for dietary needs or add your favorite flavors, it’s pretty forgiving — and delicious no matter what tweak you try.
- Gluten-Free Crust: I once swapped the all-purpose flour for almond flour and it worked wonderfully — just add a tablespoon of extra butter to help bind.
- Berry Mix: Feel free to use blackberries or blueberries instead of raspberries for a different fruity note.
- Honey Substitute: If you don’t have honey, maple syrup or agave syrup make a lovely alternative with a bit of extra caramel flavor.
- Dairy-Free Option: I’ve experimented with vegan cream cheese and coconut yogurt — it changes the texture but still packs that creamy punch.
How to Make Raspberry Goat Cheese Cheesecake Recipe
Step 1: Perfect the Crust
Start by creaming 1 cup of butter, sugar, and honey together until fluffy — this gives the crust a tender, flavorful base. Mix in the flour and salt just until combined. Divide and shape the dough into logs, then chill in the fridge or freezer until firm. Trust me, chilling is key here—it makes slicing the dough into perfectly sized pieces easier and the final crust more crumbly. Bake the slices until golden, then crush them up to create your cookie crumbs crust base. Mix in the remaining melted butter and press it firmly into your prepared springform pan. After a quick bake, that crust is ready to hold all those luscious layers!
Step 2: Prepare the Raspberry Swirl
This is where the magic happens! Combine cornstarch, lemon juice, and warm water to create a thickening base. Then, heat raspberries with sugar and stir until the berries release their juices. Add the cornstarch mixture and cook just until it thickens. Puree the mixture and strain to get a smooth, vibrant sauce perfect for swirling into the cheesecake. I like to do this part ahead of time so the sauce can cool—warm sauce won’t swirl properly and may just blend into the filling.
Step 3: Mix the Cheesecake Filling
Beat cream cheese and goat cheese until fluffy — this is the cornerstone for a creamy texture with a subtle bite from the goat cheese. Add mascarpone and sugar, then stir in sour cream and vanilla for richness and flavor depth. Incorporate the eggs one at a time, making sure each is fully mixed in before adding the next. Scrape your bowl often to make sure everything gets incorporated evenly. This step determines how smooth your cheesecake will turn out; rushing it can lead to a lumpy filling, which we definitely want to avoid!
Step 4: Assemble and Bake with a Water Bath
Pour the cheesecake filling into your cooled crust, then drop spoonfuls of the raspberry sauce over the top. Use a toothpick to gently swirl the sauce, creating that beautiful marbled effect. The water bath is my favorite cheesecake hack—placing your springform pan wrapped in foil inside a larger pan with warm water helps the cheesecake bake evenly and prevents cracks. Bake for one hour, then turn the oven off and leave it closed for an extra hour to finish baking gently. This slow cooling trick is why my cheesecakes come out so creamy and crack-free every time.
Step 5: Chill and Serve
Once baked, refrigerate your cheesecake for at least 5-6 hours or overnight — I find the flavors really deepen, and the texture sets perfectly. When you’re ready to serve, a drizzle of honey on top adds that final touch of sweetness and shine that just makes it feel special.
Pro Tips for Making Raspberry Goat Cheese Cheesecake Recipe
- Soften Cheeses Thoroughly: I learned that letting all your cheeses come fully to room temperature before mixing prevents lumps and makes the filling silky smooth.
- Don’t Skip the Water Bath: This saved my cheesecakes from cracking and drying out — wrap well and watch your confidence grow!
- Chill the Crust Dough: I noticed my crust sliced cleaner and baked more evenly when chilled properly; don’t rush this step.
- Use a Toothpick for Swirling: It’s subtle but using a toothpick lets you control the swirl without mixing the raspberry into the whole batter.
How to Serve Raspberry Goat Cheese Cheesecake Recipe

Garnishes
I like to keep the garnishes simple to let the cheesecake shine. Fresh whole raspberries placed neatly around the slice really brighten up the plate. Sometimes I add a little mint leaf for color and freshness. The drizzle of honey, as mentioned, is optional but really lovely—it adds a subtle sweetness and a pretty glossy finish that makes each slice look as good as it tastes.
Side Dishes
When I serve this cheesecake, I usually pair it with light and refreshing sides like a petite salad with citrus vinaigrette or a cup of good-quality coffee or herbal tea. If I’m going all out, a small scoop of vanilla bean ice cream complements the creamy texture perfectly without overpowering the tart raspberry notes.
Creative Ways to Present
For special occasions, I’ve tried serving individual mini cheesecakes in ramekins with the same raspberry swirl on top — it’s a crowd-pleaser that looks fancy but is easy to portion. Another fun idea is to create a layered parfait by breaking the crust and layering cheesecake filling, raspberry swirl, and crushed fresh raspberries in clear glasses — visually stunning and just as delicious.
Make Ahead and Storage
Storing Leftovers
I always store leftovers wrapped tightly with plastic wrap or in an airtight container in the fridge. This cheesecake keeps beautifully for up to 4 days. I find the flavors actually meld more, so it often tastes even better the next day. Just be sure it’s well covered to avoid absorbing other fridge odors.
Freezing
Freezing cheesecake can be tricky, but for this Raspberry Goat Cheese Cheesecake Recipe, I’ve had great results. Slice the cheesecake, wrap each piece tightly in plastic wrap and then foil, and freeze. When you want a slice, thaw overnight in the refrigerator. The texture stays surprisingly creamy, and the raspberry swirl maintains its flavor and brightness.
Reheating
Cheesecake is best served cold or at room temperature, so I usually just let frozen or refrigerated slices sit out for 20-30 minutes before eating. If you prefer it slightly warmed, pop a slice in the microwave for about 10 seconds – just enough to take the chill off without melting the filling.
FAQs
-
Can I use frozen raspberries for the raspberry swirl?
Absolutely! Frozen raspberries work just as well. Just thaw them first to release the juices, and then proceed with the recipe. Using frozen can make this recipe even easier year-round and still delivers that bright, fresh flavor.
-
Why do you recommend a water bath for baking?
The water bath gently heats the cheesecake, preventing the edges from drying out and the top from cracking. It gives you that smooth, creamy texture we all love without the cracks that can happen in a dry oven.
-
Can I make the crust with store-bought cookies?
Yes! For a shortcut, use about 2 1/4 cups of shortbread cookie crumbs mixed with melted butter, pressed into the pan, then baked as directed. It saves time and still tastes delicious.
-
How do I avoid lumps in my cheesecake filling?
Make sure all your cheeses are at room temperature before mixing, and use medium speed when beating the filling. Scrape down the bowl sides often to ensure an even mix. This keeps your cheesecake silky smooth.
-
How long should I chill the cheesecake before serving?
For the best texture and flavor, chill overnight or at least 5-6 hours. This lets the cheesecake set fully and melds the raspberry swirl beautifully into every bite.
Final Thoughts
This Raspberry Goat Cheese Cheesecake Recipe holds a special place in my heart because it combines everything I love in a dessert: creamy, tangy, sweet, and just a little bit fancy. It’s one of those recipes I feel proud serving yet easy enough to make when I want to treat myself. If you’re craving a cheesecake that stands out, with complex layers of flavor and texture, then this is your go-to. Give it a try and let me know what you think — I’m betting it’ll become a favorite on your dessert list too!
Print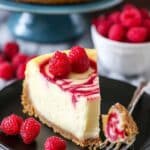
Raspberry Goat Cheese Cheesecake Recipe
- Prep Time: 1 hour 15 minutes
- Cook Time: 2 hours 40 minutes
- Total Time: 3 hours 55 minutes
- Yield: 12-14 slices
- Category: Dessert
- Method: Baking
- Cuisine: American
- Diet: Vegetarian
Description
This luscious Raspberry Goat Cheese Cheesecake blends the creamy tang of goat cheese with the rich smoothness of cream cheese and mascarpone, swirled with a vibrant homemade raspberry sauce. A buttery, crisp cookie crumb crust forms the perfect base for this elegant dessert, which is baked in a water bath for a silky texture. Finished with an optional honey drizzle, this cheesecake is perfect for special occasions or anytime you crave a sophisticated treat.
Ingredients
Crust:
- 1 cup, plus 3 tablespoons (266g) unsalted butter, room temperature
- 1/2 cup (104g) sugar
- 3 tbsp honey
- 2 cups (260g) all purpose flour
- Pinch of salt
Raspberry Swirl:
- 2 tsp cornstarch
- 1 tsp fresh lemon juice
- 1 tbsp warm water
- 2 cups (255g) fresh or frozen raspberries
- 2 tbsp sugar
Goat Cheese Cheesecake:
- 16 oz cream cheese, room temperature
- 12 oz goat cheese, room temperature
- 4 oz mascarpone cheese, slightly softened
- 1 1/2 cups (310g) sugar
- 1 cup (230g) sour cream
- 2 tsp vanilla extract
- 4 large Eggland’s Best eggs
Additional:
- Honey, for serving, optional
Instructions
- Make Crust Mixture: In a large mixer bowl, cream 1 cup butter, sugar, and honey on medium speed until fluffy. Add flour and salt, mix till just combined.
- Form and Chill Dough Logs: Divide dough in half; shape each half into a log (~1 1/4 inch diameter) on parchment paper. Wrap tightly, then freeze for 30 minutes or refrigerate 2 hours until firm.
- Preheat Oven and Prepare Baking Sheet: Preheat oven to 325°F. Line a cookie sheet with a silicone mat or parchment paper.
- Slice and Bake Cookies: Cut dough logs into 1/4 inch slices and space 1/2 inch apart on sheet. Bake 15-20 minutes until edges golden. Cool completely.
- Process Cookie Crumbs and Combine with Butter: Crush cooled cookies in a food processor to get 2 1/4 cups crumbs. Melt remaining 3 tbsp butter; stir into crumbs until well combined.
- Press and Bake Crust: Press crumbs into bottom of a greased 9-inch springform pan lined with parchment. Bake crust 10 minutes, then cool. Cover pan exterior with foil to protect from water bath.
- Prepare Raspberry Swirl: Whisk cornstarch, lemon juice, and warm water until dissolved. In a saucepan over medium heat, combine raspberries and sugar, cook stirring 3 minutes until juices release. Add cornstarch mixture, cook 3 more minutes while smashing berries; mixture should bubble and thicken. Puree and strain the sauce; set aside to cool.
- Make Cheesecake Filling: Preheat oven to 350°F. Beat cream cheese and goat cheese in a large bowl until fluffy. Add mascarpone and sugar, mix well. Stir in sour cream and vanilla on low speed until combined.
- Add Eggs: Beat in eggs one at a time, scraping bowl sides after each addition, ensuring full incorporation.
- Assemble Cheesecake: Pour filling over crust. Drop spoonfuls of raspberry sauce onto filling and gently swirl with toothpick or knife.
- Prepare Water Bath: Place springform pan in a larger pan. Fill larger pan with warm water reaching halfway up springform pan sides but below foil top edge.
- Bake Cheesecake: Bake for 1 hour. Turn off oven, leave door closed for 1 hour for the cheesecake to continue baking while cooling.
- Chill Cheesecake: Remove from oven and water bath, unwrap foil, refrigerate until firm, about 5-6 hours or overnight.
- Serve: Keep refrigerated until serving. Drizzle with honey if desired. Best eaten within 3-4 days.
Notes
- Shortcut crust: use 2 1/4 cups shortbread cookie crumbs combined with 3 tablespoons melted butter, pressed into pan, then bake as directed.
Nutrition
- Serving Size: 1 slice (approx. 1/13th recipe)
- Calories: 480
- Sugar: 32g
- Sodium: 280mg
- Fat: 33g
- Saturated Fat: 19g
- Unsaturated Fat: 12g
- Trans Fat: 0.5g
- Carbohydrates: 35g
- Fiber: 2g
- Protein: 8g
- Cholesterol: 140mg


