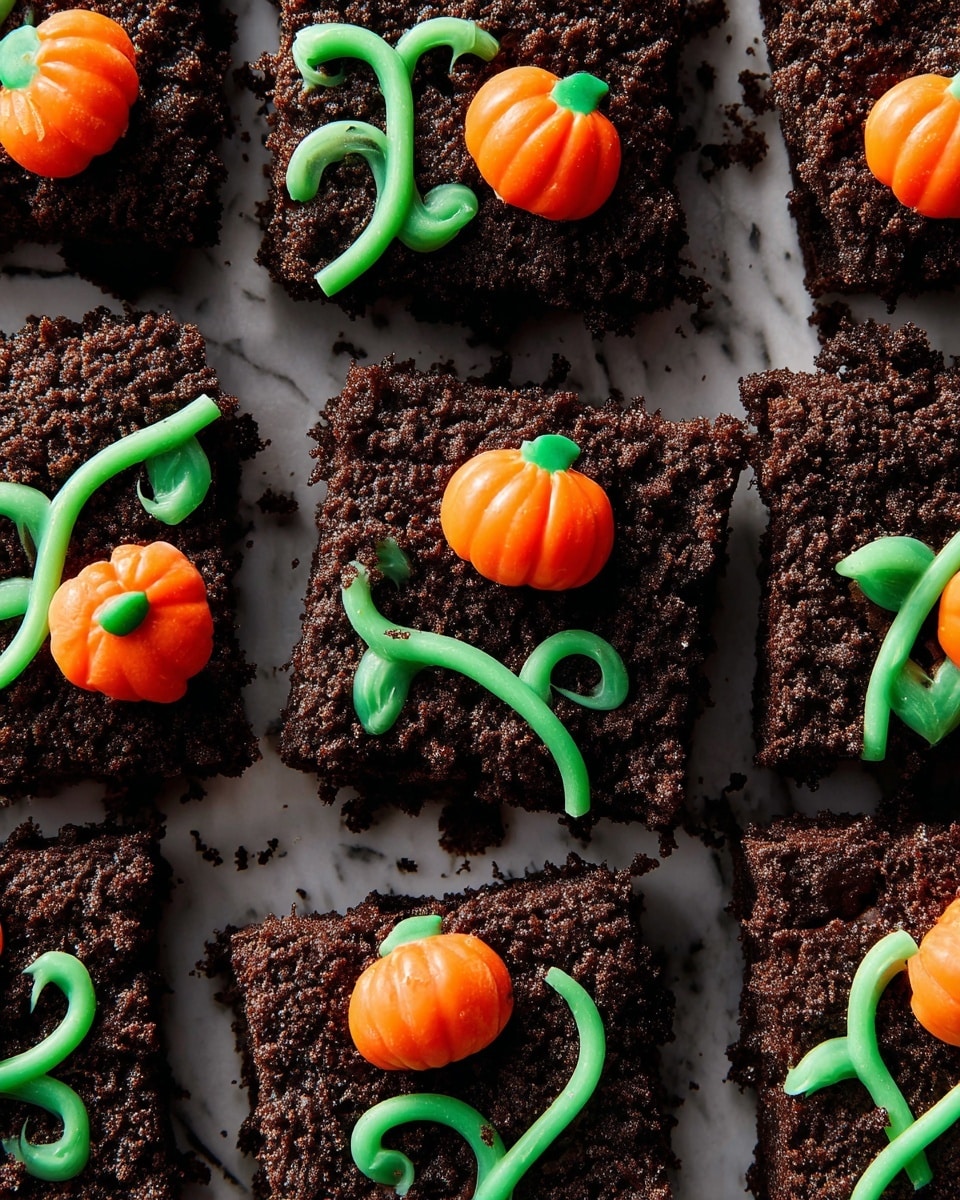
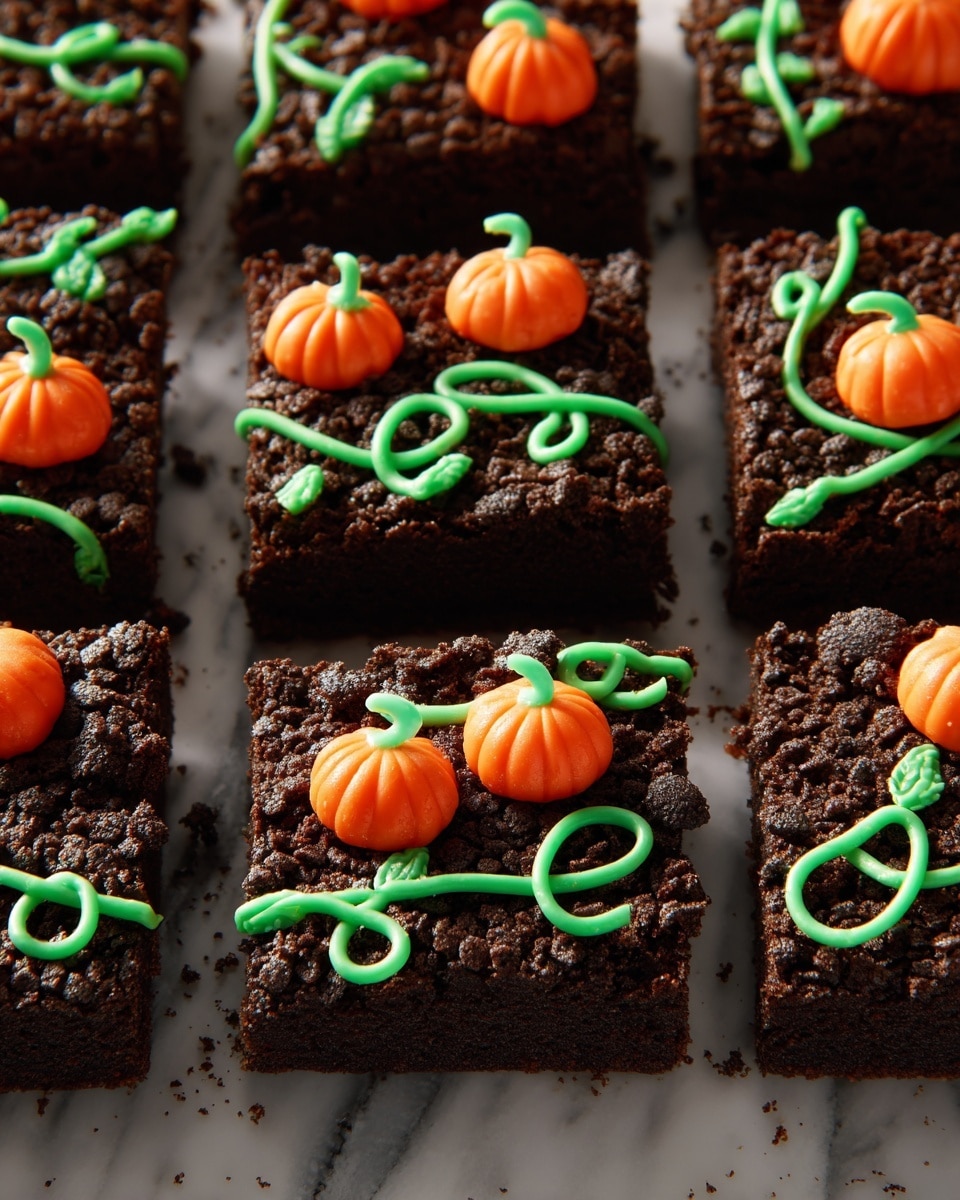
If you’re looking for a fun, festive treat that’s just as yummy as it is adorable, you absolutely need to try my Pumpkin Patch Brownies Recipe. I’m telling you, these brownies are the perfect combo of rich chocolate and cute fall vibes—plus, they’re really simple to pull off, even if you’re not a baking pro. Stick with me, and I’ll show you how to make this fan-freaking-tastic dessert that’s perfect for Halloween, Thanksgiving, or just because pumpkin season deserves some sweet love!
Why You’ll Love This Recipe
- Easy to Make: Using a brownie mix keeps things simple without sacrificing flavor.
- Festive & Fun: The green piped “vines” and pumpkin candies make it whimsical and perfect for fall.
- Crowd-Pleaser: My family goes crazy for how moist and chocolaty these turn out.
- Super Customizable: You can tweak the decorations and add your own twist easily.

Ingredients You’ll Need
These ingredients come together in such a fun way—you’ve got the classic rich brownie base, creamy frosting, and then a little bit of magic with white chocolate and green food coloring that brings the pumpkin patch theme to life. Shopping tip: stick to a reliable brownie mix you love already—it makes all the difference.
- Brownie mix: Pick your favorite box mix, the foundation for a moist and fudgy brownie.
- White chocolate chips: These melt beautifully for piping the green vines.
- Vegetable oil: Helps melt the white chocolate chips smoothly.
- Green food coloring: For that vibrant vine color—grab gel coloring if you can.
- Chocolate frosting: A rich, spreadable layer that adds extra chocolatey goodness.
- Crushed Oreos: Adds a little texture and “dirt” effect to your pumpkin patch.
- Pumpkin candies: The stars of the show—tiny pumpkins that sit cute on top.
Variations
I love encouraging you to make this Pumpkin Patch Brownies Recipe your own. Once you nail the basics, feel free to swap things up with what you have on hand or what you like best. I find personal touches turn this into a signature dessert with every bake.
- Pumpkin Spice Twist: Adding a teaspoon of pumpkin pie spice to the brownie mix gives it an extra warm, seasonal touch.
- Nutty Brownies: Toss in some chopped pecans or walnuts for crunch—I did this last year, and it was a hit!
- Gluten-Free Option: Use a gluten-free brownie mix and gluten-free Oreos for allergy-friendly fun.
- Vegan Version: Swap to dairy-free chocolate chips, frosting, and vegan brownie mix for a plant-based delight.
How to Make Pumpkin Patch Brownies Recipe
Step 1: Prep and Bake the Brownies
Start by preheating your oven to 350°F and lining a 9×13-inch pan with parchment paper—this makes removing the brownies a breeze. Don’t forget to lightly grease the paper with cooking spray so nothing sticks. Follow the brownie mix instructions exactly on the box, then pour that luscious batter into the pan. Bake for about 28 to 30 minutes until a toothpick comes out with moist crumbs (not wet batter). Let the brownies cool completely—this step is key because you want a smooth frosting layer later without melting everything.
Step 2: Melt the White Chocolate Vines
While the brownies cool, it’s vine-piping time! In a small bowl, combine the white chocolate chips with a tablespoon of vegetable oil and a few drops of green food coloring. Microwave in 30-second bursts, stirring in between, until melting into a silky, smooth green puddle. Pour this mixture into a small ziplock bag and snip off a tiny corner for easy piping. This is where your creativity shines—get those swirly vines going!
Step 3: Decorate Your Pumpkin Patch
Spread a generous layer of chocolate frosting over the cooled brownies—this adds creamy richness and helps the decorations stick. Sprinkle the crushed Oreos evenly on top; it makes a perfect “dirt” effect. Now, pipe the green chocolate vines in swirling patterns all over the brownies. I like to take my time here because it really transforms the look. Finally, scatter the pumpkin candies across your mini patch, and voilà—your pumpkin patch comes alive!
Pro Tips for Making Pumpkin Patch Brownies Recipe
- Let Brownies Cool Completely: Frosting won’t spread smoothly if the brownies are warm, so patience really pays off here.
- Use a Small Tip for Piping: Snip a tiny hole in your ziplock bag for better vine detail and more control.
- Microwave Carefully: Melt white chocolate in short bursts to avoid burning — stirring well between helps keep it smooth.
- Store in an Airtight Container: Keeps brownies moist and awards you leftovers that taste like you just baked them!
How to Serve Pumpkin Patch Brownies Recipe
Garnishes
I usually add a light dusting of powdered sugar for a soft “morning dew” effect on my pumpkin patch. A few extra crushed Oreos here and there don’t hurt either, just to keep things looking rustic and delicious. Sometimes, I throw on a sprinkle of cinnamon after piping the vines—it adds a subtle spice that pairs perfectly with the pumpkin candies.
Side Dishes
This Pumpkin Patch Brownies Recipe pairs wonderfully with a warm cup of spiced chai or a simple glass of cold milk. For gatherings, I often serve it alongside pumpkin-flavored coffee or even a scoop of vanilla ice cream, which melts into the brownies like magic.
Creative Ways to Present
One of my favorite presentation tricks is to cut these brownies into little squares and place each one in a mini cupcake liner—super cute and perfect for parties. For kids, you could set up a “decorate your own” station with extra pumpkin candies and green piping so everyone can add their own twist to the patch!
Make Ahead and Storage
Storing Leftovers
Once decorated, wrap your pumpkin patch brownies tightly with plastic wrap or store them in an airtight container at room temperature—the frosting and toppings stay fresh for about 2-3 days. I learned the hard way that refrigerating them can sometimes dry them out, so room temp is best unless you live somewhere super warm.
Freezing
If you want to make these ahead of time, I recommend freezing the plain baked (but unfrosted) brownies wrapped well in foil and plastic wrap. When you’re ready to serve, thaw completely and then add your frosting, Oreos, piping, and candies fresh. This way, everything looks vibrant and tasty like you just made it.
Reheating
Since frosting is involved, I usually don’t reheat these brownies in the microwave. Instead, I let them come to room temperature for a little while before serving because the brownies soften and the flavors deepen naturally without losing that decorator magic on top.
FAQs
-
Can I make these brownies from scratch without a mix?
Absolutely! While I love the convenience of a brownie mix, you can use your favorite scratch recipe. Just be sure your brownies are moist but firm enough to hold up to frosting and decorations.
-
What if I don’t have green food coloring?
You can mix yellow and blue food coloring to get green, or try natural options like matcha powder for a muted green shade. Just keep in mind, natural colors might change the flavor slightly.
-
Can I use other candies instead of pumpkin candies?
For sure! Mini candy corn, candy pumpkins, or even small gummy candies work well and bring their own charm to the pumpkin patch theme.
-
How do I make the green chocolate vines look neat?
Practice piping on parchment paper first to get a feel for the flow and pressure. Use a very small corner snip on your bag, and pipe slowly while steadying your hand for the cleanest vines.
Final Thoughts
This Pumpkin Patch Brownies Recipe is one of those joyful kitchen projects that fills both your belly and your heart—perfect for sharing with loved ones when you want to celebrate the flavors and fun of fall. I really hope you try making these and see how easily they bring a festive vibe to your table. Trust me, once you do, your family and friends will keep asking for them every year just like mine do. Happy baking, and enjoy your pumpkin patch in every bite!
Print
Pumpkin Patch Brownies Recipe
- Prep Time: 20 mins
- Cook Time: 30 mins
- Total Time: 1 hr
- Yield: 8 – 10 servings
- Category: Dessert
- Method: Baking
- Cuisine: American
Description
These Pumpkin Patch Brownies are a festive and fun dessert perfect for autumn gatherings. Rich, fudgy brownies are topped with creamy chocolate frosting, crushed Oreos for a soil-like texture, green white chocolate vines, and colorful pumpkin candies to create a charming pumpkin patch scene that’s as delicious as it is cute.
Ingredients
Brownie Base
- 1 box brownie mix, plus ingredients called for on box
Topping and Decoration
- 1 cup white chocolate chips
- 1 Tbsp. vegetable oil
- Green food coloring (enough to tint chocolate)
- 1 can chocolate frosting
- 1 cup crushed Oreos
- Pumpkin candies (quantity as desired for decoration)
Instructions
- Prepare Brownie Batter: Preheat your oven to 350°F and line a 9×13-inch baking pan with parchment paper, then grease it lightly with cooking spray. Prepare the brownie batter according to the package instructions, then pour it evenly into the prepared pan.
- Bake Brownies: Bake the batter for 28 to 30 minutes or until a toothpick inserted into the center comes out with moist crumbs. Remove from the oven and let the brownies cool completely in the pan to ensure the topping adheres well.
- Make Green Chocolate Vines: In a microwave-safe bowl, combine white chocolate chips, vegetable oil, and green food coloring. Microwave in 30-second intervals, stirring in between, until the mixture is fully melted and smooth. Transfer the melted green chocolate into a small ziplock bag and snip one corner of the bag to create a piping bag for decorating.
- Assemble Brownie Decoration: Spread an even layer of chocolate frosting over the cooled brownies. Sprinkle the crushed Oreos on top to mimic soil texture. Use the green chocolate-filled piping bag to pipe vine designs across the surface of the brownies.
- Add Pumpkin Candies: Scatter pumpkin candies over the top of the brownies along the piped vines, creating a festive pumpkin patch look. Serve and enjoy!
Notes
- Allow brownies to cool completely before frosting to prevent melting the frosting.
- Use a variety of green food coloring shades if desired for more realistic vine color variation.
- Ensure crushed Oreos are finely crumbled for better texture and adherence.
- This dessert can be assembled a few hours ahead and refrigerated until serving.
- For a gluten-free option, use a gluten-free brownie mix and gluten-free Oreos.
Nutrition
- Serving Size: 1 piece (approximate, based on 10 servings)
- Calories: 280
- Sugar: 25g
- Sodium: 180mg
- Fat: 14g
- Saturated Fat: 7g
- Unsaturated Fat: 6g
- Trans Fat: 0g
- Carbohydrates: 36g
- Fiber: 2g
- Protein: 2g
- Cholesterol: 20mg


