
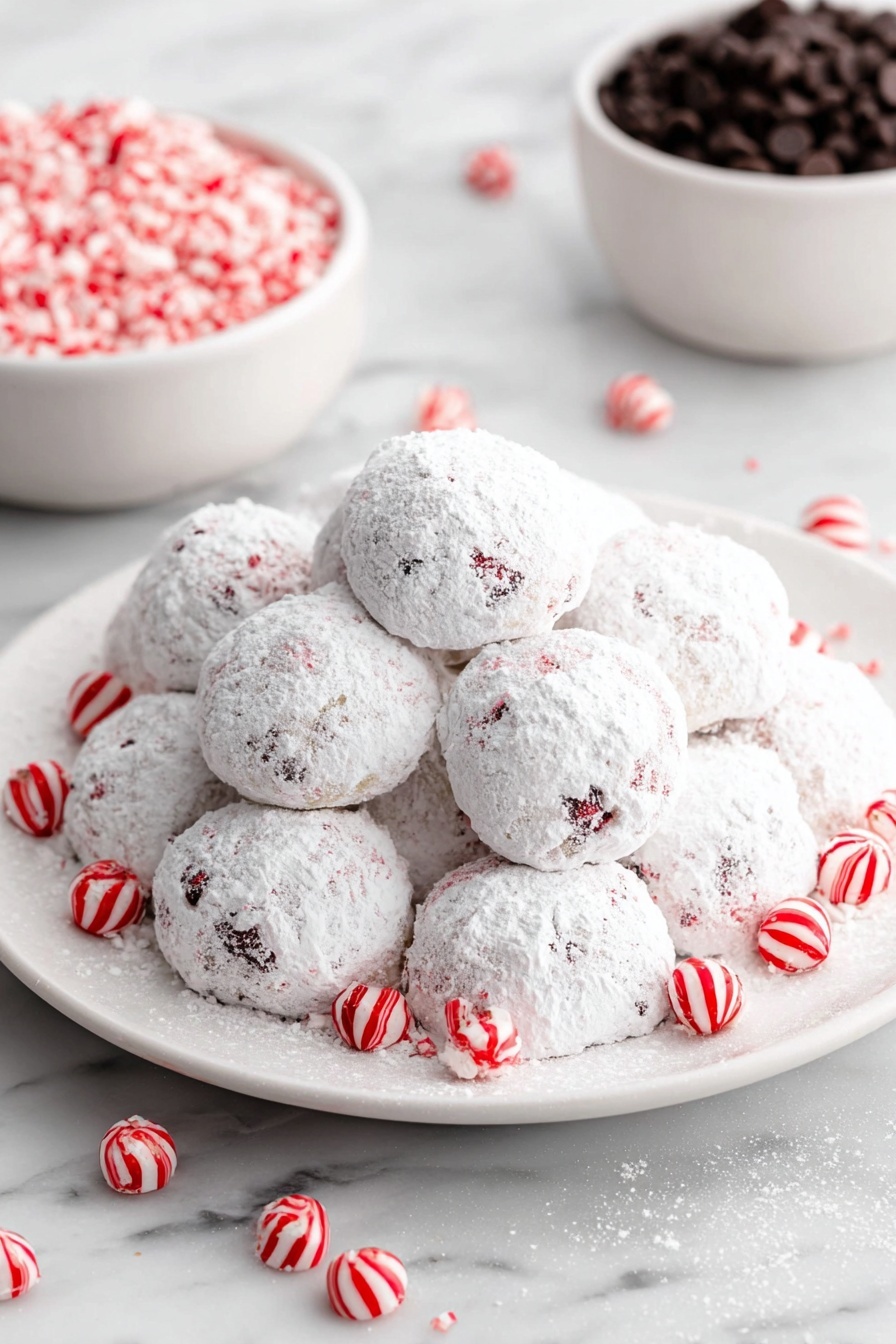
If you’re anything like me and adore festive, melt-in-your-mouth treats, you’re going to flip for this Peppermint Snowball Cookies Recipe. I absolutely love how these cookies burst with cool peppermint flavor and a delightful chocolate chip surprise, all wrapped up in a snowy sugar coating. Perfect for holiday baking or anytime you crave a cozy, sweet treat. Stick with me, and I’ll show you how to nail these beauties from start to finish — your kitchen will smell incredible, and your taste buds will thank you!
Why You’ll Love This Recipe
- Perfect Peppermint Punch: The pure peppermint extract and crushed candies deliver that festive, fresh flavor you crave this season.
- Soft yet Slightly Crunchy: The cookies stay tender inside while the sugar coating and crushed peppermint add delightful texture.
- Simple to Make: With easy-to-follow steps and common ingredients, you’ll be baking like a pro.
- Gorgeous Festive Appeal: That hint of pink color and snowy powdered sugar coating make these cookies pretty enough for any holiday spread.

Ingredients You’ll Need
The magic of this Peppermint Snowball Cookies Recipe lies in using high-quality simple ingredients that complement each other beautifully. From creamy butter to refreshing peppermint extract, each element plays a crucial role in delivering that melt-in-your-mouth experience.
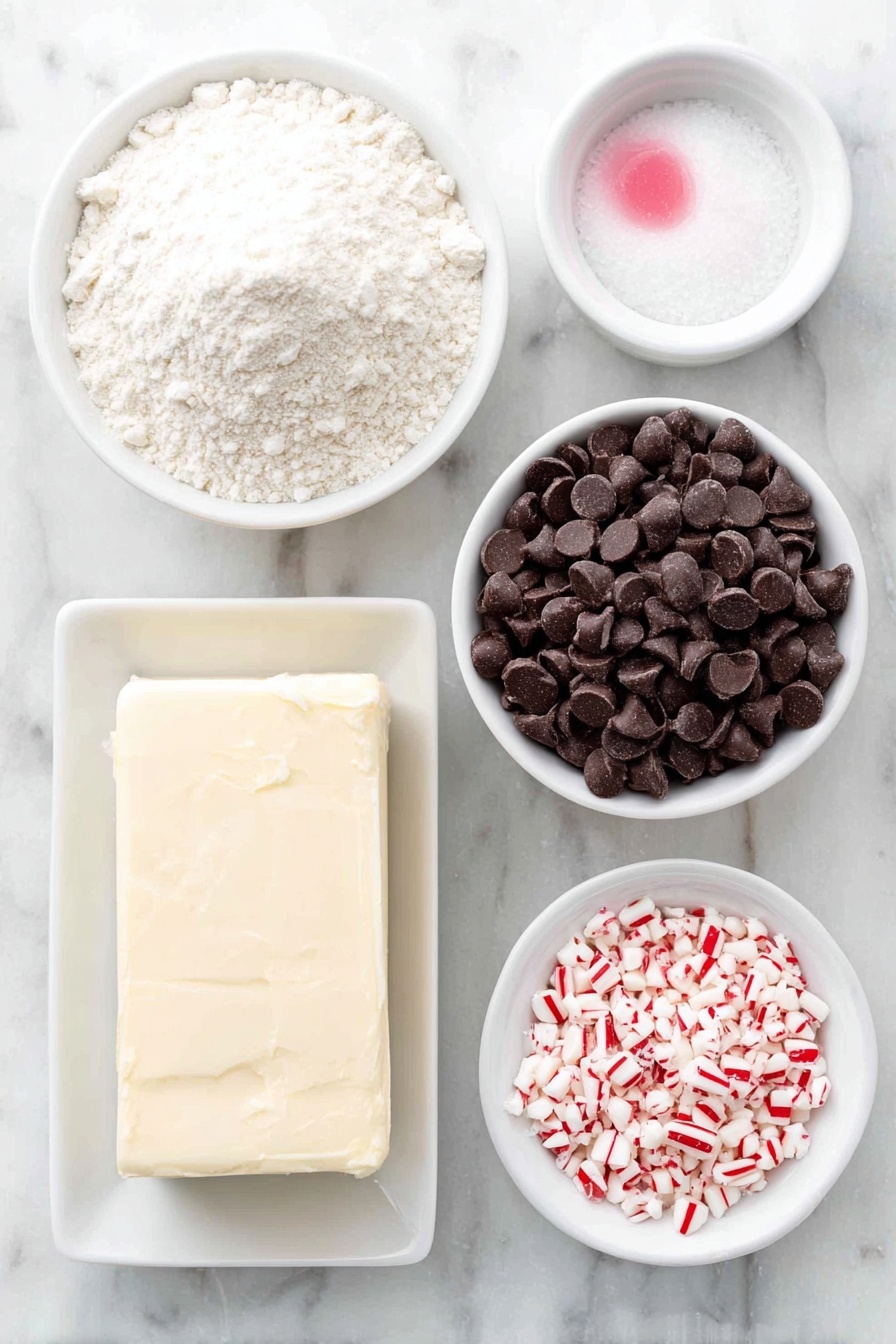
- All-purpose flour: The base of your cookie dough, combining it with cornstarch keeps your cookies tender and soft.
- Cornstarch: This little secret ingredient lightens the texture, preventing them from turning tough or crumbly.
- Salted sweet cream butter: Softened, not melted! Make sure it’s at room temperature for the perfect dough consistency.
- Powdered sugar: Divided into two parts, it sweetens the dough and creates that classic snowball cookie coating.
- Pure peppermint extract: The star flavor – trust me, fresh pure extract makes all the difference.
- Pure vanilla extract: Balances flavors and adds a warm undertone.
- Mini semi-sweet chocolate chips: Tiny pockets of chocolate surprise that add richness to each bite.
- Hot pink/rose food color gel: Just a few drops for that pretty blush color that feels festive and fun.
- Finely crushed peppermint candies: Coats the cookies post-bake and adds an irresistible crunch and sparkle.
Variations
One of the best things about this Peppermint Snowball Cookies Recipe is how easily you can tweak it to fit your taste or dietary needs without losing a bit of its charm. I’ve tried some fun variations, and you’ll find it’s pretty forgiving!
- Chocolate Lover’s Boost: I swapped mini semi-sweet chips for white chocolate chips once, and my family went crazy for the creamy sweetness alongside peppermint.
- Vegan Version: Use a plant-based butter substitute and make sure your powdered sugar is vegan-friendly; the cookie texture stays surprisingly great!
- Spicy Mint Kick: Adding a pinch of ground cinnamon or a tiny bit of cayenne powder gives the cookies a fun, unexpected warmth.
- Gluten-Free Option: Substituting all-purpose flour with a gluten-free blend plus a touch more cornstarch kept them tender and delicious.
How to Make Peppermint Snowball Cookies Recipe
Step 1: Combine your dry ingredients with care
Start by whisking together the all-purpose flour and cornstarch in a bowl. This combo is my go-to for keeping cookies soft, and whisking helps evenly distribute the cornstarch. Set this aside — it’s about to meet some creamy goodness.
Step 2: Cream butter and sugar until fluffy
Using a stand mixer or handheld mixer, beat the softened salted butter on medium-high speed for about 30 seconds. Then add 1 cup of powdered sugar and beat for another 1 to 1½ minutes. The goal is a creamy, fluffy texture that’ll make your cookies soft and tender. If your butter is too cold or melted, the texture will suffer — trust me, I’ve learned this the hard way!
Step 3: Add peppermint and vanilla for that festive flavor
Lower your mixer speed to medium-low and pour in the peppermint and vanilla extracts. This is when your kitchen starts to smell like holiday heaven, so take a deep breath and savor it. Mixing gently at this stage ensures the flavors blend evenly.
Step 4: Incorporate the dry ingredients carefully
Keep your mixer on medium-low and slowly add the flour-cornstarch mixture. Mix just until everything is combined—overmixing can make the cookies tough, and that’s the last thing you want.
Step 5: Add festive color and chocolate chips
Turn the mixer speed up to medium and in goes the red/pink food color gel. Mix just until the dough is uniformly colored—don’t overdo it or your dough will get very sticky. Then fold in the mini semi-sweet chocolate chips, mixing just enough to spread them evenly.
Step 6: Chill and preheat
Cover the dough and pop it in the fridge for 10 minutes. This little chill step helps the dough firm up, so the cookies keep their shape while baking. Meanwhile, preheat your oven to 350°F and line two baking sheets with parchment paper—one for baking and one for cooling the coated cookies.
Step 7: Shape and bake your cookies
Use a 1-tablespoon cookie scoop (or a regular spoon if you don’t have one) to form even dough balls. Roll them gently between your palms, place the balls about an inch apart on the baking sheet, and bake for 10-12 minutes. The edges might start to set but you want them to stay soft and a little pale—don’t let them brown.
Step 8: Sugar and peppermint candy coat
While your cookies bake, mix the remaining 2 cups powdered sugar with finely crushed peppermint candies in a bowl. When your cookies come out of the oven, let them rest on the baking sheet for 5 minutes—this helps them set without crumbling. Then, roll each cookie in the peppermint-sugar mixture for that classic snowy look and peppermint snap. Transfer the coated cookies to the second baking sheet. Once cooled, give them another gentle roll in the mixture to make them extra snowy and sweet.
Pro Tips for Making Peppermint Snowball Cookies Recipe
- Butter Temperature Matters: Always soften your butter—too cold or melted butter can ruin your cookie texture.
- Don’t Overmix Your Dough: Mix just until combined after adding the dry ingredients to keep your cookies tender.
- Chill Dough Briefly: Even a short chill firms up the dough for less spreading and perfect shapes.
- Double Sugar Coating: Rolling twice in the powdered sugar-peppermint mix gives that signature snowball look and crunch.
How to Serve Peppermint Snowball Cookies Recipe
Garnishes
I love adding a few extra crushed peppermint candies on top of the cookies just before they finish the second sugar roll—it adds an extra pop of festive color and crunch. Sometimes I sprinkle a tiny pinch of edible glitter for a bit of holiday sparkle, especially if I’m serving these at a party.
Side Dishes
These cookies pair beautifully with a warm mug of hot cocoa or peppermint-infused coffee. For special gatherings, I like serving them alongside a cheese board featuring mild cheeses and fresh fruit—the sweet and minty cookie balances savory bites wonderfully.
Creative Ways to Present
For holiday parties, I’ve arranged these cookies in a wreath shape on a large platter with sprigs of holly and rosemary for a natural touch. Wrapping them in pretty cellophane bags tied with festive ribbons makes for an adorable edible gift that everyone raves about.
Make Ahead and Storage
Storing Leftovers
I keep leftover Peppermint Snowball Cookies in an airtight container at room temperature for up to 5 days. If your home is humid, storing them with a piece of bread inside the container helps keep them soft by absorbing excess moisture.
Freezing
These cookies freeze beautifully! After baking and coating, I freeze them in a single layer on a baking sheet first, then transfer to a zip-top bag or airtight container. They keep well for up to 3 months. When you’re ready to enjoy, just thaw at room temperature—easy and convenient!
Reheating
If you want a freshly baked feel, warm the cookies in a 300°F oven for 5-7 minutes. This refreshes the softness without melting the sugar coating. Just watch closely to prevent browning.
FAQs
-
Can I make Peppermint Snowball Cookies Recipe without peppermint extract?
While peppermint extract gives these cookies their signature flavor, if you don’t have it on hand, you can substitute with vanilla extract alone for a milder taste or add a small amount of mint-flavored syrup. Just keep in mind the distinct peppermint kick won’t be as strong.
-
Why is cornstarch used in the recipe?
Cornstarch helps create a tender, soft cookie texture by preventing gluten development in the flour. It’s a common trick I learned that makes snowball cookies extra delicate and melt-in-your-mouth.
-
Can I use regular granulated sugar instead of powdered sugar?
Powdered sugar dissolves more easily into the dough and creates the classic snowball cookie coating. Granulated sugar won’t give the same softness or coating effect, so I recommend sticking to powdered sugar for best results.
-
How do I prevent these cookies from spreading too much?
Ensure your butter is softened but not melted and chill the dough before baking. Also, resist the urge to overmix the dough. These steps help maintain the cookie shape and prevent spreading.
-
Can I make these cookies vegan?
Yes! Substitute the butter with a plant-based vegan butter and check that your powdered sugar is vegan-friendly (some brands use bone char). The recipe should work well with these swaps, though texture might slightly vary.
Final Thoughts
This Peppermint Snowball Cookies Recipe holds a special place in my heart—it’s the cookie that instantly brings me back to cozy winter afternoons spent baking with family. I love how approachable it is, yet yields stunning results that impress every time. If you’re looking for a festive treat that’s both charming and delicious, I wholeheartedly recommend giving these a try. Trust me, once you make them, they’ll be a new favorite in your holiday repertoire!
Print
Peppermint Snowball Cookies Recipe
- Prep Time: 15 minutes
- Cook Time: 12 minutes
- Total Time: 27 minutes
- Yield: 42 cookies
- Category: Dessert
- Method: Baking
- Cuisine: American
Description
Delight in these festive Peppermint Snowball Cookies, featuring a buttery, tender texture infused with peppermint and vanilla, studded with mini chocolate chips, and coated in crushed peppermint candies and powdered sugar for a perfect holiday treat.
Ingredients
Dry Ingredients
- 2 cups + 2 tablespoons all-purpose flour
- 2 tsp cornstarch
- 3 cups powdered sugar, divided (2 cups and 1 cup)
- ¼ cup finely crushed peppermint candies
Wet Ingredients
- 1 cup salted sweet cream butter, softened
- 1 tsp pure peppermint extract
- ½ tsp pure vanilla extract
- 5-6 drops hot pink/rose food color gel
Add-ins
- 1¼ cup mini semi sweet chocolate chips
Instructions
- Mix Dry Ingredients: Whisk together the all-purpose flour and cornstarch in a bowl and set aside to combine thoroughly.
- Cream Butter and Sugar: In a stand mixer or large mixing bowl using a handheld mixer on medium-high speed, beat the softened butter for 30 seconds. Add 1 cup of powdered sugar and continue beating for 1 to 1½ minutes until creamy.
- Add Extracts: Lower the mixer speed to medium-low and mix in the pure peppermint extract and pure vanilla extract evenly.
- Incorporate Dry Mixture: Keeping the mixer on medium-low speed, add the flour and cornstarch mixture gradually, mixing just until well combined to avoid overworking the dough.
- Add Food Coloring: Increase the mixer speed to medium and add 5-6 drops of hot pink or rose food color gel. Mix until the dough has a uniform pink color.
- Mix in Chocolate Chips: Fold in 1¼ cup mini semi sweet chocolate chips until evenly distributed throughout the dough.
- Chill Dough: Cover the cookie dough and chill it in the refrigerator for 10 minutes to firm up slightly.
- Prepare Baking Sheets and Oven: Preheat the oven to 350°F (175°C). Line two baking sheets with parchment paper. Set one aside for baking the cookie dough balls, and one for cooling and rolling the finished cookies.
- Form and Bake Cookies: Use a 1-tablespoon cookie scoop to portion the dough. Roll each portion into a ball and place them on the prepared baking sheet, spacing about 1 inch apart. Bake for 10-12 minutes until set but not browned.
- Prepare Peppermint Sugar Coating: In a medium mixing bowl, whisk together the remaining 2 cups of powdered sugar and the finely crushed peppermint candies. Set this peppermint sugar mixture aside.
- First Coating: Remove the cookies from the oven and let them rest on the baking sheet for 5 minutes. Roll each warm cookie in the peppermint sugar mixture until fully coated, then transfer to the second prepared baking sheet to cool completely.
- Second Coating: Once the cookies have cooled completely, roll them again in the peppermint sugar mixture for a double coating and a snowy finish.
Notes
- Storage: Store leftover cookies in an airtight container at room temperature for up to 5 days.
- Freezing: Baked cookies can be frozen for up to 3 months in an airtight container. Thaw at room temperature before serving.
- Tip: Ensure butter is softened but not melted to prevent cookies from spreading too much while baking.
Nutrition
- Serving Size: 1 cookie
- Calories: 120
- Sugar: 12g
- Sodium: 40mg
- Fat: 6g
- Saturated Fat: 3.5g
- Unsaturated Fat: 2g
- Trans Fat: 0g
- Carbohydrates: 16g
- Fiber: 1g
- Protein: 1.5g
- Cholesterol: 15mg


