
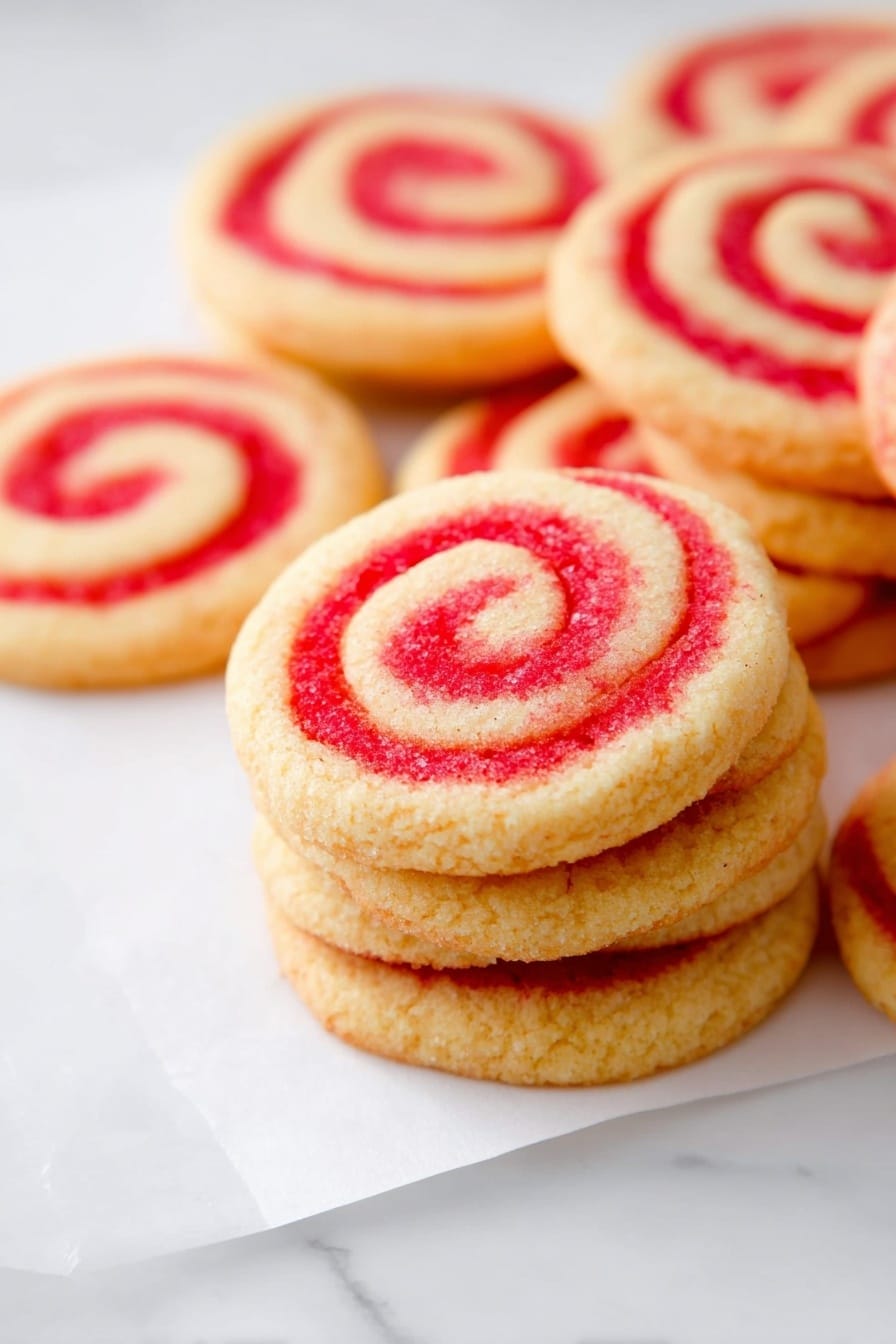
If you’re looking for a festive treat that’s as fun to make as it is to eat, you’re in the right place! This Peppermint Pinwheel Cookies Recipe is one of my absolute favorites during the holidays and beyond. The playful swirl, combined with that refreshing hint of peppermint, makes every bite feel like a little celebration. Whether you’re baking with kids or just want a cookie that wows guests, you’re going to love how easy and delightful these turn out.
Why You’ll Love This Recipe
- Simple Ingredients: You’d be surprised how pantry staples can come together to create such a stunning cookie.
- Fun Visual Appeal: The pinwheel swirl is a crowd-pleaser and makes these cookies perfect for gifting or parties.
- Delicious Peppermint Flavor: The subtle peppermint extract adds that refreshing twist without overpowering the cookie’s buttery sweetness.
- Make Ahead Friendly: These cookies are perfect for prepping in advance, so you can have festive treats ready whenever you want.

Ingredients You’ll Need
This recipe is all about balance—with butter and sugar giving richness, and peppermint bringing that crisp, festive touch. A pinch of cream of tartar makes the cookies tender with just the right amount of chew.

- Unsalted Butter: Make sure it’s at room temperature for easy creaming and a smooth dough.
- Granulated Sugar: The classic sweetener that helps with that perfect golden finish.
- Egg: Also at room temp—it binds everything together beautifully.
- Vanilla Extract: Adds warmth and depth to your cookie base.
- Peppermint Extract (optional): Just a touch to impart that cool, minty flavor without overwhelming.
- All-Purpose Flour: The foundation for your dough—add a little extra flour for rolling to prevent sticking.
- Baking Powder: Helps the cookies lift gently.
- Cream of Tartar: Keeps the texture tender and adds a slight tang.
- Salt: Balances sweetness and enhances flavors.
- Red Food Coloring: This is what creates that signature festive swirl, turning half the dough bright and cheerful.
Variations
I love how customizable this Peppermint Pinwheel Cookies Recipe is. Sometimes I like to switch up the extract for something seasonal or skip the coloring for a more subtle look. Play around and make it yours!
- No Peppermint Option: I’ve made these without peppermint extract when I wanted a more classic vanilla flavor, and they still turned out great—just as buttery and soft.
- Flavor Swaps: Orange or almond extract works beautifully if you want a different twist, especially around festive holidays or cozy gatherings.
- Natural Coloring: Use beet juice powder or natural red food coloring if you’re avoiding artificial dyes. It gives a more subtle, earthy hue that’s still pleasing.
- Gluten-Free Version: I haven’t personally tried this yet, but swapping with a 1:1 gluten-free baking flour might work. Just depend on how your mix behaves—adding a bit of xanthan gum can help with structure.
How to Make Peppermint Pinwheel Cookies Recipe
Step 1: Cream Butter and Sugar until Fluffy
Start by beating your room temperature butter and granulated sugar together. This is where magic happens—the texture transforms into a light, fluffy base that makes your cookies tender. I usually use a hand mixer or stand mixer for about 2 minutes here. You’ll want to see it get pale and airy, which means you’ve incorporated enough air into the dough. This step is key for that melt-in-your-mouth softness.
Step 2: Add Egg and Extracts
Next, beat in your egg and both vanilla and peppermint extracts. If you’re skipping peppermint, just use vanilla here. This mixture might look a little loose at first, but don’t worry—you’re about to add the dry ingredients. The extracts really start to make the dough smell like the holidays already.
Step 3: Combine Dry Ingredients Separately
Whisk together your flour, baking powder, cream of tartar, and salt in a separate bowl. This helps evenly distribute the rising agents and salt so your dough has consistent texture and flavor. Trust me, taking a moment here saves you from clumps or uneven rising later.
Step 4: Mix Dry Ingredients into Wet Ingredients
Now it’s time to slowly beat the dry stuff into your wet mixture. Don’t rush—add the flour blend gradually so the dough stays smooth and manageable. It might look crumbly at first, but keep mixing until it comes together into a soft ball. If it’s sticky, you can sprinkle in a bit more flour but try not to overdo it.
Step 5: Divide, Color, and Roll Out Dough
Divide the dough in half. Add your red food coloring to one half and knead gently until the color is uniform—wear gloves if you want to avoid red-stained hands! On a floured surface, roll each portion into a rectangle about 1/4-inch thick. This layering is what gives you that iconic swirl, so try to keep the shapes similar in size for an even pinwheel.
Step 6: Form the Pinwheel Log and Chill
Carefully place the red dough on top of the plain dough, pressing gently to stick them together. Then, starting from one edge, roll the dough tightly into a log. This step can be a little tricky—rolling slowly and evenly helps keep your swirl smooth. Wrap the log tightly in plastic wrap and pop it in the fridge for at least an hour. Chilling solidifies the dough so it’s easier to slice without losing shape.
Step 7: Slice and Bake
Preheat your oven to 350°F and line cookie sheets with parchment paper or silicone mats. Take your chilled dough log out and slice into 1/4-inch thick cookies with a sharp knife. Discard the end pieces if they’re uneven. Place your pinwheels on the sheets, leaving a bit of room for spreading. Bake for 8–12 minutes until the edges just start to turn golden. Watch closely at the end—you want a soft but set cookie, not an overbaked crisp one.
Pro Tips for Making Peppermint Pinwheel Cookies Recipe
- Ease Rolling: Chill your dough before rolling for easier handling and cleaner edges.
- Uniform Slices: Use a sharp serrated knife to slice the log carefully—this keeps the pinwheels intact and pretty.
- Watch Bake Time: Every oven is different, so start checking cookies at 8 minutes to avoid overbaking and losing that soft center.
- Color Control: Add color a little at a time to get to your preferred shade without going too intense or uneven.
How to Serve Peppermint Pinwheel Cookies Recipe
Garnishes
I usually keep the cookies simple, but a light dusting of powdered sugar adds a snowy look that’s just charming. For a bit of extra festivity, crushed candy canes sprinkled on top before baking can add crunch and boost the peppermint punch.
Side Dishes
Pair these cookies with a warm cup of hot cocoa or peppermint tea. I’ve found that the creamy drinks balance the crisp peppermint flavor beautifully, turning every snack moment into a cozy treat time.
Creative Ways to Present
For special occasions or gift-giving, I arrange these cookies on decorative trays lined with festive napkins. Tying sets with a little ribbon and a sprig of fresh mint or pine really amps up the holiday spirit. It’s simple, but it makes the presentation feel extra heartfelt.
Make Ahead and Storage
Storing Leftovers
Once cooled, I store these cookies in an airtight container at room temperature—they stay fresh and soft for up to 5 days this way. If it’s a warmer climate or you want them to last longer, the fridge works too, extending freshness for about a week.
Freezing
For those times when you want to bake ahead, freezing the dough log is a game-changer. Wrap it tightly in plastic wrap and aluminum foil for up to 3 months. When ready to bake, just thaw it overnight in the fridge and slice as usual. The cookies bake just as beautifully and taste fresh.
Reheating
If you have leftover cookies you want to warm up, pop them in the oven at 300°F for about 5 minutes. This refreshes their softness nicely, without drying them out. Avoid microwaving, which can make them a bit rubbery or tough.
FAQs
-
Can I make Peppermint Pinwheel Cookies Recipe without peppermint extract?
Absolutely! You can omit the peppermint extract or substitute it with vanilla, almond, or even orange extract depending on your flavor preference. The cookies will still be delicious and maintain that fun swirl design.
-
How do I prevent the pinwheel from losing shape during baking?
Chilling the dough log thoroughly makes a huge difference. Also, slicing the log carefully with a sharp knife helps the cookies keep their neat swirl. Baking at 350°F for just the right amount of time (8-12 minutes) ensures the cookies set without spreading too much.
-
Can I prepare the dough ahead of time?
Yes! I like to make the dough log and refrigerate it overnight or freeze it wrapped tightly. When you’re ready, just slice and bake—the cookies taste freshly made every time.
-
What’s the best way to color the dough evenly?
Add the red food coloring a few drops at a time and knead gently to distribute. Wearing gloves helps keep your hands clean, and working slower prevents uneven patches of color.
Final Thoughts
I absolutely love how these Peppermint Pinwheel Cookies come together to create such a charming and flavorful treat. When I first made them, my whole family went crazy for that bright swirl and subtle minty flavor—it’s like a hug in cookie form. Making this recipe feels special but isn’t complicated, and I think you’ll find that it becomes a holiday tradition for you too. Give it a try, and I can’t wait to hear how yours turn out!
Print
Peppermint Pinwheel Cookies Recipe
- Prep Time: 20 minutes
- Cook Time: 10 minutes
- Total Time: 30 minutes
- Yield: 24 cookies
- Category: Dessert
- Method: Baking
- Cuisine: American
- Diet: Vegetarian
Description
These Peppermint Pinwheel Cookies are a festive and visually striking treat perfect for holiday celebrations. Featuring a delightful swirl of classic buttery sugar cookie dough and vibrant red peppermint-flavored dough, these cookies offer a tender, buttery bite with a refreshing hint of peppermint. Easy to make with simple ingredients, this recipe involves rolling, layering, and chilling the dough for the perfect pinwheel effect before baking to golden perfection.
Ingredients
Cookie Dough
- 3/4 cup unsalted butter, room temperature
- 3/4 cup granulated sugar
- 1 large egg, room temperature
- 1 teaspoon vanilla extract
- 1/2 teaspoon peppermint extract, optional
- 2 1/4 cups all-purpose flour, plus more for rolling
- 1/2 teaspoon baking powder
- 1/2 teaspoon cream of tartar
- 1/2 teaspoon salt
- Red food coloring
Instructions
- Beat Butter and Sugar: In a large bowl, beat together the unsalted butter and granulated sugar until the mixture is light and fluffy, approximately 2 minutes. This creates the creamy base for the dough.
- Add Egg and Extracts: Beat in the egg, vanilla extract, and optional peppermint extract until fully combined, ensuring the flavor is evenly distributed.
- Mix Dry Ingredients: In a separate small bowl, whisk together the all-purpose flour, baking powder, cream of tartar, and salt to combine the leavening agents and salt evenly.
- Combine Dry and Wet Ingredients: Gradually beat the dry flour mixture into the butter mixture until a uniform dough forms, taking care not to overmix.
- Divide and Color Dough: Split the dough evenly into two portions. Add red food coloring to one half and knead until the color is uniformly incorporated.
- Roll Dough into Rectangles: On a floured surface, roll out each portion of dough into a rectangle about 1/4 inch thick. Place the red dough rectangle on top of the uncolored dough, aligning edges.
- Form Dough Log and Chill: Carefully roll the layered doughs into a log shape. Wrap tightly in plastic wrap and refrigerate for at least one hour or overnight to firm up.
- Preheat and Prepare Baking Sheets: Preheat the oven to 350°F (175°C). Line two cookie sheets with parchment paper or silicone baking mats to prevent sticking.
- Slice Cookies: Remove dough log from the refrigerator and slice into 1/4 inch thick rounds, discarding any uneven ends for uniform thickness.
- Bake: Arrange the cookie slices on the prepared baking sheets, spacing them apart. Bake for 8 to 12 minutes until the edges turn just slightly golden but the centers remain soft.
Notes
- If you are not a fan of peppermint, you may omit the peppermint extract or substitute it with orange, rum, or almond extract for a different flavor twist.
- Store baked cookies at room temperature in an airtight container for up to 5 days, or refrigerate for up to 1 week to maintain freshness.
- For convenience, prepare the dough log ahead of time and freeze it by wrapping it first in plastic wrap and then in a layer of aluminum foil, allowing for easy slice-and-bake cookies later.
Nutrition
- Serving Size: 1 cookie
- Calories: 110
- Sugar: 7g
- Sodium: 90mg
- Fat: 6g
- Saturated Fat: 3.7g
- Unsaturated Fat: 2g
- Trans Fat: 0g
- Carbohydrates: 14g
- Fiber: 0.4g
- Protein: 1g
- Cholesterol: 20mg

