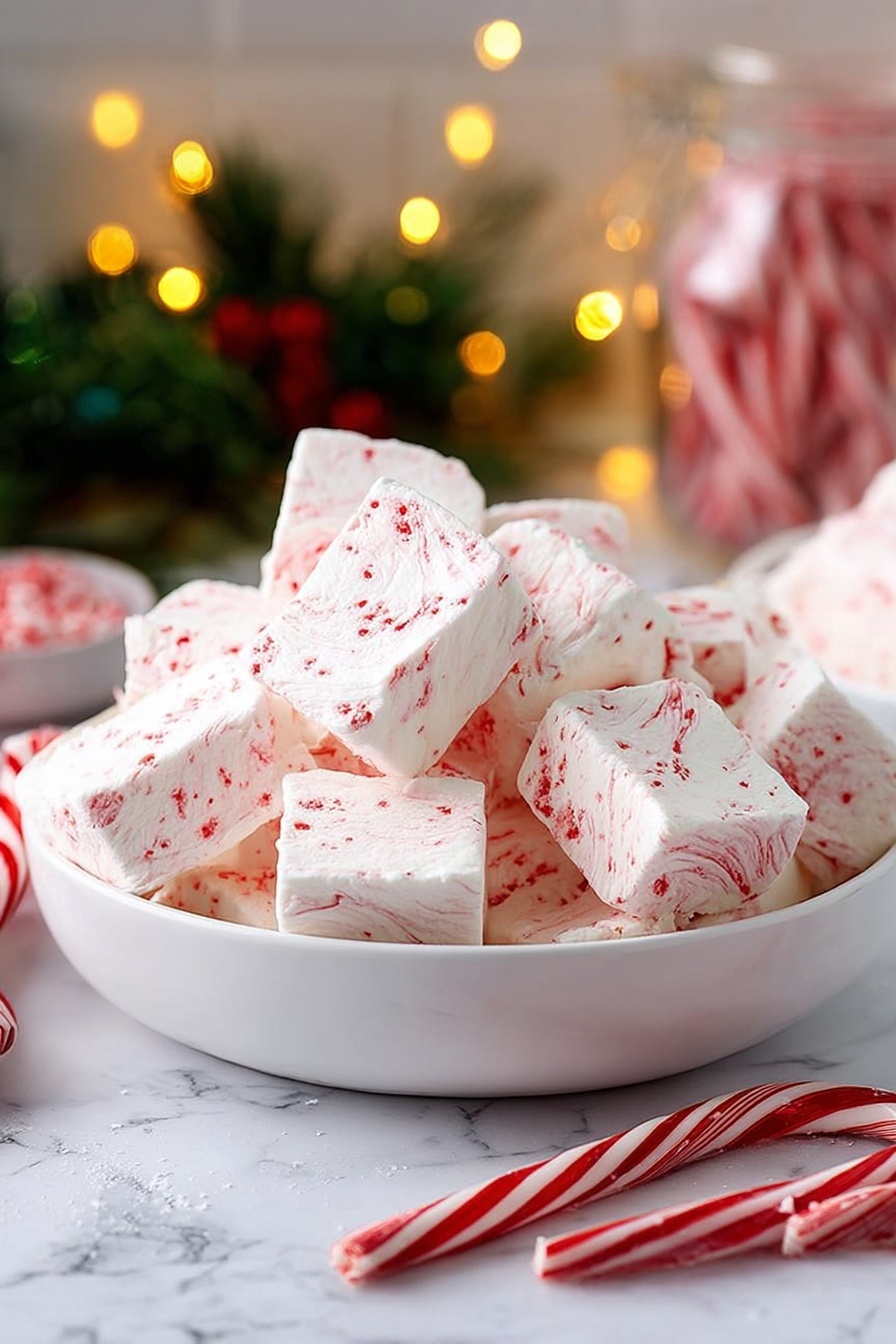
If you’re craving a sweet treat that perfectly combines a classic marshmallow fluff with a refreshing hint of wintery peppermint, you’re going to adore my Peppermint Marshmallow Squares Recipe. I absolutely love how these fluffy, minty squares turn out — soft, chewy, and with just the right pop of peppermint that feels festive and fun. Whether you’re making them to gift, serve at a party, or simply indulge yourself, this recipe is straightforward and totally worth the wait. Stick with me, and I’ll walk you through every step to nail these to perfection!
Why You’ll Love This Recipe
- Perfect Peppermint Kick: The peppermint extract and crushed candy canes add that refreshing holiday vibe I just can’t get enough of.
- Homemade Softness: Nothing beats homemade marshmallows for their melt-in-your-mouth texture—way better than store-bought!
- Straightforward Process: Even if you’re a beginner, you’ll find the instructions easy to follow, especially with my handy tips.
- Customizable Touches: You can tweak the flavor, color, or add mix-ins to make these truly your own treasured treat.

Ingredients You’ll Need
You’ll notice the ingredients list combines simple pantry staples with some special touches that help create that perfect peppermint marshmallow magic. I highly recommend using pure peppermint extract (not regular mint!) and real gelatin—you’ll thank me later. Also, if you grab some candy canes to crush, it adds a delightful texture and sparkle, but that’s totally optional.
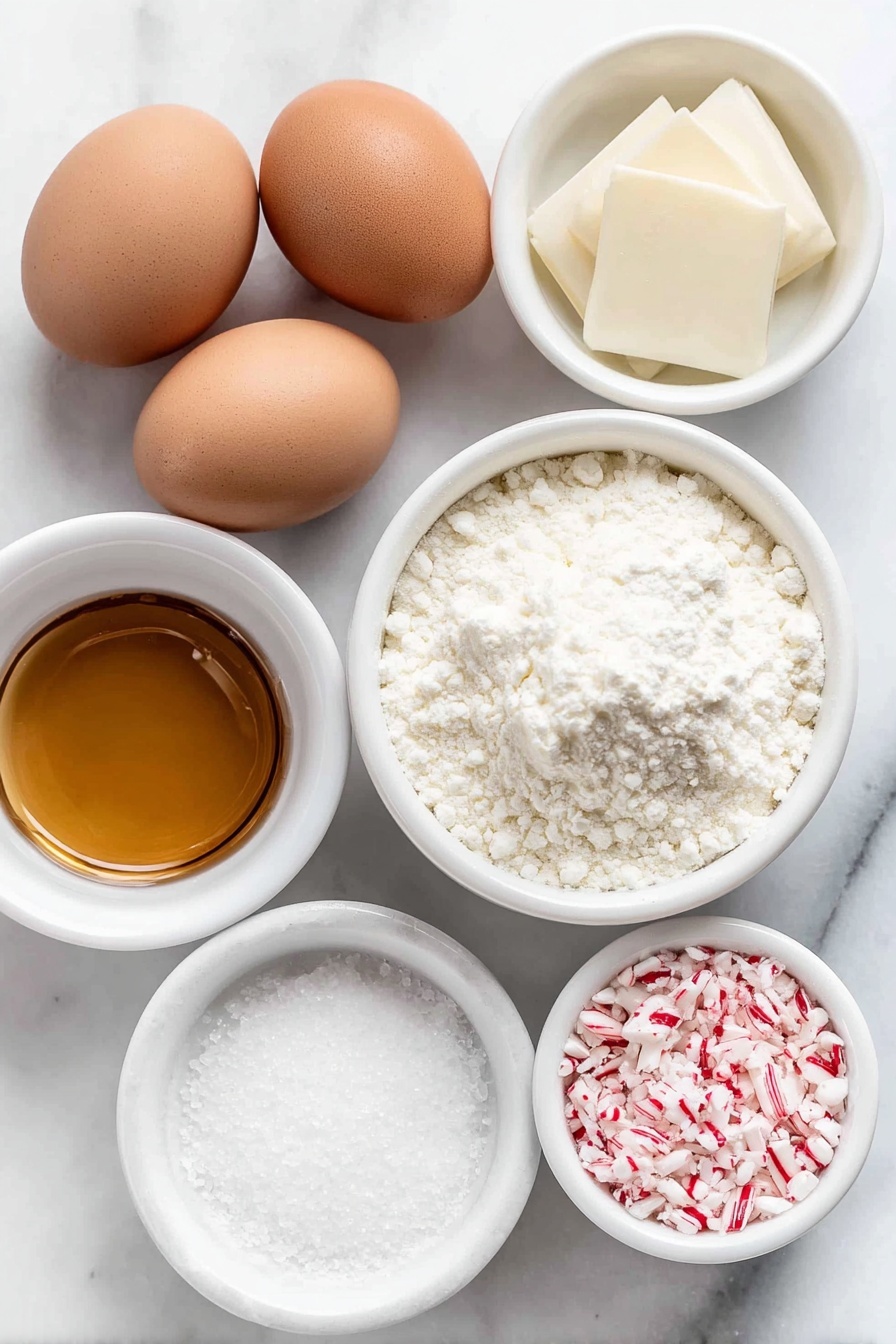
- Unflavored Gelatin: This is the base that gives your marshmallows that airy but firm texture—never skip it!
- Light Corn Syrup: It prevents sugar crystallization, keeping your marshmallows smooth and chewy; if you prefer, honey can be a substitute but affects flavor.
- White Sugar: For that classic sweet base that everyone expects.
- Peppermint Extract: Essential for the signature flavor—make sure it’s peppermint, not just mint.
- Vanilla Extract: Adds a warm depth that balances the mint nicely.
- Crushed Candy Canes (Optional): Gives pretty flecks and a crunchy surprise inside each square.
- Red Gel Food Coloring (Optional): Swirled in for festive looks without overpowering the flavor.
- Cornstarch and Confectioners’ Sugar: A combined dusting that prevents stickiness and helps with neat cutting and storage.
Variations
This Peppermint Marshmallow Squares Recipe is a fantastic base for creativity, and I often like to mix it up depending on the occasion or my mood. Don’t hesitate to make it your own!
- Chocolate Peppermint: Adding mini chocolate chips or a drizzle of melted chocolate complements the peppermint beautifully—I tried it last winter and my family went crazy for it.
- Vegan Adaptation: While this classic uses gelatin, you can experiment with agar-agar as a substitute, though texture might shift slightly—I’ve heard some friends have success with this swap.
- Colorful Swirls: Besides red, I love playing with pastel blues or greens to make these squares pop on holiday dessert tables.
- Nutty Crunch: Tossing in finely chopped toasted almonds or pistachios lends a lovely texture contrast and nutty depth I’ve come to appreciate.
How to Make Peppermint Marshmallow Squares Recipe
Step 1: Prepare Your Pan and Gelatin
Start by lining a 9×9 inch baking dish with plastic wrap and spraying it with non-stick cooking spray. I learned this little extra step prevents sticking like a charm, and it makes clean-up way easier. Meanwhile, sprinkle the unflavored gelatin over ½ cup of water in your stand mixer bowl to let it soften—this soaking helps it bloom properly, which is key for that perfect fluffy texture.
Step 2: Boil Your Sugar Mixture
Combine the remaining ¼ cup water, light corn syrup, and white sugar in a saucepan over medium heat. Bring it to a rolling boil and let it boil hard for exactly one minute—this timing is crucial to get your marshmallows setting properly without becoming gritty. Once done, carefully pour the hot syrup into your gelatin mixture and prepare for the fun part!
Step 3: Whip to Fluffy Perfection
Using the whisk attachment, beat the combined mixture on high speed for 12 minutes. At first, it looks like sweet syrup, but soon it transforms into this beautiful fluffy cloud that holds stiff peaks. This step might seem long, but trust me, it’s worth the wait—the longer you whip, the better the texture. Then, add the vanilla and peppermint extracts, and fold in crushed candy canes if you want that delightful crunch and sparkle.
Step 4: Spread, Swirl, and Set
Pour the marshmallow fluff into your prepared pan, smoothing the top with a greased spatula. Here’s a fun trick I discovered: drop 9 to 12 drops of red gel food coloring on top, then swirl it around with an oiled butter knife or chopstick to create festive, beautiful patterns. Cover with another sprayed piece of plastic wrap pressed lightly on top. Let it rest for at least 4 hours or overnight—I like to make this in the evening so it’s perfectly set by morning.
Step 5: Cut and Coat Your Squares
Combine cornstarch and confectioners’ sugar in a shallow dish for coating. Use oiled scissors or a kitchen knife to cut the set marshmallow slab into 1-inch squares—this keeps them neat and tidy without sticking. Then, dredge each square lightly in the cornstarch mixture. This step prevents your squares from sticking together and adds a delicate finish that feels irresistible.
Pro Tips for Making Peppermint Marshmallow Squares Recipe
- Bloom the Gelatin Properly: Always sprinkle your gelatin over cold water first and let it sit—this activates it and ensures soft marshmallows rather than tough.
- Use a Candy Thermometer: Though the recipe calls for boiling as timing, I found having a thermometer helps keep the sugar syrup precise at soft-ball stage (around 240°F).
- Oil Your Utensils Well: Applying a thin layer of oil to your spatulas and knives keeps the sticky marshmallow from sticking and makes cleanup a breeze.
- Don’t Rush the Setting Time: Cutting too soon leads to gooey squares—waiting overnight gives you those perfectly firm yet fluffy marshmallow bites.
How to Serve Peppermint Marshmallow Squares Recipe
Garnishes
I love dusting a little extra crushed candy cane or a sprinkle of edible glitter on top right before serving—it adds sparkle and a pop of color that’s both festive and inviting. Sometimes, I also like a light drizzle of dark chocolate just to balance the sweet peppermint with a slight bitterness.
Side Dishes
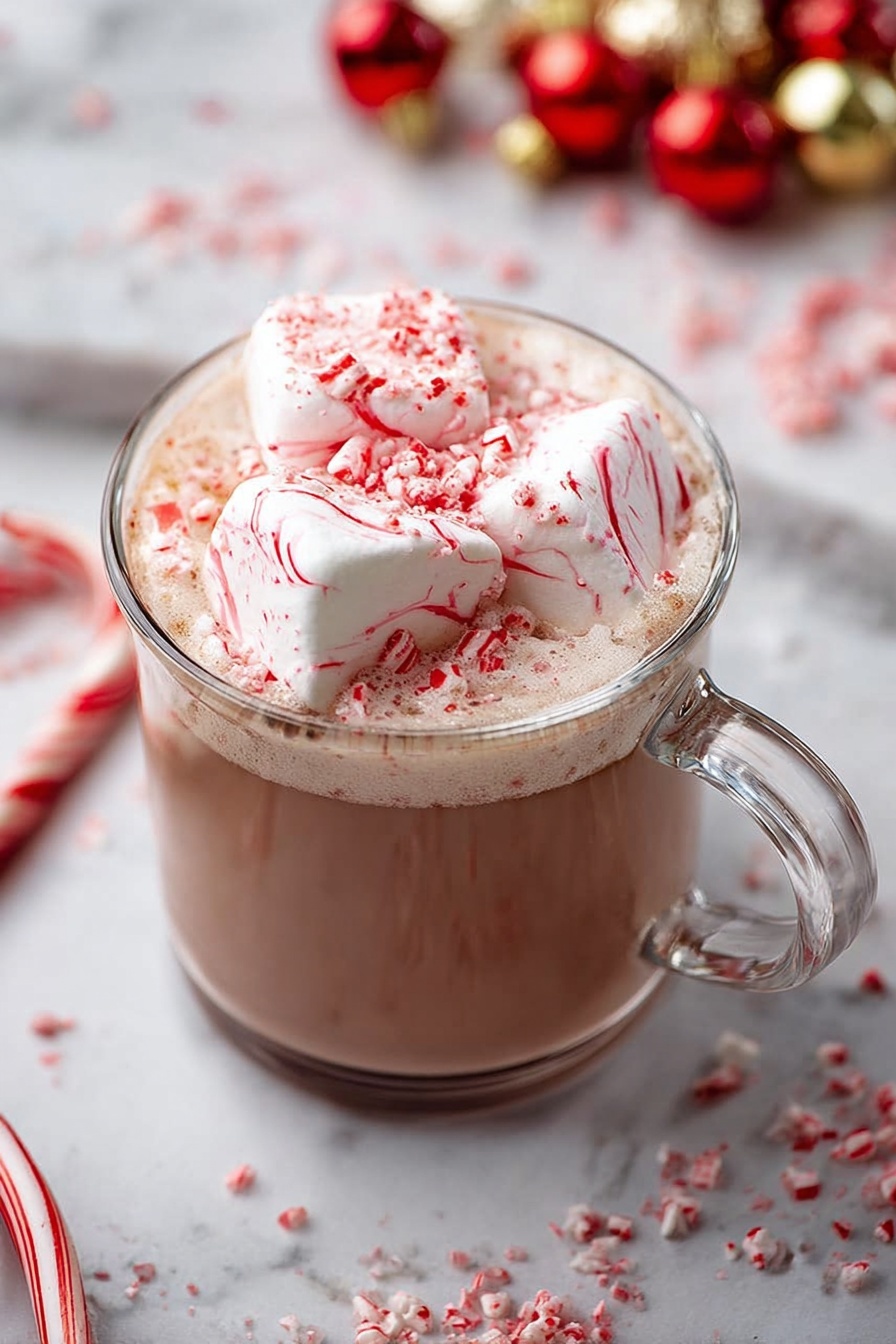
These squares make a delightful companion to a cup of hot cocoa or peppermint mocha. For holiday gatherings, I pair them with gingerbread cookies or spiced nuts to create an indulgent dessert spread that everyone raves about.
Creative Ways to Present
For special occasions, I arrange my peppermint marshmallow squares in festive tins layered with wax paper. You can also stack them in a glass jar tied with a bright ribbon for charming edible gifts. Another fun idea: stick a square on the rim of a holiday cocktail glass as a sweet garnish that guests will love.
Make Ahead and Storage
Storing Leftovers
I keep any leftovers in an airtight container at room temperature, dusting the marshmallows again with a bit of cornstarch mixture if they start sticking. They stay fresh and chewy for up to a week, making it easy to enjoy them slowly without any hassle.
Freezing
If I want to store them longer, I freeze marshmallow squares separated by parchment paper in freezer-safe containers. When thawed at room temperature, they maintain their texture surprisingly well—just avoid refreezing to prevent dryness.
Reheating
I don’t usually reheat marshmallows since they’re best fresh or at room temp, but if you want them softer, a quick 5-second microwave zap wrapped in a damp paper towel works wonders. Just don’t overdo it or you’ll end up with a melted mess.
FAQs
-
Can I use other extracts instead of peppermint?
Absolutely! While peppermint provides a festive touch, you can swap it for vanilla, almond, or even citrus extracts. Just keep the quantity small to avoid overpowering the marshmallow’s sweetness.
-
What if I don’t have a stand mixer?
A stand mixer is ideal for beating the marshmallow mixture to stiff peaks, but you can use a handheld mixer. Just be prepared for a longer whipping time and possibly more arm workout!
-
Can I omit the corn syrup?
You can substitute corn syrup with honey or agave syrup, but this may alter the texture and flavor slightly, making it less neutral and possibly softer. Corn syrup helps prevent sugar crystallizing, which is pivotal for smooth marshmallows.
-
How do I store peppermint marshmallow squares?
Store them in an airtight container at room temperature, dusted lightly with cornstarch and powdered sugar to prevent sticking. They’ll stay fresh and chewy up to a week.
Final Thoughts
This Peppermint Marshmallow Squares Recipe holds a special place in my heart because it’s not only a sweet treat but also a way to bring people together during the holidays and beyond. I remember the first time I made these—with a few trial runs and tweaks—and how my whole family descended on the kitchen, eager for a taste. Now, it’s a staple whenever I want to impress without fuss. I hope you’ll give it a try and enjoy every fluffy, minty bite as much as I do. Happy marshmallow making!
Print
Peppermint Marshmallow Squares Recipe
- Prep Time: 20 minutes
- Cook Time: 10 minutes
- Total Time: 4 hours 20 minutes
- Yield: 36 marshmallows
- Category: Dessert
- Method: Stovetop
- Cuisine: American
Description
Delightfully fluffy and minty, these Peppermint Marshmallows are a festive treat perfect for holiday gifting or enjoying by the fire. Made from scratch using gelatin, sugar, and refreshing peppermint extract, they’re soft, chewy, and beautifully swirled with optional red food coloring and crushed candy canes for extra holiday charm.
Ingredients
Wet Ingredients
- ¾ cup water, divided
- ⅔ cup light corn syrup
- 1 tablespoon pure vanilla extract
- ½ teaspoon peppermint extract
Dry Ingredients
- 3 envelopes unflavored gelatin (0.25 ounces each)
- 2 cups white sugar
- ¼ cup cornstarch
- ¼ cup confectioners’ sugar
Optional Ingredients
- ½ cup finely crushed candy canes
- Red gel food coloring
Instructions
- Prepare the pan: Line a 9×9 inch baking dish with plastic wrap and spray with non-stick cooking spray. Also spray another piece of plastic wrap to cover the top later, then set both aside.
- Soften gelatin: Pour ½ cup of water into the bowl of a stand mixer fitted with a whisk attachment. Sprinkle the gelatin evenly over the water and allow it to soak while preparing the sugar syrup.
- Cook sugar syrup: In a medium saucepan, combine ¼ cup water, light corn syrup, and white sugar. Bring this mixture to a boil over medium heat, then allow it to boil hard for exactly 1 minute to properly dissolve and reach the right consistency.
- Whip marshmallow mixture: Carefully pour the hot sugar syrup into the gelatin mixture in the stand mixer. Beat on high speed for 12 minutes until the mixture is fluffy and forms stiff peaks. Add in the vanilla extract and peppermint extract, then beat just to combine. If desired, gently fold in the crushed candy canes at this stage.
- Set and color marshmallows: Pour the marshmallow batter into the prepared baking dish. Use a greased spatula to smooth the surface evenly. Drop 9 to 12 drops of red gel food coloring on top and use an oiled butter knife or chopstick to swirl the color into the mixture for a festive effect. Cover the marshmallows with the second sprayed plastic wrap, pressing lightly to seal.
- Allow marshmallows to set: Let the marshmallows rest uncovered at room temperature for at least 4 hours or overnight until fully set and firm enough to cut.
- Cut and coat marshmallows: Mix the cornstarch and confectioners’ sugar in a shallow dish. Using oiled scissors or an oiled kitchen knife, cut the marshmallows into strips and then into 1-inch squares. Lightly dredge each piece in the cornstarch mixture to prevent sticking. Store the marshmallows in an airtight container to maintain freshness.
Notes
- Look for unflavored gelatin in the baking aisle, usually found near flavored gelatin like Jello; Knox is a common brand in the U.S.
- Light corn syrup prevents sugar crystallization and results in smooth marshmallows, but honey can be used as an alternative with a slight flavor difference.
- Use peppermint extract specifically, not mint extract, for authentic flavor.
Nutrition
- Serving Size: 1 marshmallow
- Calories: 65
- Sugar: 13g
- Sodium: 10mg
- Fat: 0.1g
- Saturated Fat: 0g
- Unsaturated Fat: 0g
- Trans Fat: 0g
- Carbohydrates: 16g
- Fiber: 0g
- Protein: 0.3g
- Cholesterol: 0mg


