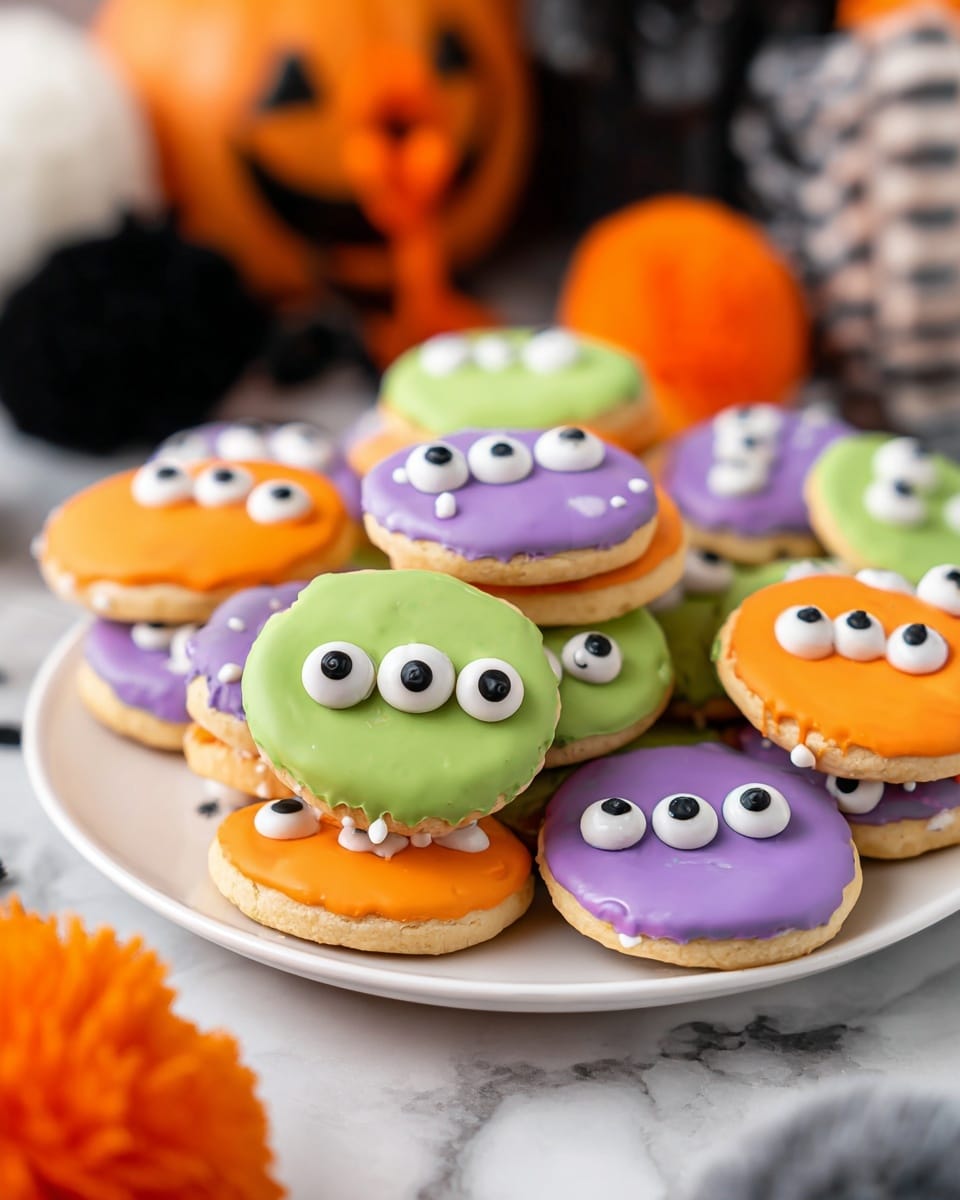
If you’re looking for a fun, colorful treat that’s as whimsical as it is tasty, you’re going to adore this Peanut Butter Monster Snacks Recipe. I stumbled upon this gem when I needed a quick, no-bake snack to wow the kids — and let me tell you, it’s a total crowd-pleaser! Crisp Ritz crackers sandwiching creamy peanut butter, all dipped in vibrant candy coating and topped with googly eyes? It’s an absolute party for your taste buds and your eyes. Stick around, because I’m sharing all my best tips so you can nail these playful monsters on your very first try.
Why You’ll Love This Recipe
- Easy and No-Bake: Perfect for when you want a quick sweet treat without turning on the oven.
- Kid-Friendly Fun: The candy eyeballs and bright colors make these snacks irresistible to little ones.
- Customizable Colors: You can swap in your favorite candy melts to match any occasion or mood.
- Perfect Party Treats: They make adorable and festive snacks for Halloween, birthdays, or anytime you want to spread some cheer.

Ingredients You’ll Need
Getting the right ingredients is half the magic here. The salty crunch of the Ritz crackers paired with smooth peanut butter is a classic combo, and the candy melts not only add a vivid pop of color but also give these snacks a sweet, glossy finish that’ll make you want to eat three in one sitting.
- Ritz Crackers: Look for fresh, crispy crackers that won’t crumble easily — they’re the base of your monster’s crunchy cheeks!
- Creamy Peanut Butter: Smooth is key here for spreading easily, but feel free to use natural peanut butter if you prefer just note it can be a bit runnier.
- Orange Candy Melts: These give a bright, festive color – perfect for monster faces or just fun variation.
- Green Candy Melts: Adds a spooky or fresh pop of color and pairs beautifully with the orange and purple.
- Purple Candy Melts: The perfect complementary shade to round out a monster-themed palette.
- Candy Eyeballs: These are the showstoppers that bring your monsters to life — purchase ready-made eyes from baking supply stores or online.
Variations
One of the things I love most about the Peanut Butter Monster Snacks Recipe is how easy it is to tweak. Whether you’re aiming for a different holiday theme or catering to specific taste preferences, these monsters can transform with just a few swaps.
- Nut-Free Variation: I substituted sunflower seed butter once for a classroom party, and the snacks came out just as tasty and creamy.
- Color Swaps: Play with seasonal candy melts — pastel tones for spring or bright red and white for Christmas to keep these fun year-round.
- Darker Chocolate: For an adult twist, try dipping the sandwiches in melted dark chocolate instead of candy melts — my family goes crazy for this richer version.
- Additional Toppings: I’ve sprinkled mini chocolate chips or crushed nuts on top of the melted candy for extra texture and flavor punch.
How to Make Peanut Butter Monster Snacks Recipe
Step 1: Ready Your Workspace and Make Your Sandwiches
Start by laying out a piece of parchment paper on your counter or a baking sheet — this will prevent any sticky mess and make clean up a breeze. Then, place 16 Ritz crackers on the parchment. Spread about a tablespoon of creamy peanut butter on each cracker, and make sure to smooth it out evenly. I like to use an offset spatula here because it helps avoid rips in the crackers. Top each peanut butter-coated cracker with another plain Ritz cracker to create your sandwich base. You’ll end up with 16 little peanut butter sandwiches ready for their colorful makeover.
Step 2: Melt Your Candy Coatings
Grab three small microwave-safe bowls, one for each color: purple, orange, and green candy melts. Pop them in the microwave, melting for 20-second intervals and stirring in between each go. Slowly is the name of the game here — you want a smooth, fluid melt without overheating or burning the chocolate. If the melted candy seems thick, you can add a tiny bit of vegetable oil or shortening to loosen it up for easier dipping.
Step 3: Dip, Decorate, and Set
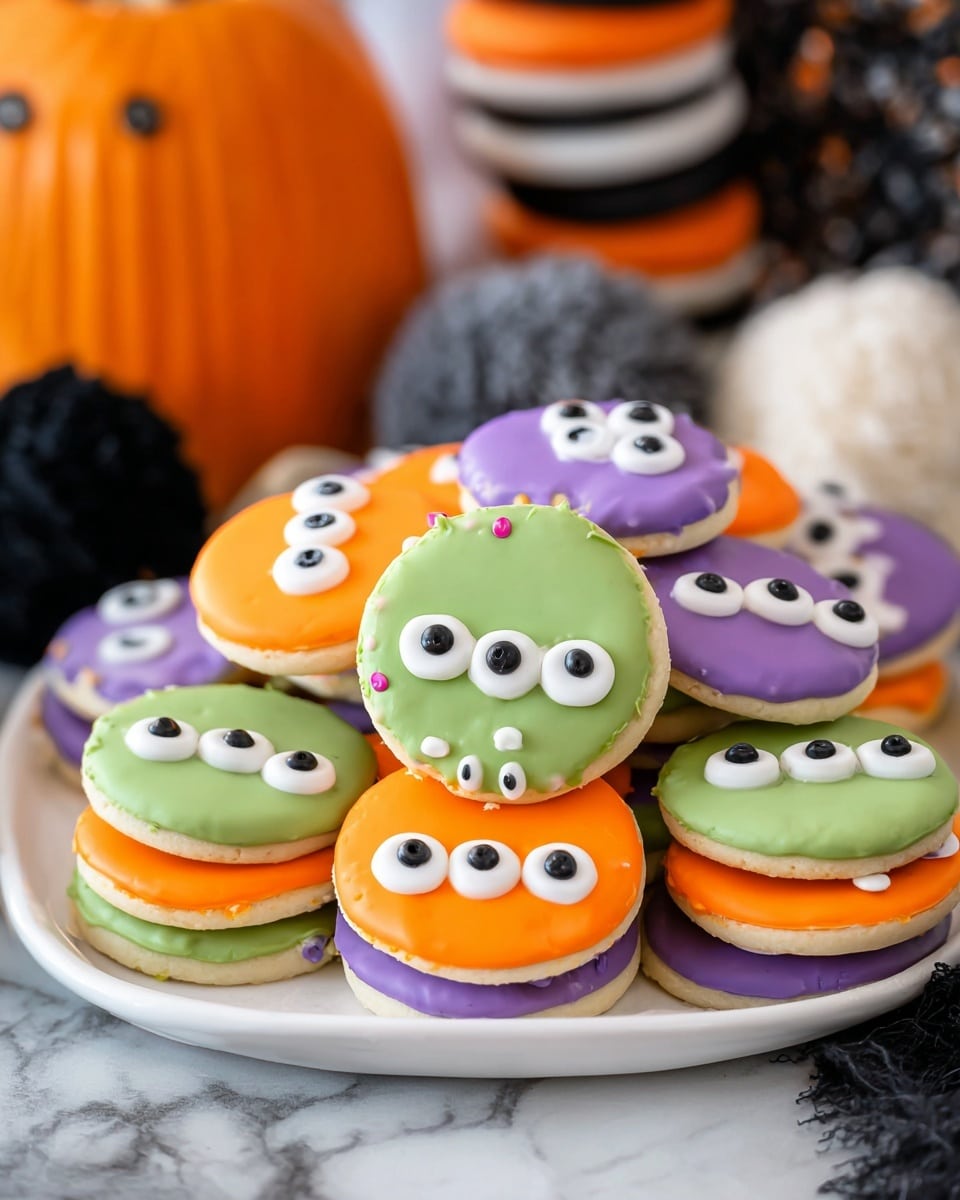
Using a fork, gently dip each peanut butter sandwich into one of the melted candy bowls. Lift it out and let excess candy drip off before placing it on your prepared parchment paper. This part is fun to mix up – I love creating “monster assortments” by dipping a few in each color. As soon as the candy coating is soft but still wet, press a pair of candy eyeballs onto each snack. These little decoration details really bring the monsters to life and add a playful touch everyone will appreciate. Let them sit at room temperature to completely set — it usually takes about 15-20 minutes.
Pro Tips for Making Peanut Butter Monster Snacks Recipe
- Perfect Peanut Butter Spread: Warm your peanut butter slightly in the microwave (about 10 seconds) to make spreading effortless and prevent cracker breakage.
- Keeping Candy Melts Smooth: Stir thoroughly between microwave intervals and add a tiny bit of neutral oil if your candy seems too thick for a silky dip.
- Avoiding Mess on Dipping: Use a fork to dip and tap gently on the bowl edge to remove excess candy — less drips make a cleaner finished look.
- Setting the Candy Coating: Let the dipped snacks rest on parchment at room temperature instead of refrigerating to avoid cracking or dullness in finish.
How to Serve Peanut Butter Monster Snacks Recipe
Garnishes
I like to add a little extra fun by sprinkling some edible glitter or tiny sprinkles just before the candy coating sets — it makes these monster snacks sparkle under party lights. The candy eyeballs are non-negotiable in my book because they give a cheeky personality to each bite-sized friend!
Side Dishes
These snacks are sweet and rich on their own, so I usually serve them alongside fresh fruit slices or a light yogurt dip to balance the flavors. They also pair wonderfully with a cold glass of milk or hot cocoa for a cozy treat session.
Creative Ways to Present
If you’re making these for a Halloween party, I love arranging the Peanut Butter Monster Snacks Recipe on a black cake stand with faux cobwebs and little plastic spiders scattered around for a spooky vibe. For birthdays, stacking them in a clear jar tied with a ribbon makes a charming gift or party favor that guests adore.
Make Ahead and Storage
Storing Leftovers
I store any leftovers in an airtight container at room temperature because refrigeration tends to dull the candy’s shiny finish and can make the crackers soggy. Properly stored, these treats stay fresh and crunchy for up to 3 days — which rarely happens because everyone loves grabbing seconds!
Freezing
While freezing isn’t my go-to, I’ve wrapped the sandwiches individually in parchment and popped them in a freezer bag for up to a month. Just be sure to thaw them fully at room temp before serving so the candy melts return to their smooth texture without condensation.
Reheating
Since these are no-bake snacks, reheating isn’t necessary. If your peanut butter monster snacks have lost a bit of their shine, a quick blast of warm air from a hairdryer held at a distance can help revive the candy melts’ glossiness without melting them further.
FAQs
-
Can I use crunchy peanut butter instead of creamy for the Peanut Butter Monster Snacks Recipe?
Absolutely! Crunchy peanut butter adds a delightful extra crunch inside the sandwich, but be mindful that it might make spreading a bit trickier and could increase the risk of cracker breakage. If you decide to use crunchy, warm it slightly first to soften it up.
-
What if I don’t have candy melts? Can I use regular chocolate?
Regular chocolate chips or bars work just fine — though candy melts are specially formulated to melt smoothly and hold shape without tempering. If you choose regular chocolate, melt it gently and consider adding a bit of shortening or coconut oil to keep it fluid and shiny for dipping.
-
How long do these Peanut Butter Monster Snacks last?
Stored in an airtight container at room temperature, they stay fresh and tasty for about 3 days. Beyond that, the crackers may lose their crunch and the candy coating might dull.
-
Can I make these ahead for a party?
You sure can! I usually make these the day before and keep them in a sealed container at room temp. Just add the candy eyeballs last minute if you’re worried about them sticking or melting in transit.
-
Are these snacks suitable for kids with peanut allergies?
Not with peanut butter, but you can easily swap in a peanut-free alternative like sunflower seed butter or a soy-based spread. Just be sure to check that your candy melts and eyeballs are allergen-safe too.
Final Thoughts
I absolutely love how the Peanut Butter Monster Snacks Recipe turns out every time — the colorful candy coatings, the creamy peanut butter, and those quirky candy eyeballs always bring a smile to everyone’s face. Whether you’re making them for a quick after-school snack, a festive gathering, or just a sweet treat to brighten up your day, they’re so easy and fun to make, you’ll want to keep a stash of ingredients handy. Try making these little monsters next time you want something playful and delicious — trust me, you’ll be glad you did!
Print
Peanut Butter Monster Snacks Recipe
- Prep Time: 20 minutes
- Cook Time: 0 minutes
- Total Time: 20 minutes
- Yield: 16 snacks
- Category: Snack
- Method: No-Cook
- Cuisine: American
- Diet: Vegetarian
Description
These Peanut Butter Monster Snacks are a fun and festive treat perfect for Halloween or any playful snack time. Made with creamy peanut butter sandwiched between Ritz crackers and coated in colorful melted candy wafers, these snacks are decorated with candy eyeballs for a spooky, monster-inspired look. Easy to make and perfect for kids and adults alike!
Ingredients
Cracker Sandwiches
- 32 Ritz crackers
- ½ cup creamy peanut butter
Candy Coating
- 4 oz orange candy melts
- 4 oz green candy melts
- 4 oz purple candy melts
Decoration
- Candy eyeballs
Instructions
- Prepare Surface: Lay a piece of parchment paper onto a clean working surface or on a baking sheet to prevent sticking and make cleanup easier.
- Assemble Sandwiches: Place 16 Ritz crackers on the parchment paper. Add about 1 tablespoon of creamy peanut butter on each cracker, spreading it evenly. Top each with another Ritz cracker to form a sandwich.
- Melt Candy Coatings: In three separate microwave-safe bowls, melt 4 oz each of purple, orange, and green candy melts. Heat in 20-second increments, stirring in between, until fully melted and smooth enough for dipping.
- Dip Sandwiches: Using a fork, gently dip each peanut butter cracker sandwich into one of the melted candy coatings, fully covering the sandwich. Lift and let excess chocolate drip off, then place it back onto the parchment paper.
- Add Eyes: While the candy coating is still soft, place candy eyeballs on each dipped sandwich to create the monster look.
- Set and Serve: Allow the candy coating to completely harden at room temperature before serving to ensure the coating is firm and the eyeballs stick well.
Notes
- Make sure the candy melts are not too thick or they will be difficult to dip; adjust by adding a small amount of vegetable oil if needed.
- Use parchment paper to easily remove the snacks once the candy coating is set.
- Store any leftovers in an airtight container at room temperature to maintain crispness.
- To speed up setting, refrigerate the dipped sandwiches for about 15 minutes after adding eyeballs.
Nutrition
- Serving Size: 1 snack
- Calories: 150
- Sugar: 10g
- Sodium: 230mg
- Fat: 8g
- Saturated Fat: 3g
- Unsaturated Fat: 4g
- Trans Fat: 0g
- Carbohydrates: 17g
- Fiber: 1g
- Protein: 4g
- Cholesterol: 0mg


