
If you’re looking for a show-stopping holiday treat that’s as fun to make as it is to eat, I absolutely have to share this Oreo Truffles Christmas Ornaments Recipe with you. When I first tried these, they became an instant favorite in my family — the perfect combination of rich Oreo flavor, creamy cheese, and festive chocolate coating! Plus, they look so adorable hanging on the tree or arranged on a platter. Stick with me, and I’ll walk you through every step so your Oreo truffles come out perfectly every time.
Why You’ll Love This Recipe
- Festive & Fun: These Oreo truffles double as delicious treats and charming Christmas ornament decorations.
- Easy to Make: No fancy techniques required—just simple steps that anyone can follow.
- Kid-Friendly: A perfect holiday project to make with kids, who’ll love rolling and decorating.
- Crowd-Pleaser: Each bite is creamy, chocolaty, and irresistible—your guests will keep coming back for more.

Ingredients You’ll Need
Every ingredient in this Oreo Truffles Christmas Ornaments Recipe works together beautifully to bring out that classic creamy, chocolatey flavor with a hint of festive fun. Let me tell you what makes each one special, and some shopping tips so you’re ready for success.
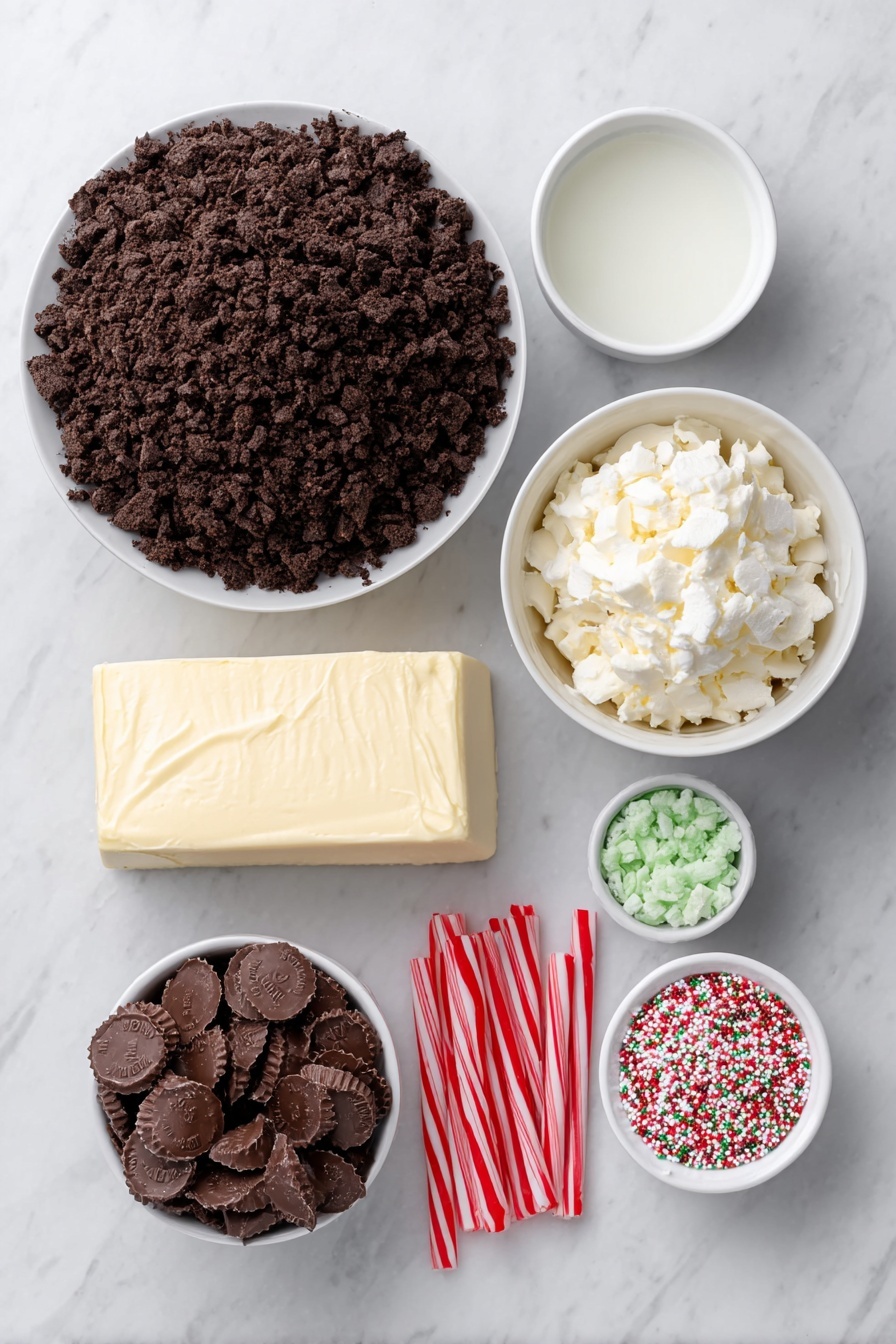
- Oreo cookies: I use regular Oreos for that perfect crunch and chocolate flavor; finely crushing them by hand or food processor helps achieve the right texture.
- Cream cheese: Full-fat, softened cream cheese gives truffles that silky smooth consistency and rich taste—don’t try to skip or substitute without softening!
- Vanilla extract: Adds a subtle warmth and depth that elevates the Oreo base without overpowering it.
- Green and red melting wafers: These colorful melting chocolates melt smoothly to coat the truffles in festive shades—find them at craft stores or specialty baking aisles.
- Crisco: This helps the melting wafers achieve a glossy finish and easier dipping.
- Miniature Reese’s Cups: They’re the perfect little “ornament top” that adds delicious peanut butter flavor and visual appeal.
- Christmas sprinkles: Use your favorite holiday sprinkles to add sparkle and fun—don’t be shy about getting creative here.
- Licorice or red vine candy: Cut into small pieces to act as the loop or hanger for your ornaments; choose thin ones for easier slicing and handling.
Variations
I love experimenting with this Oreo Truffles Christmas Ornaments Recipe, and I’ve found it’s super easy to switch things up without losing that festive magic. Feel free to personalize to your taste or dietary needs!
- Chocolate coating variation: If you don’t have colored melting wafers, I’ve used white chocolate tinted with gel food coloring before, which works great—but be sure to skip liquid drops, or it’ll seize.
- Flavor twists: Adding a pinch of cinnamon or peppermint extract to the Oreo mixture can bring a lovely holiday flair.
- Dairy-free option: I’ve tried cream cheese alternatives (like vegan cream cheese) and dairy-free chocolate wafers when accommodating friends, and it’s a solid swap!
- Decorations: Swap out Reese’s Cups for mini candy canes or other candies, tailoring the look for your family traditions.
How to Make Oreo Truffles Christmas Ornaments Recipe
Step 1: Mix Up That Dreamy Oreo Truffle Base
Start by carefully crushing your Oreo cookies until they’re finely ground. I prefer using a food processor for super fine crumbs, but putting them in a sealed bag and smashing with a rolling pin works well too! Then, in a bowl, blend those crumbs with softened cream cheese and vanilla extract until completely smooth and uniform. I usually use an electric hand mixer—trust me, it saves time and gives the creamiest texture! This is the heart of your truffles, so make sure everything’s evenly combined.
Step 2: Shape Your Ornaments Like a Pro
Using a 1-inch cookie scoop makes portioning easy—you’ll get consistent sizes that look great. After scooping, roll each ball between your palms until smooth and round. Don’t worry if a few crack, just gently press those cracks away. Place each ball onto a parchment-lined cookie sheet and pop them into the fridge for at least an hour to chill; this step helps them firm up so they hold their shape during dipping.
Step 3: Melt Your Chocolate Coatings to Perfection
About 5-10 minutes before your truffles finish chilling, set up a double boiler with a pot of boiling water and a heatproof bowl on top. Start melting one color of the wafers, stirring frequently with a rubber spatula so they melt evenly. Add a tablespoon of Crisco—this is a trick I learned that makes your coating silky smooth and glossy, perfect for that “professional” finish. Once melted and smooth, take the bowl off the heat and get ready to dip.
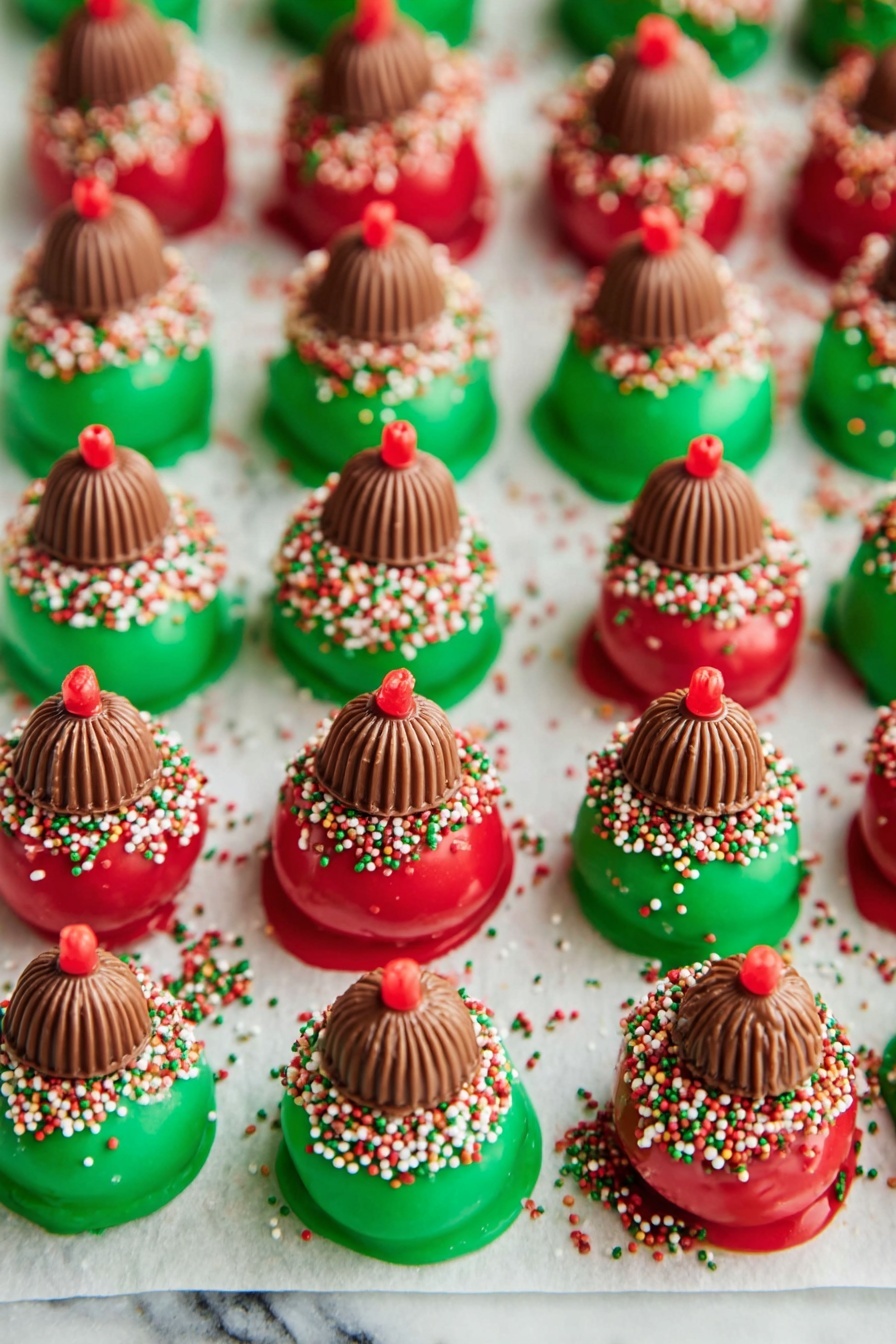
Step 4: Dip, Decorate, and Assemble Your Ornaments
Using two forks or dipping tools, carefully lower each chilled truffle ball into the melted chocolate. Roll it around until it’s completely coated—don’t rush this, patience gives you the smoothest coating. Lift it out and let excess chocolate drip off before placing the ball back on parchment. Immediately top with an upside down miniature Reese’s Cup, then sprinkle with festive Christmas sprinkles for that extra holiday joy.
Quickly add a small dab of melted chocolate on top of the Reese’s Cup and press in a small piece of licorice or red vine candy vertically, forming the “hanger” for your ornament. I found slicing the licorice thinly beforehand helps it sit better without breaking. Repeat for half the truffles, then pop your tray back into the fridge to set.
Step 5: Repeat with the Second Chocolate Color
While the first batch chills, melt the other color of melting wafers the same way and finish dipping, decorating, and assembling the remaining truffles. Pop everything back into the refrigerator for at least 20 minutes to allow the coatings to fully harden before serving or hanging on your tree!
Pro Tips for Making Oreo Truffles Christmas Ornaments Recipe
- Chill, Chill, Chill: Make sure the truffles are well chilled before dipping, or the coating won’t stick properly or might crack.
- Tight Scooping: I pack my cookie scoop firmly with the mixture to avoid holes or cracks in my truffles.
- Smooth Dipping Technique: Roll the truffles gently but thoroughly in the chocolate for an even, glossy coat every time.
- Thin Your Licorice: Slicing the licorice or red vines thinner helps them stay sturdy but flexible enough to insert without breaking.
How to Serve Oreo Truffles Christmas Ornaments Recipe
Garnishes
I love topping these truffles with classic Christmas sprinkles because they add festive color and fun texture—but feel free to swap in edible glitter, crushed candy canes, or even finely chopped nuts for a personal touch. The miniature Reese’s Cups on top bring a peanut butter burst that’s simply addictive, and the licorice “hanger” makes them extra cute!
Side Dishes
These truffles pair beautifully with hot cocoa, spiced cider, or rich eggnog for dessert tables. If you’re making a holiday platter, include fresh fruit like cranberries or sliced apples to balance the richness with a bit of brightness.
Creative Ways to Present
One of my favorite ways to showcase this Oreo Truffles Christmas Ornaments Recipe is hanging them on a small decorative Christmas tree or mini wreath using clear ribbon threaded through the licorice loop—instant edible decor! Alternatively, arrange them in layered glass jars or tiered dessert stands for holiday parties. Gift boxes with a few truffles wrapped up prettily also make amazing hostess gifts.
Make Ahead and Storage
Storing Leftovers
I always store leftover Oreo truffles in an airtight container in the refrigerator to keep them fresh and firm—they stay perfect for up to 5 days. Just make sure they don’t get crushed or stacked too tightly to keep their cute shapes intact.
Freezing
Freezing is a great option! I usually freeze the uncoated Oreo balls first, separating layers with wax paper so they don’t stick together. When I’m ready to treat myself, I thaw them in the fridge, then dip and decorate. This tip has been a lifesaver when I want to prep ahead for holiday gatherings.
Reheating
Since these truffles are best served chilled, I skip reheating. But if you want the coating a little softer for dipping or decorating, gently warm the melting wafers over your double boiler again before using. Otherwise, just enjoy them straight from the fridge—they’re perfectly creamy that way.
FAQs
-
Can I use different cookie types instead of Oreos for this recipe?
Absolutely! While Oreos give that classic chocolate and cream flavor, you can experiment with other chocolate sandwich cookies or even flavored cookies for a unique twist. Just be sure to crush them finely and adjust sweetness as needed.
-
What should I do if my melted wafers are too thick?
If your melted wafers seem too thick for dipping, add a small amount of Crisco or vegetable shortening—about a teaspoon at a time—to thin out the chocolate while keeping it smooth and shiny.
-
How do I prevent the Oreo truffles from cracking after dipping?
Make sure your truffles are well chilled before dipping and avoid rapid temperature changes. Also, dip them quickly and gently; letting the coating cool too fast can sometimes cause cracking.
-
Can I make these Oreo Truffles Christmas Ornaments Recipe ahead of time?
Yes! You can make the Oreo mixture, shape the balls, and freeze them uncoated up to 2 months in advance. When ready, just thaw and finish the dipping and decorating steps close to serving time.
-
What’s the best cream cheese to use?
I prefer full-fat cream cheese as it provides the richest flavor and smoothest texture, but reduced-fat works if you’re watching calories—just expect a less creamy truffle.
Final Thoughts
I can’t recommend this Oreo Truffles Christmas Ornaments Recipe enough—it’s been my go-to holiday treat for years, and I love the way it brings everyone together in the kitchen and around the table. Whether you display these cute little ornaments on your tree or share them at your next holiday party, they’re guaranteed to make everyone smile. Give this recipe a try, and I promise you’ll be hooked just like my family and me!
Print
Oreo Truffles Christmas Ornaments Recipe
- Prep Time: 25 minutes
- Cook Time: 0 minutes
- Total Time: 1 hour 45 minutes
- Yield: 18 servings
- Category: Dessert
- Method: No-Cook
- Cuisine: American
Description
Delicious and festive Oreo Truffles Ornaments made with crushed Oreos and cream cheese, dipped in colorful melted wafers, and decorated with miniature Reese’s Cups, Christmas sprinkles, and licorice sticks. Perfect for holiday celebrations and easy to prepare.
Ingredients
Truffle Mixture
- 3 cups Oreo cookies, finely crushed
- 8 oz block of cream cheese, softened to room temperature
- 1 teaspoon vanilla extract
Coating and Decoration
- 1½ cups green melting wafers
- 1½ cups red melting wafers
- 2 tablespoons Crisco
- 18-20 miniature Reese’s Cups
- Christmas sprinkles
- 2-3 sticks licorice or red vine candy, cut into ½ inch pieces
Instructions
- Prepare cookie sheet: Line a large cookie sheet with parchment paper and set aside to place the truffles later.
- Mix truffle ingredients: In a small mixing bowl, combine the finely crushed Oreos, softened cream cheese, and vanilla extract. Use an electric hand mixer or stand mixer to blend until smooth and well combined.
- Form truffle balls: Using a 1-inch cookie scoop, scoop out the mixture and roll into 1 to 1½ inch balls using the palms of your hands to smooth them evenly until all the mixture is used.
- Chill truffles: Place each truffle ball onto the prepared parchment-lined baking sheet and refrigerate for 1 hour to firm up.
- Prepare first color melting chocolate: About 5-10 minutes before chilling is complete, place one color of melting wafers into a large heatproof bowl. Set the bowl over a pot of boiling water to create a double boiler.
- Melt chocolate wafers: Stir the wafers frequently with a rubber spatula as they melt. Add 1 tablespoon of Crisco and continue stirring until the chocolate is smooth, silky, and fully melted. Remove from heat when done.
- Dip truffles: Using two forks or dipping tools, dip each chilled truffle ball into the melted chocolate, completely covering it. Roll to coat evenly and place back onto parchment paper.
- Decorate: Immediately top each dipped truffle with an upside-down miniature Reese’s Cup and sprinkle Christmas sprinkles over the chocolate.
- Add ornament hanger: Place a dollop of melted chocolate on top of the Reese’s Cup and insert a piece of licorice or red vine candy upright to mimic an ornament hanger.
- Repeat for first color: Continue dipping and decorating half of the truffles with the first chocolate color, then refrigerate the baking sheet again.
- Prepare second color melting chocolate: While the first batch chills, melt the second color of melting wafers in a double boiler using the same process as before.
- Dip and decorate second batch: Dip the remaining uncovered truffles in the second melted chocolate color and decorate them following the same steps of topping with Reese’s Cups, sprinkles, and licorice sticks.
- Final chill: Place all decorated truffles back into the refrigerator and allow to set for an additional 20 minutes before serving.
Notes
- Store leftover Oreo truffles in an airtight container in the refrigerator for up to 5 days.
- You can freeze uncoated Oreo balls in an airtight container separated by wax paper for up to 2 months. Thaw before coating and decorating.
- For easier licorice candy pieces, slice licorice in half or quarters before cutting ½ inch pieces.
- Pack the cookie scoop tightly to form uniform truffle balls.
- Use an electric hand mixer or stand mixer for best results when mixing the truffle base.
- Colored melting wafers can be found at craft stores; if substituting with food coloring, use gel colors rather than drops to avoid seizing.
- Full-fat cream cheese is recommended for richer flavor, but reduced-fat also works.
Nutrition
- Serving Size: 1 truffle
- Calories: 160
- Sugar: 15g
- Sodium: 95mg
- Fat: 10g
- Saturated Fat: 3.5g
- Unsaturated Fat: 5g
- Trans Fat: 0g
- Carbohydrates: 16g
- Fiber: 1g
- Protein: 1.5g
- Cholesterol: 15mg


