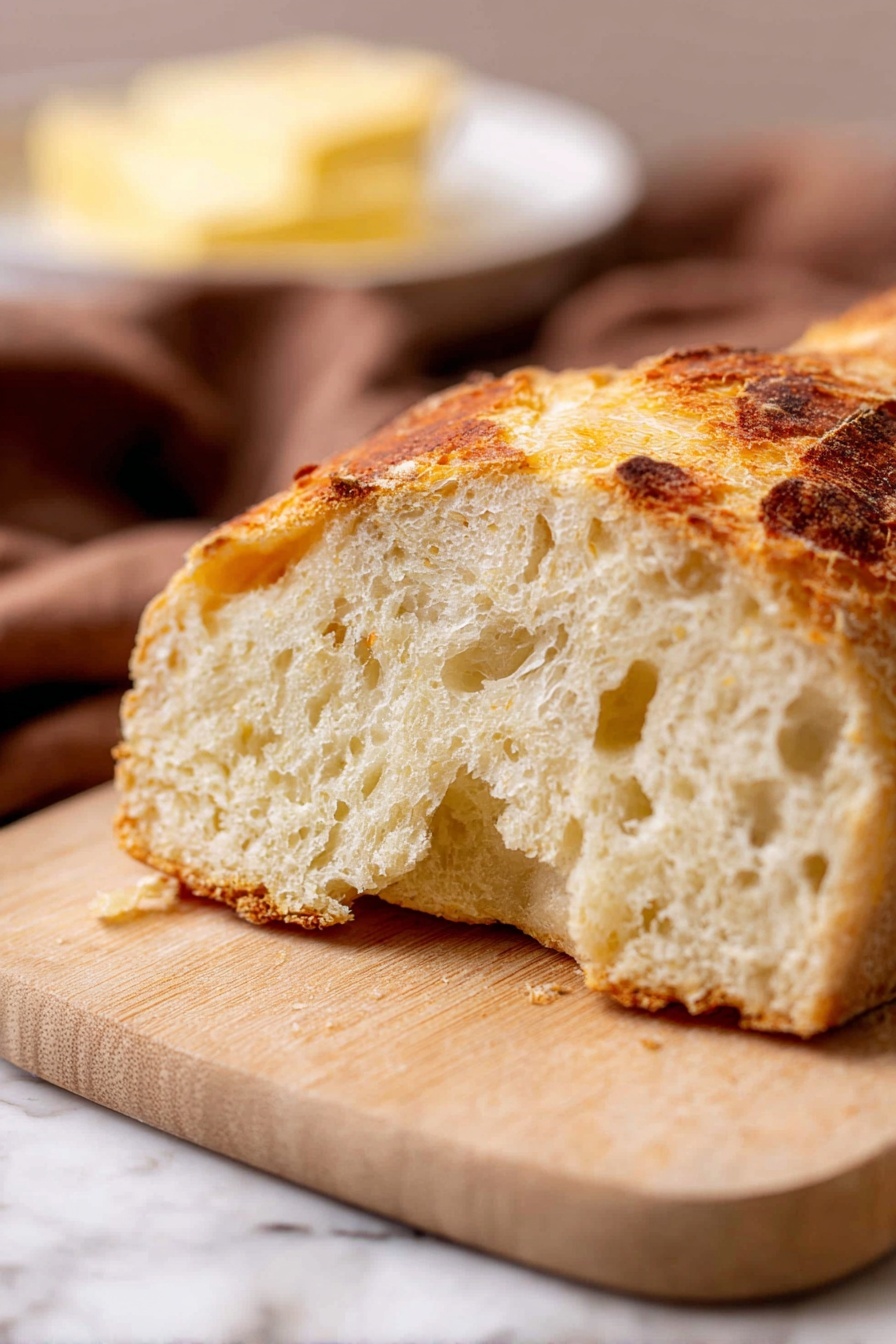
If you’ve ever wanted to make beautiful, bakery-style bread at home without the fuss of kneading, you’re going to adore this No Knead Italian Artisan Bread Recipe. It’s incredibly simple, uses just a handful of ingredients, and delivers that perfect crust and airy crumb that’ll make you think a professional baker snuck into your kitchen. Trust me, once you try it, you’ll be making this rustic loaf again and again.
Why You’ll Love This Recipe
- Effortless Process: This bread requires no kneading, so it’s beginner-friendly but still feels fancy.
- Simple Ingredients: You probably already have everything in your pantry to make it right now.
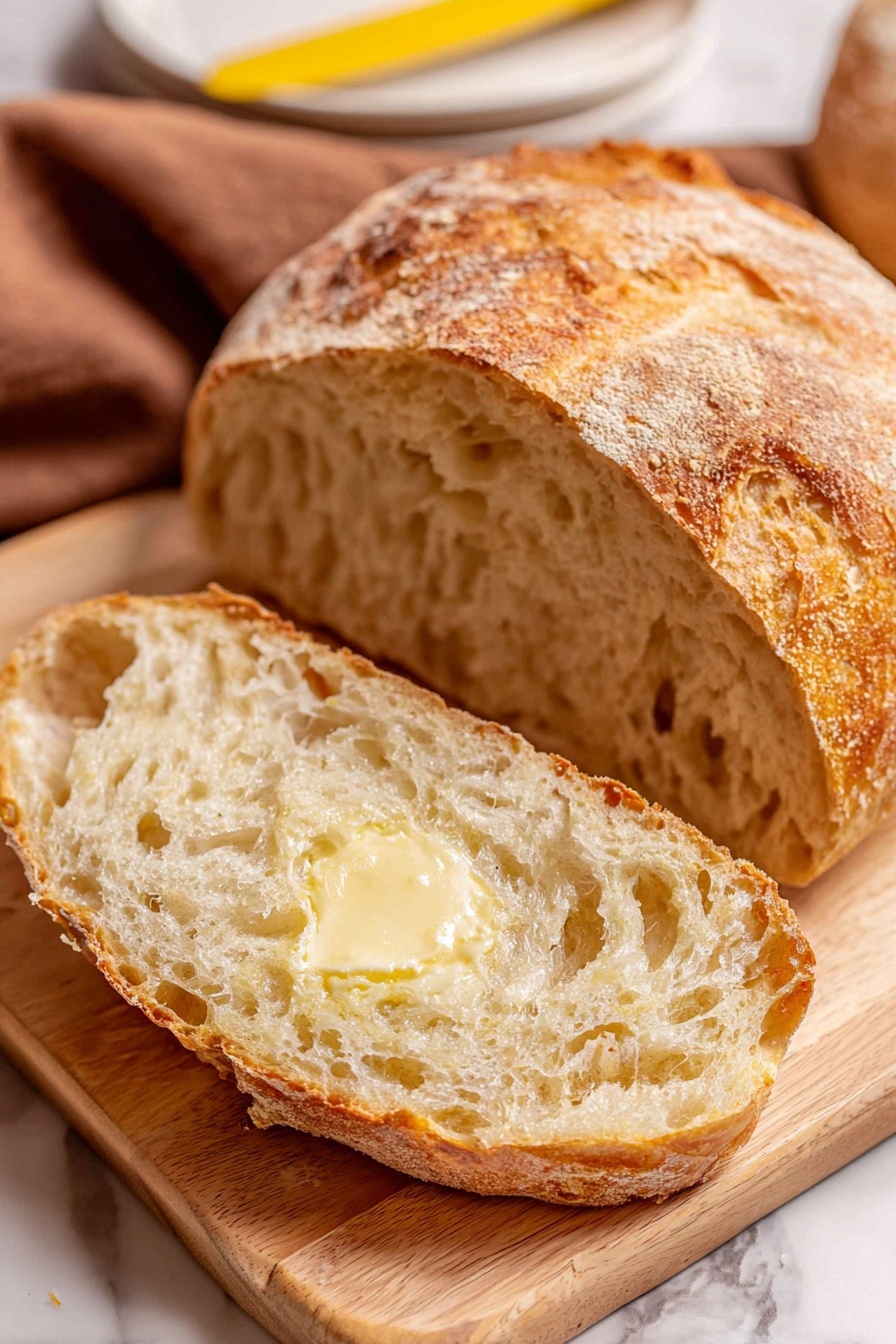
- Delicious Texture: Crispy crust meets fluffy, chewy inside—just like an artisan loaf.
- Perfect for Any Occasion: Great for sandwiches, sides, or just dipping in olive oil and balsamic.

Ingredients You’ll Need
Each ingredient in this No Knead Italian Artisan Bread Recipe plays a key role in developing its signature flavor and texture. Keep an eye out for quality flour and fresh yeast to get the best results.
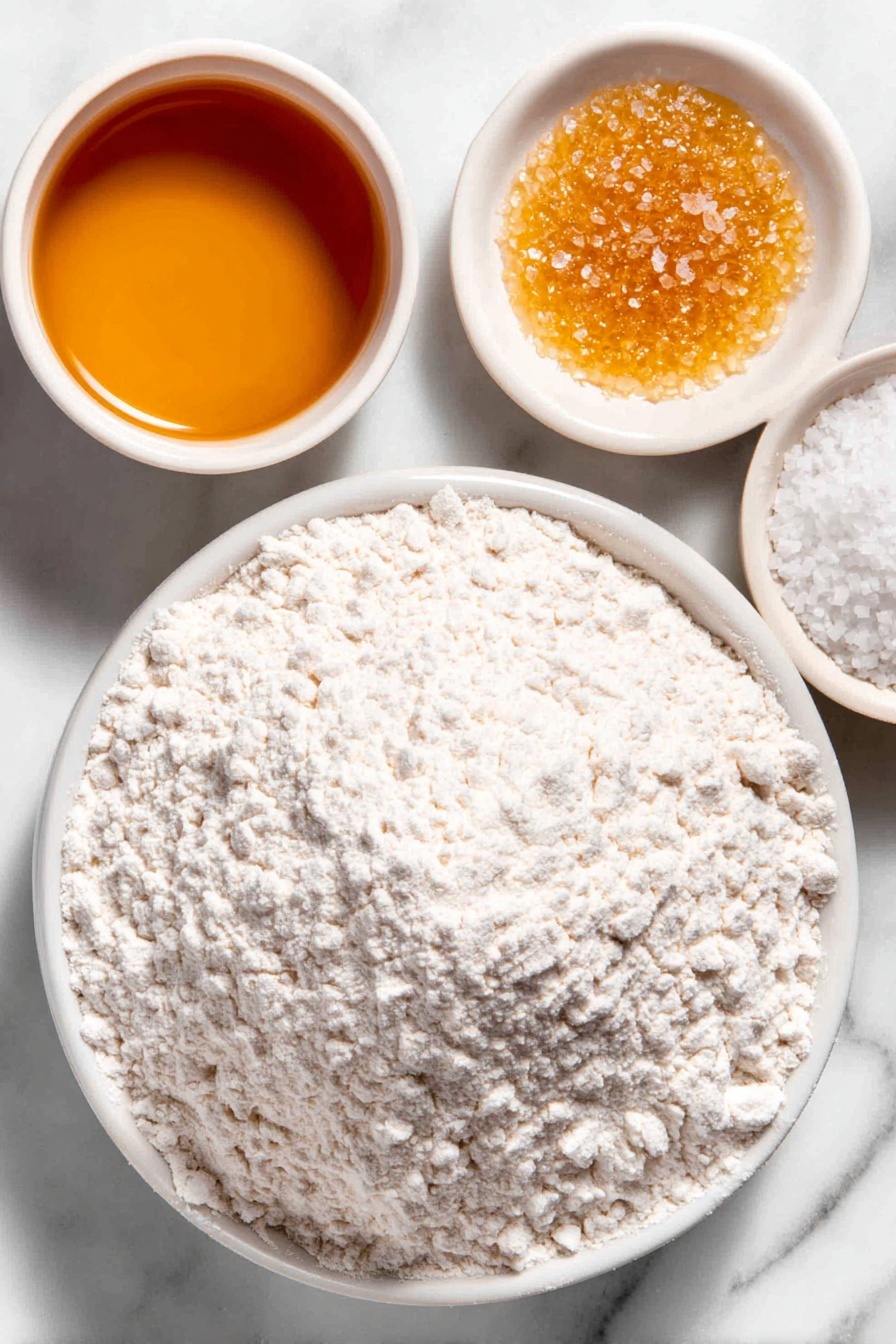
- All-purpose flour: Using standard all-purpose flour works beautifully, but if you want a bit more chewiness, mix in some bread flour.
- Lukewarm water: The temperature matters! Too hot can kill the yeast, too cold slows the rise—aim for that cozy warmth (100-110°F).
- Instant dry yeast: This is the magic that makes your dough rise; make sure it’s fresh for a bubbly, airy loaf.
- Honey: Just a touch to feed the yeast and add a subtle sweetness.
- Salt: Essential for flavor and strengthening the gluten structure.
Variations
I love experimenting with this No Knead Italian Artisan Bread Recipe to fit different moods or occasions. Don’t be shy about making it your own—there’s lots of room for creativity!
- Herbs and spices: Adding fresh rosemary or dried Italian herbs into the dough gives it an extra aromatic punch that my family adores.
- Whole wheat flour: I swapped half the flour for whole wheat once, and it gave a lovely nuttiness without compromising the easy rise.
- Olives or sun-dried tomatoes: Stir in chopped olives or sun-dried tomatoes for a bold Mediterranean twist perfect for appetizers.
- Gluten-free option: While trickier, I’ve had success with gluten-free flour blends that maintain the dough’s stickiness—just adjust rising times accordingly.
How to Make No Knead Italian Artisan Bread Recipe
Step 1: Activate the Yeast
Start by dissolving the yeast in about ¼ cup of your lukewarm water along with the teaspoon of honey. Leave it somewhere warm for about 5 minutes until it’s bubbly and smells yeasty. This step is key—I discovered that skipping it can leave your bread dense and flat, so don’t rush here!
Step 2: Combine Flour and Remaining Water
Next, pour the flour into a large mixing bowl and add the rest of the lukewarm water. Then pour in your bubbly yeast mixture. Use a fork to mix it quickly but gently—you don’t want a smooth dough here, just a sticky one. If it feels too dry, splash in a little more water. I’ve learned to watch for a tacky texture that isn’t shaggy or crumbly.
Step 3: Add the Salt and Let It Rise
Sprinkle in the salt and stir everything together. Once mixed, dust the top with some flour, cover the bowl with a damp cloth or plastic wrap, and set it somewhere cozy to rise. Depending on your kitchen’s warmth, it can take anywhere from 45 minutes to an hour and a half. You’ll know it’s ready when the dough is puffed up and almost doubled. Patience here pays off!
Step 4: Prepare to Bake
Preheat your oven to a hot 425°F (220°C). Gently tip the risen dough onto a non-stick baking sheet dusted with flour, keeping the floured side up. Use a very sharp knife to score the top lightly—this helps the bread expand and gives that gorgeous artisan look. Just don’t cut too deeply, or you’ll risk deflating the dough.
Step 5: Bake to Perfection
Bake the loaf at 425°F for about 25 minutes until the crust starts turning golden. Then, lower the oven temperature to 325°F (160°C) and bake for another 10 to 15 minutes. The cooling step is important too—I always let my bread rest on a wire rack for at least 15 minutes to finish cooking through and develop the perfect texture before slicing.
Pro Tips for Making No Knead Italian Artisan Bread Recipe
- Warm Water Temperature: I always double-check my water temp with a thermometer—too hot and you’ll kill the yeast, but a perfect 100-110°F jumpstarts a lively rise.
- Avoid Overmixing: The dough should look shaggy, not smooth; mix just enough to combine ingredients to keep that airy texture.
- Use a Sharp Knife for Scoring: A dull knife can drag and deflate your dough, but a sharp blade creates clean slashes that help your bread blossom in the oven.
- Don’t Skip Cooling: Letting the bread cool completely is key—cutting too soon can leave the crumbs gummy rather than fluffy.
How to Serve No Knead Italian Artisan Bread Recipe
Garnishes
I love serving this bread with a simple drizzle of extra virgin olive oil and a sprinkle of flaky sea salt—it instantly elevates the flavor. Fresh herbs like basil or thyme work wonderfully too, especially if you’re making the herb variation.
Side Dishes
This bread pairs beautifully with classic Italian dishes like minestrone soup or a rich pasta bolognese. My go-to is using it to scoop up creamy risottos or alongside a colorful charcuterie board filled with cheeses and cured meats.
Creative Ways to Present
For a party, I’ve hollowed out the center and turned the loaf into a rustic bread bowl filled with warm Italian wedding soup or even a cheesy fondue. It’s always a showstopper and so cozy to share with friends!
Make Ahead and Storage
Storing Leftovers
My tip is to store leftover bread loosely wrapped in a clean kitchen towel or paper bag at room temperature. This keeps the crust crisp and the crumb soft for up to 2 days without turning soggy or stale.
Freezing
If you want to freeze the bread, slice it first for convenience, then wrap tightly in plastic and foil to prevent freezer burn. When you’re ready, defrost at room temp—easy and just as fresh as the day you baked it.
Reheating
I love reheating slices in a toaster oven to revive that crusty texture, or pop the whole loaf in a preheated 350°F oven for about 10 minutes wrapped loosely in foil to warm it through without drying out.
FAQs
-
Can I use bread flour instead of all-purpose flour in this recipe?
Yes! Bread flour has more protein and can create a chewier texture, which many people love in artisan bread. You can substitute all-purpose flour with bread flour 1:1, but expect a slightly different crumb and crust.
-
Do I really have to let the dough rise for an hour and a half?
The rise time varies depending on your kitchen temperature. The dough needs to almost double in size, so in cooler kitchens, it may take longer. Don’t rush—better to wait for a good rise than shorten it and end up with dense bread.
-
Why is my bread dense instead of airy?
Density usually means the yeast wasn’t active enough or the dough didn’t rise sufficiently. Make sure your yeast isn’t expired and that the water temperature is right for activation. Also, avoid overmixing which can toughen the gluten.
-
Can I add flavors like garlic or cheese to this loaf?
Absolutely! Adding finely minced garlic, grated parmesan, or fresh herbs can boost flavor. Just fold them gently into the dough after mixing to evenly distribute without overworking the bread.
Final Thoughts
This No Knead Italian Artisan Bread Recipe has become one of my kitchen staples because it’s so forgiving and utterly delicious. I love sharing it with friends who never believe the crust and crumb came from my own oven with hardly any effort. When you try it, you’ll see how satisfying it is to pull a warm, golden loaf fresh from your oven—your family and guests will ask for seconds. Seriously, give it a go and treat yourself to the joy of homemade artisan bread without all the hard work!
Print
No Knead Italian Artisan Bread Recipe
- Prep Time: 1 hour
- Cook Time: 35 minutes
- Total Time: 3 hours 5 minutes
- Yield: 1 loaf (about 8 slices)
- Category: Bread
- Method: Baking
- Cuisine: Italian
Description
This No Knead Italian Artisan Bread recipe is a simple, rewarding way to bake a crusty, flavorful loaf with minimal effort. Combining basic ingredients like all-purpose flour, yeast, honey, and salt, this technique requires no kneading, relying instead on a long rise to develop the dough’s texture and flavor. With easy steps and straightforward baking, it yields a beautifully golden-crusted bread perfect for sandwiches, dipping, or enjoying plain.
Ingredients
Main Ingredients
- 2 ¼ cups (9 oz) all-purpose flour, plus extra for topping
- ¾ cups (185 ml) lukewarm water (100-110°F)
- 1 ⅛ teaspoon (0.20 oz) instant dry yeast
- 1 teaspoon honey
- 1 teaspoon salt
Instructions
- Activate Yeast: Dissolve the instant dry yeast in ¼ cup of lukewarm water combined with 1 teaspoon of honey. Let it sit for 5 minutes until the mixture becomes bubbly, indicating the yeast is active.
- Mix Dough: In a mixing bowl, add the all-purpose flour and the remaining water. Pour in the activated yeast mixture, then use a fork to quickly combine the ingredients.
- Add Salt and Adjust Dough: Stir in 1 teaspoon of salt. The dough should be soft, sticky, and not smooth. If it feels too dry, gradually add a little more lukewarm water to reach the correct consistency.
- First Rise: Sprinkle some flour over the dough, cover the bowl with a damp cloth or plastic wrap, and allow it to rise in a warm spot for 45 minutes to 1 hour 30 minutes until it nearly doubles in size. The rising time depends on the warmth of your kitchen.
- Preheat Oven: Set your oven to 425°F (220°C) to prepare for baking the bread.
- Prepare Dough for Baking: Carefully transfer the risen dough onto a non-stick baking sheet lightly sprinkled with flour. Ensure the floured side is facing upwards to prevent sticking.
- Score the Bread: Using a very sharp knife, make shallow cuts on the surface of the dough. This step controls how the bread expands in the oven and gives it an artisan appearance.
- Bake Bread: Place the baking sheet in the preheated oven and bake for about 25 minutes. After this initial baking time, reduce the oven temperature to 325°F (160°C) and continue baking for an additional 10 to 15 minutes or until the loaf turns golden brown.
- Cool: Remove the bread from the oven and set it on a wire rack to cool for at least 15 minutes before slicing. Cooling helps to set the crumb and avoids a gummy interior.
Notes
- For best results, use a kitchen thermometer to ensure water is between 100-110°F when activating the yeast.
- If the dough is too dry or too wet, adjust the water quantity slightly to achieve a sticky but manageable consistency.
- Covering the dough while rising helps maintain humidity which is essential for proper fermentation and rise.
- Cooling on a wire rack prevents moisture buildup on the bottom and keeps the crust crisp.
- This bread is best enjoyed fresh but can be stored in an airtight container for up to 2 days or frozen for longer storage.
Nutrition
- Serving Size: 1 slice (approximately 1/8 of loaf)
- Calories: 160
- Sugar: 1 g
- Sodium: 230 mg
- Fat: 0.5 g
- Saturated Fat: 0.1 g
- Unsaturated Fat: 0.3 g
- Trans Fat: 0 g
- Carbohydrates: 33 g
- Fiber: 1 g
- Protein: 5 g
- Cholesterol: 0 mg


