
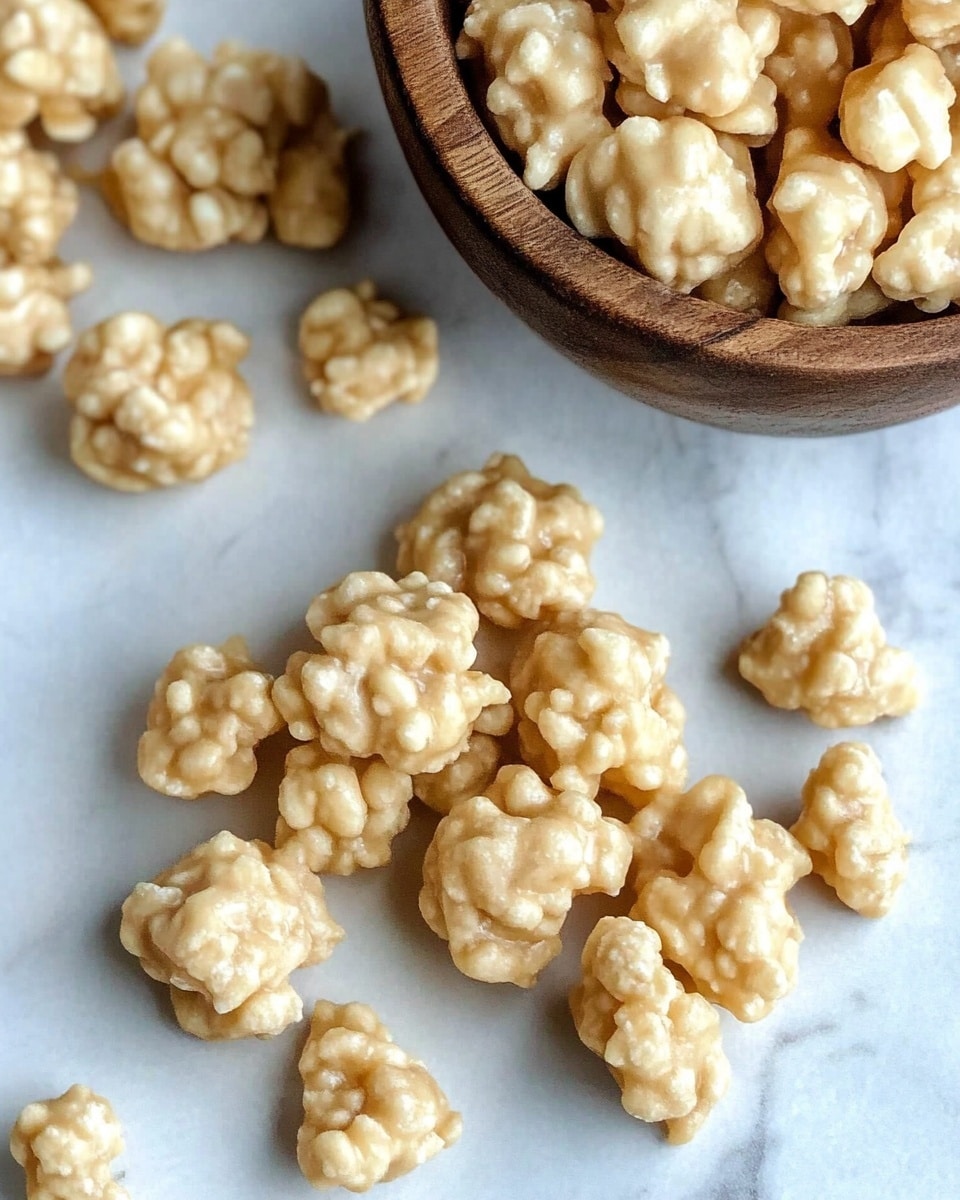
I absolutely love sharing this No Bake Avalanche Cookies Recipe because it’s one of those easy, no-fuss treats that feels like a hug in cookie form. When you’re short on time but want something that’s festive, fun, and totally delicious, these cookies have you covered. They’re especially great for last-minute gatherings or when you need a quick sweet fix that everyone will rave about.
What makes this No Bake Avalanche Cookies Recipe stand out to me is the perfect balance of crispy rice cereal, creamy peanut butter, and that luscious white chocolate coating. Plus, you don’t have to turn on the oven, which means less heat in the kitchen and more time to enjoy eating. I discovered this trick when I was scrambling to pull together treats during a busy holiday, and now it’s a go-to dessert in my recipe box.
Why You’ll Love This Recipe
- No Oven Required: Perfect for when you want a sweet treat without heating up your kitchen.
- Quick Prep Time: You’ll have these ready in under 20 minutes, great for those last-minute snack cravings.
- Kid-Friendly Fun: My family goes crazy for these because they’re easy to make and fun to eat.
- Flexible Ingredients: You can easily customize toppings or mix-ins to suit your taste or whatever you have on hand.

Ingredients You’ll Need
The combination of crispy rice cereal, mini marshmallows, and smooth peanut butter works like magic when coated with melted white chocolate. Each ingredient brings its unique texture and flavor to the mix, creating a cookie that’s light yet indulgent. I recommend picking good-quality white chocolate for the best creamy finish.
- Crispy Rice Cereal: Adds the satisfying crunch that gives these cookies their signature avalanche texture.
- Mini Marshmallows: Help bind the cereal together and add a touch of chewiness.
- Creamy Peanut Butter: Brings richness and a subtle nutty flavor that complements the sweetness perfectly.
- White Chocolate: I prefer melting it slowly in a double boiler to avoid burning and get a silky smooth coating.
- Mini Chocolate Chips (optional): A sprinkle on top adds a little extra chocolate burst and makes the cookies look extra inviting.
Variations
This No Bake Avalanche Cookies Recipe is pretty forgiving and fun to play with, so I encourage you to make it your own. I sometimes switch up the mix-ins depending on the season or what I’m craving—feel free to get creative!
- Add Nuts: When I add chopped almonds or pecans, it gives a nice extra crunch and a touch of sophistication.
- Dark Chocolate Swap: Using dark chocolate instead of white changes the flavor profile but keeps all the gooey goodness.
- Seasonal Touch: Try adding dried cranberries or festive sprinkles around the holidays for a cheerful twist.
- Nut-Free Version: I’ve made it without peanut butter using sunflower seed butter for friends with allergies, and it works beautifully.
How to Make No Bake Avalanche Cookies Recipe
Step 1: Prep Your Workspace
Start by lining two baking sheets with parchment paper—this makes cleanup a breeze and the cookies won’t stick. Having everything ready before you melt your chocolate is key because the mixture sets fairly quickly once combined.
Step 2: Mix the Dry Ingredients
In a large bowl, combine the crispy rice cereal and mini marshmallows. I find tossing them together with a sturdy spatula works better than a whisk here because of the bigger cereal pieces.
Step 3: Melt the Peanut Butter and White Chocolate
Here’s the trickiest step—but don’t worry, I’ve got you. Use a double boiler to slowly melt together the white chocolate and creamy peanut butter, stirring often to keep it silky smooth. If you don’t have a double boiler, microwave in short 20-second bursts, stirring in between, so the chocolate doesn’t scorch.
Step 4: Combine and Coat
Pour the melted chocolate mixture over the cereal and marshmallows, then gently stir until everything is thoroughly coated. I like to use a spatula to fold the mix, ensuring each bite has that luscious white chocolate goodness without squishing the cereal too much.
Step 5: Form the Cookies
Drop the mixture by tablespoons onto your lined baking sheets. If you’d like, sprinkle mini chocolate chips on top right away—they stick nicely while the chocolate is still wet. Don’t press them down or your cookies might lose their airy crunch.
Step 6: Chill Until Set
Pop the trays in the refrigerator for about 30 minutes or until the white chocolate is fully set. This step is essential for that perfect snap when you bite in and keeps the cookies from sticking together.
Pro Tips for Making No Bake Avalanche Cookies Recipe
- Slow Melting is Key: Melting the white chocolate over low heat prevents it from seizing or burning, giving you that perfect creamy coating every time.
- Use Parchment Paper: This prevents sticking and helps the cookies lift off easily, saving you from frustrating battles later.
- Don’t Overmix: Gently fold the cereal mixture to keep it crunchy rather than soggy.
- Chill Properly: Make sure to give your cookies enough time to set in the fridge; rushing this step leads to a messier, less stable cookie.
How to Serve No Bake Avalanche Cookies Recipe
Garnishes
I personally love a sprinkle of mini chocolate chips or rainbow nonpareils on top — it adds such a fun pop of color and texture. For a festive touch, a light dusting of powdered sugar mimics a white snowy avalanche perfectly.
Side Dishes
These cookies are fantastic on their own, but I often serve them alongside a cold glass of milk or hot cocoa, especially during chilly evenings. Sometimes, I pair them with fresh fruit to balance out the sweetness.
Creative Ways to Present
For holiday parties or gift-giving, I arrange the No Bake Avalanche Cookies Recipe on a decorative plate layered with festive parchment paper. Wrapping individual cookies in cellophane bags tied with a ribbon makes a charming homemade gift that everyone appreciates.
Make Ahead and Storage
Storing Leftovers
I store leftover cookies in an airtight container in the refrigerator to keep them crisp and fresh. They typically stay delicious for up to a week, and you’ll find they keep their texture nicely this way.
Freezing
You can freeze these cookies by placing them in a single layer on a tray first, then transferring them to a freezer bag once solid. When frozen, they keep well for up to 2 months without losing that satisfying crunch.
Reheating
Since these cookies are meant to be enjoyed cold or at room temperature, I usually just let frozen cookies thaw naturally on the counter for about 15 minutes. Avoid microwaving, as it can melt the chocolate and ruin the texture.
FAQs
-
Can I use regular marshmallows instead of mini marshmallows?
You definitely can, but chop the regular marshmallows into smaller pieces so they mix evenly and melt consistently within the cereal mixture.
-
Is there a substitute for peanut butter?
Yes! If you have peanut allergies or prefer a different flavor, try almond butter, sunflower seed butter, or even cookie butter to mix things up.
-
My white chocolate seized while melting. What can I do?
This happens if white chocolate overheats or gets wet. To fix it, add a little bit of vegetable oil or shortening and stir gently to smooth it out. Using a double boiler and low heat helps prevent this.
-
Can I make these cookies vegan?
Yes, with some ingredient swaps! Use vegan marshmallows, a plant-based butter substitute, peanut or almond butter that’s vegan-friendly, and dairy-free white chocolate alternatives.
-
How long do No Bake Avalanche Cookies stay fresh?
Stored in an airtight container in the fridge, these cookies stay fresh for about 5 to 7 days without losing crunch or flavor.
Final Thoughts
I hope this No Bake Avalanche Cookies Recipe becomes as much of a favorite for you as it is in my home. It’s a perfect little no-oven-needed project that yields rich and crunchy cookies with minimal effort. Whether you’re whipping them up for a sudden craving, a fun cooking activity with kids, or a holiday cookie swap, I’m confident you’ll enjoy every bite. Give it a try—you won’t regret it!
Print
No Bake Avalanche Cookies Recipe
- Prep Time: 15 minutes
- Cook Time: 0 minutes
- Total Time: 15 minutes
- Yield: 24 cookies
- Category: Dessert
- Method: No-Cook
- Cuisine: American
Description
No Bake Avalanche Cookies are a delightful, easy-to-make treat combining crispy rice cereal, mini marshmallows, and creamy peanut butter all coated in smooth white chocolate. These no-bake cookies are perfect for a quick dessert or snack, requiring minimal prep and zero baking time. Optionally topped with mini chocolate chips for an extra touch of sweetness, they are a fun and crunchy treat loved by kids and adults alike.
Ingredients
Dry Ingredients
- 2 cups Crispy Rice cereal
- 1 cup mini marshmallows
- 1/4 cup mini chocolate chips (optional, to sprinkle on top)
Wet Ingredients
- 1/2 cup creamy peanut butter
- 1 lb white chocolate
Instructions
- Prepare Baking Sheets: Line 2 baking sheets with parchment paper and set aside to prevent sticking and make cleanup easier.
- Mix Dry Ingredients: In a large bowl, combine the crispy rice cereal and mini marshmallows thoroughly and set the bowl aside.
- Melt Chocolate and Peanut Butter: Using a double boiler, melt the white chocolate and creamy peanut butter together slowly for a smooth consistency. Alternatively, melt them in a microwave in short bursts, stirring frequently to avoid burning.
- Combine Ingredients: Pour the melted white chocolate and peanut butter mixture over the cereal and marshmallow mixture. Stir carefully until all the dry ingredients are completely coated with the chocolate mixture.
- Portion Cookies: Using a tablespoon, drop dollops of the coated mixture onto the prepared baking sheets, spacing them evenly apart.
- Optional Topping: Sprinkle mini chocolate chips on top of each portion if desired to add extra texture and flavor.
- Set Cookies: Place the baking sheets with the cookie drops into the refrigerator. Chill until the white chocolate is fully set and the cookies are firm, about 30-60 minutes.
Notes
- Use a double boiler for melting white chocolate to ensure a smooth, burn-free texture.
- If you don’t have a double boiler, melting white chocolate and peanut butter in the microwave in 20-second intervals, stirring in between, works well.
- To make these cookies vegan or dairy-free, substitute white chocolate with a vegan white chocolate alternative and use a nut butter of choice.
- Store cookies in the refrigerator to keep them firm, especially in warm environments.
- You can customize the toppings by adding nuts, dried fruit, or different types of chips.
Nutrition
- Serving Size: 1 cookie
- Calories: 140
- Sugar: 12g
- Sodium: 70mg
- Fat: 7g
- Saturated Fat: 3.5g
- Unsaturated Fat: 3g
- Trans Fat: 0g
- Carbohydrates: 18g
- Fiber: 1g
- Protein: 2g
- Cholesterol: 5mg


