
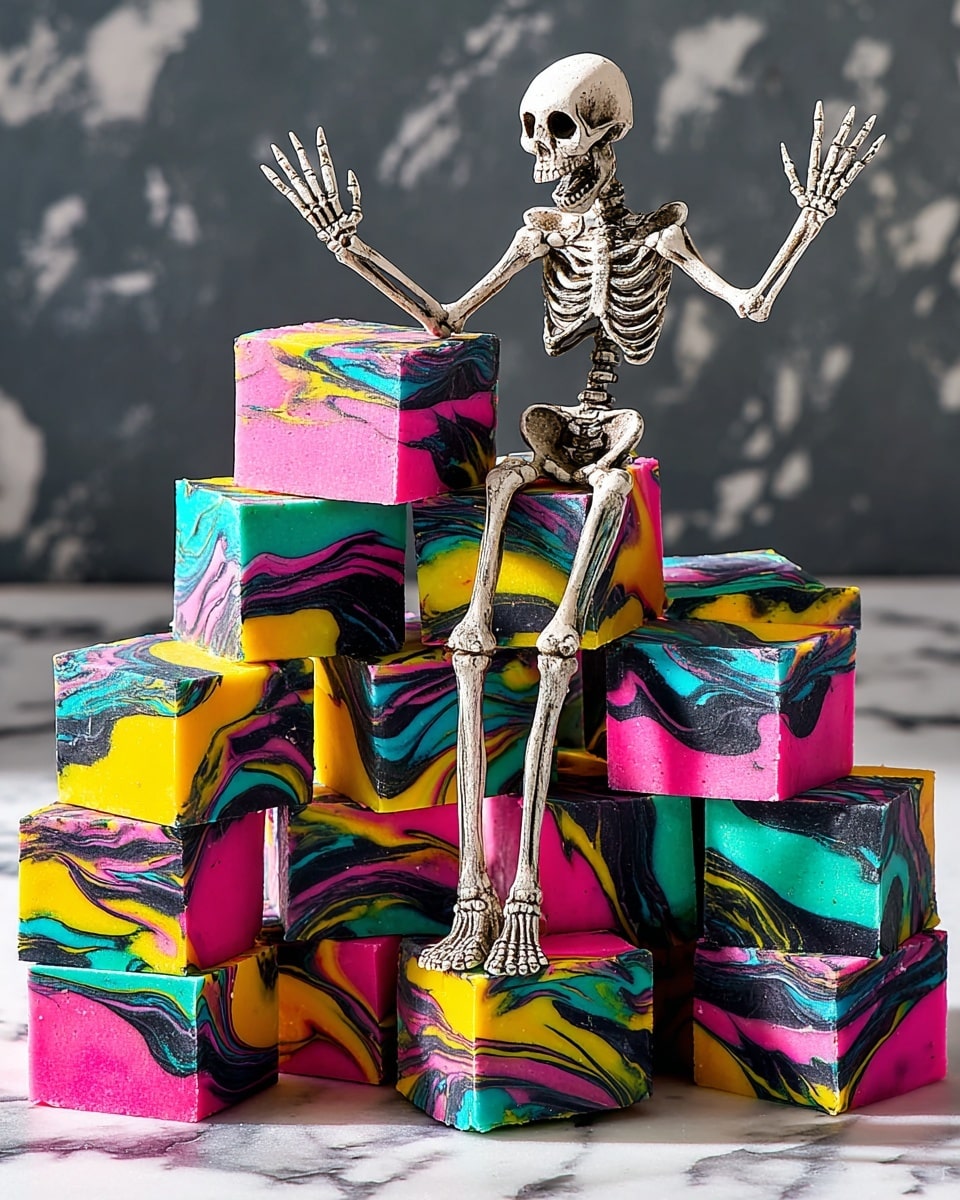
If you’re a fan of indulgent treats and festive flavors, you’re going to love this Nightmare Before Christmas Fudge Recipe. It’s a gorgeous, colorful fudge that’s not only easy to make but also brings a whimsical pop of fun and flavor inspired by the holiday classic. I absolutely love how this turns out — rich, creamy, and bursting with peppermint goodness, plus those swirled colors make it totally Instagram-worthy (and deliciously memorable!). Stick around and I’ll share all the details so you can nail it on your first try.
Why You’ll Love This Recipe
- Easy to Make: You’ll find the steps straightforward, and I’ll guide you to avoid common pitfalls.
- Beautiful & Festive: The colorful swirls make this fudge a showstopper for holidays or themed parties.
- Peppermint Perfection: The blend of vanilla and peppermint extract gives it a refreshing twist that the whole family goes crazy for.
- Versatile & Fun: You can customize the colors and flavors to match any celebration.

Ingredients You’ll Need
I love how this fudge blends simple staples with a few special ingredients that give it a silky texture and festive flavor. When shopping, opt for high-quality white chocolate chips for the best melt and texture, and don’t skip the Marshmallow Fluff—that’s the secret to that creamy, fudge-y bite you’ll come back for.
- White chocolate chips: Use good-quality chips for smooth melting and a creamy base flavor.
- Sweetened condensed milk: This adds sweetness and a luscious rich texture that binds the fudge beautifully.
- Marshmallow Fluff: Helps keep the fudge light and soft, avoiding graininess.
- Unsalted butter: Adds richness and a smooth finish—don’t substitute with salted!
- Vanilla bean paste or extract: Brings depth to the flavor without overpowering the peppermint.
- Peppermint extract: The star of the show—provides that classic candy cane coolness.
- Gel food coloring (black, pink, yellow, teal): These vibrant colors give the fudge its signature swirled look; gel colors work best because they don’t thin the fudge.
Variations
I love how fun this recipe is to tweak based on what you have or what mood you’re in. Feel free to swap out the peppermint for other extracts, or experiment with different fun colors to match your holiday theme.
- Chocolate Peppermint Twist: I once added a swirl of dark chocolate fudge along with the colored white chocolate for a more complex flavor and my family went nuts over it.
- Dairy-Free Version: Try coconut condensed milk and dairy-free white chocolate chips to make this vegan-friendly.
- Seasonal Flavors: In the fall, I swap peppermint for pumpkin spice extract and use autumn-hued colors like orange and brown.
- More Minty: If you really want that peppermint punch, add a drop or two extra extract, but be cautious—it can get overpowering.
How to Make Nightmare Before Christmas Fudge Recipe
Step 1: Prep Your Pan Like a Pro
Start by lining an 8-inch square pan with two pieces of parchment paper, arranged in a plus sign so you have overhang on all sides. This trick makes lifting the fudge out after it’s set a breeze—you won’t struggle with steaming or cutting sticky fudge off the pan. Bonus tip: use binder clips on the edges to keep the parchment in place while you pour in the fudge.
Step 2: Melt White Chocolate and Condensed Milk
Place the white chocolate chips and sweetened condensed milk in a medium saucepan over low heat. Stir occasionally to prevent scorching. After about 5 minutes, you’ll have a silky smooth, glossy mixture. Patience here is key—don’t rush the heating or you might end up with clumpy fudge.
Step 3: Blend in Fluff, Butter, and Extracts
Add the Marshmallow Fluff, unsalted butter, vanilla bean paste, and peppermint extract to the melted chocolate mixture. Stir gently and cook just long enough (about 1 minute) to combine everything well. This step adds an extra level of creaminess and flavor that’s just irresistible.
Step 4: Divide and Dye Your Fudge
Now, split the fudge evenly into 4 bowls—roughly 1 cup each. Add about 4 drops of black gel food coloring to one bowl for that deep, inky shade. Add 2 drops each of pink, yellow, and teal gel color to the remaining three bowls. Mix quickly but thoroughly so the fudge colors evenly while it’s still moveable. Don’t wait too long or it will start to set!
Step 5: Swirl & Chill
Drop spoonfuls of each colored fudge into the prepared pan at random. Grab a toothpick or paring knife and swirl the fudge gently to create beautiful marbled effects—this is where the fun creative vibe really shines. Pop it in the fridge and chill for at least 2 hours or overnight until firm and ready to cut.
Step 6: Cut and Enjoy
Using the parchment overhang, lift the fudge out of the pan and onto a cutting board. Slice into roughly 36 squares (or however big you like!). This fudge keeps well, so you can treat guests or stash some for yourself.
Pro Tips for Making Nightmare Before Christmas Fudge Recipe
- Use Binder Clips: They keep your parchment in place, so pouring fudge is mess-free and setting is even.
- Work Quickly When Coloring: Fudge can start setting fast; mixing colors swiftly helps avoid clumping or uneven patches.
- Low and Slow Melting: Keeping heat low avoids scorching the white chocolate, which can ruin the flavor and texture.
- Stir Gently: Over-mixing introduces air bubbles, so stir just enough to combine for smooth fudge.
How to Serve Nightmare Before Christmas Fudge Recipe
Garnishes
I like sprinkling crushed candy canes or edible glitter over the fudge once it’s swirled but before chilling. It adds a delightful crunch and sparkle that really makes the presentation pop, especially for holiday gatherings.
Side Dishes
This fudge pairs perfectly with a warm mug of hot cocoa or peppermint tea. For parties, I love serving it alongside mini gingerbread cookies or spiced nuts to complement the minty sweetness.
Creative Ways to Present
For special occasions, I arrange the fudge squares on a tiered dessert stand or individually wrap pieces in festive cellophane bags tied with colorful ribbons—makes the perfect gift or party favor with that fun, whimsical vibe!
Make Ahead and Storage
Storing Leftovers
I keep leftover fudge in an airtight container in the refrigerator, layered with parchment paper to prevent sticking. It stays fresh for up to 2 weeks, although I’m pretty sure you won’t have leftovers that long!
Freezing
Want to stash some for later? Wrap individual pieces tightly in plastic wrap, then place in an airtight freezer bag. The fudge freezes beautifully for up to 3 months and thaws overnight in the fridge without losing texture.
Reheating
If you prefer your fudge softer, a few seconds in the microwave (10-15 seconds) can bring out a melt-in-your-mouth texture. Just be careful—not too long or it’ll get too gooey.
FAQs
-
Can I use regular food coloring instead of gel?
Gel food coloring is best because it doesn’t alter the fudge’s consistency. Regular liquid food coloring adds moisture and can cause the fudge to be too soft or unset.
-
What’s the best way to avoid gritty fudge?
Gritty fudge usually happens if the sugar crystals aren’t dissolved well or the chocolate overheats. Stir gently over low heat and make sure your ingredients are fully melted before adding the fluff and extracts.
-
Can I make this fudge nut-free?
Yes! This recipe is naturally nut-free, but always check ingredient labels on extracts and chocolate for any cross-contamination warnings if allergies are an issue.
-
How long does the fudge take to set?
Chilling in the fridge for a minimum of 2 hours is needed, but overnight chilling gives the best firm texture for clean slicing.
-
Can I substitute peppermint extract with something else?
Definitely! You can swap peppermint for other extracts like almond or orange to create completely different flavor profiles, just adjust the quantity to suit your taste.
Final Thoughts
This Nightmare Before Christmas Fudge Recipe has become one of my absolute favorites to make during the holidays and beyond. It’s that perfect mix of creamy, minty, and oh-so-pretty that delights both kids and grown-ups alike. I’m confident once you try it, you’ll be hooked just like my family and me—we always end up making double batches! So go ahead, give this a whirl, and enjoy sharing a sweet slice of holiday magic with your loved ones.
Print
Nightmare Before Christmas Fudge Recipe
- Prep Time: 15 mins
- Cook Time: 10 mins
- Total Time: 2 hrs 25 mins
- Yield: 36 pieces
- Category: Dessert
- Method: Stovetop
- Cuisine: American
- Diet: Vegetarian
Description
Delight your taste buds with this colorful Nightmare Before Christmas Fudge recipe. Creamy white chocolate fudge infused with peppermint and vanilla extracts is divided into vibrant colors and swirled together for a spooky and festive treat perfect for Halloween or holiday gatherings.
Ingredients
Main Ingredients
- 3 1/2 cups white chocolate chips
- 1 (14-oz.) can sweetened condensed milk
- 3 Tbsp. Marshmallow Fluff
- 2 Tbsp. unsalted butter
- 1/4 tsp. vanilla bean paste or extract
- 1/2 tsp. peppermint extract
Coloring
- Black gel food coloring
- Pink gel food coloring
- Yellow gel food coloring
- Teal gel food coloring
Instructions
- Prepare the pan: Line an 8″ x 8″ pan with two pieces of parchment paper arranged in a plus sign shape with 2″ overhang on all sides. Secure the overhang with binder clips if desired for easy removal.
- Melt the base ingredients: In a medium pot over low heat, combine the white chocolate chips and sweetened condensed milk. Stir occasionally until melted and smooth, about 5 minutes.
- Add flavorings: Stir in the Marshmallow Fluff, unsalted butter, vanilla bean paste, and peppermint extract. Continue cooking and stirring until the mixture is heated through and well combined, about 1 more minute.
- Divide and color fudge: Pour the fudge mixture evenly into four medium bowls, roughly 1 cup each. Add about 4 drops of black gel food coloring to one bowl. Add about 2 drops each of pink, yellow, and teal gel food coloring to the other three bowls respectively. Mix quickly to incorporate the colors, adding more drops if needed until desired shades are reached.
- Assemble and swirl: Drop spoonfuls of each colored fudge randomly into the prepared pan. Use a toothpick or paring knife to swirl the colors together gently, creating a marbled effect.
- Set the fudge: Refrigerate the pan for at least 2 hours or overnight until the fudge is firm and set.
- Cut and serve: Use the parchment overhang to lift the fudge out of the pan and transfer it to a cutting board. Cut into 36 squares and serve.
Notes
- Use binder clips to secure parchment paper edges for easier fudge removal.
- Work quickly when mixing colors to prevent the fudge from setting too soon.
- Gel food coloring is preferred for vibrant colors without affecting fudge consistency.
- Store fudge in an airtight container in the refrigerator for up to one week.
- Bring fudge to room temperature before serving for the best texture.
Nutrition
- Serving Size: 1 piece (approx. 1/36th of recipe)
- Calories: 140
- Sugar: 18g
- Sodium: 30mg
- Fat: 7g
- Saturated Fat: 5g
- Unsaturated Fat: 1.5g
- Trans Fat: 0g
- Carbohydrates: 20g
- Fiber: 0.2g
- Protein: 1g
- Cholesterol: 10mg


