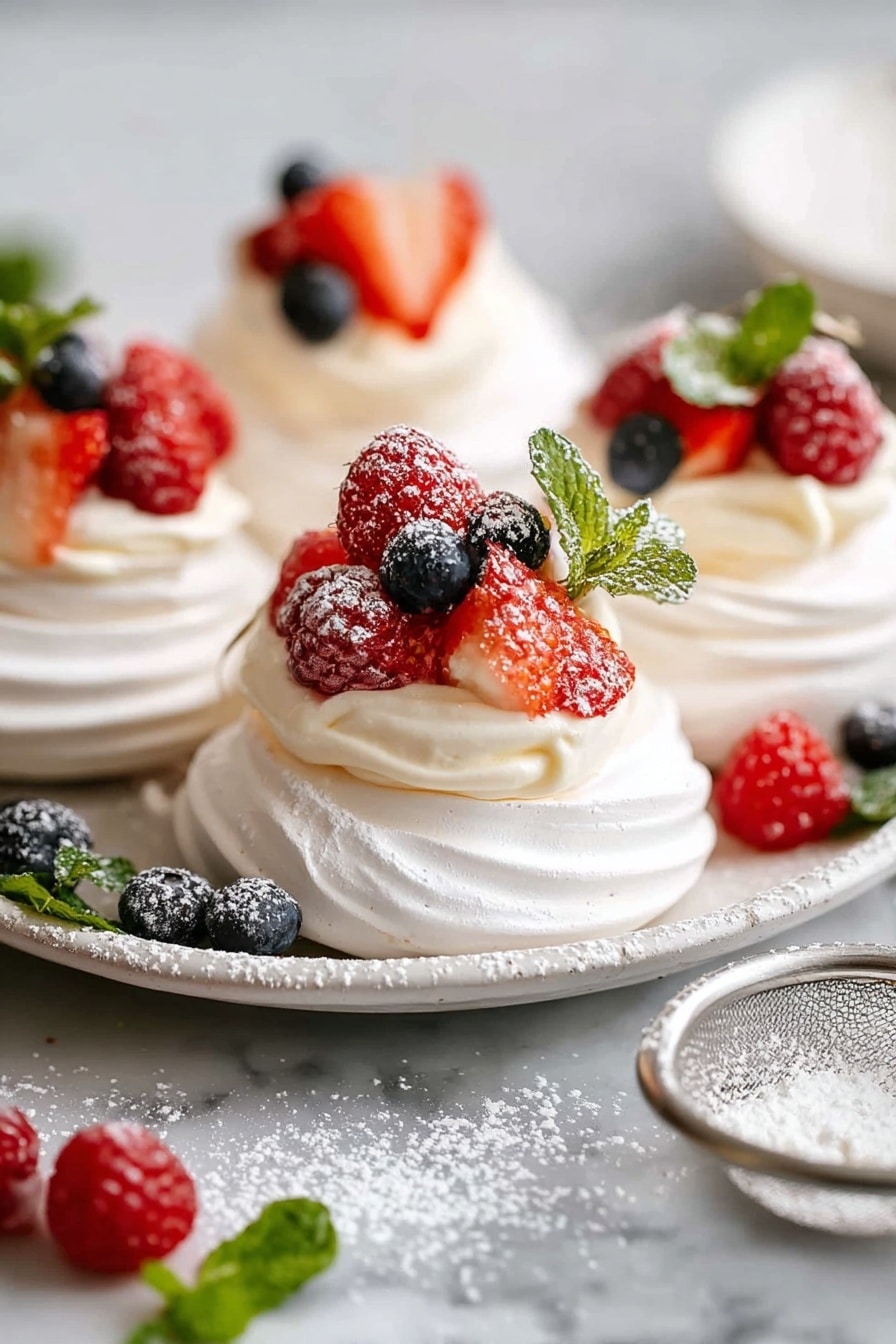
If you have a sweet tooth and love desserts that feel light and airy but are still packed with flavor, then this Mini Pavlovas with Fresh Fruit Recipe is about to become your new favorite. I absolutely love how these little meringue nests turn out—crispy on the outside, marshmallow-soft in the middle, topped with luscious whipped cream and vibrant fresh fruit. Whether you’re planning a special gathering or just want to treat yourself, these mini pavlovas are guaranteed to impress and are surprisingly straightforward to make.
Why You’ll Love This Recipe
- Light & Airy Texture: The meringue has this amazing crispy shell with a soft marshmallow center that melts in your mouth.
- Customizable Fresh Fruit: You can top these with whatever fruit is in season or your personal favorite for a fresh burst of flavor.
- Make Ahead Friendly: The pavlovas can be baked and stored ahead of time, making dessert day super stress-free.
- Kid- and Crowd-Pleaser: I love how everyone—from kids to adults—goes crazy for these elegant yet fun treats.

Ingredients You’ll Need
This Mini Pavlovas with Fresh Fruit Recipe uses simple, everyday ingredients that come together beautifully. The key is fresh eggs for a fluffy meringue and fresh seasonal fruit that brightens every bite.
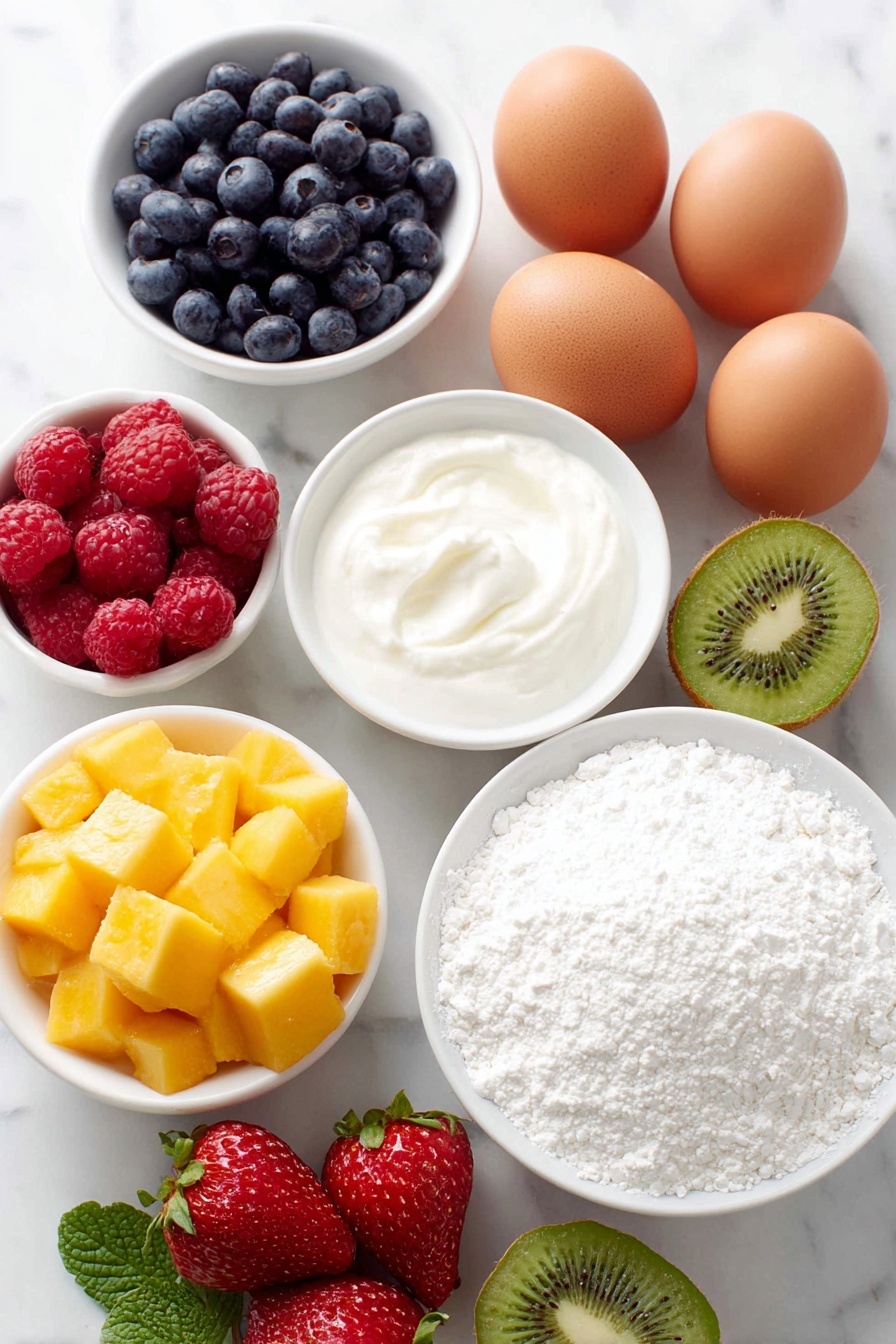
- Egg whites: Fresh eggs work best here—you’ll notice a big difference between fresh and carton whites in fluffiness.
- Caster sugar (superfine sugar): Dissolves quickly and creates that glossy, stable meringue texture you’re aiming for.
- Cornflour (cornstarch): Helps stabilize the pavlova and keeps it from cracking during baking.
- White vinegar: Just a splash stabilizes the meringue perfectly, don’t worry—there’s no vinegar taste.
- Heavy cream (whipping cream): Cold cream whips up airy and holds peaks for a luxurious topping.
- Mascarpone (optional): I love using it to stabilize the cream if I want to whip it the day before.
- Vanilla extract: Adds a warm, sweet undertone that ties everything together.
- Fresh fruit: Strawberries, mango, blueberries, raspberries, kiwi, passionfruit—you name it. Go wild with what you love!
- Mint sprigs and icing sugar: For garnish, adding a lovely fresh aroma and elegant finish.
Variations
I love how versatile the Mini Pavlovas with Fresh Fruit Recipe is—you can switch up the fruit topping depending on the season, or swap mascarpone out if you’re skipping dairy. Making it your own keeps things exciting!
- Vegan Variation: I experimented once with aquafaba instead of egg whites, and while it takes a bit more practice, you can get a surprisingly good meringue base.
- Flavor Twist: Add citrus zest like lemon or lime to the meringue for a refreshing zing.
- Stabilized Cream: If you want to prep ahead, adding mascarpone to your whipped cream helps it hold up overnight without losing fluffiness.
- Fully Crisp Pavlovas: For crunchy nests all the way through, pipe a spiral base with edges and bake longer—perfect if you want no softness inside.
How to Make Mini Pavlovas with Fresh Fruit Recipe
Step 1: Prep the Egg Whites for That Perfect Fluff
Start by separating your egg whites from the yolks while the eggs are still cold—trust me, this makes it much easier and less messy. Measure out about 2/3 cup of egg whites, which usually comes from 5-6 large eggs. Then let them come to room temperature for about 30 minutes; room temp whites whip up so much better than cold ones. I discovered this trick the hard way after struggling with dense meringues!
Step 2: Whip and Sweeten the Meringue
Preheat your oven to 150°C (or 325°F), then start beating your egg whites on high for about a minute until frothy. Now, with the mixer still running, add the caster sugar one tablespoon at a time—this slow addition is key for a glossy, smooth mixture. Beat for about 8 minutes until it’s thick, shiny, and feels smooth between your fingers without any sugar grains. Then fold in your vinegar and cornflour and beat for another 30 seconds. This little stabilizing combo helps you avoid cracks and collapse later.
Step 3: Pipe Your Mini Pavlovas
Line two baking trays with parchment paper (don’t forget to secure it with a dab of meringue at the corners). Spoon your meringue mixture into a piping bag fitted with a nozzle of your choice—it doesn’t have to be fancy! Pipe 12 to 13 mounds, each about 6–7 cm wide and 5 cm tall. Using the back of a spoon, make a shallow little well in each mound to hold your whipped cream and fruit later. You’ll see the pavs shrink a bit during baking, ending roughly 4 cm tall.
Step 4: Bake Low and Slow
Pop both trays in the oven, immediately lowering the heat to 110°C (225°F). Now, here comes the patience part—bake for a good 1 hour and 30 minutes until the pavlovas feel dry to the touch. If they’re sticky, give them more time. Every oven’s a bit different, so keep an eye out. Then, turn off the oven and let them cool completely inside for at least 4 hours or overnight. This cooling step is crucial to get the perfect crunchy shell with a soft center. I usually make them the day before a party and store them carefully.
Step 5: Whip The Cream and Assemble
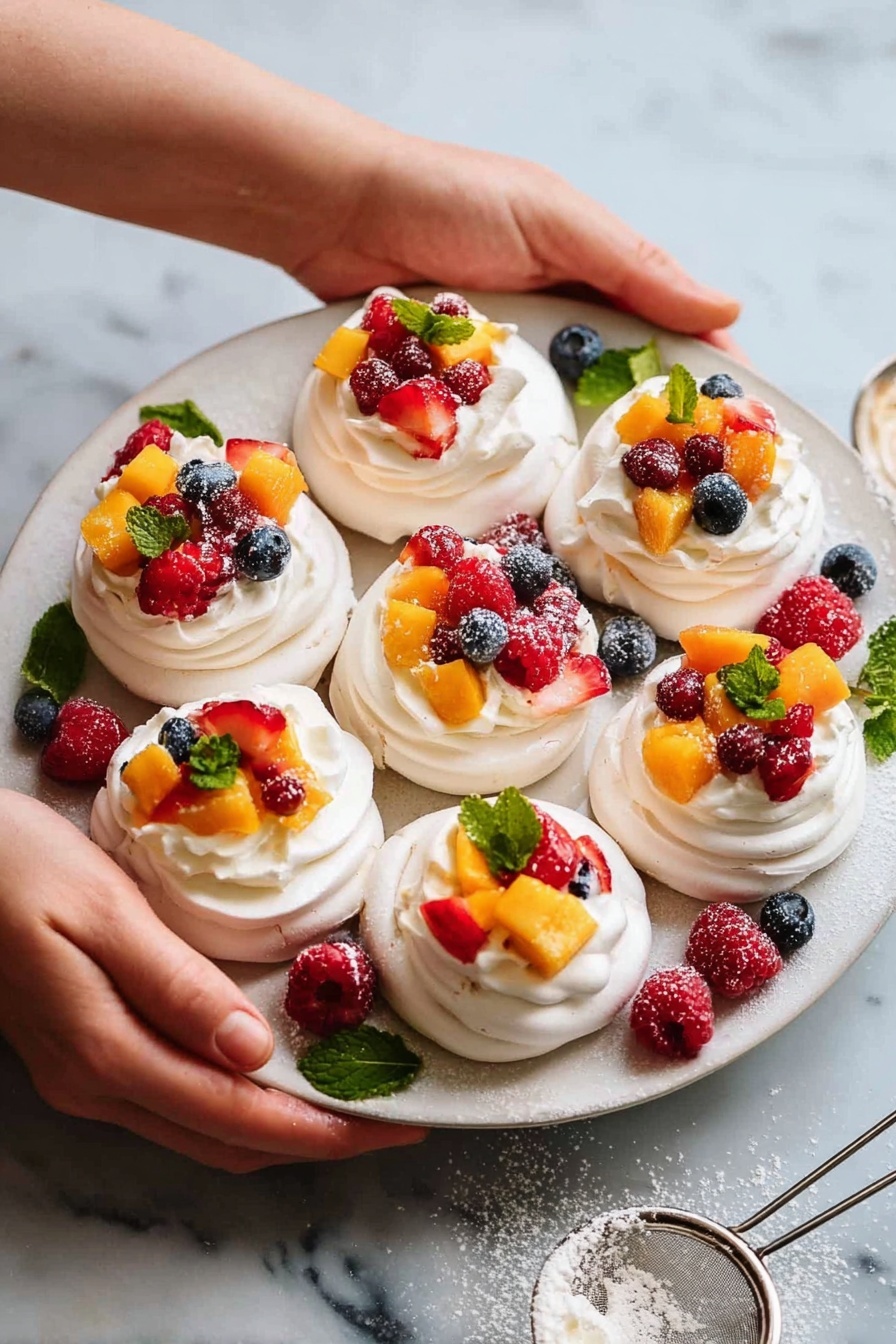
When you’re ready to serve, whip the cold heavy cream with caster sugar and vanilla until soft peaks form. If you want super stable cream that holds all day, toss in some mascarpone right from the start. Dollop the whipped cream generously into the pavlova nests, then crown them with bright, fresh fruit like diced mango, strawberries, kiwi, and a sprinkle of berries. A quick dusting of icing sugar and a mint sprig finish them off beautifully. Honestly, every bite feels like a little celebration!
Pro Tips for Making Mini Pavlovas with Fresh Fruit Recipe
- Use Fresh Eggs: Fresh egg whites whip better and hold more volume, making your pavlovas fluffy and perfect every time.
- Add Sugar Slowly: Pour sugar gradually while beating to avoid grainy meringue and to develop a glossy finish.
- Cool Pavlovas in the Oven: Leaving them overnight in the turned-off oven prevents cracks and helps them dry out evenly.
- Assemble Just Before Serving: Putting on whipped cream and fruit early will make the pavlova soggy, so wait until the last moment for that crisp and fresh experience.
How to Serve Mini Pavlovas with Fresh Fruit Recipe
Garnishes
I always finish my mini pavlovas with a light dusting of icing sugar—it feels like fairy dust and adds a subtle sweetness. Fresh mint sprigs are my go-to because they add a refreshing aroma and a pop of green that makes the dessert look even more inviting.
Side Dishes
This recipe pairs beautifully with a crisp, fresh salad or even a light glass of sparkling wine for celebrations. For a casual tea party, it’s perfect alongside floral teas or a fresh fruit punch. Trust me, the mini pavlovas steal the spotlight every time and don’t need much else to shine.
Creative Ways to Present
One of my favorite ways to dress these up for parties is piping the whipped cream with a star nozzle and layering different fruits by color to create a rainbow effect. Using edible flowers or gold leaf on top makes them look so fancy without much effort—perfect for birthdays or weddings!
Make Ahead and Storage
Storing Leftovers
After baking, let the mini pavlovas cool completely and then store them in an airtight container at room temperature in a cool, dry spot. They keep nicely for 2-3 days, but be mindful the marshmallow center will deflate a bit over time. Don’t refrigerate them uncovered, or they’ll get sticky and chewy.
Freezing
I’ve frozen mini pavlovas successfully by placing them in a single layer on a tray first, freezing thoroughly, and then transferring to a sealed container or bag. When ready, thaw at room temperature. Note: the texture softens a bit after freezing, so I prefer making them fresh, but freezing is handy if you plan ahead.
Reheating
I don’t recommend reheating mini pavlovas, as the delicate texture can be lost. Instead, enjoy them straight from storage at room temperature. If you need them warmer, a gentle blast of warm air from a hairdryer on low can refresh the surface gently without melting the cream or fruit.
FAQs
-
Can I make mini pavlovas without a piping bag?
Absolutely! If you don’t have a piping bag, you can spoon the meringue mixture onto the baking tray in small mounds and gently shape them with the back of your spoon to create a nest. They might look a bit rustic, but they’ll taste just as delicious.
-
Why is my meringue sticky or chewy?
Sticky or chewy meringue usually means it wasn’t baked long enough or cooled properly. Make sure to bake low and slow according to the recipe, and don’t skip the slow cooling in the oven—that’s essential for drying out the shell fully.
-
Can I prepare the whipped cream the night before?
Yes! If you add mascarpone to the cream, it stabilizes it so you can whip it the night before. Store it in a piping bag or airtight container and avoid stirring it before serving to keep it fluffy.
-
What fruits work best on mini pavlovas?
Berries like strawberries, blueberries, and raspberries are classic favorites. You can also add tropical fruits like mango, passionfruit, or kiwi for a vibrant twist. Pick what’s fresh and in season for the best flavor combination.
-
How long do mini pavlovas last after assembling?
Once topped with cream and fruit, mini pavlovas are best enjoyed immediately. The cream will soak into the meringue over time, making it soggy, so assembling just before serving ensures the best texture experience.
Final Thoughts
This Mini Pavlovas with Fresh Fruit Recipe holds a special place in my heart because it’s a dessert that feels both indulgent and light—perfect for any occasion. I love how it’s simple enough to make with everyday ingredients but looks and tastes like you’ve spent hours in the kitchen. Give it a try; I promise you’ll be wowed by how easy it is to impress your family and friends. Once you try it, it’ll become a dessert you turn to again and again!
Print
Mini Pavlovas with Fresh Fruit Recipe
- Prep Time: 25 minutes
- Cook Time: 1 hour 30 minutes
- Total Time: 2 hours 55 minutes (including cooling time of 1 hour 30 minutes and additional 1 hour 30 minutes cooling in the oven)
- Yield: 12 mini pavlovas
- Category: Dessert
- Method: Baking
- Cuisine: Australian
- Diet: Vegetarian
Description
This Mini Pavlovas recipe creates delicate, crispy-on-the-outside, marshmallowy-on-the-inside meringue nests topped with luscious whipped cream and fresh fruit. Perfectly portioned, these pavlovas combine the fluffiness of whipped egg whites stabilized with vinegar and cornflour with the richness of mascarpone-enhanced cream and vibrant seasonal fruit. Ideal for elegant desserts or festive occasions, they offer a light, sweet treat with customizable toppings.
Ingredients
Mini Pavlovas
- 160 ml / 2/3 cup egg whites (5 – 6 large eggs)
- 1 1/4 cups caster sugar (superfine sugar)
- 2 1/2 tsp cornflour / cornstarch
- 1 tsp white vinegar
Whipped Cream
- 1 1/2 cups heavy/thickened cream (whipping cream), COLD
- 1/2 cup mascarpone (optional, for stabilizing)
- 3 tbsp caster sugar / superfine sugar
- 1 tsp vanilla extract
Toppings (choose as desired)
- Strawberries, diced into 1cm / 1/3″ cubes
- Mangoes, diced into 1cm / 1/3″ cubes
- Blueberries
- Raspberries
- Kiwi, sliced
- Passionfruit pulp
- Small mint sprigs
- Icing sugar / powdered sugar, for dusting
Instructions
- Prepare Egg Whites: Separate the egg yolks from the egg whites while cold from the fridge for easier handling. Measure out 160 ml (2/3 cup) of egg whites, which usually requires 5 to 6 large eggs. Set the egg whites aside to come to room temperature for 30 minutes; this helps them fluff better during beating.
- Preheat Oven: Set your oven to 150°C (325°F) for all oven types.
- Add Sugar to Egg Whites: Using a stand mixer or electric beater, beat the egg whites on high speed for 1 minute. Gradually add 1 dessert spoon of caster sugar at a time while continuing to beat, ensuring sugar incorporates fully without grains.
- Beat Until Glossy: Continue beating for about 8 minutes until the mixture is fluffy, glossy, and no sugar granules remain when rubbed between your fingers. Then, add the white vinegar and cornflour and beat for an additional 30 seconds to stabilize the meringue.
- Prepare Baking Trays: Dab a small amount of the mixture on two baking trays to hold parchment in place. Cover the trays with baking paper (parchment).
- Pipe Meringue Mounds: Transfer the meringue mixture into a large piping bag fitted with your preferred nozzle. Pipe 12 to 13 mounds approximately 6 to 7 cm (2.5 inches) wide and 5 cm (2 inches) tall onto the trays. Flatten the top slightly and create a small dent to hold cream and fruit. Aim for finished pavlovas about 4 cm (1.6 inches) high.
- Bake at Lower Temperature: Immediately place both trays in the oven, then reduce the oven temperature to 110°C (225°F) (100°C fan). Bake for 1 hour 30 minutes or until the pavlovas are dry to the touch. If still sticky, extend baking time as oven heat distribution varies.
- Cool in Oven: Turn off the oven and allow the pavlovas to cool completely inside for 4 hours or preferably overnight (around 10 hours). This cooling process dries the shell while keeping the center marshmallowy.
- Store Pavlovas: Once fully cooled, store the pavlovas in an airtight container at room temperature in a cool, dry place until ready to serve.
- Prepare Whipped Cream: In a large bowl, beat the cold heavy cream, mascarpone (if using), caster sugar, and vanilla extract on high speed until soft peaks form. This takes about 1 minute with a stand mixer or 2–3 minutes with a handheld beater.
- Assemble and Decorate: Just before serving, spoon a generous dollop of whipped cream into each meringue nest. Top with your choice of fresh fruit, scatter mint sprigs if desired, and finish with a dusting of icing sugar.
Notes
- Egg Whites: Use fresh eggs for best results and avoid carton egg whites, as they do not whip up as well. Separate whites from yolks while cold for better ease and measure to ensure 2/3 cup volume. Let whites rest at room temperature for 30 minutes before whipping.
- Vinegar and Cornflour: These ingredients stabilize the pavlova meringue and help prevent cracking. Use plain white vinegar for best results.
- Mascarpone for Whipped Cream Stabilization: Adding mascarpone allows whipped cream to be prepared a day ahead and retain fluffiness. Store whipped cream in a piping bag or airtight container without stirring before use to avoid deflation.
- Checking Meringue Readiness: The pavlova should have a dry, lightly crispy shell when ready. The interior remains marshmallowy. Baking times may vary depending on oven heat distribution.
- Meringue Nests for Fully Crisp Texture: Pipe a spiral base and two layers around the edge to create walls. Bake for 2 to 2.5 hours for completely crisp pavlovas. Shelf life is 3 to 5 days in airtight containers.
- Storage Recommendations: Store cooled pavlovas in airtight containers in a cool, dry place. Avoid humidity to prevent stickiness. Serve pavlovas the day they are fully cooled for the best crisp shell and marshmallow texture. Assemble cream and fruit just before serving to prevent sogginess.
Nutrition
- Serving Size: 1 mini pavlova with cream and fruit
- Calories: 220 kcal
- Sugar: 18 g
- Sodium: 15 mg
- Fat: 14 g
- Saturated Fat: 8.5 g
- Unsaturated Fat: 4 g
- Trans Fat: 0 g
- Carbohydrates: 18 g
- Fiber: 1 g
- Protein: 3 g
- Cholesterol: 30 mg


