
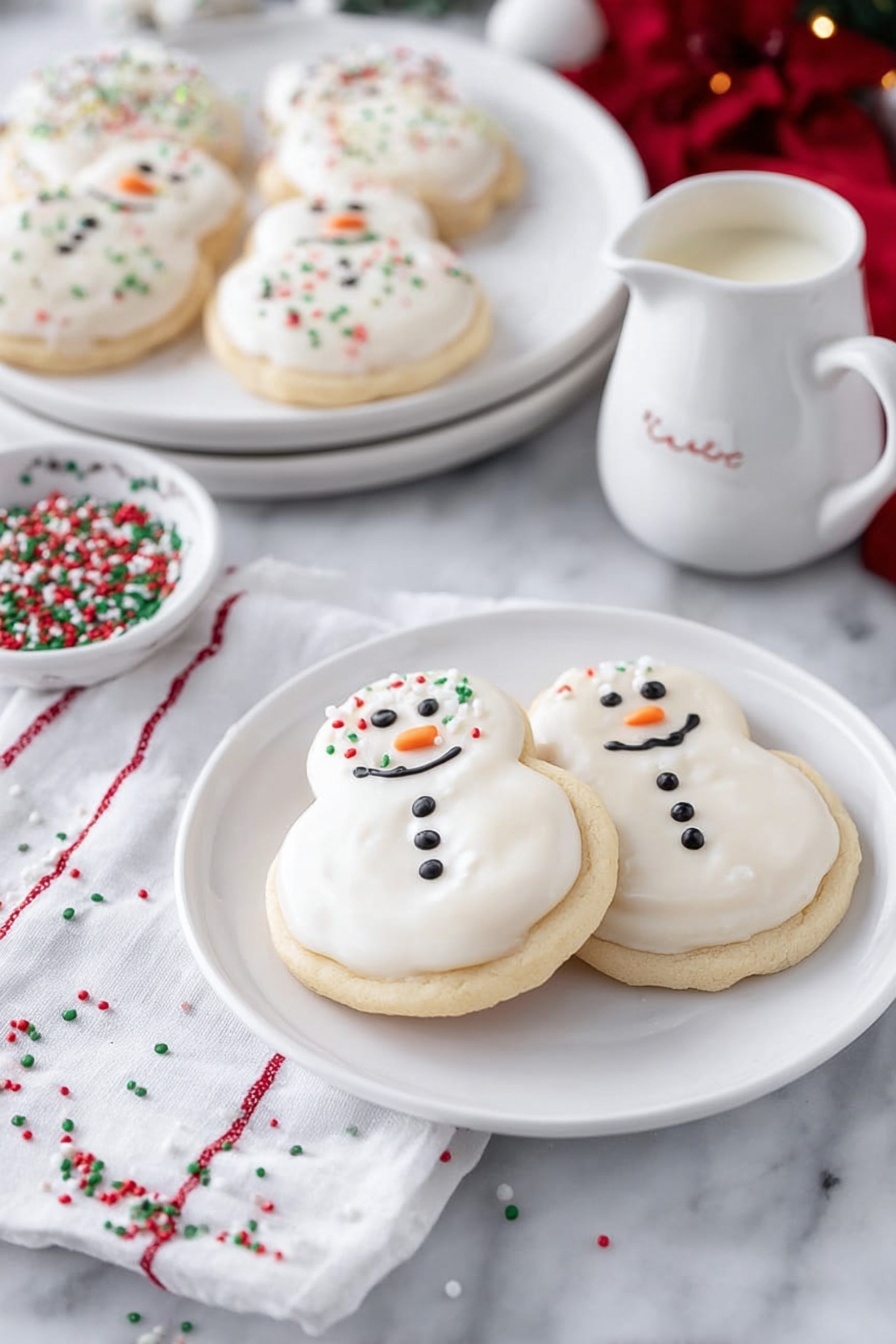
If you’re anything like me, you’ll adore these charming Melted Snowman Sugar Cookies Recipe that bring a playful spin to holiday baking. Melted Snowman Sugar Cookies Recipe combines the classic buttery sweetness of sugar cookies with an enchanting, melted snowman look that’s sure to delight kids and grown-ups alike. Stick with me here—I’ll share all the tips and tricks that make these cookies as fun to make as they are to eat.
Why You’ll Love This Recipe
- Whimsical Design: These cookies don’t just taste great—they’re adorable and perfect for holiday gatherings.
- Easy to Customize: I’ll show you how to personalize them with various sprinkles and candy accents.
- Simple Ingredients: Using a trusted sugar cookie mix means you don’t have to mess with complicated dough-making.
- Fun Decorating Process: The melted candy coat lets you get creative without stress and impress everyone.

Ingredients You’ll Need
The magic here really lies in pairing a classic sugar cookie base with melted candy coating that makes the snowman look like it’s… well, melting! I always pick candy melts that melt smoothly and hold their shape well—trust me, it makes decorating a breeze.

- Betty Crocker sugar cookie mix: I love this one because it’s foolproof and yields soft, buttery cookies every time.
- Unsalted butter: Softened butter blends perfectly to keep cookies tender and flavorful.
- Large egg: Adds just enough moisture and richness to the dough.
- White candy melts: These melt smoothly and create the perfect snowy white coating.
- Black sugar pearls or candy confetti: Perfect for making expressive eyes and buttons—tiny details that count!
- Orange candy-coated sunflower seeds or orange jimmies: Tiny “carrot noses” that add a pop of color and crunch.
- White sparkling sugar: Adds shimmer to mimic glistening snow.
- Festive sprinkles: Fun accents that let you customize and elevate the look.
Variations
I love how versatile the Melted Snowman Sugar Cookies Recipe is. Once you’ve nailed the basics, you can mix it up with different decorations or even tweak the cookie style to fit your vibe. It’s your snowman—dress it up however you like!
- Single Cookie Snowman: I sometimes decorate one large cookie to look like a fully melted snowman—makes it quicker and still adorable.
- Colored Candy Melts: Try pastel candy melts for a funky twist or even tinted white for shimmer.
- Allergy-Friendly: Swap in dairy-free butter and candy melts to make these safe for guests with allergies.
- Different Cookie Doughs: Use your favorite sugar cookie dough or even gingerbread dough for a spiced option.
How to Make Melted Snowman Sugar Cookies Recipe
Step 1: Prep the Oven and Dough
Start by preheating your oven to 375°F and lining a baking sheet with parchment paper—this keeps everything from sticking and makes cleanup easier. Then, mix your sugar cookie dough by combining the package mix, softened butter, and egg. Use a wooden spoon or your mixer’s paddle attachment until you get a soft, workable dough. I learned this step is key to avoid overmixing; it keeps your cookies tender and lovely.
Step 2: Shape the Snowman Cookies
Take about two-thirds of your dough to roll into walnut-sized balls—the bodies of your snowmen. Flatten these slightly, so they bake with a nice flat surface. The rest gets rolled into smaller, marble-sized balls for the heads, but don’t flatten those! Place them on your prepared baking sheet so you have evenly sized pairs.
Step 3: Bake and Cool
Bake for 8-10 minutes or until the edges are barely golden. Trust me, pulling them out too late makes them less tender, so keep an eye on those edges. Let them cool on the baking sheet for about 5 minutes until firm enough to transfer to a cooling rack. Complete cooling before decorating is a must—I found the candy coating won’t set properly on warm cookies.
Step 4: Melt the Candy Coating
Bring a small pot of water to a simmer and set your candy melts in a bowl over the top (a double boiler setup). Stir frequently as they melt so you get smooth, lump-free coating. This step’s fun because you get to watch the transformation—it’s almost mesmerizing!
Step 5: Assemble Your Melted Snowmen
Place parchment or wax paper beneath your cooling rack to catch drips. Dab a small dot of melted candy onto the large cookie near an edge, then press a small cookie on top at a slight angle to create that “melted” look. Once secured, spoon the candy coating over the whole cookie, letting it spill over — this creates the illusion of melting snow. Add eyes with black sugar pearls, a nose with orange candy-coated seeds, and buttons down the body. Sprinkle on some sparkling sugar and festive sprinkles for the final snowy touch.
Step 6: Let Them Dry and Serve
Put the cookies aside to dry completely. This patience pays off when your decoration doesn’t smudge or slide off. Once dry, pop them in an airtight container until you’re ready to serve. My family literally goes crazy for these whenever I bring them to holiday parties!
Pro Tips for Making Melted Snowman Sugar Cookies Recipe
- Don’t Overbake: Pull cookies out at the perfect moment—edges barely golden—to keep them soft and perfect for decorating.
- Work Quickly with Candy Coating: Melted candy can harden fast, so prep your cookies and decorations in advance.
- Use a Flat Surface: Flatten the bottom cookie slightly so your snowman body won’t wobble when you assemble your cookie pairs.
- Be Patient Drying: Let decorated cookies dry fully on a rack—this avoids smearing and keeps your snowmen looking pristine.
How to Serve Melted Snowman Sugar Cookies Recipe
Garnishes
I like to gently dust some extra sparkling sugar over the top right before serving—it gives a frosted, magical snow-like glow. Sometimes a light drizzle of white chocolate adds extra flair, but the classic simplicity of the original sparkling sugar is what I reach for most.
Side Dishes
These cookies pair wonderfully with a cozy cup of hot cocoa or spiced apple cider—perfect for chilly winter nights. I often serve them alongside a simple cheese platter for a sweet and savory mix during holiday get-togethers.
Creative Ways to Present
For holiday parties, I’ve arranged these cookies standing in a “snowdrift” of white coconut flakes or powdered sugar on a festive platter. Tucking a few cinnamon sticks and pine sprigs nearby instantly ups the cozy-factor and looks stunning on the dessert table.
Make Ahead and Storage
Storing Leftovers
I store leftovers in an airtight container layered with parchment paper to keep the cookies from sticking. They stay fresh and chewy for about 5 days, making them a great make-ahead treat for busy weeks.
Freezing
Yes! I’ve frozen these cookies successfully by wrapping individual cookies in plastic wrap and placing them in a freezer-safe container. When you’re ready, thaw them at room temperature—just note the candy coating may lose a bit of its shine, but the taste holds strong.
Reheating
If you want that just-baked warmth, I recommend briefly warming cookies in a microwave for 10-15 seconds on low power—just enough to warm but not melt the candy coating again. It’s delightful with a tall glass of milk!
FAQs
-
Can I use a homemade sugar cookie dough instead of the mix for the Melted Snowman Sugar Cookies Recipe?
Absolutely! Feel free to use your favorite sugar cookie dough, but keep in mind the baking times might vary slightly. Just make sure your dough holds its shape well in balls for the distinctive melted snowman look.
-
What if I don’t have candy melts—can I use white chocolate instead?
White chocolate can work, but it usually needs a bit of added oil or shortening to melt smoothly and cover cookies well. Candy melts are more forgiving and set up easier for decorated cookies like these.
-
How long do these cookies stay fresh?
When stored in an airtight container at room temperature, these decorated cookies stay fresh for about 5 days. Beyond that, they may start to dry out or lose their soft texture.
-
Can I decorate these cookies with kids?
Definitely! Kids love the fun of placing eyes, noses, and buttons, and spooning melted candy over cookies is always a hit. Just keep an eye on the hot melted candy part and handle that yourself.
Final Thoughts
I absolutely love how the Melted Snowman Sugar Cookies Recipe brings joy to my kitchen every holiday season. Not only do these cookies taste like the perfect sugar cookie, but decorating them melts away stress and fills the room with smiles. I remember the first time I tried these; my kids couldn’t stop giggling about “melting” snowmen that were just too cute to eat—until they did, of course! You’ll find that once you make this recipe, it becomes a beloved tradition you’ll want to share year after year. Go ahead, grab your mixing bowl, and let’s make some sugary snow magic happen!
Print
Melted Snowman Sugar Cookies Recipe
- Prep Time: 1 hour
- Cook Time: 9 minutes
- Total Time: 1 hour 9 minutes
- Yield: 16 cookies
- Category: Dessert
- Method: Baking
- Cuisine: American
- Diet: Vegetarian
Description
These Melted Snowman Cookies are a delightful and festive treat perfect for holiday celebrations. Featuring soft sugar cookies topped with melted white candy coating and adorned with candy eyes, carrot noses, and button details, these charming cookies combine a fun decorating experience with delicious flavors. Easy to make and visually appealing, they will surely be a hit at any winter gathering.
Ingredients
Cookie Dough
- 1 package Betty Crocker sugar cookie mix (1 pound 1.5 ounces)
- ½ cup unsalted butter, softened
- 1 large egg
Decorations
- 12 ounces white candy melts
- Black sugar pearls or black candy confetti for eyes and buttons
- Orange candy-coated sunflower seeds or orange jimmies for noses
- White sparkling sugar
- Various festive sprinkles
Instructions
- Preheat and Prepare Baking Sheet: Preheat the oven to 375°F. Line a baking sheet with parchment paper to ensure cookies bake evenly and do not stick.
- Make the Dough: In a large bowl or the bowl of a stand mixer fitted with a paddle attachment, combine the sugar cookie mix, softened butter, and egg. Mix until a soft dough forms, either by hand with a wooden spoon or with the mixer.
- Shape Cookies: Divide the dough by rolling about two-thirds into walnut-sized balls for the snowman bodies and flatten slightly before placing on the prepared baking sheet. Roll the remaining dough into marble-sized balls for the snowman heads and place them on the baking sheet without flattening. Aim for an equal number of heads and bodies.
- Bake Cookies: Bake the cookies for 8-10 minutes until the edges are barely golden. Let them cool on the baking sheet for around 5 minutes until firm enough to transfer. Move them to a cooling rack to cool completely before decorating.
- Melt Candy Coating: Bring 1-2 inches of water to a simmer in a small pot. Place the white candy melts in a heatproof bowl that fits on top of the pot without touching the water. Stir frequently until the candy melts are smooth and fully melted.
- Prepare Workspace: Place waxed or parchment paper underneath the cooling rack to catch drips during decorating.
- Assemble Snowmen: Use a dot of melted candy coating on the bottom of each small cookie and adhere it to one side of a larger cookie, forming the snowman shape. After this sets, spoon more melted candy coating over the entire snowman, allowing some to drip over the edges.
- Decorate Faces and Buttons: Quickly place two black sugar pearls or confetti on the smaller cookie for eyes and one orange candy-coated sunflower seed or jimmy in the center for a carrot nose. Add three black sugar pearls or confetti sprinkles on the larger cookie as buttons. Optionally, add other festive sprinkles and a dusting of white sanding sugar to complete the look.
- Dry and Store: Allow the decorated snowmen to dry completely before storing them in an airtight container to preserve freshness.
Notes
- Instead of forming a body and head, simply decorate one large cookie to represent a completely melted snowman.
- Alternative decoration ideas include using cookie icing to draw arms or sour belt candies to create scarves.
- You can substitute your preferred sugar cookie mix or use pre-made cut-out sugar cookies, using 2-inch to 2.5-inch circles for the bodies and 1-inch circles for the heads.
Nutrition
- Serving Size: 1 cookie
- Calories: 180
- Sugar: 15g
- Sodium: 120mg
- Fat: 8g
- Saturated Fat: 5g
- Unsaturated Fat: 2g
- Trans Fat: 0g
- Carbohydrates: 25g
- Fiber: 0.5g
- Protein: 1g
- Cholesterol: 15mg


