
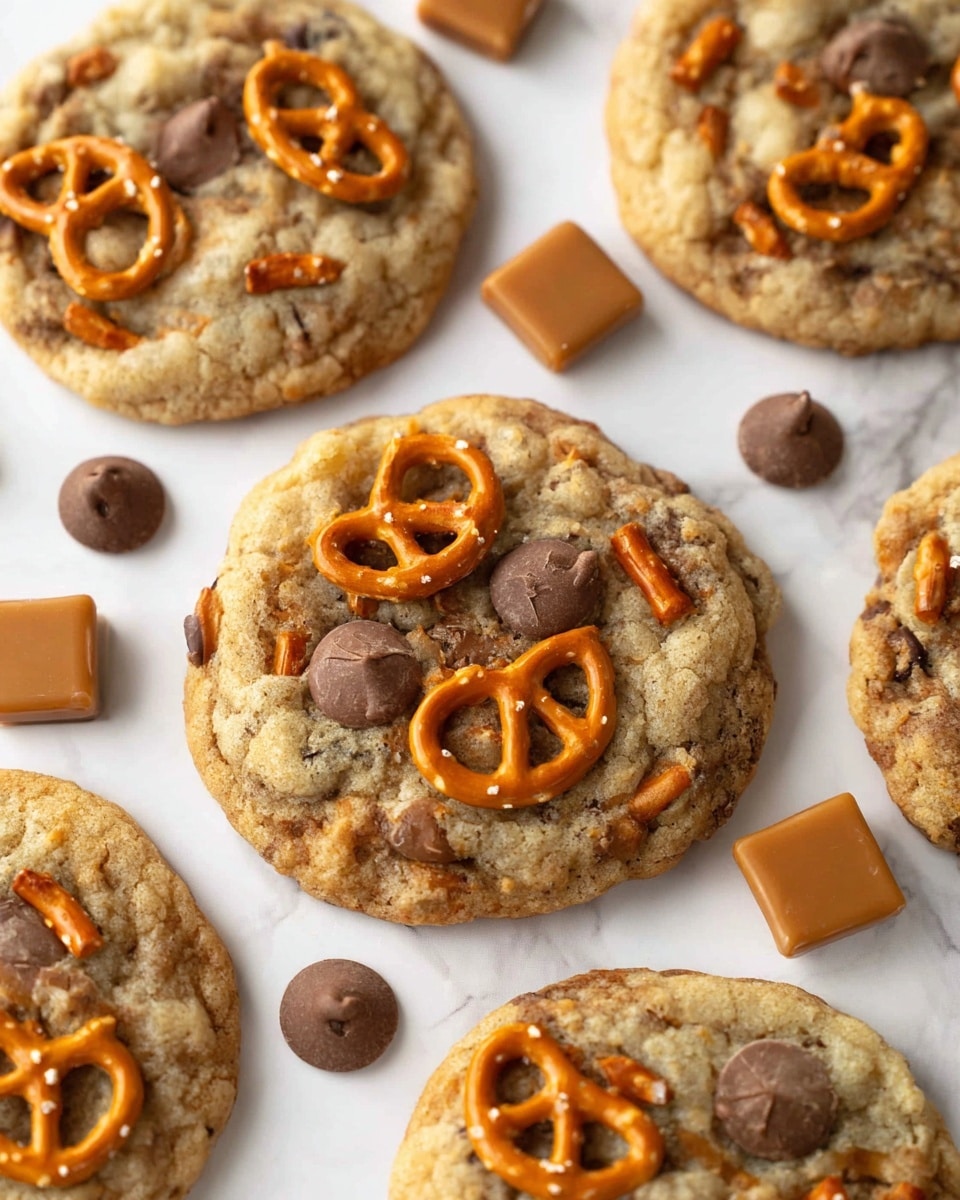
I absolutely love this Kitchen Sink Cookies Recipe because it’s like a flavor explosion with every bite! You’re tossing in a little bit of everything—chocolate, pretzels, caramel—all mixed into one gooey, chewy cookie. It’s perfect when you just want to use up odds and ends from your pantry without worrying about strict measurements or fancy baking techniques.
When I first tried this recipe, I was amazed at how the salty pretzels and sweet caramel chunks balanced each other out. You’ll find that it works great for when friends drop by unexpectedly or when you just want a no-fuss sweet treat that feels special. Trust me, these cookies will become your new go-to anytime snack or dessert.
Why You’ll Love This Recipe
- Flexible Ingredients: You can customize with whatever mix-ins you have on hand—perfect for pantry cleanouts.
- Simple Method: No mixer needed—just melt butter and stir, so it’s easy to whip up last-minute.
- Perfect Texture: Crispy edges with chewy, gooey centers thanks to the caramel chunks.
- Crowd-Pleaser: My family goes crazy for these—everyone asks for seconds and sometimes thirds!

Ingredients You’ll Need
The ingredients in this Kitchen Sink Cookies Recipe come together beautifully, balancing sweetness, saltiness, and texture. Each one plays a role, whether it’s the rich butter for moisture or the pretzels for that satisfying crunch.
- Unsalted butter: Melting it gives the dough a wonderful texture and depth of flavor without being greasy.
- Light brown sugar: Adds moisture and a slight caramel note that meshes well with the caramel chunks.
- Granulated sugar: Helps with a slight crispiness around the edges—don’t skip it!
- Egg: Binds everything together, making the dough rich and chewy.
- Vanilla extract: The secret ingredient that enhances all the flavors in the cookie.
- Baking soda: Ensures these cookies get just the right amount of rise and softness.
- Salt: Balances the sweetness and intensifies the chocolate and caramel flavor.
- All-purpose flour: Gives the dough structure but keeps it soft and chewy when not overmixed.
- Chocolate chips: I like to split semi-sweet and milk chocolate for variety in every bite.
- Pretzels: The salty crunch takes these cookies from ordinary to unforgettable.
- Caramels: Chopped chunks melt into gooey pockets that are pure bliss.
Variations
I love tweaking this Kitchen Sink Cookies Recipe based on what’s in my pantry or what my family is craving. Don’t be afraid to experiment—you can really make this recipe your own.
- Nutty Delight: I sometimes add chopped walnuts or pecans, which add a warm crunch that pairs so well with the sweet caramel bits.
- Double Chocolate: For a richer cookie, swap out half the flour for cocoa powder—your chocolate lovers will be thrilled.
- Gluten-Free: I’ve had success subbing a 1:1 gluten-free flour blend; just make sure you don’t overmix.
- Vegan Version: Use a flax egg and dairy-free butter to make these cookies vegan-friendly without compromising on taste.
How to Make Kitchen Sink Cookies Recipe
Step 1: Prep Your Mix-Ins
Start by chopping half your chocolate chips into small shards and slivers—this helps create those little pockets of melty chocolate goodness. Next, cut your caramels into chunks roughly the same size as the chocolate and break up the pretzels into bite-sized bits. Set all these aside so they’re ready to fold in later.
Step 2: Melt Butter and Mix Sugars
Pop your unsalted butter in the microwave, covered with a paper towel to avoid splatters, for about 30 to 60 seconds until completely melted and hot. Stir in light brown sugar and granulated sugar using a spatula—this is one time I skip the mixer! Letting the sugars cool the butter naturally helps the dough form better without cooking the egg.
Step 3: Add Egg, Vanilla, and Leavening
Next, stir in the egg and vanilla extract until smooth. Then sprinkle in baking soda and salt, mixing gently to combine. These steps give your cookies that perfect balance of rise and flavor.
Step 4: Incorporate Flour and Mix-Ins
Add the all-purpose flour and mix until just combined—the dough will feel wet and sticky, which is totally normal. Now fold in your chopped chocolate, whole chocolate chips, pretzels, and caramel chunks. Letting the dough rest for a couple of minutes helps it firm up so it’s easier to handle; if it’s still too sticky, sprinkle in a tablespoon or two of flour.
Step 5: Shape and Bake
Line your baking sheet with parchment paper, then scoop roughly ¼ cup of dough and roll into balls. Flatten the top slightly into thick discs; this step is key for achieving that lovely chewy texture with crispy edges. If you want, press some extra pretzel pieces on top—my family thinks it makes the cookies look extra inviting. Pop them into the oven at 350°F for 12 to 14 minutes—aim for golden edges and slightly underbaked centers for that perfect gooey bite.
Step 6: Cool and Enjoy
When the timer goes off, if your cookies look wonky, quickly press them back into shape using a bowl just a little bigger than the cookie—this trick saves the day every time! Then place the pan on a cooling rack and let the cookies finish cooking for 10 to 15 minutes before moving them to a wire rack. Warm or fully cooled, these cookies are delicious—you might want to eat them right away when the caramel is still melty.
Pro Tips for Making Kitchen Sink Cookies Recipe
- Don’t Skip Resting the Dough: Letting the dough sit for a minute helps it firm up, which makes shaping easier and prevents the cookies from spreading too much.
- Press Cookies Right After Baking: The wiggle technique with the bowl immediately shapes cookies back into neat rounds before they harden.
- Balance Your Salt and Sweet: Use salted pretzels or add a pinch of flaky sea salt on top for an extra flavor punch.
- Skip the Mixer: I learned this the hard way—a hand spatula keeps the dough tender and prevents overmixing that can make cookies tough.
How to Serve Kitchen Sink Cookies Recipe
Garnishes
I usually garnish mine just with extra pretzel pieces pressed right on top before baking because it adds a lovely texture and makes the cookies look extra inviting. Sometimes I sprinkle a little flaky sea salt on top after baking for that perfect sweet-salty contrast.
Side Dishes
These cookies are amazing just on their own, but I love pairing them with a big glass of cold milk or a cup of strong coffee. They’re also great alongside a bowl of vanilla ice cream for an indulgent dessert treat.
Creative Ways to Present
For special occasions, I like to stack the cookies on a pretty platter with small bowls of extra chocolate chips and caramel candies around, so guests can “add more” if they want. Wrapping a few in parchment paper tied with twine makes a charming homemade gift!
Make Ahead and Storage
Storing Leftovers
I store leftover cookies in an airtight container at room temperature for up to 4 days. Placing a slice of bread in the container keeps them soft, a little trick I discovered that works wonders to maintain that fresh-baked texture.
Freezing
These cookies freeze beautifully! I wrap each cookie in plastic wrap, then place them in a freezer-safe bag. When I’m ready to eat one, I just let it thaw for an hour or so at room temp, and it tastes just like fresh.
Reheating
To enjoy a freshly-baked feel, I pop my leftover cookies in a 350°F oven for about 5 minutes. This revives the gooey caramel and melty chocolate, making them taste like they just came out of the oven.
FAQs
-
Can I use any type of caramel in this Kitchen Sink Cookies Recipe?
Yes! I prefer Kraft caramels sliced into chunks because they melt nicely and create gooey pockets. Caramel bits can work too but don’t melt as deeply, so the texture is a bit different. Avoid hard caramel candies as they won’t soften properly during baking.
-
Do I have to use pretzels, or can I substitute something else?
Pretzels add a wonderful salty crunch, but if you’re out, chopped nuts, potato chips, or even crispy cereal can work as a creative swap. Just be mindful of the salt level and texture to keep the cookie balanced and interesting.
-
Can I make the dough ahead of time?
Absolutely! You can prepare the dough and refrigerate it for up to 24 hours before baking. Chilling helps the flavors meld and can make shaping the dough easier since it firms up. Just let the dough sit at room temperature for 10 minutes before scooping.
-
What if my cookies spread too much while baking?
This can happen if the dough is too warm or too wet. To prevent spreading, chill the dough briefly before baking or add a tablespoon of flour if it’s very sticky. Also, flattening the dough balls helps them bake evenly without becoming cakey.
-
Can I make smaller cookies with this recipe?
Yes, you can! Just reduce the baking time by a couple of minutes since smaller cookies bake faster. Keep an eye on them and look for the edges to turn golden while the center remains slightly soft.
Final Thoughts
This Kitchen Sink Cookies Recipe has become one of those comforting, go-to treats I love making when I want a hug in cookie form. It’s simple, forgiving, and packed with so many delicious surprises in every bite. I hope you enjoy making and sharing these as much as my family and I do—let them bring a little extra joy and warmth to your kitchen.
Print
Kitchen Sink Cookies Recipe
- Prep Time: 10 minutes
- Cook Time: 12 minutes
- Total Time: 25 minutes
- Yield: 9 large cookies
- Category: Dessert
- Method: Baking
- Cuisine: American
Description
Delight in these Kitchen Sink Cookies, a flavorful and irresistible treat packed with a variety of textures and tastes including chocolate chips, pretzels, and melty caramel chunks. Perfectly chewy with a slight crunch from pretzels and gooey caramel centers, these cookies are easy to make and bake in under 30 minutes, making them an ideal dessert or snack to satisfy any sweet craving.
Ingredients
Wet Ingredients
- 1/2 cup unsalted butter (1 stick)
- 1 large egg
- 2 teaspoons vanilla extract
Dry Ingredients
- 1/2 cup light brown sugar, packed
- 1/4 cup granulated sugar
- 1/2 teaspoon baking soda
- 1/4 teaspoon salt
- 1 1/4 cups all-purpose flour (not packed, scooped and leveled)
Mix-ins
- 1 cup chocolate chips (1/2 cup chopped semi-sweet and milk chocolate, 1/2 cup whole chocolate chips)
- 1/2 cup pretzels, chopped
- 1/2 cup caramel candies, chopped (about 10 Kraft caramels)
Instructions
- Preheat Oven: Preheat your oven to 350°F (175°C) to ensure it’s ready for baking the cookies.
- Prepare Mix-ins: Chop half of the chocolate chips into small shards and slivers. Cut the caramels into small chunks roughly the size of the chocolate chips, and break up the pretzels into pieces. Set all aside.
- Melt Butter: Place the unsalted butter in a medium microwave-safe bowl and cover with a paper towel to prevent splattering. Melt in the microwave for 30 to 60 seconds until fully melted and hot, but not boiling.
- Combine Sugars and Butter: Stir in the light brown sugar and granulated sugar with a spatula until thoroughly combined. Allow the mixture to cool slightly if still piping hot.
- Add Egg and Vanilla: Stir in the egg and vanilla extract until fully incorporated, creating a smooth mixture.
- Add Leavening and Salt: Mix in baking soda and salt to distribute evenly throughout the batter.
- Incorporate Flour: Gradually add the all-purpose flour and stir until no flour streaks remain. The dough will be wet and sticky at this stage.
- Mix in Add-ins: Fold in the chopped chocolate chips, whole chocolate chips, chopped pretzels, and chopped caramel chunks. Let the dough sit for 1 to 2 minutes to firm up slightly. If still too sticky, add 1 to 2 tablespoons of flour as needed.
- Shape Cookies: Line a baking sheet with parchment paper. Scoop ¼ cup portions of dough and gently roll into balls. Flatten each ball into a thick disc shape to prevent cakey texture. Optionally press extra pretzel pieces on top for garnish.
- Bake: Bake at 350°F for 12 to 14 minutes until edges and tops are lightly browned and centers appear slightly underbaked. A 13-minute bake time is ideal in most ovens.
- Shape Cookies: If cookies are unevenly shaped after baking, immediately use a slightly larger bowl to gently nudge them into a round shape while still warm.
- Cool: Transfer the baking sheet to a cooling rack and let the cookies cool on the pan for 10 to 15 minutes to finish baking and set. Then transfer cookies to a wire rack to cool completely or enjoy warm.
- Serve: Enjoy the cookies slightly warm for gooey caramel or fully cooled for a firmer texture. Both ways are delightful.
Notes
- Do not use a mixer—the dough is best mixed by hand using a spatula.
- The dough is naturally sticky; allowing it to sit briefly after mixing helps it firm up for easier handling.
- If the dough remains too sticky to shape, add 1-2 tablespoons more flour a little at a time.
- Pressing pretzel pieces on top before baking adds extra crunch and visual appeal.
- Store cookies in an airtight container to keep them fresh for several days.
- Allow cookies to cool on the baking sheet to finish baking gently before transferring; will help maintain the soft center.
Nutrition
- Serving Size: 1 large cookie
- Calories: 230
- Sugar: 16g
- Sodium: 150mg
- Fat: 12g
- Saturated Fat: 7g
- Unsaturated Fat: 4g
- Trans Fat: 0g
- Carbohydrates: 28g
- Fiber: 1g
- Protein: 3g
- Cholesterol: 35mg


