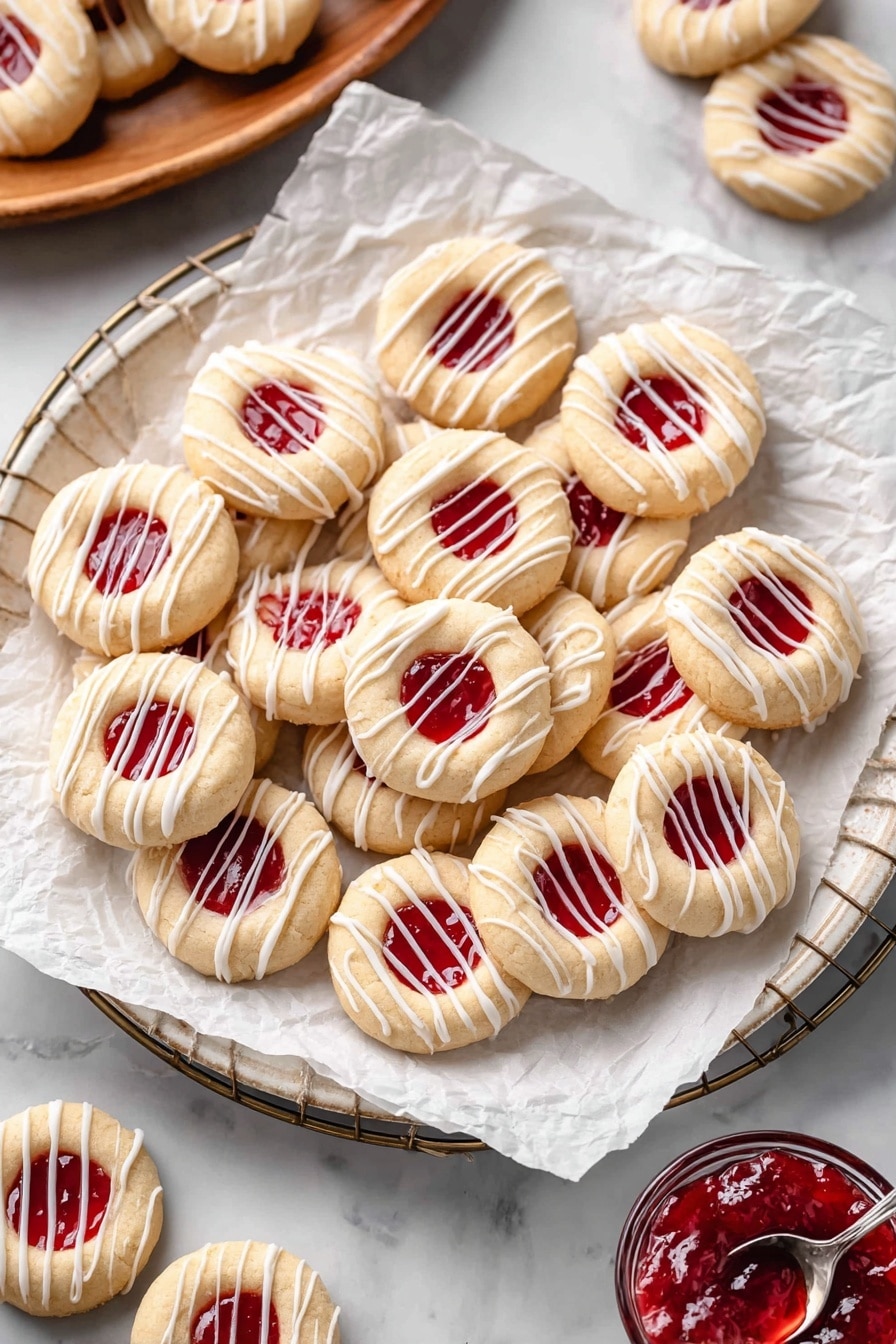
If you’re looking for a sweet, buttery cookie that’s just as fun to make as it is to eat, you’re going to adore this Jam Thumbprint Cookies Recipe. I absolutely love how these little treats turn out—perfectly soft, with a delightful jammy center that feels like a cozy hug. When I first made them, my family went crazy for these, and I discovered a few tricks that make the process smooth and enjoyable. Trust me, once you try this recipe, you’ll be reaching for it whenever you want a homey, delicious cookie that’s simple yet impressive.
Why You’ll Love This Recipe
- Super Easy to Make: The straightforward steps and simple ingredients mean you can whip these up quickly, even on a busy day.
- Customizable Flavors: You can fill these cookies with your favorite jam, making each batch unique to your taste buds.
- Perfect Texture: Soft, buttery edges with a slightly chewy jam center – so pleasing every time.
- Great for Any Occasion: Whether it’s a casual snack or a festive gathering, these cookies never fail to impress.

Ingredients You’ll Need
Getting the right ingredients is key to making this Jam Thumbprint Cookies Recipe come together beautifully. Each one plays a vital role, from the tender crumb of the cookie dough to the lovely burst of flavor from the jam.
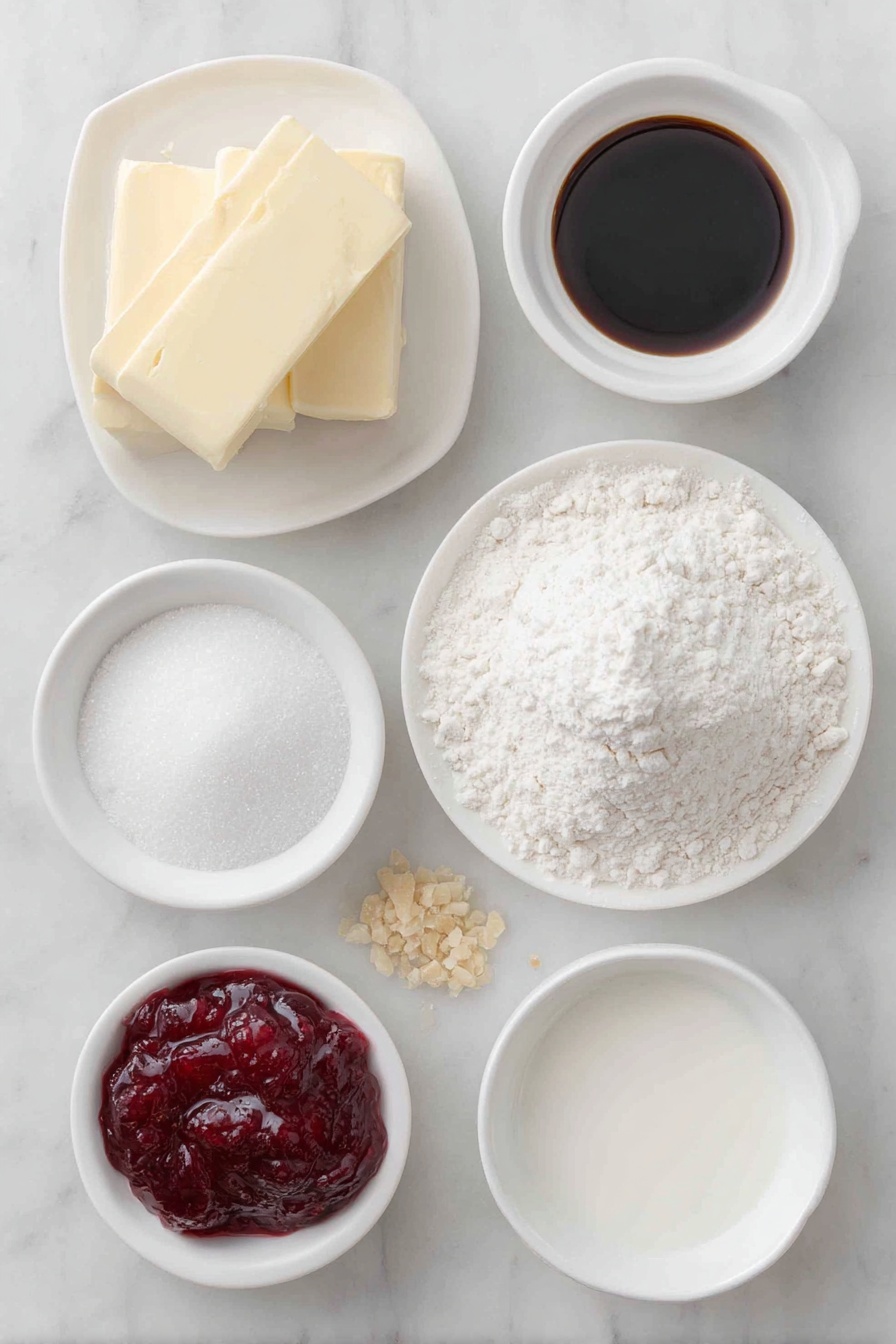
- Unsalted Butter: Softened butter is the foundation for that rich, tender crumb you want in a thumbprint cookie.
- Granulated Sugar: Sweetens the dough just enough without overpowering the jam filling.
- Pure Vanilla Extract: Adds warm, comforting depth to the cookie flavor.
- Salt: Balances the sweetness and enhances all the flavors.
- All-Purpose Flour: The sturdy base that shapes your cookie’s texture perfectly.
- Jam: This is where you get to get creative! Pick your favorite flavor – raspberry, strawberry, marmalade, or even homemade jam if you like making things from scratch.
- Confectioners’ Sugar: For the delicate glaze that adds a subtle sweetness and pretty finish.
- Almond Extract: Infuses the glaze with a lovely almond aroma that complements the jam beautifully.
- Milk: Adjusts the glaze consistency so it drizzles just right over the cookies.
Variations
This Jam Thumbprint Cookies Recipe is such a joy to tweak. I often swap jellies and jams around based on seasons or what’s on hand, and sometimes I even add a little cinnamon or lemon zest to the cookie dough for a twist. Don’t be afraid to make this recipe your own – that’s half the fun!
- Jam Flavors: I’ve tried strawberry, raspberry, apricot, and orange marmalade – each brings its own sparkle. Homemade jam makes it even more special.
- Nutty Twist: Adding a bit of finely chopped nuts, like pistachios or almond slivers, on top of the jam before baking adds a lovely crunch.
- Gluten-Free Version: Using a gluten-free flour blend works well – I had to adjust chilling time slightly but it’s entirely doable.
- Chocolate Dip: For a richer treat, try dipping half the cookie in melted dark chocolate after glazing.
How to Make Jam Thumbprint Cookies Recipe
Step 1: Cream Butter and Sugar to Fluffy Perfection
Start by creaming the softened butter and granulated sugar together using a stand mixer or hand mixer. Work it on medium speed for about 2 to 3 minutes until it’s nice and light – this step helps create that tender texture you’re aiming for. Don’t rush this part; properly creamed butter makes all the difference.
Step 2: Add Vanilla, Salt, and Fold in Flour
Next, beat in the vanilla extract and salt until fully combined. Then, reduce the mixer speed to low and gradually add the all-purpose flour. Mix just until the dough comes together—don’t over-mix here, or your cookies might turn out tough. The dough will be slightly crumbly but should hold when you press it into a ball.
Step 3: Chill the Dough
Wrap the dough tightly in plastic wrap and pop it in the fridge for at least one hour. I used to skip this step, but I learned the hard way that chilling helps the flavors develop and the dough hold its shape during baking.
Step 4: Shape the Cookies and Add Jam
Preheat your oven to 350°F and line a baking pan with parchment paper or a silicone mat. Scoop out about 1 tablespoon of dough and roll it into a smooth ball. Place the balls spaced apart on your baking sheet, then gently press your thumb (or the back of a measuring spoon) into the center of each one to create the signature thumbprint. Fill each indentation with your chosen jam, but be careful not to overfill – you want a little well that bakes up nicely without spilling over.
Step 5: Bake and Cool
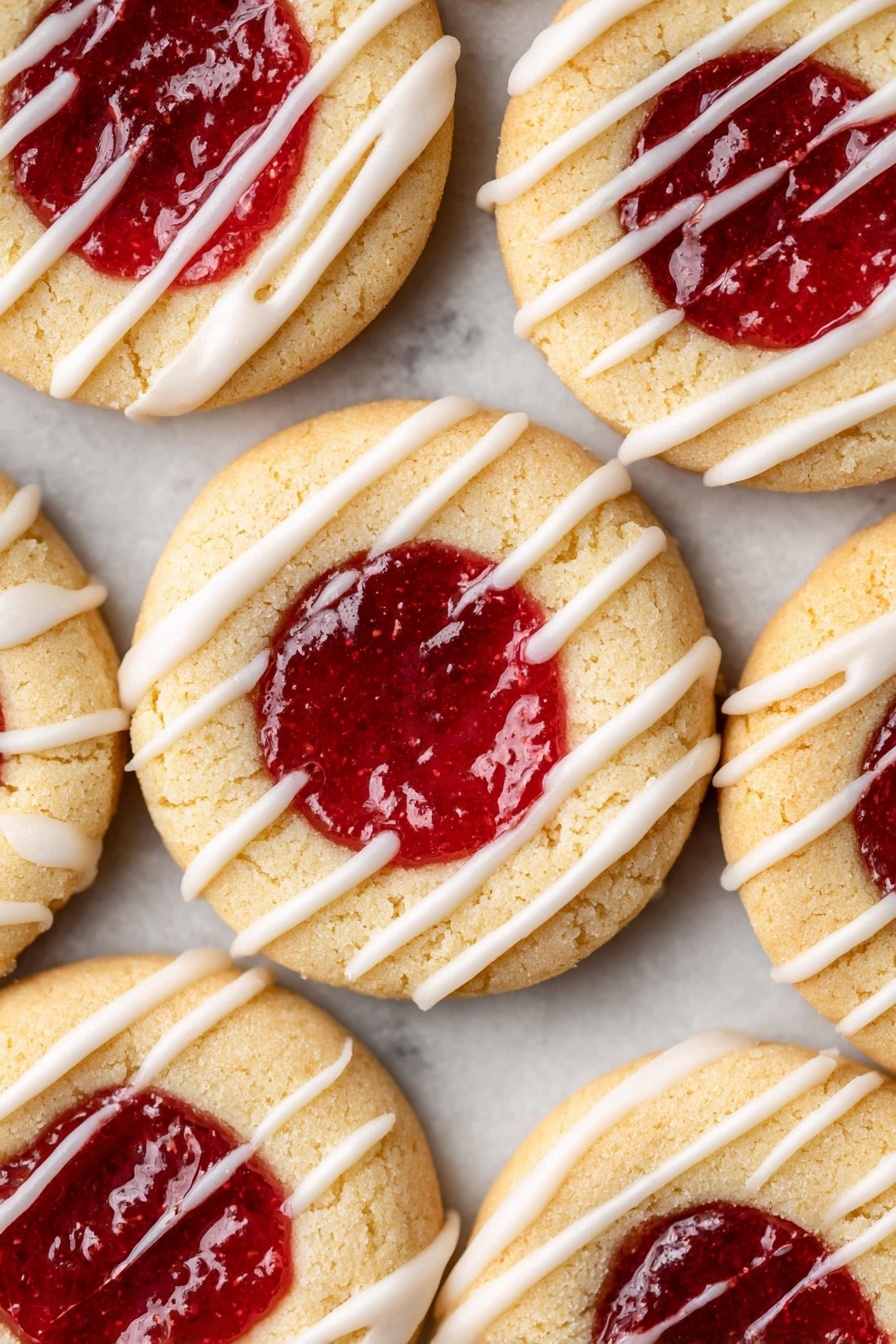
Pop the cookie sheet into the refrigerator while the oven heats up – this helps maintain the cookie shape. Then bake for 13-15 minutes until the edges turn a lovely light golden brown. After baking, let the cookies cool on the pan for about 5 minutes before carefully transferring them to a wire rack to cool completely. That jam center will be soft and inviting.
Step 6: Whip Up the Almond Glaze
While the cookies cool, whisk together confectioners’ sugar, almond extract, and 1 tablespoon of milk in a bowl. Add more milk a teaspoon at a time until the glaze reaches a drizzle-friendly consistency – thick enough to hold shape but thin enough to pour. Use a spoon or piping bag to drizzle the glaze elegantly over the top of each cookie. Let them set for an hour or two before indulging.
Pro Tips for Making Jam Thumbprint Cookies Recipe
- Chill That Dough: Don’t skip chilling—it prevents spreading and helps maintain that classic thumbprint shape.
- Be Gentle with Jam: Overfilling the jam well leads to messy cookies; a small spoonful is enough for a perfect burst of flavor.
- Use Room Temperature Butter: This makes creaming easier and results in a lighter cookie dough.
- Test Your Oven Temperature: I once baked too hot and ended up with browned bottoms—an oven thermometer is a baker’s best friend.
How to Serve Jam Thumbprint Cookies Recipe
Garnishes
I like to add a light sprinkle of finely chopped nuts like pistachios or chopped almonds on top of the jam before baking sometimes — it adds a bit of crunch and a pretty finish. Once glazed, a little grated lemon zest or edible flowers can elevate the presentation beautifully.
Side Dishes
These cookies are a match made in heaven with a hot cup of tea or coffee. I often serve them alongside a creamy latte or herbal tea for an afternoon treat. They also pair nicely with a scoop of vanilla ice cream if you’re turning dessert up a notch.
Creative Ways to Present
For special occasions, I like arranging these thumbprint cookies on a tiered cake stand with fresh berries and mint leaves for a festive look. Wrapping a batch in cellophane with a pretty ribbon makes a thoughtful homemade gift that always delights family and friends.
Make Ahead and Storage
Storing Leftovers
I store my jam thumbprint cookies in a single layer inside an airtight container to keep them from getting soggy. They last about 4 days at room temperature, but if I want them to stay fresh longer, I pop the container in the fridge where they keep well for around 10 days without losing texture.
Freezing
Freezing these cookies works wonderfully. I first freeze them uncovered on a parchment-lined tray until firm—this takes a couple of hours—then transfer them to an airtight container or freezer bag. They keep beautifully for up to three months. When I want to enjoy them, I let them thaw gently at room temperature or in the fridge.
Reheating
To freshen up frozen or leftover cookies, I warm them briefly in a preheated oven at 300°F for 4-5 minutes. This melts the glaze slightly and softens the cookie, making them taste freshly baked again. Just keep an eye on them to avoid drying out.
FAQs
-
Can I use any type of jam for Jam Thumbprint Cookies Recipe?
Absolutely! One of the best things about this recipe is its flexibility. You can use raspberry, strawberry, apricot, orange marmalade, or even homemade jam. Just make sure the jam isn’t too runny, as thicker jams hold their shape better during baking.
-
Why do I need to chill the dough before baking?
Chilling the dough firms it up, making it easier to roll and shape. It also prevents the cookies from spreading too much during baking, resulting in that classic thumbprint shape with a neat jam center.
-
How do I make sure my cookies don’t spread too much?
Besides chilling the dough, make sure you use room temperature butter—not melted—and avoid over-mixing once you add the flour. Also, placing the cookie sheet back in the fridge before baking helps the dough keep its shape.
-
Can I make the glaze without almond extract?
Yes, you can! The almond extract adds a subtle nutty note that pairs nicely with jam, but if you don’t have it, vanilla extract is a good substitute or you can enjoy the cookies without glaze altogether.
-
How long do Jam Thumbprint Cookies keep?
Stored properly in an airtight container, they keep well at room temperature for about 4 days, or up to 10 days in the fridge. For longer storage, freezing is best.
Final Thoughts
This Jam Thumbprint Cookies Recipe holds a special spot in my kitchen rotation. There’s just something so heartwarming about those buttery cookies with a dollop of fruity sweetness that feels like a little homemade gift in every bite. Whether you’re baking with family, surprising friends, or just treating yourself, this recipe delivers comforting results every time. I can’t wait for you to try it—you’ll soon see why my whole crew keeps asking for ‘just one more’!
Print
Jam Thumbprint Cookies Recipe
- Prep Time: 15 minutes
- Cook Time: 15 minutes
- Total Time: 1 hour 30 minutes
- Yield: 24 cookies
- Category: Dessert
- Method: Baking
- Cuisine: American
Description
Delightfully buttery and tender jam thumbprint cookies, filled with your favorite jam and topped with a sweet almond glaze. These classic cookies are perfect for holiday gatherings, tea time, or anytime you crave a buttery, melt-in-your-mouth treat with a burst of fruity flavor.
Ingredients
For the cookies:
- 1 cup unsalted butter, softened
- ⅔ cup granulated sugar
- 1 teaspoon pure vanilla extract
- ¼ teaspoon salt
- 2 ¼ cups (280 grams) all-purpose flour
- ⅓ cup jam (raspberry, strawberry, marmalade, or any preferred kind)
For the glaze:
- 1 cup confectioners’ sugar
- 1 teaspoon almond extract
- 1-2 tablespoons milk
Instructions
- Prepare the dough: Using a stand mixer or hand mixer, cream together the softened butter and granulated sugar on medium speed until the mixture is light and fluffy, about 2-3 minutes. This step is crucial for incorporating air and achieving a tender cookie texture.
- Add flavorings: Beat in the pure vanilla extract and salt until fully incorporated, continuing on medium speed. These ingredients enhance the richness and flavor depth in the cookies.
- Incorporate the flour: Gradually add the all-purpose flour to the mixture, beating on low speed just until combined and the dough forms. Avoid overmixing to keep cookies tender.
- Chill the dough: Shape the dough into a ball using your hands; it may be slightly crumbly but should hold together. Wrap tightly with plastic cling wrap and refrigerate for at least one hour. Chilling helps relax the gluten and solidify the butter for easier shaping.
- Preheat oven and prepare baking sheet: When ready to bake, preheat your oven to 350°F (175°C). Line a large half sheet baking pan with parchment paper or a silicone baking mat to prevent sticking and provide even baking.
- Shape cookies: Scoop about 1 tablespoon of dough and roll into 1-inch balls. Place the balls evenly spaced on the prepared baking sheet.
- Create thumbprints: Press your thumb or the back of a small spoon or measuring spoon into the center of each dough ball to create an indentation for the jam.
- Fill with jam: Spoon a small amount of your chosen jam into each indentation carefully, avoiding overfilling which can cause jam to overflow while baking.
- Chill before baking: Place the baking sheet with the jam-filled cookies in the refrigerator while the oven finishes preheating. This step prevents spreading and helps retain the thumbprint shape.
- Bake cookies: Bake the cookies for 13-15 minutes, or until the edges are lightly browned and the bottoms are set. Baking times may vary slightly depending on your oven.
- Cool cookies: Allow the cookies to cool on the baking sheet for 5 minutes, then transfer carefully to a wire cooling rack to cool completely. Proper cooling is essential before glazing.
- Prepare glaze: In a medium bowl, whisk together the confectioners’ sugar, almond extract, and 1 tablespoon of milk. Add additional milk teaspoon by teaspoon until the glaze reaches your desired thin drizzling consistency. If too thin, add more sugar.
- Glaze the cookies: Using a spoon or a piping bag fitted with a fine round tip, drizzle the glaze over the cooled jam thumbprint cookies. The glaze adds a sweet, almond-flavored finish that complements the jam and buttery cookie base.
- Set the glaze: Let the glazed cookies sit at room temperature for 1-2 hours to allow the glaze to firm up before serving or storing.
Notes
- You can use any kind of jam such as raspberry, strawberry, or marmalade. Homemade jams work wonderfully if you have time.
- Store cookies in a single layer in an airtight container at room temperature for up to 4 days, or refrigerate for up to 10 days.
- To freeze, place jam-filled cookies on a parchment-lined baking sheet and freeze uncovered until firm (1-2 hours). Transfer to an airtight container or freezer bag and store for up to 3 months. Thaw in the refrigerator or at room temperature before serving.
- Be mindful not to overfill the jam indentation to prevent spilling during baking.
Nutrition
- Serving Size: 1 cookie
- Calories: 140
- Sugar: 10g
- Sodium: 50mg
- Fat: 7g
- Saturated Fat: 4g
- Unsaturated Fat: 3g
- Trans Fat: 0g
- Carbohydrates: 18g
- Fiber: 0.5g
- Protein: 1g
- Cholesterol: 20mg


