
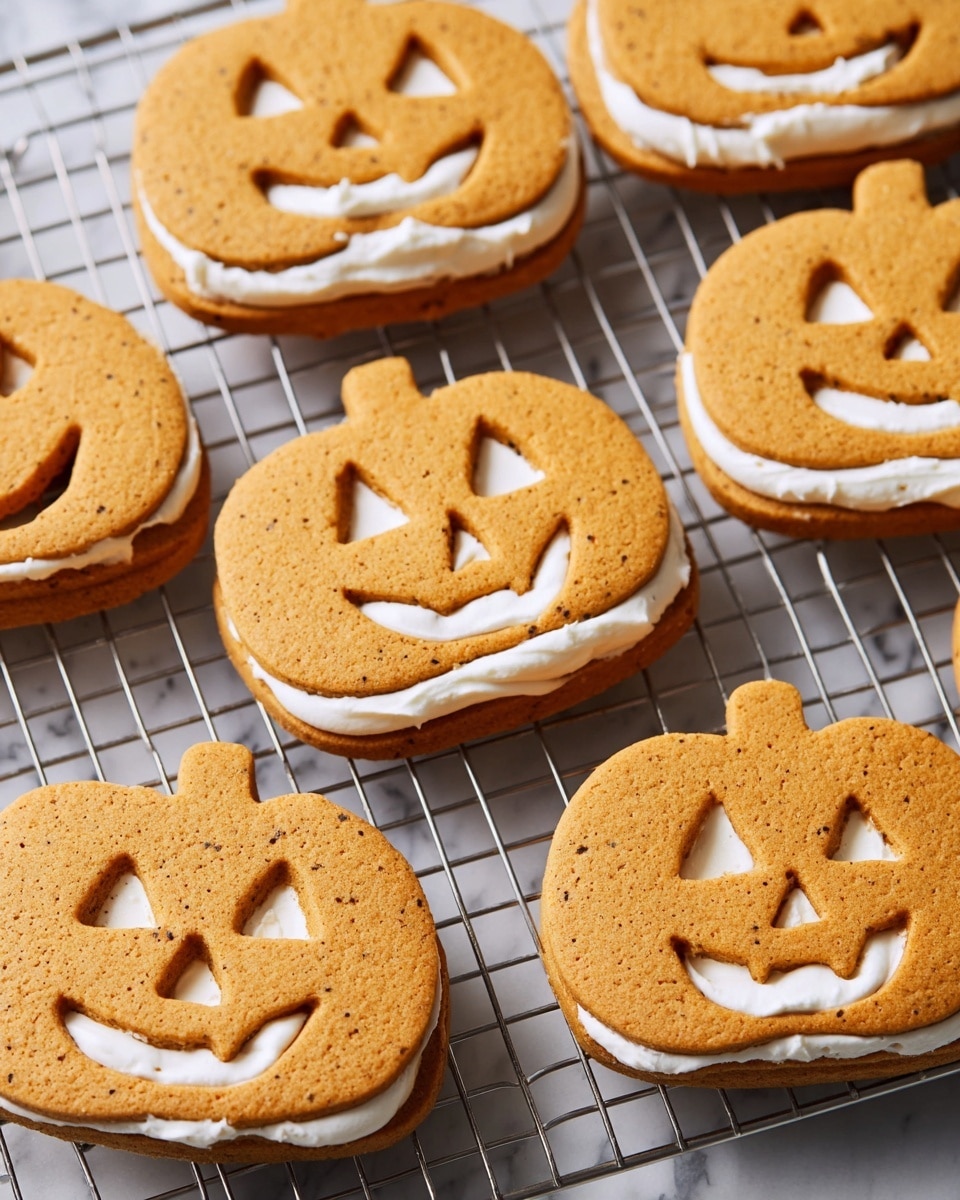
If you’re looking for a festive treat to wow your friends and family this Halloween, I’ve got just the thing for you! I absolutely love this Jack-O’-Lantern Sandwich Cookies Recipe because it combines soft pumpkin-spiced cookies with creamy, dreamy cream cheese frosting — all shaped like adorable little jack-o’-lanterns. When I first tried it, I was hooked, especially seeing my kids’ faces light up when they got to pick their favorite pumpkin “face.” Stick with me here, and I’ll walk you through every step so your cookies turn out just perfect.
Why You’ll Love This Recipe
- Perfectly Spiced: The pumpkin spice in the dough brings the right amount of cozy fall flavor without being overpowering.
- Soft & Creamy Combo: The cream cheese frosting pairs beautifully with the tender cookies, making each bite melt in your mouth.
- Fun & Festive: Carving the faces into half the cookies adds a playful touch that kids (and adults!) absolutely adore.
- Make-Ahead Friendly: You can prep the dough up to 3 days in advance and freeze the cookies, so it suits your schedule.

Ingredients You’ll Need
Each ingredient in this Jack-O’-Lantern Sandwich Cookies Recipe works together to create that perfect balance between soft spiced cookie and smooth frosting. Here’s what I like to use and why:
- All-purpose flour: The base of the cookies, providing just enough structure without making them hard.
- Pumpkin spice: A blend of cinnamon, nutmeg, and cloves that brings in that warm fall feeling.
- Baking powder: Helps the cookies rise slightly, keeping them soft and tender.
- Kosher salt: Balances the sweetness and enhances all the flavors.
- Butter: Always go for unsalted, softened butter for creamy texture and control over saltiness.
- Granulated sugar: Adds sweetness and a nice crumb texture.
- Brown sugar: Adds moisture and a lovely deeper caramel flavor.
- Large egg: Binds the dough together and gives richness.
- Pumpkin puree: The real star, making these cookies soft and subtly pumpkin-flavored – make sure it’s plain pumpkin, not pie filling!
- Vanilla extract: Adds that background richness and balance.
- Cream cheese: For the frosting, softened for easy mixing and that signature tangy creaminess.
- Powdered sugar: Sweetens and thickens the frosting to spreadable perfection.
Variations
I love playing around with this recipe depending on who I’m baking for or the occasion. Feel free to make it your own – that’s part of the fun, right?
- Gluten-Free Version: I once swapped the all-purpose flour for a gluten-free blend with great success — just make sure it’s a one-to-one replacement mix for baking.
- Orange-tinted Cookies: Adding a few drops of orange food coloring to the dough really amps up the pumpkin look! It’s a kid-pleaser for sure.
- Frosting Flavors: Try adding a little maple syrup or cinnamon to the cream cheese frosting for a subtle twist that keeps it interesting.
- Spooky Shapes: If you don’t have a pumpkin cutter, any Halloween-themed cookie cutters work great — bats, ghosts, or even simple circles!
How to Make Jack-O’-Lantern Sandwich Cookies Recipe
Step 1: Mix the Dry Ingredients
In a large bowl, whisk together the flour, pumpkin spice, baking powder, and salt. This is an important step because it helps distribute everything evenly, so your cookies get consistent flavor and texture. I like to use a sifter or a fine-mesh sieve if I want to be extra sure there are no lumps — it makes rolling out the dough much easier later on.
Step 2: Cream the Butter and Sugars
In another bowl, use a hand mixer to beat the butter with both sugars until it’s light and creamy—this usually takes about 2-3 minutes. I learned this trick the hard way: if you don’t cream enough, your cookies may turn out dense. Then add the egg and beat until just combined, followed by the pumpkin puree and vanilla. These liquids add moisture and richness.
Step 3: Combine Wet and Dry Ingredients
Gradually add the dry ingredients to your wet mix, beating on low speed until just combined. Overmixing here can make the cookies tough, so once you see no streaks of flour, stop! Divide the dough into two discs, wrap in plastic wrap, and chill in the fridge for at least 2 hours or up to 3 days. This rest time is key to firm up the dough so it rolls smoothly and keeps your shapes sharp.
Step 4: Roll and Cut Your Cookies
Line two baking sheets with parchment paper. Take one dough disc at a time and roll it out on a lightly floured surface to about ¼ inch thick. I find a floured rolling pin helps a ton to prevent sticking. Use a pumpkin-shaped cookie cutter to cut out as many cookies as you can, and place them on the baking sheets. Don’t toss those scraps! Just re-roll and cut again. Here’s a great trick: freeze the cookies on the sheets for about 15 minutes to help them hold their shape.
Step 5: Carve the Faces
Preheat your oven to 350°F. Now, use a small paring knife to carefully cut out jack-o’-lantern faces on half of the cookies. If the dough warms up and gets too soft, pop the trays back in the freezer for a bit. This step takes a little patience, but trust me — it’s worth it to get those perfect spooky smiles!
Step 6: Bake and Cool
Bake the cookies for 8 to 10 minutes until they are set but not browned. I watch closely toward the end — you want firm edges but still soft centers. Let them cool completely on the sheets before frosting; otherwise, the cookies can break or the frosting will melt.
Step 7: Make the Cream Cheese Frosting
While the cookies cool, beat the softened cream cheese and powdered sugar in a large bowl with a hand mixer until smooth and fluffy. Then add the vanilla and a pinch of salt to brighten the flavors. This frosting is rich but light, the perfect balance with the pumpkin cookies.
Step 8: Assemble Your Sandwich Cookies
Flip the plain cookies over and spread a generous dollop of frosting on the underside. Top each with a cookie that has a carved face, pressing lightly to sandwich them together. Here’s a quick tip: use a piping bag or zip-top bag with a corner snipped if you want neater frosting layers!
Pro Tips for Making Jack-O’-Lantern Sandwich Cookies Recipe
- Chill That Dough Well: I used to rush this step, but chilling the dough makes cutting the pumpkin shapes way easier and keeps the cookies from spreading too much.
- Freeze Before Baking: Freezing the cookies for at least 15 minutes before baking helps them hold the jack-o’-lantern faces crisp and clean.
- Paring Knife Patience: When carving faces, keep your knife sharp and work slowly – a gentle hand will give you cute, defined shapes every time.
- Frosting Consistency: If your cream cheese frosting feels too soft, chill it for 10-15 minutes before assembling to avoid messy sandwiches.
How to Serve Jack-O’-Lantern Sandwich Cookies Recipe
Garnishes
I love sprinkling a tiny bit of cinnamon or edible glitter on the frosting to make these cookies pop on the plate, especially for parties. Sometimes I even press a small mint leaf or a tiny chocolate chip “stem” onto the pumpkin’s top for extra cuteness. It’s a simple touch that makes the presentation stand out.
Side Dishes
These cookies pair wonderfully with a warm spiced cider or a creamy pumpkin latte. For a party, I also set out bowls of mixed nuts, caramel apples, or even a small cheese plate to balance the sweetness.
Creative Ways to Present
For Halloween gatherings, I’ve served these cookies stacked in tall glass jars decorated with orange ribbons. You could also set them out on a black platter with some autumn leaves and mini pumpkins to elevate the spooky vibe. Kids love it when each cookie’s face is different, so I sometimes let them help carve the faces before baking—that’s always a huge hit!
Make Ahead and Storage
Storing Leftovers
Once assembled, store leftover sandwich cookies in an airtight container in the fridge for up to 4 days. I like to layer them between sheets of parchment paper to keep the frosting from sticking or smudging the pumpkin faces.
Freezing
I’ve frozen both the baked cookies (before frosting) and the fully assembled sandwich cookies. For best results, freeze the unassembled cookies in a single layer on a baking sheet, then transfer to a freezer bag. They keep well up to 3 months. The frosting can be whipped fresh when thawed, or if you freeze the sandwiches with frosting, thaw them slowly in the fridge overnight.
Reheating
Since these are cookies, reheating usually isn’t necessary, but if you prefer a slightly warm treat, let them come to room temperature or microwave for 10 seconds. Avoid warming too long or the frosting might melt and get messy.
FAQs
-
Can I substitute canned pumpkin puree in this recipe?
Yes! Just make sure you use plain canned pumpkin puree, not pumpkin pie filling, which contains added sugar and spices that can alter the taste and texture of the cookies.
-
What if I don’t have a pumpkin cookie cutter?
Not a problem! You can use any Halloween-themed cutter or even a simple round cutter. The key is cutting out faces on half the cookies to assemble the sandwiches.
-
How long can I keep the dough in the fridge?
The dough keeps well refrigerated for up to 3 days. Just make sure it’s wrapped tightly in plastic wrap to prevent drying out.
-
Can I make this recipe dairy-free?
You can substitute the butter with a dairy-free margarine and use a plant-based cream cheese alternative for the frosting. Just keep in mind these swaps might slightly alter the texture and flavor.
-
How do I keep the frosting from making the cookies soggy?
Spread the frosting just before serving or store the sandwiches in the fridge. Chilling helps keep the cookies firm and prevents sogginess from the cream cheese moisture.
Final Thoughts
This Jack-O’-Lantern Sandwich Cookies Recipe has become one of my all-time favorites for fall — the aroma while baking, the fun of carving little faces, and the joy of biting into that soft pumpkin cookie with luscious cream cheese frosting. Whether you’re making them for a Halloween party or a cozy night in, they’re sure to bring smiles and maybe even a few cheeky “trick-or-treat” requests. Give this recipe a try — I think you’ll love it as much as my family does!
Print
Jack-O’-Lantern Sandwich Cookies Recipe
- Prep Time: 15 mins
- Cook Time: 10 mins
- Total Time: 3 hrs 30 mins
- Yield: 12 servings
- Category: Dessert
- Method: Baking
- Cuisine: American
- Diet: Vegetarian
Description
Celebrate Halloween with these festive Jack-O’-Lantern Sandwich Cookies featuring spiced pumpkin-flavored dough and creamy vanilla cream cheese frosting. Perfectly shaped with pumpkin faces, these cookies are as delightful to look at as they are to eat.
Ingredients
For the Cookie Dough
- 2 3/4 cups all-purpose flour, plus more for surface
- 1 1/2 tsp pumpkin spice
- 1 tsp baking powder
- 1/2 tsp kosher salt
- 1/2 cup (1 stick) butter, softened
- 1/2 cup granulated sugar
- 1/2 cup packed brown sugar
- 1 large egg
- 1/2 cup pumpkin puree
- 1 tsp pure vanilla extract
For the Cream Cheese Frosting
- 6 oz cream cheese, softened
- 1 1/2 cups powdered sugar
- 1 tsp pure vanilla extract
- Pinch kosher salt
Instructions
- Mix Dry Ingredients: In a large bowl, whisk together flour, pumpkin spice, baking powder, and kosher salt until evenly combined to create the spiced base for the cookie dough.
- Cream Butter and Sugars: In a separate large bowl, use a hand mixer to beat the softened butter, granulated sugar, and brown sugar together until the mixture is creamy and smooth.
- Add Wet Ingredients: Beat in the egg until fully incorporated, then mix in the pumpkin puree and vanilla extract until the batter is uniform.
- Combine Dry and Wet: Gradually add the dry ingredients to the wet mixture and beat just until combined to form the cookie dough. Avoid overmixing.
- Chill Dough: Divide the dough into two discs, wrap, and refrigerate for at least 2 hours or up to 3 days to allow the dough to firm up, which ensures easier rolling and cutting.
- Prepare for Baking: Line two baking sheets with parchment paper. On a floured surface, roll out one disc of dough to ¼ inch thickness. Use a pumpkin-shaped cookie cutter to cut out cookies and place them on the prepared sheets. Re-roll scraps and cut additional cookies as needed.
- Freeze Cookies: Freeze the cut cookies on the baking sheets for 15 minutes to help them maintain shape during baking.
- Preheat Oven and Cut Faces: Preheat the oven to 350°F (175°C). Using a paring knife, carefully cut pumpkin faces from half of the cookies to create jack-o’-lantern designs. If the dough becomes too warm to handle easily, freeze again briefly before baking.
- Bake Cookies: Bake the cookies for 8 to 10 minutes until they are set but not browned. Remove from the oven and allow them to cool completely on the baking sheets.
- Make Frosting: While the cookies cool, use a hand mixer in a large bowl to beat the softened cream cheese with powdered sugar until smooth and creamy. Mix in vanilla extract and a pinch of kosher salt until well combined.
- Assemble Sandwich Cookies: Flip the whole cookies (without faces) over and spread a layer of cream cheese frosting on the flat side. Top each with a pumpkin face cookie to create the sandwich effect.
Notes
- For best results, ensure the dough is well chilled before rolling and cutting to prevent the cookies from spreading during baking.
- If the dough or cut cookies become too soft while working, place them back in the freezer to firm up.
- Store sandwich cookies in an airtight container in the refrigerator to keep the cream cheese frosting fresh.
- Allow cookies to come to room temperature before serving for the best flavor and texture.
Nutrition
- Serving Size: 1 sandwich cookie
- Calories: 250
- Sugar: 18g
- Sodium: 120mg
- Fat: 14g
- Saturated Fat: 8g
- Unsaturated Fat: 5g
- Trans Fat: 0g
- Carbohydrates: 28g
- Fiber: 1g
- Protein: 3g
- Cholesterol: 40mg


