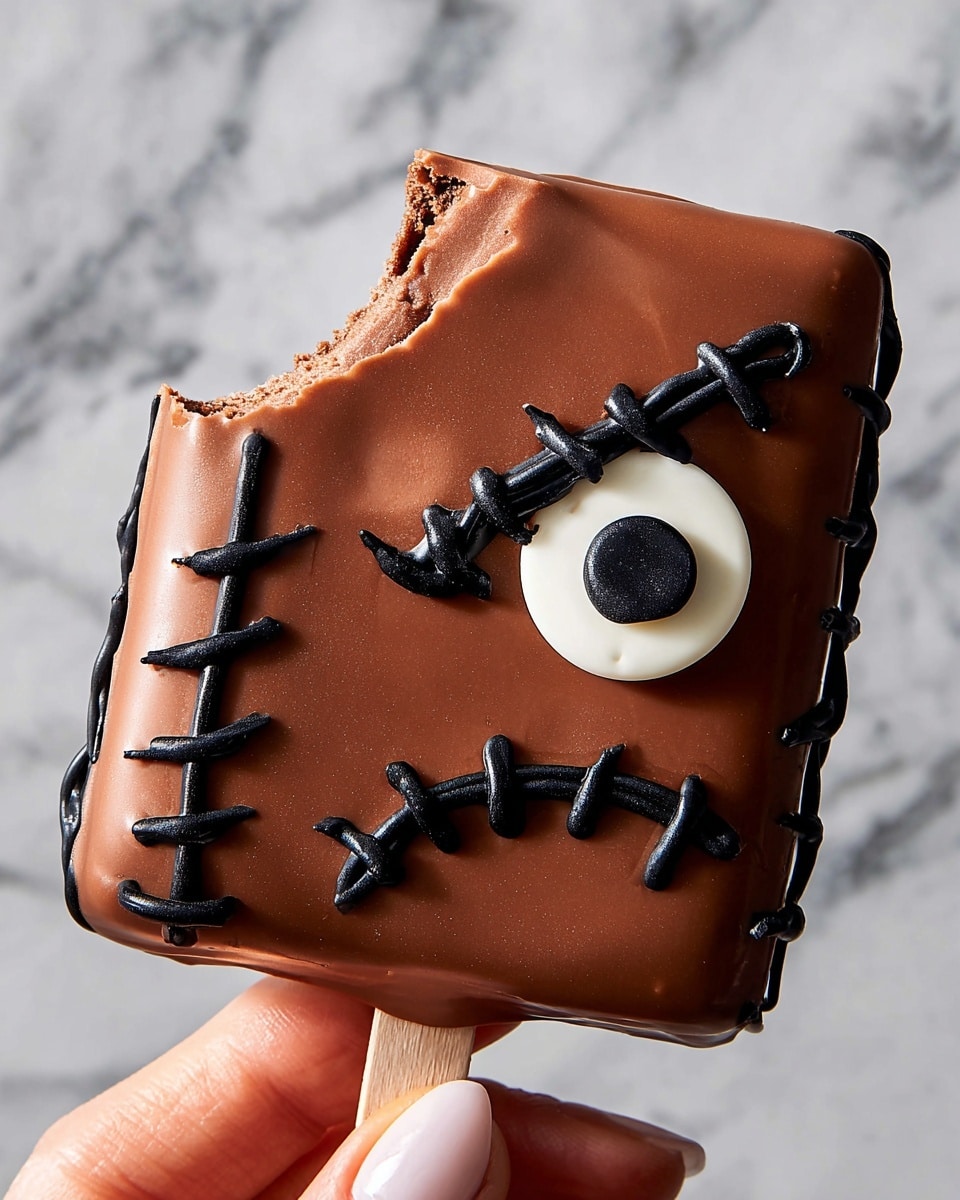
If you’re looking for a spooky treat that’s as fun to make as it is to eat, you’ve got to try this Hocus Pocus S’mores Pops Recipe. It’s a playful twist on classic s’mores—with a magical Halloween vibe that’s perfect for parties, cozy nights, or whenever you want to impress the kiddos (or yourself!). I absolutely love how these pops combine gooey marshmallow, melty chocolate, and crunchy graham crackers all wrapped up in a cute, spooky design. Stick around because I’m sharing every trick and tip to make this recipe foolproof and festive.
Why You’ll Love This Recipe
- Easy To Make: Seriously, you don’t need to be a baking pro to make these pops look amazing.
- Kid-Approved: My family goes crazy for these—kids love decorating, and adults love eating.
- Perfectly Portable: Popsicle sticks make these easy to serve at parties or as a Halloween handout treat.
- Customizable Creativity: You can swap in your favorite candy eyes or frosting designs to fit your spooky style.
Ingredients You’ll Need
These ingredients come together like a dream and are surprisingly simple to find, so you won’t have to hunt around too much. My tip: get the good quality semisweet chips—they melt beautifully and give just the right bittersweet balance!
- Graham crackers: Halved, because that’s the perfect bite size for these pops.
- Marshmallow crème: I love this because it’s easier than melting marshmallows, and it sticks everything perfectly.
- Semisweet chocolate chips: Use standard chips for melting; they give a great smooth coating.
- Coconut oil: This helps your chocolate coat nice and glossy—don’t skip it!
- Candy eyes: Adds a fun spooky look. You can find these online or in the baking aisle.
- Black cookie frosting: For drawing spooky details like stitches and outlines; it’s softer and less messy than regular icing.
Variations
I love how flexible this Hocus Pocus S’mores Pops Recipe is — it invites you to get creative. I often swap the candy eyes for little edible spiders or even festive sprinkles to change things up, depending on the occasion.
- White Chocolate Coating: Tried it once and it’s a hit with my kids—plus you can add orange food coloring for a seasonal touch.
- Nut-Free Version: Use dairy-free chocolate chips and double-check eyes and frosting for allergens; it still tastes just as addictive!
- Mini S’mores Pops: Use smaller graham cracker pieces to make bite-sized versions—perfect for a party platter.
- Flavored Marshmallow: Experiment with peppermint or pumpkin spice marshmallow crème for a subtle seasonal twist.
How to Make Hocus Pocus S’mores Pops Recipe
Step 1: Assemble the S’mores with a Stick
Spread about a tablespoon of marshmallow crème on half of the graham cracker halves. Then, place a popsicle stick halfway into the marshmallow so it sticks out like a handle. Top with the remaining graham cracker half, gently pressing together. Lay these on a parchment-lined baking sheet and pop them into the freezer while you prep your chocolate. This chilling step helps the assembly hold up when you dip the pops in chocolate later—don’t skip it!
Step 2: Melt the Chocolate Coating
In a microwave-safe bowl, melt your semisweet chocolate chips with the coconut oil. I do 20-second bursts, stirring in between to keep things smooth and prevent burning. It usually takes about a minute total. The coconut oil is key here—it thins the chocolate just enough so it coats evenly without being gloopy.
Step 3: Dip and Decorate
Dip each graham cracker sandwich fully into the chocolate, using a butter knife or silicone spatula to help coat the sides if needed. While the chocolate is still wet, press one candy eye on each “book” toward the right side and about halfway down. Pop them back on your baking sheet and let them chill in the fridge for about 15 minutes so the chocolate hardens.
Step 4: Add Spooky Frosting Details
Once the chocolate coating is firm, use your black cookie frosting to draw a circle around each eye, add two semicircles on the corners of the graham cracker “book,” and create fun “stitches” over the chocolate. This step really brings the pops to life—they look like miniature spell books straight out of Hocus Pocus!
Step 5: Chill Until Set
Pop your beautifully decorated s’mores pops back into the fridge for another 15 minutes to make sure everything sets well. Then, you’re ready to dig in or display for your spooky gathering!
Pro Tips for Making Hocus Pocus S’mores Pops Recipe
- Freezing First: Chilling the s’mores before dipping keeps the marshmallow from oozing out, making your pops nice and neat.
- Use Parchment Paper: Always set your dipped pops on parchment so they release easily once the chocolate hardens.
- Don’t Overheat Chocolate: Melting in short bursts and stirring prevents burning, keeping the chocolate silky smooth.
- Frosting Precision: Use a small piping tip or the corner of a zip-top bag to get cleaner “stitch” lines and details.
How to Serve Hocus Pocus S’mores Pops Recipe

Garnishes
I usually keep garnishes pretty simple—sometimes I add tiny edible glitter or sprinkles for extra magic, but the candy eyes and black frosting do all the spooky work. A handful of mini candy pumpkins or Halloween confetti around the serving plate really amps up the festive vibe too.
Side Dishes
These s’mores pops are sweet and filling on their own. For parties, I like serving them alongside a warm apple cider or a pumpkin spice latte. They also pair well with a light fruit salad to balance all that rich chocolate.
Creative Ways to Present
For Halloween gatherings, I like to stand these pops upright in a foam block covered with black tissue paper or create a “spell book” centerpiece on the dessert table. Wrapping each pop in a clear treat bag tied with orange and black ribbons makes them perfect party favors too!
Make Ahead and Storage
Storing Leftovers
If you have leftovers (which rarely happens in my house!), store the s’mores pops in an airtight container in the fridge. They stay fresh and delicious for up to 3 days—just keep them chilled to maintain that crisp chocolate shell.
Freezing
I’ve frozen these pops a few times for later celebrations. Wrap them individually in plastic wrap and place in a sealed freezer bag. When ready, thaw in the fridge overnight to avoid condensation ruining that chocolate coating.
Reheating
These are best enjoyed cold or at room temp. If you want to soften the marshmallow center a bit, just let them sit at room temperature for 15-20 minutes, but avoid microwaving—you’ll melt the chocolate and lose the crisp coating.
FAQs
-
Can I use regular marshmallows instead of marshmallow crème in this recipe?
You can, but it’s a bit messier because regular marshmallows need to be melted or toasted first, and they may not spread as neatly between the graham crackers. Marshmallow crème is smoother and sticks better for this popsicle-style treat.
-
What’s the best way to prevent the chocolate from cracking after it hardens?
Adding coconut oil thins the chocolate so it’s less brittle after it sets. Also, keeping the pops refrigerated and handling them gently helps avoid cracks. Room temperature changes can cause chocolate to bloom or crack, so serve them chilled if possible.
-
Can I make these vegan or dairy-free?
Absolutely! Use vegan marshmallow crème, dairy-free chocolate chips, and make sure your candy eyes and frosting don’t contain dairy or animal products. They’ll still be delicious and just as fun!
-
How do I store Hocus Pocus S’mores Pops for a party?
Keep them in the freezer or fridge until just before serving, then display on a platter lined with parchment paper. Avoid leaving them out long in warm rooms because the chocolate and marshmallow can soften too much.
-
Can kids help make these pops?
Definitely! Kids love assembling the s’mores and decorating with frosting and candy eyes. Just supervise the chocolate melting and dipping steps to keep things safe and mess-free.
Final Thoughts
This Hocus Pocus S’mores Pops Recipe has quickly become one of my go-to treats for autumn and Halloween celebrations. It’s a fun project that equally delights the eyes and the taste buds. Whether you need a new party dessert or a sweet family activity, these pops will bring smiles and a bit of magic to your kitchen table. Trust me, once you try making these, you’ll want to keep them around for every spooky season!
Print
Hocus Pocus S’mores Pops Recipe
- Prep Time: 15 mins
- Cook Time: 15 mins
- Total Time: 45 mins
- Yield: 6 s’mores pops
- Category: Dessert
- Method: No-Cook
- Cuisine: American
Description
Hocus Pocus S’mores Pops are a fun and festive Halloween treat, combining classic s’mores with a spooky twist. Graham cracker sandwiches are filled with marshmallow crème, dipped in a rich chocolate coating, and decorated with candy eyes and black frosting to resemble creepy little ‘books’. Perfect for a Halloween party or family gathering.
Ingredients
Graham Cracker Sandwiches
- 12 graham crackers, halved
- 1/2 cup marshmallow crème
- 6 popsicle sticks
Chocolate Coating
- 2 cups semisweet chocolate chips
- 3 Tbsp. coconut oil
Decorations
- 1 bag candy eyes
- 1 container black cookie frosting
Instructions
- Prepare the Graham Cracker Sandwiches: Spread about 1 tablespoon of marshmallow crème on half of the graham cracker halves. Place a popsicle stick halfway onto the marshmallow crème so it protrudes from the graham cracker like a handle. Top with the remaining graham cracker halves to make sandwiches. Arrange them on a parchment-lined baking sheet and freeze while you prepare the chocolate sauce.
- Melt the Chocolate: In a medium heatproof bowl, microwave the semisweet chocolate chips and coconut oil in 20-second increments, stirring between each session until melted and smooth, about 1 minute total.
- Coat the Sandwiches: Dip each graham cracker sandwich thoroughly into the melted chocolate, using a butter knife or silicone spatula to ensure the sides are fully coated. Place candy eyes on the far right side about halfway down each chocolate-covered graham cracker “book.” Lay the coated s’mores pops back on the baking sheet and refrigerate until the chocolate hardens, approximately 15 minutes.
- Decorate: Use black cookie frosting to draw a circle around each candy eye, add two semicircles on the outer corners of each graham cracker “book”, and create “stitches” on the chocolate coating to enhance the spooky look.
- Set the Decorations: Refrigerate the s’mores pops for at least 15 minutes more to allow the frosting to set before serving.
Notes
- Freezing the graham cracker sandwiches before dipping helps them hold together and prevents melting.
- Use parchment paper to avoid sticking while the chocolate sets.
- Adjust the number of candy eyes and frosting decorations to customize your spooky design.
- Store leftovers in the refrigerator to keep the chocolate firm and fresh.
Nutrition
- Serving Size: 1 s’mores pop
- Calories: 280
- Sugar: 20g
- Sodium: 110mg
- Fat: 15g
- Saturated Fat: 10g
- Unsaturated Fat: 4g
- Trans Fat: 0g
- Carbohydrates: 32g
- Fiber: 2g
- Protein: 3g
- Cholesterol: 0mg


