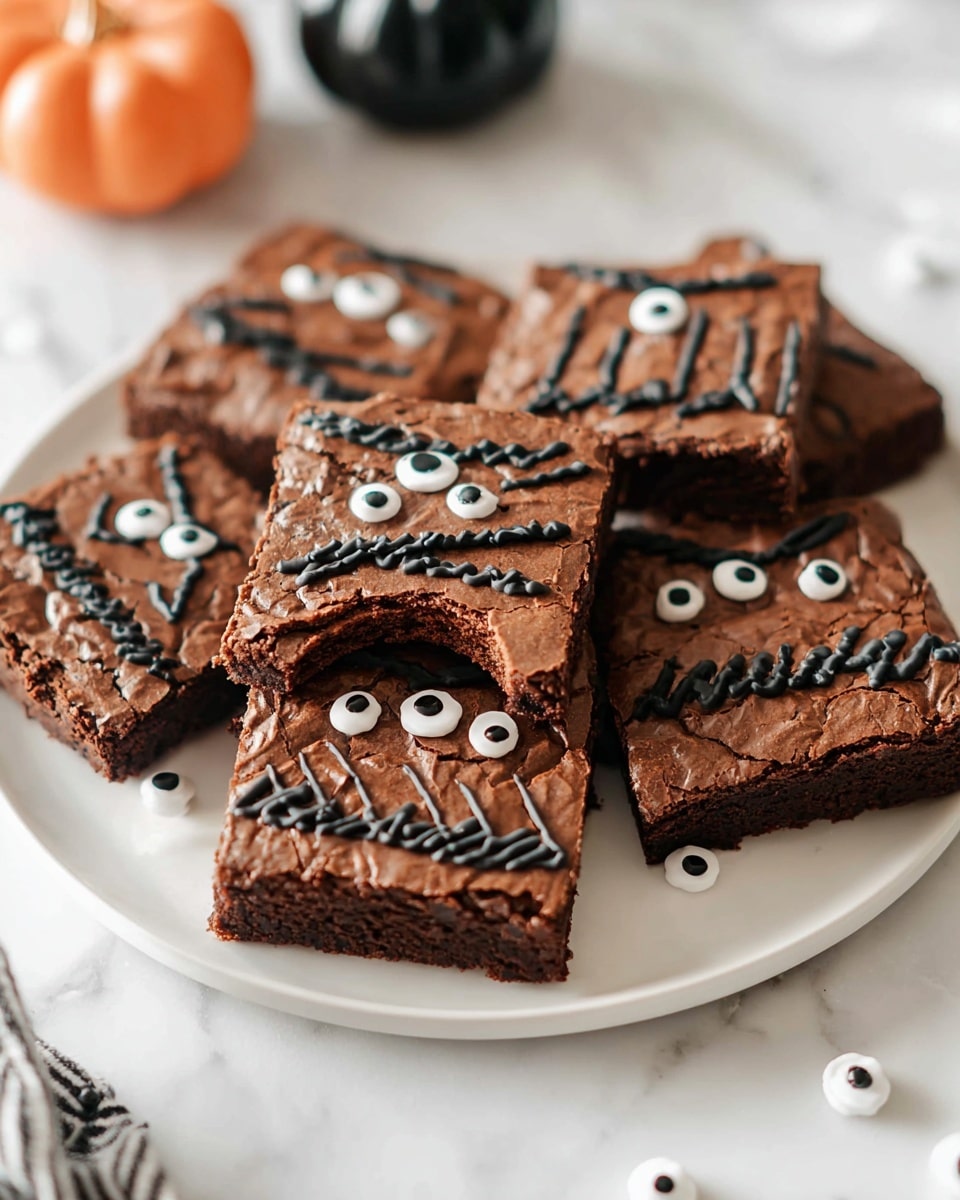
If you’re on the hunt for a brownie recipe that’s both delicious and totally fun to make, you’ve got to try my Hocus Pocus Brownies Recipe. These brownies aren’t just fudgy and rich — they come dressed up with spooky candy eyes and icing details that make them perfect for a Halloween party or just a magical treat to enjoy any day. Trust me, once you make these, your family and friends will be begging for the recipe!
Why You’ll Love This Recipe
- Easy to Follow: The steps are straightforward, even if you’re a beginner baker, so you’ll find success every time.
- Deliciously Fudgy: These brownies have a rich chocolate flavor that’s not too sweet but incredibly satisfying.
- Fun and Festive: The candy eyeballs and icing details make these brownies a showstopper for any spooky occasion.
- Perfect Texture Balance: They bake up moist inside with just enough crumb, avoiding that “too cakey” or “too gooey” trap.

Ingredients You’ll Need
The magic behind the Hocus Pocus Brownies Recipe is in using classic brownie ingredients with a few fun twists — like the candy eyeballs and black icing that bring spooky vibes. I always recommend using good-quality semi-sweet baking chocolate because it melts smoothly and gives such a rich flavor.
- Semi-sweet baking chocolate: Choose a good-quality brand for silky, deep chocolate flavor and smooth melting.
- Powdered sugar: This helps create a tender, melt-in-your-mouth texture and balances the bitterness of cocoa.
- Sugar: Adds sweetness and helps give the brownies that classic fudgy chew.
- Flour: Use all-purpose flour for the right structure without making brownies too dense.
- Cocoa powder: Use unsweetened to keep flavors balanced and earthy.
- Salt: Just a pinch amps up all the chocolate flavors.
- Oil: I like using neutral oil like vegetable or canola for moist brownies without overpowering flavor.
- Water: Helps keep the batter smooth and not too thick.
- Vanilla extract: Always a must for baking – it adds warmth and depth.
- Candy eyeballs: These are the star decor that makes these brownies fun and festive.
- Black decorating icing or gel: For adding spooky “spellbook” details around the eyeballs.
Variations
I love that the Hocus Pocus Brownies Recipe is super adaptable. You can definitely put your own twist on these depending on the occasion or what you have in the kitchen. Sometimes I swap out the candy eyeballs for spooky sprinkles, or I add a handful of chopped nuts for some crunch.
- Nutty Upgrade: I once added chopped walnuts, and it gave such a nice texture contrast without taking away from the fudginess.
- Gluten-free Version: I’ve tried using a gluten-free flour blend, which worked great — just watch baking time as some blends bake faster.
- Extra Chocolatey: Sprinkle chocolate chips on top before baking for molten pockets of chocolate delight.
- Decor Trick: Use colored decorating gels to make the “spellbook” look more vibrant and fun for kids.
How to Make Hocus Pocus Brownies Recipe
Step 1: Melt the Chocolate With Care
Start by chopping or breaking your semi-sweet baking chocolate into pieces and placing them in a microwave-safe bowl. Microwave for 30 seconds, then stir. Continue heating in 15-second increments, stirring after each one until the chocolate is completely melted and smooth. This gentle melting prevents burning and keeps your chocolate silky. Let it cool slightly — you want it warm but not hot to avoid scrambling the eggs later.
Step 2: Mix the Dry Ingredients
In a large bowl, whisk together powdered sugar, white sugar, flour, cocoa powder, and salt. Make sure there are no lumps here — this mix forms the base for your batter’s balanced texture.
Step 3: Combine Wet Ingredients
In a small bowl, whisk the eggs with oil, water, and vanilla extract until smooth and well combined. This step makes mixing everything together much easier and ensures even baking.
Step 4: Bring It All Together
Add the wet ingredients into the dry ingredients and stir just until no dry patches remain. Then gently fold in the melted chocolate until combined. Overmixing can make brownies tough, so be gentle here for that perfect fudgy texture.
Step 5: Bake to Perfection
Pour the batter into a parchment-lined 9×13 pan, spreading evenly. Bake in a preheated 325°F oven for about 45 minutes. You want to check with a toothpick: it should come out with a few moist crumbs attached. This part is key because overbaking dries brownies out, but underbaking can make them too gooey.
Step 6: Decorate Your Magical Spellbook Brownies
Once cooled completely, cut your brownies into 12 rectangles. Press one candy eyeball about halfway down the right long side of each brownie, leaving room to draw details. With black decorating icing or gel, draw a circle around each eyeball and add extra “spellbook” decorations like lines, swirls, and half-circles on the opposite edge. These little details bring your brownies to life in the best way!
Pro Tips for Making Hocus Pocus Brownies Recipe
- Chocolate Melting: I discovered heating chocolate slowly in increments and stirring well keeps it silky and prevents burning.
- Don’t Overmix: Folding the melted chocolate in gently really helps keep a moist, fudgy crumb instead of tough brownies.
- Baking Time Precision: I learned to watch the toothpick test closely; pulling brownies right when a few crumbs stick gives perfect texture.
- Decoration Patience: Let brownies cool completely before adding icing; warm brownies can make the gel run and ruin your design.
How to Serve Hocus Pocus Brownies Recipe

Garnishes
I usually keep the garnishes simple because the candy eyeballs and icing already steal the show. Sometimes, I sprinkle a light dusting of powdered sugar for a “magical spell dust” effect. For extra drama, a few edible glitter sprinkles around the edges work wonders.
Side Dishes
Honestly, these brownies are a treat on their own, but I like pairing them with a scoop of vanilla ice cream or a dollop of whipped cream. Hot spiced cider or a cozy mug of pumpkin spice latte elevates the whole experience, especially during chilly fall evenings.
Creative Ways to Present
For Halloween parties, I’ve arranged these brownies on a rustic wooden board with fake cobweb decorations and placed plastic spiders around for an eerie effect. Serving them in mini treat bags with themed tags also makes for a fun take-home gift. It’s a great way to bring some extra magic to your gatherings!
Make Ahead and Storage
Storing Leftovers
Once decorated, I store these brownies in an airtight container at room temperature for up to 3 days. Keeping them covered well stops them from drying out but preserves the icing details nicely. If your kitchen’s warm, storing in the fridge is an option, but the texture might firm up slightly.
Freezing
I’ve frozen undecorated brownies successfully by wrapping them tightly in plastic wrap and foil. When you’re ready to enjoy, thaw them overnight in the fridge. I recommend decorating them fresh after thawing for the best look and taste.
Reheating
If you want to warm a brownie before serving, a quick 10-15 second zap in the microwave works well — just keep it brief so it doesn’t become gooey. I usually remove any decorated eyeballs and icing first to protect them.
FAQs
-
Can I use regular chocolate chips instead of baking chocolate?
Yes, you can substitute semi-sweet chocolate chips if you don’t have baking chocolate on hand. Just melt them carefully using the same microwave method. Keep in mind that chips may have stabilizers, so the texture might be slightly different, but the brownies will still be delicious.
-
What if I don’t have candy eyeballs to decorate?
No worries! You can use mini chocolate chips, colorful sprinkles, or even draw eyes with white and black icing directly on the brownies. The key is to have fun with it and get creative.
-
How do I know when the brownies are fully baked?
Use the classic toothpick test — insert a toothpick in the center, and when it comes out with just a few moist crumbs (not wet batter), your brownies are ready. This ensures they stay fudgy but not raw.
-
Can I make these brownies vegan?
To make vegan Hocus Pocus Brownies, substitute eggs with flax eggs (1 tbsp ground flax + 3 tbsp water per egg) and use a vegan butter or oil. Double-check that your chocolate and icing are vegan-friendly. The texture may vary slightly but still tasty!
Final Thoughts
I absolutely love how this Hocus Pocus Brownies Recipe brings together great chocolate flavor with a playful, festive twist. When I first tried making these brownies, the decorating part made me feel like a kid again, and the taste did not disappoint. Whether you’re baking for Halloween or just because, these brownies are easy to customize and always a crowd-pleaser. Give them a shot—you’ll be grinning as much as I do when I pull them out of the oven!
Print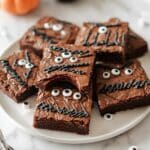
Hocus Pocus Brownies Recipe
- Prep Time: 10 minutes
- Cook Time: 35 minutes
- Total Time: 45 minutes
- Yield: 12 brownies
- Category: Dessert
- Method: Baking
- Cuisine: American
Description
Hocus Pocus Brownies are a festive and fun Halloween treat featuring rich, fudgy chocolate brownies decorated to resemble magical spell books. These brownies combine the deep flavor of semi-sweet baking chocolate with a tender crumb and are topped with candy eyeballs and detailed black icing for a spooky, eye-catching dessert that’s perfect for seasonal parties or family gatherings.
Ingredients
Brownie Batter
- 8 ounces semi-sweet baking chocolate
- 3 cups powdered sugar
- 1 cup sugar
- 1 ½ cups all-purpose flour
- ½ cup cocoa powder
- 2 teaspoons salt
- 1 cup oil (vegetable or canola)
- ½ cup water
- 2 teaspoons vanilla extract
- 2 large eggs
Decorations
- 12 candy eyeballs
- Black decorating icing or gel
Instructions
- Preheat and Prepare Pan: Preheat your oven to 325°F and line a 9×13 inch baking pan with parchment paper to prevent sticking and simplify removal.
- Melt Chocolate: In a microwave-safe bowl, melt 8 ounces of semi-sweet baking chocolate by microwaving for 30 seconds, then stirring. Continue microwaving in 15-second increments, stirring after each, until the chocolate is completely melted and silky smooth. Allow it to cool slightly but not fully.
- Combine Dry Ingredients: In a large bowl, whisk together 3 cups powdered sugar, 1 cup sugar, 1 ½ cups all-purpose flour, ½ cup cocoa powder, and 2 teaspoons salt until thoroughly blended and lump-free.
- Mix Wet Ingredients: In a small bowl, whisk together 2 large eggs, 1 cup oil, ½ cup water, and 2 teaspoons vanilla extract until smooth.
- Combine Wet and Dry: Add the wet mixture to the dry ingredients and stir just until the dry ingredients are moistened with no visible patches of flour.
- Incorporate Chocolate: Gently fold the melted chocolate into the batter until evenly combined, being careful not to overmix.
- Bake: Pour the batter into the prepared pan and spread it evenly. Bake in the preheated oven for about 35 to 45 minutes or until a toothpick inserted in the center comes out with a few moist crumbs attached.
- Cool and Set: Let the brownies cool in the pan for about 20 minutes until slightly warm to the touch, then lift them out of the pan using the parchment paper and allow to cool completely on a wire rack.
- Cut Brownies: Once completely cooled, cut the brownies into 12 equal rectangular pieces.
- Decorate: Press one candy eyeball into the right long side of each brownie about halfway down, leaving space to draw a circle around it. Using black decorating icing or gel, draw a circle around each candy eye.
- Add Details: Use black icing to create short horizontal lines resembling book seams on the long side opposite the candy eye. Add half circles at each corner above and below the eye, and draw additional vertical lines or swirls to add character and detail resembling a spell book.
Notes
- The brownies are best enjoyed once fully cooled to allow for easier cutting and decorating.
- You can use vegetable or canola oil for a neutral flavor, or substitute melted butter for a richer taste.
- If candy eyeballs are not available, small round candies or decorating dots can be used as a substitute.
- Store brownies in an airtight container at room temperature for up to 3 days or refrigerate to keep fresh longer.
- For enhanced chocolate flavor, use high-quality baking chocolate with at least 60% cocoa content.
Nutrition
- Serving Size: 1 brownie (approx. 2.5 x 3 inches)
- Calories: 320
- Sugar: 32g
- Sodium: 220mg
- Fat: 18g
- Saturated Fat: 7g
- Unsaturated Fat: 10g
- Trans Fat: 0g
- Carbohydrates: 38g
- Fiber: 3g
- Protein: 3g
- Cholesterol: 20mg


