
If you’re looking for a festive and utterly irresistible treat this season, you’ve got to try this Halloween Oreo Balls Recipe. I absolutely love how these cute little bites come together with minimal effort but tons of fun and flavor — they’re perfect for parties, classroom treats, or just spoiling yourself (because why not?). Each Oreo ball is like a mini piece of Halloween magic wrapped in chocolate, and I promise you’ll find yourself going back for just one more. Keep reading, and I’ll share everything you need to whip these up flawlessly!
Why You’ll Love This Recipe
- Super Easy to Make: You don’t need fancy ingredients or complicated steps — just crush, mix, and dip!
- Customizable Designs: From spiders to ghosts, pumpkins to sprinkles, you can get playful with your decorations.
- Kid-Friendly Fun: I love making these with my kids; it’s a fun way to get everyone involved in Halloween prep.
- Deliciously Decadent: The creamy cream cheese mixed with Oreo crumbs and coated in chocolate makes each bite a crowd-pleaser.

Ingredients You’ll Need
The magic of this Halloween Oreo Balls Recipe really comes down to a handful of simple ingredients that work beautifully together: creamy, crunchy, rich, and perfect for decorating your spooky creations. Here’s what I always keep on hand when it’s time to get festive.
- Oreo Cookies: Classic Oreos are ideal since the filling helps bind the balls, but you can use Halloween-themed versions for extra fun.
- Cream Cheese: Softened cream cheese blends the Oreo crumbs into a smooth, moldable dough — be sure it’s room temperature!
- Chocolate Melting Wafers: Choose colors that match your Halloween theme: dark chocolate for spiders, white for ghosts and mummies, orange for pumpkins.
- Black Licorice Laces: These make perfect spider legs — just cut them to size before assembly.
- Mini Candy Eyes: These little eyes bring your spooky characters to life.
- Mini Chocolate Chips: Great for ghost eyes and tiny details.
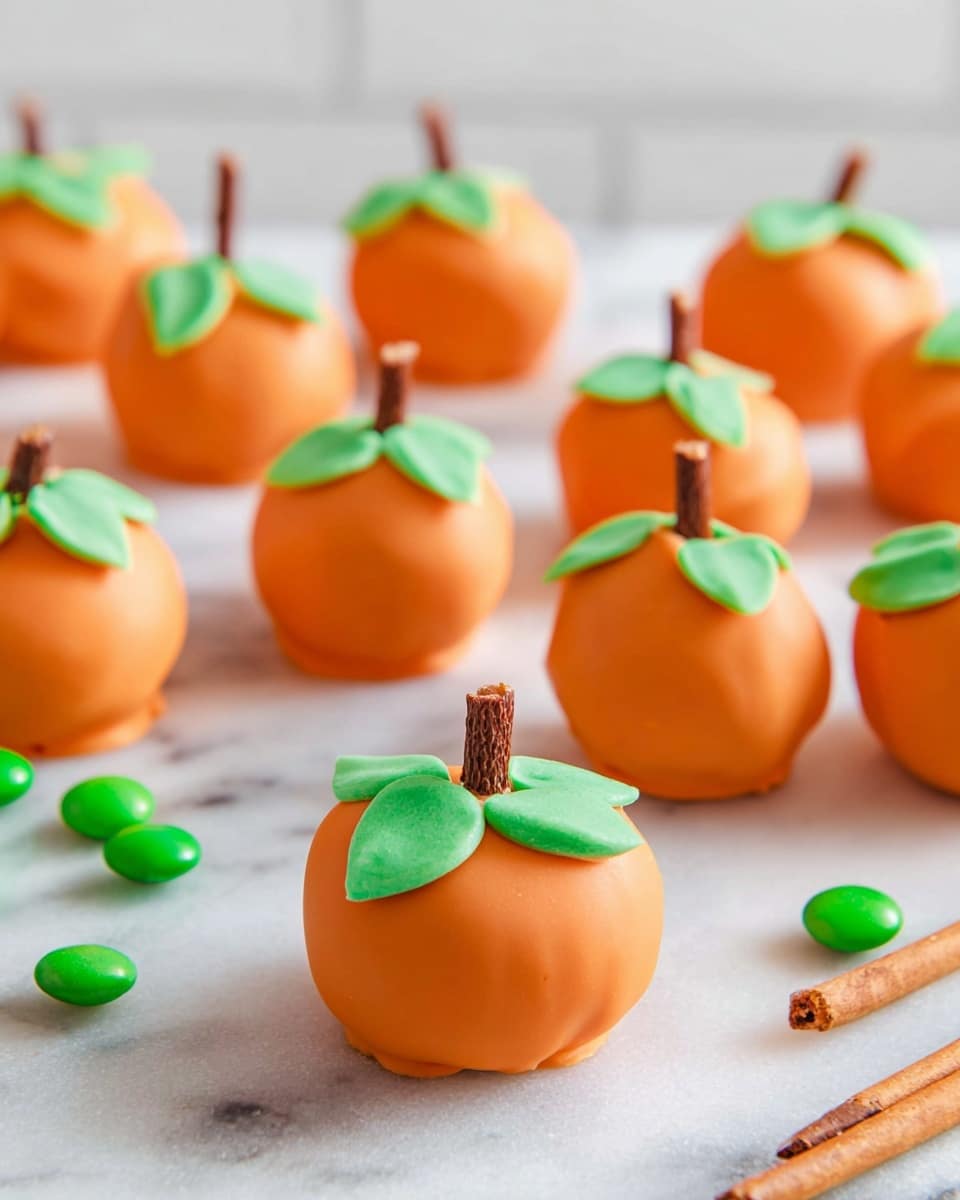
- Pretzel Sticks: I use these as pumpkin stems; breaking them into smaller pieces works best.
- Green M&M’s: Perfect for pumpkin leaves when dipped slightly in melted orange chocolate.
- Seasonal Sprinkles: Add a pop of color and texture on sprinkle version balls.
Variations
I love how this Halloween Oreo Balls Recipe is such a blank canvas for creativity. Once you’ve mastered the classic version, feel free to tweak it to suit your taste buds or dietary preferences — I always encourage playing around!
- Peanut Butter Twist: Swap half the cream cheese for peanut butter to add a rich, nutty flavor — my family goes crazy for this variation.
- Dairy-Free Option: Use a dairy-free cream cheese and melting chocolate alternative to make these allergy-friendly.
- Spooky Flavors: Add a few drops of peppermint or orange extract to the cream cheese mixture for a seasonal kick.
- Extra Crunch: Mix in some chopped nuts or candy pieces for texture inside the Oreo balls.
How to Make Halloween Oreo Balls Recipe
Step 1: Crush the Oreos Into Fine Crumbs
Start by pulsing 36 Oreos in a food processor until you get really fine crumbs. If you don’t have a processor, no worries — pop them in a zip-top bag and crush them with a rolling pin. I used to skip this step thinking chunks would be fun, but I learned that fine crumbs help the mixture come together smoother and the balls hold their shape better.
Step 2: Mix Oreos With Cream Cheese
In a large bowl, combine your Oreo crumbs and softened cream cheese. I usually start mixing with an electric mixer, but if it feels too stiff, just roll up your sleeves and get your hands in there — it’s totally worth it and oddly satisfying! Your goal is a uniform dough that sticks together nicely.
Step 3: Shape Into Balls and Chill
Use a small cookie scoop to portion out the mixture onto a parchment-lined baking sheet, then roll into smooth balls with your hands. Pop them in the freezer for 10 to 15 minutes — just until they’re slightly firm to the touch. Trust me, you don’t want them rock hard or the chocolate won’t stick as well.
Step 4: Dip and Decorate
Gently melt your chosen chocolate melting wafers in 30-second intervals in the microwave, stirring between each, until silky smooth. For spiders, ghosts, pumpkins, and mummies, there’s a fun decorating technique to bring each character to life — I’ve found that working quickly while the chocolate’s still soft is key for sticking on legs, eyes, and stems without any drama.
Pro Tips for Making Halloween Oreo Balls Recipe
- Softened Cream Cheese: Don’t rush this step — if your cream cheese is cold, you’ll end up with lumps and it won’t blend well.
- Don’t Overchill the Balls: If they’re too frozen, the chocolate coating can crack, so aim for firm but still slightly pliable.
- Use a Toothpick for Details: Applying small decorations like eyes or leaves with a toothpick dipped in melted chocolate gives you precision and keeps everything in place.
- Tap for Smooth Finish: After dipping, tap the fork gently on the bowl edge and slide the ball off carefully to avoid drips and get a neat coating.
How to Serve Halloween Oreo Balls Recipe
Garnishes
When it comes to garnishes, I usually stick with mini candy eyes for character faces because they add such personality. Seasonal sprinkles are fun for a festive touch, especially on the simpler sprinkle version. Plus, a little edible glitter can take these treats to the next level for a special event.
Side Dishes
Pair these Oreo balls with a nice cup of hot cocoa or spiced apple cider — those warm drinks balance the rich, creamy flavors perfectly. If you’re serving at a party, a Halloween-themed cheese platter or popcorn mix keeps the festive vibe going between bites.
Creative Ways to Present
I once presented these Oreo balls on a tiered cake stand dressed with fake cobwebs and tiny plastic spiders for a super fun Halloween party centerpiece. You can also arrange them in mini cupcake liners or on a haunted-themed platter with candy corn and candy pumpkins sprinkled around for an instant showstopper.
Make Ahead and Storage
Storing Leftovers
I keep any leftover Halloween Oreo balls in an airtight container in the refrigerator. They stay creamy and delicious for up to a week, but honestly, they rarely last that long in my house! Just make sure they’re well covered to avoid the chocolate getting sticky.
Freezing
Freezing works great if you want to prep ahead. I wrap each Oreo ball individually in plastic wrap, then place them in an airtight container or freezer bag for up to 3 months. When ready, thaw overnight in the fridge to maintain that perfect creamy texture.
Reheating
These treats don’t really need reheating, but if the chocolate has gotten a bit firm from the fridge, just let the Oreo balls sit at room temperature for 15-20 minutes before serving. This softens the chocolate and brings out the creamy filling perfectly.
FAQs
-
Can I use a different type of cookie instead of Oreos for this recipe?
Absolutely! While Oreos are classic and give the best texture and flavor, you can experiment with other sandwich cookies or chocolate wafers. Just make sure they’re sturdy and not too dry, so the mixture holds together well.
-
What’s the best way to melt the chocolate without it seizing?
Microwave your melting wafers in short 30-second bursts, stirring thoroughly each time. Avoid any water contact in the bowl or on utensils, as even a tiny drop can cause the chocolate to seize up.
-
My Oreo balls are too crumbly and don’t stick together — what did I do wrong?
This usually means the cream cheese wasn’t soft enough or there wasn’t enough moisture. Make sure your cream cheese is fully softened at room temperature before mixing, and if needed, add a tiny bit more cream cheese to help bind the crumbs.
-
Can I prepare Halloween Oreo balls a day in advance?
Yes! You can assemble and chill them overnight in the fridge. I recommend dipping and decorating on the day you plan to serve so the chocolate looks fresh and doesn’t develop condensation.
Final Thoughts
When I first tried this Halloween Oreo Balls Recipe, I was amazed by how simple ingredients could come together to create such an enchanting treat. They’ve since become a Halloween staple in my house — a guaranteed winner with kids and adults alike. I hope you enjoy making them as much as I do, and you’ll be impressing everyone at your next gathering with these spooky, sweet bites. Trust me, once you try this recipe, it’s going to be your go-to Halloween dessert. Happy haunting and happy baking!
Print
Halloween Oreo Balls Recipe
- Prep Time: 30 minutes
- Cook Time: 0 minutes
- Total Time: 45 minutes
- Yield: 40 servings
- Category: Dessert
- Method: No-Cook
- Cuisine: American
Description
Delightfully festive Halloween Oreo Balls featuring crushed Oreos and cream cheese dipped in colorful melted chocolate, perfectly decorated as spooky spiders, mummies, ghosts, pumpkins, or sprinkled treats. These no-bake, easy-to-make treats are perfect for Halloween parties and will impress with their creative designs and delicious flavor.
Ingredients
Base
- 36 Oreo cookies (with filling)
- 1 (8-ounce) package cream cheese, softened
- 8 ounces chocolate melting wafers (dark chocolate for spider, white chocolate for mummy and ghost, orange for pumpkin, color of choice for sprinkle version)
Spider Decorations
- Black licorice laces, cut into 2 1/2” – 3” pieces
- Mini candy eyes
Mummy Decorations
- Mini candy eyes
Ghost Decorations
- Mini chocolate chips
Pumpkin Decorations
- Pretzel sticks, broken into 3 pieces
- Green M&M’s
Sprinkle Decoration
- Seasonal sprinkles
Instructions
- Crush Oreos: Crush 36 Oreo cookies with filling into fine crumbs using a blender, food processor, or by placing them in a zip-top bag and rolling with a rolling pin. Line a baking sheet with parchment paper.
- Combine Oreos and cream cheese: In a large bowl, mix together the Oreo crumbs and softened cream cheese using an electric mixer. If the mixture is too stiff, mix it further by hand until fully combined.
- Shape into balls: Using a small cookie scoop or spoon, portion out the mixture onto the parchment-lined baking sheet. Roll each portion into a smooth ball with your hands. Freeze the balls for 10 to 15 minutes until they are slightly firm but not too cold.
- Melt chocolate: In a microwave-safe bowl, melt the chocolate wafers in 30-second intervals, stirring well between each interval until smooth and fully melted.
- Dip Oreo balls: Using a fork, dip each Oreo ball into the melted chocolate (except ghosts). Tap the fork on the bowl’s edge to remove excess and help create a smooth coating. Use a toothpick to transfer the coated balls back to the parchment-lined sheet.
- Decorate Spiders: Before the chocolate sets, press 6 black licorice lace pieces into each ball to form legs. If chocolate hardens, dip licorice ends in melted chocolate and hold until set. Attach mini candy eyes with a dab of melted chocolate.
- Decorate Mummies: Allow the chocolate coating to harden. Drizzle white melted chocolate over each ball in a back-and-forth motion to mimic bandages. Attach mini candy eyes using melted chocolate as glue.
- Decorate Ghosts: Instead of fully dipping, spoon melted white chocolate over the top and sides so the Oreo ball is partly exposed and a ghostly shape forms on the parchment. Once chocolate hardens, attach mini chocolate chips as eyes with a small dab of melted chocolate.
- Decorate Pumpkins: Before the chocolate sets, press one broken pretzel piece into the top of each ball as the stem. Dip a green M&M lightly into melted orange chocolate and hold it on top of the ball to resemble a leaf until set.
- Sprinkle decoration: Sprinkle seasonal sprinkles over the chocolate-coated balls before the chocolate hardens.
- Store and serve: Refrigerate the decorated Oreo balls until ready to serve for best texture and freshness.
Notes
- You can crush the Oreos using a blender, food processor, or rolling pin in a bag depending on your tools.
- If the mixture is too crumbly, soften the cream cheese more or mix by hand until it comes together.
- Use different colors of melting chocolate to suit your desired Halloween character.
- Freeze balls just enough to firm up for dipping but not too cold or the chocolate may crack.
- Store balls refrigerated for up to one week.
Nutrition
- Serving Size: 1 ball (approximate)
- Calories: 110
- Sugar: 10g
- Sodium: 90mg
- Fat: 7g
- Saturated Fat: 4g
- Unsaturated Fat: 2g
- Trans Fat: 0g
- Carbohydrates: 13g
- Fiber: 0.5g
- Protein: 1g
- Cholesterol: 15mg


