
If you’re on the hunt for a fun, easy, and utterly adorable Halloween treat, you’re going to want to stick around for this **Halloween Marshmallow Pops Recipe**. I absolutely love how these little pops turn out — they’re vibrant, super simple to make, and perfect for parties or just a cozy night of spooky fun. Whether you’re crafting them with kids or prepping a last-minute treat, this recipe has got your back.
Why You’ll Love This Recipe
- Super Easy to Make: Even if you’re not a pro in the kitchen, these marshmallow pops are foolproof and fast.
- Kid-Friendly Fun: Perfect activity to make with little ones — plus, they get to design their own spooky faces.
- Colorful & Festive: The bright candy melts create the cutest Halloween vibe that really pops on any party spread.
- Customizable Treats: You can easily swap out decorations and colors to fit your own spooky style.

Ingredients You’ll Need
I love that this Halloween Marshmallow Pops Recipe uses simple ingredients you probably have around or can easily find. The candy melts add a glossy finish that holds the decorations in place, while the jumbo marshmallows make for perfectly sized pops that are just sweet enough.

- Jumbo marshmallows: Choose gluten-free, allergy-friendly if needed — these big ones are easier to coat and hold on the sticks.
- Cake pop sticks: Essential for dipping and displaying your marshmallow pops neatly without sticky fingers.
- Sprinkles for hair: Adds texture and fun—pick Halloween colors or funky shapes to amp up the spooky vibe.
- Candy eyes: These bring your pops to life; you can find them in most craft or baking stores during the season.
- Sweets for mouth: Tiny candies or mini chocolate chips work great to create different expressions.
- Orange candy melts: Perfect for pumpkin-inspired pops or hair.
- Green candy melts: Great for a witchy or monster look.
- Yellow candy melts: For a fun, cheerful twist or ghostly pops with color variation.
Variations
I like to switch things up depending on the mood or what I have at home. Feel free to experiment with different candy colors or add edible glitter to make your pops shimmer for extra wow factor. Personalizing the faces with different candy combinations always brings a smile!
- Chocolate coating: Sometimes I swap candy melts for melted dark or white chocolate to keep things rich and indulgent — works beautifully if you want a less sweet twist.
- Spooky shapes: Instead of round marshmallows, try cutting marshmallows in half or using different candy add-ons to mimic bats or pumpkins.
- Diet-friendly swaps: Use sugar-free or vegan candy melts for friendly versions without skimping on fun.
How to Make Halloween Marshmallow Pops Recipe
Step 1: Prep Your Marshmallows and Sticks
First things first, carefully push a cake pop stick into each jumbo marshmallow, about halfway through. I find it easier if you wiggle the stick gently instead of pushing hard — that way, the marshmallow won’t squish or tear. Set them aside standing up or laying flat on parchment paper, ready to dip.
Step 2: Melt Your Candy Coatings
Next up, melt your orange, green, and yellow candy melts separately according to the package instructions. I usually microwave them in short bursts of 20 seconds, stirring in between, until the melted candy is smooth and glossy. Be careful not to overheat—it can get grainy fast.
Step 3: Dip and Decorate Your Pops
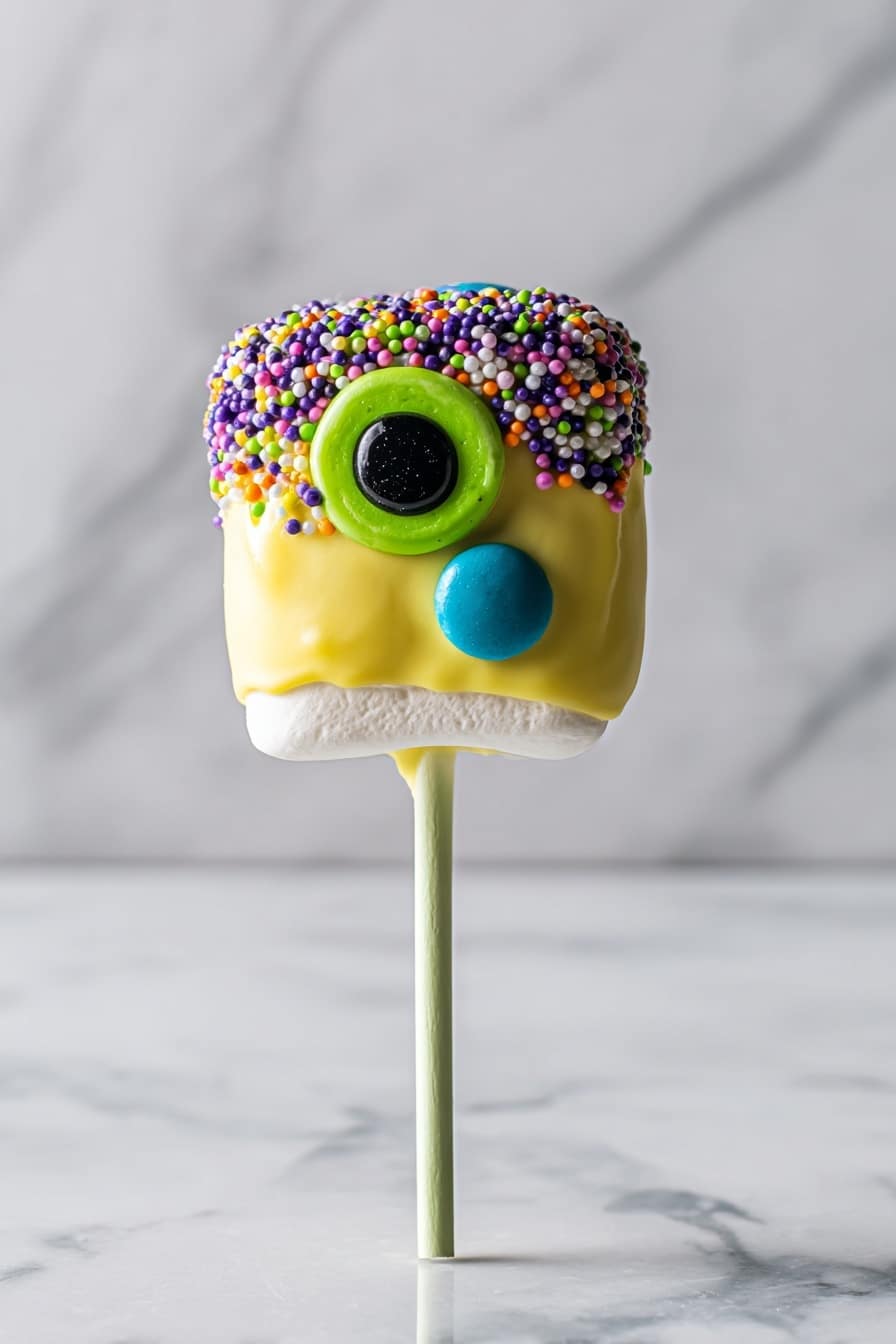
Dip each marshmallow into one of the melted candy colors, swirling until it’s fully coated. Then immediately dip the top of the marshmallow into your sprinkles to create “hair” — this sticky candy coating acts like glue for your decorations. Before it hardens, carefully press on the candy eyes and sweets for the mouth. Each pop turns into its own friendly (or spooky!) character.
Step 4: Let Them Harden and Enjoy
Pop the decorated marshmallow pops upright or lay them flat on parchment paper and let them harden at room temperature. I’ve found that chilling them for 10 minutes in the fridge speeds things up without causing any condensation. Once set, they’re ready for munching or gifting to friends!
Pro Tips for Making Halloween Marshmallow Pops Recipe
- Stick Insertion: I found warming the sticks slightly in your hands makes insertion smoother without breaking the marshmallow.
- Even Coating: Use a fork or dipping tool if you don’t want to get messy fingers while dipping the pops.
- Decoration Timing: Add eyes and mouth quickly after dipping before the coating sets—working fast helps everything stick well.
- Storage Tip: Store pops standing up in an airtight container with parchment between layers to keep decorations pristine.
How to Serve Halloween Marshmallow Pops Recipe
Garnishes
I’m a sucker for using extra sprinkles and edible glitter as garnishes because they make the pops look professionally spooky. I also line up the pops in a decorated cup filled with candy corn or mini pumpkins for a cute display that doubles as decoration and dessert.
Side Dishes
These marshmallow pops pair wonderfully with pumpkin spice cookies, caramel apples, or a rich hot chocolate with whipped cream—that classic fall combo makes any party feel instantly cozy.
Creative Ways to Present
For a party, I love arranging these pops in a Halloween-themed foam block covered with black tissue paper or an orange pumpkin bucket. You can also wrap each pop in clear cellophane with a ribbon tied at the end — perfect for handing out as spooky favors.
Make Ahead and Storage
Storing Leftovers
If you happen to have leftovers (they tend to disappear fast!), store your Halloween Marshmallow Pops upright in an airtight container at room temperature for up to 2 days to keep that candy coating crisp and fresh.
Freezing
Freezing isn’t my go-to here because the candy coating can get a bit soft and the marshmallows might get mushy when thawed. If you do freeze them, wrap each pop tightly in plastic wrap plus foil, and thaw slowly at room temp before serving.
Reheating
Honestly, these pops are best enjoyed as-is—no reheating needed. If the candy coating dulls a bit, letting them sit at room temperature for a while brings back their shine nicely.
FAQs
-
Can I use regular chocolate instead of candy melts for the Halloween Marshmallow Pops Recipe?
You definitely can! Regular chocolate can work, but candy melts are specially formulated to melt smoothly and harden with a shiny finish, which makes decorating easier and more vibrant. If you use chocolate, temper it gently to avoid a dull or greasy finish.
-
How do I prevent the candy melts from getting too thick when melting?
Heat candy melts in short bursts in the microwave—usually 20 seconds at a time—stirring well each time. If it’s getting thick, add a tiny bit of vegetable oil or shortening to loosen the mixture and keep it smooth.
-
What are some fun decoration ideas for Halloween Marshmallow Pops?
Aside from candy eyes and sprinkles, try edible markers to draw on faces, use colored sugar, mini chocolate chips for fangs, or even tiny licorice strips as smiles or mustaches. The more creative, the better!
Final Thoughts
I’ve made these Halloween Marshmallow Pops Recipe countless times with friends and family, and every single batch brings so much joy and smiles. They’re simple, customizable, and a perfect little sweet that captures the Halloween spirit without any fuss. I really hope you give them a try — it’s like sharing a mini celebration on a stick. Trust me, once you start, you’ll want to make them year after year!
Print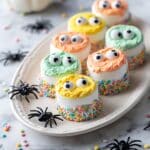
Halloween Marshmallow Pops Recipe
- Prep Time: 5 minutes
- Cook Time: 10 minutes
- Total Time: 15 minutes
- Yield: 12 marshmallow pops
- Category: Dessert
- Method: No-Cook
- Cuisine: American
- Diet: Gluten Free
Description
These Halloween Marshmallow Pops are a fun and festive treat perfect for spooky celebrations. Jumbo marshmallows are dipped in vibrant orange, green, and yellow candy melts, decorated with candy eyes, sprinkles, and sweets to create playful monster faces. Easy to make and no baking required, these pops are great for parties and kid-friendly events.
Ingredients
Marshmallow Pops
- 12 jumbo marshmallows (gluten-free)
- 12 cake pop sticks
Decorations
- Sprinkles for hair
- Candy eyes
- Sweets for mouth
Coating
- 170 g (1 cup) orange candy melts
- 170 g (1 cup) green candy melts
- 170 g (1 cup) yellow candy melts
Instructions
- Prepare marshmallows and sticks: Insert one cake pop stick into each jumbo marshmallow firmly, then set them aside ready for dipping.
- Arrange decorative items: Lay out sprinkles, candy eyes, and sweets on a flat surface to easily access them during decorating.
- Melt candy melts: In separate bowls, melt the orange, green, and yellow candy melts according to the package instructions, usually by microwaving in short bursts and stirring until smooth.
- Dip marshmallows: Dip each marshmallow into your chosen melted candy melt coating, ensuring even coverage. Then immediately dip the top of the coated marshmallow into the sprinkles to create the ‘hair’ effect.
- Add facial features: Place candy eyes and sweets to form the face — eyes and mouth — on the sticky candy surface while it is still wet.
- Set to harden: Place finished marshmallow pops upright or on parchment paper and let them sit until the candy coating hardens completely.
- Repeat: Continue the process with all marshmallows and allow them to fully set before serving or packaging.
Notes
- Use gluten-free marshmallows to keep this recipe gluten-free.
- Work quickly when decorating after dipping to ensure candy melts don’t harden before you add eyes and sweets.
- Store marshmallow pops in a cool, dry place to prevent melting.
- Use candy melts suited for dipping to avoid clumpy coatings.
- Customize colors and decorations for different holiday themes or parties.
Nutrition
- Serving Size: 1 marshmallow pop
- Calories: 120
- Sugar: 20g
- Sodium: 25mg
- Fat: 3.5g
- Saturated Fat: 2.5g
- Unsaturated Fat: 1g
- Trans Fat: 0g
- Carbohydrates: 23g
- Fiber: 0g
- Protein: 0g
- Cholesterol: 0mg


