
If you’re looking for a festive, fun, and downright delicious way to celebrate the spookiest season, I’ve got just the thing for you: my Halloween Cake Pop Decorations and Designs Recipe. These little treats are perfect for parties, classroom celebrations, or just surprising your family with a bit of creative baking magic. I absolutely love how these cake pops come out — the flavors are spot-on, and the decorating possibilities are endless. Stick around, and I’ll walk you through everything so your cake pops turn out perfectly spooky every time!
Why You’ll Love This Recipe
- Creative Fun: Decorating these cake pops with Halloween themes is a blast for all ages.
- Reliable Results: Using a homemade buttercream helps the pops stick perfectly every time.
- Customizable Flair: You can easily tailor decorations to your Halloween vibe, from pumpkins to mummies.
- Perfect Portion Size: These bite-sized sweets are great for sharing or individual party favors.

Ingredients You’ll Need
All the ingredients here are super straightforward, and together, they balance richness and sweetness just right. I always recommend using good-quality melting wafers for smooth dipping and Ghirardelli white chocolate for the best flavor and texture.
- White cake mix: Easy base that bakes up moist and crumbly—perfect for cake pops.
- Chocolate melting wafers: Dark chocolate wafers melt cleanly and create a crisp coating.
- White chocolate melting wafers: I prefer Ghirardelli for the creamy finish and reliable melting.
- Buttercream frosting: Acts like glue to bind the cake crumbs into perfect spheres.
- Salted butter: Makes your buttercream piping smooth and flavorful.
- Powdered sugar: Controls the sweetness and texture of the frosting.
- Vanilla extract: Adds that classic warm flavor to your buttercream.
- Heavy cream or milk: Keeps the frosting creamy, never dry or crumbly.
- Orange melting wafers: Essential for those cute pumpkin designs.
- Green frosting: For pumpkin stems—adds a nice pop of color.
- Black edible ink pen: To give your pumpkins a spooky face or other designs.
- Optional sprinkles and decorations: Because Halloween is all about the details!
Variations
I love switching things up depending on the crowd or occasion. You can easily adapt this to be more or less spooky, or swap ingredients to suit dietary needs. Play around with colors and designs to make it uniquely yours!
- Gluten-Free Version: Substitute the cake mix with a gluten-free alternative, and you have cake pops everyone can enjoy.
- Chocolate Lovers: Use a chocolate cake base instead of white, and dip in white or dark chocolate for contrast.
- Vegan Option: I’ve had success with dairy-free frosting and egg replacers in the cake mix for vegan-friendly pops.
- Spookier Designs: Add edible eyes, use neon colors, or try spider web patterns with colored candy melts.
How to Make Halloween Cake Pop Decorations and Designs Recipe
Step 1: Whip Up That Luxurious Buttercream
Start by creaming one stick of softened salted butter until it’s fluffy. Then gradually add powdered sugar—starting with 1 cup and working up to 2 ½ cups—to get your desired sweetness and texture. Don’t forget the teaspoon of vanilla and a tablespoon of heavy cream or milk to make the frosting silky smooth. This buttercream needs to be thick enough to hold a definite peak, acting as the perfect binder for your cake crumbs.
Step 2: Crumble Cake and Mix With Frosting
Once your white cake is baked and just slightly cooled, crumble it finely with your hands or a fork. Add two spoonfuls of your buttercream frosting and mix everything together — I usually get my hands in there because it gives the best sense of texture. Add more frosting little by little if the mixture feels too crumbly; it should hold its shape when you gently squeeze it in your palm, but not feel greasy or overly sticky.
Step 3: Shape and Chill Your Cake Balls
Using a cake pop press or a medium cookie scoop, form the cake mixture into uniform balls. Roll each ball gently between your palms for a smooth finish, then place them on a plate and pop them in the freezer for about 10 minutes. Trust me, chilling makes dipping so much easier and helps the coating set nicely.
Step 4: Melt Chocolates and Insert Sticks
While your cake balls chill, melt your dark chocolate and white chocolate wafers separately in microwave-safe bowls. Heat in 30-second bursts, stirring in between until shiny and smooth. Dip each lollipop stick into the melted chocolate before poking it into the center of a cake ball — this little “glue” trick helps everything stay put while setting. Place stuck pops back into the fridge or freezer to firm up the chocolate anchor for about 10 minutes.
Step 5: Dip, Decorate, and Delight
Pour your melted chocolate into a tall glass or skinny jar for easy dipping. Dip each cake pop, allowing excess chocolate to drip off by gently tapping or spinning the stick against the container edge. Before the chocolate hardens, decorate with Halloween sprinkles, jimmies, or other goodies. For designs needing extra chocolate layering—like mummy wraps—let the initial coat harden before drizzling additional white chocolate. Finally, for pumpkins, dip in orange chocolate, let it set, add green frosting stems, and draw faces with your edible ink pen.
Step 6: Let Them Set and Store Properly
Stick your decorated cake pops upright in a styrofoam block or a glass filled with rice to dry and harden fully for about an hour. Once set, store them in an airtight container in a cool place. They’re best enjoyed fresh but can last 3-4 days without losing their magic.
Pro Tips for Making Halloween Cake Pop Decorations and Designs Recipe
- Perfect Frosting Consistency: I learned that too much frosting makes the cake mixture greasy and hard to shape, so add it gradually.
- Chill Thoroughly: Freezing the cake balls before dipping is the key to avoiding a crumbly mess.
- Dip in Thin Layers: Thin chocolate coats dry faster and prevent cracking—double dip if you want thicker coverage.
- Use Sturdy Sticks: I switched to thick lollipop sticks after a few tries, and it made holding and dipping much easier.
How to Serve Halloween Cake Pop Decorations and Designs Recipe
Garnishes
I usually add festive sprinkles or edible glitter to the wet chocolate for extra flair. For pumpkins, a small dot of green frosting on top makes all the difference, and the edible ink pen lets me draw adorable or spooky faces that make everyone smile.
Side Dishes
These cake pops pair wonderfully with simple sides like a warm apple cider or even some salty popcorn — the salty-sweet combo delights guests big time. At parties, I serve them alongside pumpkin-flavored treats or candy corn for that full Halloween vibe.
Creative Ways to Present
For presentations, I like using festive mason jars filled with candy corn or dry rice to hold the cake pops upright. You could also place them in mini pumpkins hollowed out as a fun touch. Setting them on a tiered dessert stand with fairy lights instantly creates a spooky, magical display that your guests won’t forget.
Make Ahead and Storage
Storing Leftovers
I store leftover cake pops in an airtight container at room temperature if it’s cool, or in the fridge if your house is warm. Just be sure to keep them away from moisture, as that can make the chocolate coating lose its crispness.
Freezing
If you want to make these ahead of time, you can freeze the cake pops after assembling and decorating. Wrap each carefully in plastic wrap and place them in an airtight container or freezer bag. When you’re ready, thaw overnight in the fridge. The texture stays surprisingly good!
Reheating
I don’t usually reheat cake pops, but if they get a little cold and firm from the fridge, simply let them sit at room temperature for about 10-15 minutes before serving, and they’ll soften nicely without losing their shape or flavor.
FAQs
-
Can I use homemade cake instead of cake mix for this recipe?
Absolutely! Just make sure your homemade cake is moist and not too dense. Allow it to cool completely before crumbling, and adjust the frosting amount as needed to get the right consistency.
-
How do I prevent the cake pops from falling off the sticks?
Dipping the lollipop sticks in melted chocolate before inserting them into the cake balls creates a glue-like effect that helps secure them firmly. Also, be gentle when dipping and avoid shaking the pops too much.
-
What’s the best way to store cake pops if I want to prepare them a day ahead?
After decorating, allow the chocolate to set fully, then store the cake pops in a cool, dry place in an airtight container. You can also refrigerate them, but bring them to room temp before serving for best flavor.
-
Can I use candy melts in different colors for decorating?
Yes! Candy melts come in many fun colors and make decorating easy. Just melt them carefully and use piping bags or squeeze bottles for detailed designs.
Final Thoughts
This Halloween Cake Pop Decorations and Designs Recipe holds a special place in my heart because it’s as much about the creative process as the tasty results. I’ve made these with my kids, friends, and family, and every single time the decorating session sparks so much joy and laughter. Whether you’re a seasoned baker or just dipping your toes in, these cake pops are approachable, adaptable, and guaranteed to make your Halloween extra sweet. Give it a try — I promise you’ll have a blast!
Print
Halloween Cake Pop Decorations and Designs Recipe
- Prep Time: 40 minutes
- Cook Time: 20 minutes (cake baking) plus 10 minutes freezing
- Total Time: 1 hour
- Yield: 24 cake pops
- Category: Dessert
- Method: No-Cook
- Cuisine: American
Description
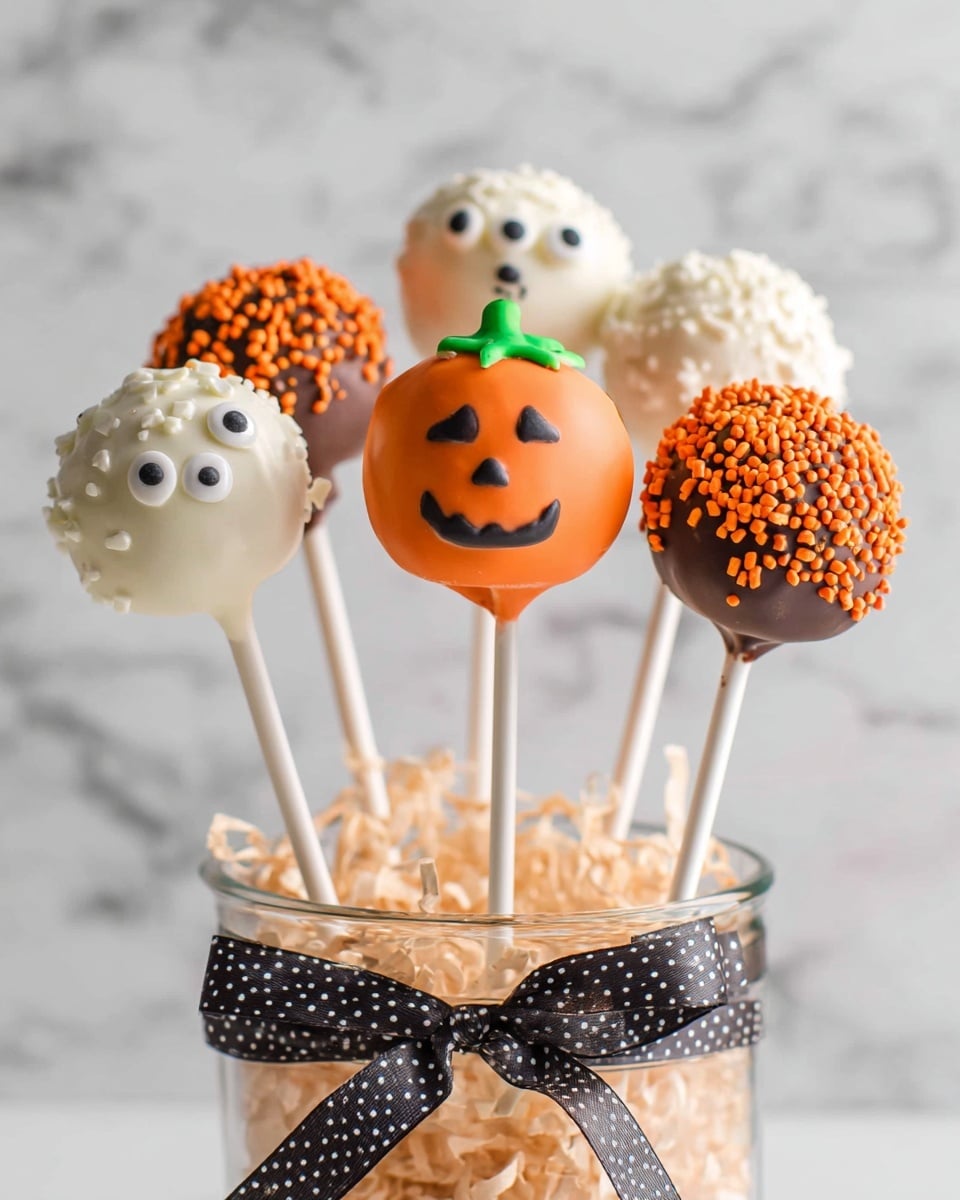
These Halloween Cake Pops are a fun and festive treat perfect for any spooky celebration. Made with white cake crumbs mixed with rich buttercream frosting, then dipped in colorful white, orange, and dark chocolate melts, they’re decorated with Halloween-themed sprinkles and edible ink for a playful touch. Whether shaped like pumpkins or mummies, these cake pops are easy to make and delightful to eat.
Ingredients
White Cake
- 15 ounce box white cake mix, cooked according to package directions in a 9×13″ pan
Buttercream Frosting
- 1 stick salted butter, softened
- 2-2 ½ cups powdered sugar
- 1 teaspoon vanilla extract
- 1 Tablespoon heavy cream or milk
Chocolate Coatings
- 5 ounce chocolate melting wafers (dark chocolate)
- 10 ounce package white chocolate melting wafers (preferably Ghirardelli)
- 10 ounces orange melting wafers (for pumpkins)
Decorations
- Green frosting (for pumpkin stems)
- Black edible ink pen (for pumpkin faces)
- Optional: Halloween sprinkles, jimmies, or other desired decorations
Instructions
- Make Buttercream Frosting: In a medium bowl, whip the softened butter until creamy. Add 1 cup of powdered sugar and mix until combined. Stir in 1 teaspoon of vanilla extract. Gradually add the remaining 1 ½ cups of powdered sugar a little at a time. Add 1 tablespoon of heavy cream or milk to achieve a thick, creamy consistency that holds a peak.
- Prepare Cake Crumbs: Once the baked white cake has cooled slightly, crumble it into fine crumbs using your hands or a spoon.
- Combine Cake and Frosting: Add 2 spoonfuls of the prepared buttercream frosting to the cake crumbs. Mix with hands or a spoon, gradually adding more frosting until the mixture holds together when squeezed but isn’t overly sticky or crumbly.
- Form Cake Pops: Using a cake pop press or a medium cookie scoop, scoop the cake mixture and roll into balls. Place the cake balls onto a plate and freeze for about 10 minutes to firm up.
- Melt Chocolates: Just before removing cake balls from the freezer, melt the dark chocolate and white chocolate wafers separately in microwave-safe bowls. Heat in 30-second intervals, stirring between each until smooth.
- Insert Sticks and Chill: Dip the tip of each lollipop stick into melted dark chocolate, then insert it into the center of each cake ball. Return the cake pops to the fridge or freezer until the chocolate sets, securing the stick in place.
- Dip Cake Pops: Pour melted chocolate into a tall glass or skinny jar. Dip each cake pop into the chocolate coating, gently tapping or spinning the stick to remove excess chocolate. Decorate immediately with Halloween sprinkles or other decorations before the chocolate hardens.
- Create Pumpkins: Dip selected cake pops in orange chocolate and allow to harden. Add green frosting on top to mimic pumpkin stems and draw pumpkin faces with a black edible ink pen.
- Create Mummies: After the first layer of white chocolate hardens, drizzle additional white chocolate using a ziplock bag with a small cut in the corner to create mummy bandage effects.
- Dry and Store: Push the finished cake pops into a styrofoam block or a glass filled with rice to keep them upright. Allow the chocolate coating to set completely, about one hour. Store cake pops in an airtight container in a cool place for 3-4 days.
Notes
- Ensure the cake is cooled before crumbling to avoid a messy mixture.
- Do not add too much frosting; the mixture should hold together but not be soggy.
- Use sharp, clean sticks to avoid breaking during dipping.
- Customize decorations with various sprinkles, edible markers, or colored frosting for different Halloween themes.
- Store cake pops in a cool, dry place to prevent melting and maintain freshness.
Nutrition
- Serving Size: 1 cake pop
- Calories: 180 kcal
- Sugar: 16 g
- Sodium: 95 mg
- Fat: 9 g
- Saturated Fat: 5 g
- Unsaturated Fat: 3 g
- Trans Fat: 0 g
- Carbohydrates: 23 g
- Fiber: 0.5 g
- Protein: 2 g
- Cholesterol: 20 mg


