
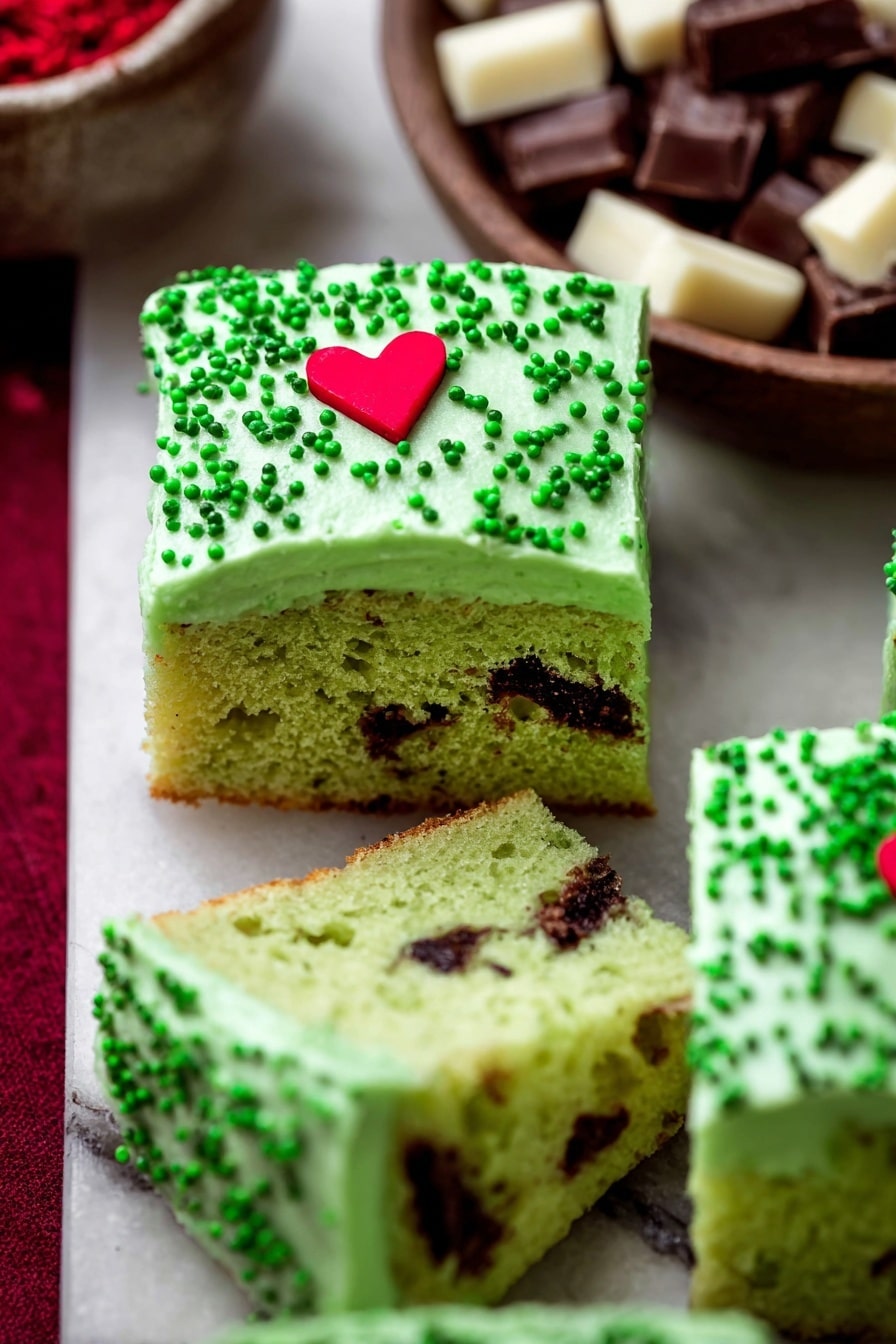
If you’re looking for a show-stopping holiday treat that’s as fun to make as it is to eat, you’ve got to try this Grinch Cake with Green Cream Cheese Frosting Recipe. I absolutely love how this cake turns out—a vibrant green, super moist, and topped with the creamiest green cream cheese frosting you can imagine. Whether you’re hosting a Christmas party or just want to surprise your family with something different, this cake is guaranteed to impress. Stick with me, and I’ll share all the tips and tricks for nailing this festive favorite!
Why You’ll Love This Recipe
- Bright and Festive: The vibrant green color pops and brings the Grinch’s mischievous spirit straight to your table.
- Deliciously Moist: Thanks to the combination of sour cream and buttermilk, this cake stays wonderfully tender without drying out.
- Creamy Frosting: The green cream cheese frosting is rich, tangy, and soft—totally irresistible on every bite.
- Easy to Make: Simple ingredients, straightforward steps, and plenty of room to add your personal touch.

Ingredients You’ll Need
All the ingredients in this Grinch Cake with Green Cream Cheese Frosting Recipe work together to create a cake that’s classic and a little playful. I recommend using room temperature dairy—it mixes better and helps create that perfect, smooth batter and frosting.
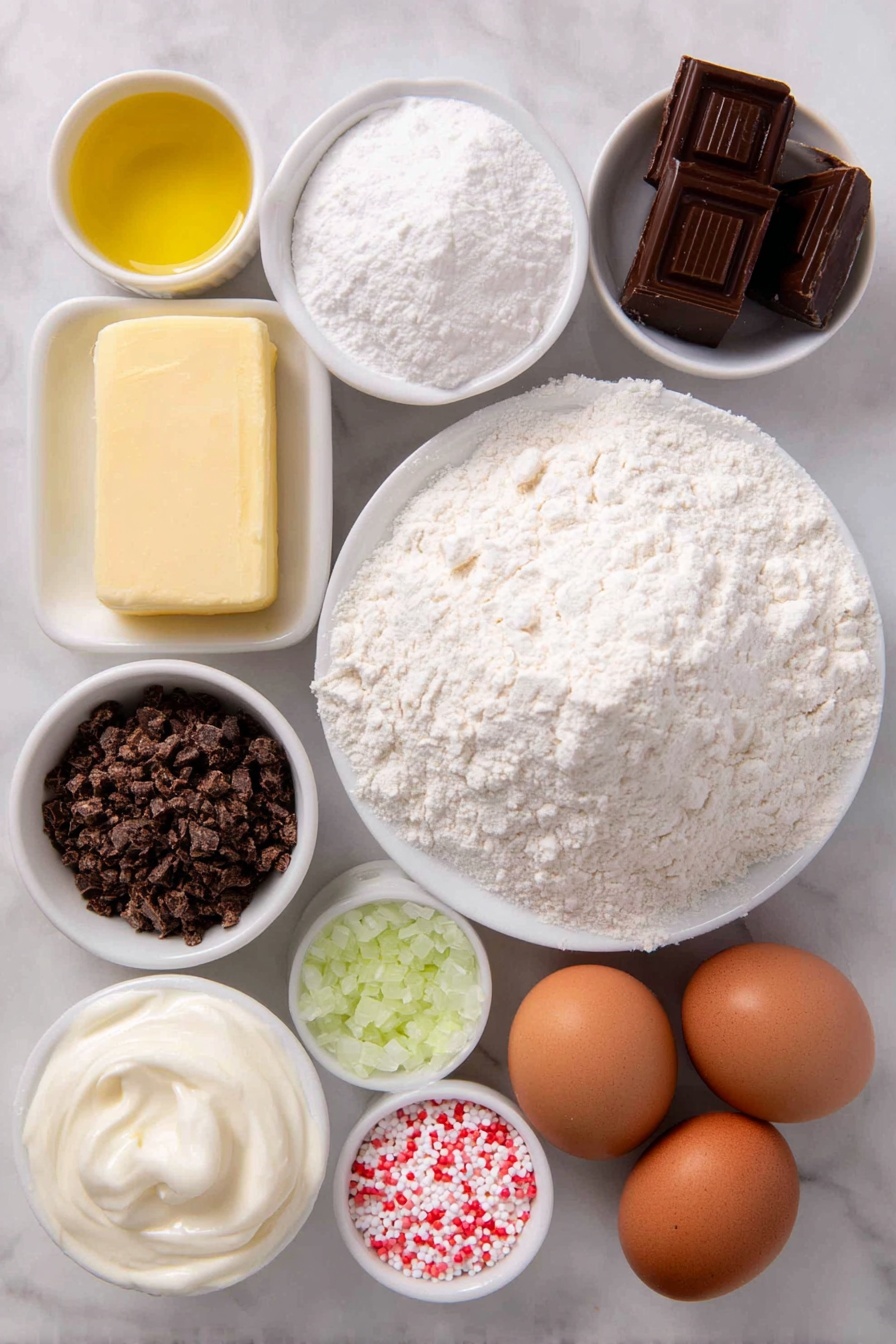
- All-purpose flour: Make sure to spoon and level for accuracy; compacted flour can make the cake dense.
- Baking powder and baking soda: These leavening agents ensure the cake rises properly and stays fluffy.
- Salt: Just a touch enhances all the flavors.
- Unsalted butter: Room temperature is key for smooth creaming with sugar.
- Canola or vegetable oil: Adding oil helps keep the cake moist and tender.
- White granulated sugar: Gives the cake sweetness and helps with structure.
- Sour cream: Adds moisture and a slight tang that balances the sweetness perfectly.
- Pure vanilla extract: Enhances the overall flavor—don’t skip it!
- Large eggs: Eggs make the cake rich and give it structure; room temperature eggs mix better.
- Buttermilk: Works with baking soda to tenderize and add flavor.
- Andes mints (optional): I love adding these chopped mints for a subtle chocolate-mint surprise inside—my family goes crazy for it!
- Green food dye: Just a few drops give this cake its iconic Grinch green without overpowering taste.
- Cream cheese: For the frosting, room temperature cream cheese beats smooth and tangy.
- Powdered sugar: Provides that silky sweetness in the frosting.
- Red heart jumbo sprinkles: Perfect for topping off the cake, adding a cute holiday pop.
Variations
I love that this Grinch Cake with Green Cream Cheese Frosting Recipe is flexible—you can tweak it to suit your taste or dietary needs. Over time, I’ve played around with a few fun twists to keep it fresh for every holiday season.
- Mint-Free Version: If Andes mints aren’t your thing, try swapping them for white chocolate chips for a sweet surprise without the minty punch—I’ve done this for picky kids and it works beautifully.
- Dairy-Free Adaptation: You can substitute dairy ingredients with plant-based alternatives like coconut yogurt and vegan cream cheese; just keep an eye on texture and baking time.
- Layered Cake: For a special occasion, bake this cake in two layers, stacking with frosting in between for extra wow-factor—I’ve had great luck with this for birthday parties.
- Extra Festive: Add a dash of peppermint extract to the frosting for an intensified holiday vibe, but start small—you don’t want it to overpower the cake.
How to Make Grinch Cake with Green Cream Cheese Frosting Recipe
Step 1: Prepare Your Pan and Dry Ingredients
First things first, preheat your oven to 350℉. I always like to spray my 9×9-inch cake pan liberally with a nonstick baking spray, then line the bottom with parchment paper, and spray again. This double layer tricks helps you release the cake effortlessly later. Next, whisk together the flour, baking powder, baking soda, and salt in a medium bowl. Set this aside—it’s your dry mix base for the batter.
Step 2: Cream Butter, Oil, and Sugar
Using a mixer, beat the room temperature butter, oil, and sugar on high speed for about 2 minutes until it’s light and fluffy. You want it well-aerated here because that helps your cake rise nicely. Don’t forget to scrape down the sides of your bowl with a spatula to catch any stubborn pockets of butter or sugar that didn’t mix in.
Step 3: Add Wet Ingredients and Green Color
Mix in the sour cream and vanilla extract with the creamed butter and sugar. Now, it’s time to bring the Grinch to life—add 3 drops of green food dye. Trust me, a little goes a long way; you want a lovely shade of green, not neon! Then, add your eggs one by one, mixing on medium speed until everything is smooth and combined. Again, scrape the bowl to keep it consistent.
Step 4: Alternate Adding Dry Ingredients and Buttermilk
Reduce your mixer to low speed. Add one-third of the flour mixture, then half of the buttermilk; mix gently until just combined. Repeat with another one-third of the flour and the remaining buttermilk, then finally add the last of the dry ingredients. This alternating method helps keep the batter tender and prevents overmixing, which I’ve found can make the cake tough.
Step 5: Fold in Andes Mints and Bake
Turn off your mixer and fold in the chopped Andes mints if you’re using them. These little gems melt in the oven, adding just a hint of minty chocolate surprise your guests will adore. Pour the batter into your prepared pan and pop it into the oven. Bake for 33 to 36 minutes—test doneness by inserting a toothpick into the center; it should come out clean or with just a few crumbs attached.
Step 6: Cool Before Decorating
Once out of the oven, let the cake rest in the pan for 10 minutes—this helps it firm up a bit for easier removal. Then, transfer it to a cooling rack and let it cool completely. Don’t skip this! Frosting a warm cake leads to melty messes, and we want that gorgeous green frosting to stay smooth and creamy.
Step 7: Make the Green Cream Cheese Frosting
In a clean bowl, sift your powdered sugar to avoid lumps. Beat the cream cheese and room temperature butter on high speed for 2 minutes until fluffy and well combined. Gradually add the powdered sugar in two batches, mixing on low after each addition. Finally, stir in the vanilla, salt, and 3 drops of green food dye, then beat on high until smooth and luscious. The frosting should be thick enough to spread easily but soft enough to pipe if you like.
Step 8: Frost and Decorate Your Grinch Cake
Spread the green cream cheese frosting all over your cooled cake using an offset spatula for the smoothest finish. I love to add red heart jumbo sprinkles on top for a festive pop of color—kind of like the Grinch’s own redemption heart in candy form. Then sit back and admire your creation before slicing into it!
Pro Tips for Making Grinch Cake with Green Cream Cheese Frosting Recipe
- Room Temperature Ingredients: Pull your butter, cream cheese, sour cream, eggs, and buttermilk out of the fridge ahead of time—about 2 hours before baking. It makes mixing so much easier and helps your cake rise perfectly.
- Don’t Overmix: When combining wet and dry ingredients, mix just until incorporated. Overmixing can develop gluten and give you a tough cake, and that’s the exact opposite of what you want here.
- Mint Inclusion: If you add chopped Andes mints, use good quality ones and chop them evenly for the best melting effect inside the cake.
- Frosting Consistency: If your frosting feels too soft, chill it a bit before spreading; if too stiff, let it sit at room temp for a few minutes and beat again.
How to Serve Grinch Cake with Green Cream Cheese Frosting Recipe
Garnishes
I always finish off this cake with red heart jumbo sprinkles to contrast the green frosting—it’s just such a cheerful holiday look. Sometimes, I add crushed peppermint candies around the edges or even tiny edible silver stars for extra sparkle. These little touches make the cake feel extra special, especially if you’re serving guests who appreciate presentation.
Side Dishes
Pairing this cake with a dollop of whipped cream or a scoop of vanilla ice cream is one of my favorite ways to enjoy it. For a holiday spread, I like serving it alongside hot cocoa, spiced mulled wine, or even a fresh fruit salad to balance the richness.
Creative Ways to Present
For a themed party, I’ve shaped this cake into a Grinch face using cookie cutters, and decorated it with frosting details (like his mischievous grin) with colored piping gels and candies. You can also serve this as mini cupcakes with green frosting and red candy “hearts” on top—perfect bite-sized treats that kids love.
Make Ahead and Storage
Storing Leftovers
If you have leftovers (which is rare in my house!), store the cake covered in an airtight container in the fridge. It stays moist and delicious for up to 4 days. Just be sure to keep it away from other strong odors, as cream cheese frosting can pick up fridge scents.
Freezing
I’ve frozen this cake before, both baked and unfrosted. Freeze the cake wrapped tightly in plastic wrap and then foil to avoid freezer burn. When ready to serve, thaw overnight in the fridge, then frost fresh for best results. This trick really saves time during busy holiday prep!
Reheating
You don’t need to warm this cake to enjoy it, but if you want a warm slice, microwave a piece for about 10 seconds. Be careful not to overheat or the frosting might melt. I usually pull it from the fridge about 10 minutes before serving to take off the chill but keep the frosting nice and firm.
FAQs
-
Can I make this Grinch Cake without Andes mints?
Absolutely! The Andes mints add a lovely subtle mint-chocolate surprise inside, but they’re completely optional. You can leave them out or substitute with white or semi-sweet chocolate chips for different flavor twists.
-
How do I get the perfect green color for the frosting?
Use gel food coloring instead of liquid since it provides a more intense color without thinning out the frosting. Start with just 3 drops and mix well; add more if you want a deeper green, but be careful not to go too far as it can turn the frosting bitter or streaky.
-
Can I make this cake ahead of time?
Yes! Bake the cake a day or two in advance, keep it tightly wrapped or in an airtight container, and frost it the day you plan to serve for the freshest taste and best frosting texture.
-
What’s the best way to slice this cake?
Use a sharp serrated knife and wipe the blade clean between slices for neat cuts without tearing the cake or smearing the frosting. Letting the cake sit at room temperature for 10-15 minutes before slicing helps the frosting soften slightly for easier cutting.
Final Thoughts
This Grinch Cake with Green Cream Cheese Frosting Recipe holds a special place in my heart—it always brings smiles and a little holiday magic to the kitchen. I remember the first time I made it for my family, and how the bright green color and minty surprise inside became an instant hit. You’re going to love how versatile and festive it is, and the way that smooth green frosting feels like wrapping every bite in a cozy holiday hug. Give it a try this season—you’ll be so proud when you serve it, and more importantly, everyone will be asking for seconds!
Print
Grinch Cake with Green Cream Cheese Frosting Recipe
- Prep Time: 35 minutes
- Cook Time: 35 minutes
- Total Time: 1 hour 10 minutes
- Yield: 16 servings
- Category: Dessert
- Method: Baking
- Cuisine: American
Description
This festive Grinch Cake features a moist, green-tinted vanilla cake studded with chopped Andes mints, topped with a luscious green cream cheese frosting and decorated with red heart sprinkles, perfect for holiday celebrations.
Ingredients
Grinch Cake:
- 2 3/4 cups All-purpose flour
- 2 tsp Baking powder
- 1/2 tsp Baking soda
- 1/2 tsp Salt
- 1/2 cup Unsalted butter, room temperature
- 2 TBSP Oil (canola or vegetable)
- 1 cup White granulated sugar
- 1/3 cup Sour cream, room temperature
- 1 TBSP Pure vanilla extract
- 3 Large eggs, room temperature
- 3/4 cup Buttermilk, room temperature
- 3/4 cup Andes mints, chopped (optional)
- Green food dye (about 3 drops)
Green Cream Cheese Frosting:
- 4 oz Cream cheese, room temperature
- 3/4 cup Unsalted butter, room temperature
- 3 cups Powdered sugar, sifted
- 1 tsp Pure vanilla extract
- 1/4 tsp Salt
- Green food dye (about 3 drops)
- Red heart jumbo sprinkles
Instructions
- Prepare the Oven and Pan: Preheat the oven to 350℉. Spray a 9×9-inch cake pan with baking nonstick spray, line the bottom with parchment paper, and spray again to ensure the cake doesn’t stick. Set the pan aside.
- Mix Dry Ingredients and Chop Mints: In a medium bowl, whisk together the all-purpose flour, baking powder, baking soda, and salt. Chop the Andes mints into small pieces and set aside.
- Cream Butter, Oil, and Sugar: Using an electric mixer, beat the softened unsalted butter, oil, and granulated sugar on high speed for 2 minutes until light and fluffy. Use a rubber spatula to scrape down the bowl sides.
- Add Sour Cream, Vanilla, Food Dye, and Eggs: Mix in the sour cream, vanilla extract, and about 3 drops of green food dye until combined. Add the eggs one at a time, mixing on medium speed until smooth, scraping down the bowl as needed.
- Incorporate Dry Ingredients and Buttermilk: Add one-third of the dry flour mixture, then half the buttermilk, mixing on low speed to combine. Repeat with another third of the dry ingredients, then the remaining buttermilk. Finish by mixing in the last third of the dry ingredients until just combined.
- Add Andes Mints to Batter: Remove the bowl from the mixer and fold in the chopped Andes mints gently until evenly distributed.
- Bake the Cake: Pour the batter into the prepared cake pan. Bake for 33 to 36 minutes or until a toothpick inserted into the center comes out clean.
- Cool the Cake: Allow the cake to rest in the pan for 10 minutes. Then, transfer it to a cooling rack and let it cool completely before decorating.
- Sift Powdered Sugar: For the frosting, sift the powdered sugar into a medium bowl to remove lumps.
- Beat Cream Cheese and Butter: Using a mixer, beat the cream cheese and unsalted butter on high speed for 2 minutes until creamy and smooth.
- Add Powdered Sugar and Flavorings: Add half the powdered sugar and mix on low speed until just combined. Repeat with the remaining powdered sugar. Then add vanilla extract, green food dye (about 3 drops), and salt. Beat on high speed until the frosting is smooth and fluffy.
- Frost and Decorate: Spread the green cream cheese frosting evenly over the cooled cake. Finish by sprinkling red heart jumbo sprinkles on top for a festive touch.
Notes
- Flour: Ensure the flour is spooned and leveled or measured with a kitchen scale to avoid compacting which can dry out the cake.
- High altitude baking: Add an extra 2 tablespoons of flour to help the cake rise properly.
- Dairy Ingredients: Remove from the refrigerator 2 hours before baking to reach room temperature for better mixing and texture.
Nutrition
- Serving Size: 1 slice (1/16 of cake)
- Calories: 320
- Sugar: 28g
- Sodium: 180mg
- Fat: 15g
- Saturated Fat: 9g
- Unsaturated Fat: 5g
- Trans Fat: 0.2g
- Carbohydrates: 42g
- Fiber: 1.5g
- Protein: 4g
- Cholesterol: 70mg


