
If you’re like me and constantly chasing the perfect treat that’s both indulgent and safe for gluten-sensitive friends, this Gluten Free Cookie Whoopie Pies Recipe is about to become your new best friend. Seriously, these whoopie pies are soft, chocolatey, and have the creamiest filling — all without a crumb of gluten! I love sharing this recipe because it proves that gluten-free baking can be just as comforting and downright delicious as the classic version.
Why You’ll Love This Recipe
- Gluten-Free and Delicious: You get the classic whoopie pie experience without any gluten worries.
- Rich Chocolate Flavor: The cocoa and tapioca flours create a tender texture and a deep chocolate taste you’ll crave.
- Creamy, Dairy-Free Filling: I use palm shortening and coconut milk to keep it light and allergy-friendly.
- Quick and Easy: From mixing to assembly, this recipe fits perfectly into a busy day without fuss.

Ingredients You’ll Need
I’ve picked ingredients that blend seamlessly to make these whoopie pies just right — soft, moist, and super chocolatey. Choosing a reliable gluten-free flour blend and quality cocoa powder makes a world of difference.

- Gluten-free flour blend: I swear by Bob’s Red Mill 1-to-1 Gluten Free Baking Flour for consistent results.
- Tapioca flour: This helps add a chewy but tender texture that makes the cakes feel fresh.
- Unsweetened cocoa powder: I use a rich Dutch-processed cocoa to deepen the chocolate flavor.
- Baking soda: Essential for that perfect rise and bounce in your whoopie pie rounds.
- Sea salt: A pinch boosts all the chocolate’s natural sweetness.
- Ghee: Provides a rich, buttery flavor that feels classic but dairy-friendly for some.
- Coconut sugar: Adds a subtle caramel sweetness with a lower glycemic impact.
- Egg: Acts as the binder and helps keep everything tender.
- Maple syrup: A touch of natural sweetness and moisture in each bite.
- Vanilla extract: Always a must in baked goods to elevate flavors.
- Canned coconut milk: Makes these moist and adds a slight tropical creaminess.
- Dairy-free milk: I prefer coconut milk for its richness, but almond or oat work fine.
- Powdered sugar: Sifted to make the filling smooth and silky.
- Palm shortening: The secret to a fluffy, stable, and light dairy-free filling.
Variations
One of my favorite things about this Gluten Free Cookie Whoopie Pies Recipe is how easy it is to switch things up. I’ve played around with flavors and textures — and you should too! Don’t hesitate to personalize it so it fits your taste buds or dietary needs.
- Pumpkin Spice: In the fall, I swap the cocoa for pumpkin pie spices, and it’s a huge hit — warm and cozy with that same soft texture.
- Nut-Free: I always avoid nuts here to keep it friendly for all, but feel free to toss in a teaspoon of sunflower seed butter for extra richness if you want a nutty twist.
- Chocolate Chip Filling: Adding mini dairy-free chocolate chips into the frosting creates delightful little pockets of chocolate surprise.
- Peanut Butter Filling: Mixing creamy peanut butter with the frosting is another popular spin I discovered — perfect if you love sweet and salty combos.
How to Make Gluten Free Cookie Whoopie Pies Recipe
Step 1: Whisk Together Your Dry Ingredients
Start by gathering your gluten-free flour blend, tapioca flour, cocoa powder, baking soda, and sea salt in a bowl. Whisking these together well ensures an even distribution of ingredients, especially the cocoa and baking soda, which can clump easily. I learned early on that skipping this step leads to uneven flavor and texture — so don’t skip it!
Step 2: Cream the Ghee and Coconut Sugar
Using a stand or hand mixer fitted with a paddle attachment, beat the ghee and coconut sugar together until light and fluffy — this usually takes about 2-3 minutes. The texture at this point matters a lot because it creates air pockets that help give your whoopie pies that lovely softness.
Step 3: Add the Wet Ingredients
Beat in the egg, followed by the maple syrup, vanilla extract, and canned coconut milk. Mix until everything is well combined. The batter should feel thick but moist, not runny. If your batter feels too loose, check your flour measurements – gluten-free flours can vary in absorption.
Step 4: Incorporate Dry Ingredients and Scoop
Add the dry ingredients to your wet bowl and mix on low speed until the batter looks smooth and thick — but don’t overmix, or it will get dense. Use a 2-tablespoon spring-loaded cookie scoop to portion the batter onto two parchment-lined baking sheets, spacing them two inches apart. You’ll get 24 perfect little cookie rounds.
Step 5: Bake and Cool
Bake your whoopie cakes at 350°F for 10-12 minutes. You’ll know they’re ready when they puff up and bounce back lightly when pressed. Avoid overbaking to keep the centers tender — I always watch closely starting at 10 minutes. Once out, transfer them gently to a wire rack to cool completely before filling.
Step 6: Make the Creamy Filling
In a large pourable measuring cup, blend your coconut milk and sifted powdered sugar until smooth. Separately, beat the palm shortening for a couple of minutes to get it silky, then stir in vanilla extract. Slowly add the milk and sugar mixture, whipping until the filling is light, fluffy, and completely smooth — usually 2-3 minutes. No clumps here!
Step 7: Assemble the Whoopie Pies
Fill a piping bag with your luscious filling and pipe a generous mound onto the flat side of 12 cookies. Top each with another cookie, flat side down, and gently twist to secure. This step is fun because you get that classic sandwich look and a creamy center bursting with flavor.
Step 8: Serve or Store
I love serving these right away to enjoy their fresh softness, but they also store wonderfully in an airtight container in your fridge for up to 4 days if you’re prepping ahead.
Pro Tips for Making Gluten Free Cookie Whoopie Pies Recipe
- Use a Reliable GF Flour Blend: I’ve tried many, but Bob’s Red Mill 1-to-1 gives me the best fluffy texture without crumbling.
- Don’t Overmix the Batter: Mixing just until combined keeps your cookies tender and soft in the middle.
- Watch Baking Time Closely: Start checking at 10 minutes so they don’t dry out—softness is key!
- Let Cookies Cool Completely: Filling warm cookies can melt your frosting and make assembly messy.
How to Serve Gluten Free Cookie Whoopie Pies Recipe

Garnishes
I like to sprinkle a tiny bit of cocoa powder or dust with powdered sugar on top to add a touch of elegance without overpowering the chocolate flavor. Sometimes I also add mini dairy-free chocolate chips on the filling swirl before topping for a delightful crunch surprise.
Side Dishes
If serving as part of a small dessert spread, I pair these whoopie pies with a scoop of dairy-free vanilla ice cream or fresh berries to balance out the richness. A warm mug of chai tea or coffee also completes the cozy vibe perfectly.
Creative Ways to Present
For parties, I like stacking these on pretty tiered trays with fresh mint leaves and edible flowers scattered around. Wrapping each pie individually in parchment paper and tying with twine makes a charming gift or party favor. Kids love helping with this part!
Make Ahead and Storage
Storing Leftovers
I keep leftover whoopie pies in an airtight container in the fridge. I’ve noticed they stay moist and flavorful for up to 4 days, which is perfect for making ahead of busy weekends or events. Just remember to bring them to room temperature before serving for the best texture.
Freezing
I’ve frozen these whoopie pies successfully — I recommend freezing them unassembled: cookies on a baking sheet first, then the filling in a separate container. When ready, thaw cookies overnight and assemble fresh. This keeps everything tasting homemade and fresh!
Reheating
If you want to enjoy leftover whoopie pies warm, I gently warm them in a 300°F oven for 3-4 minutes wrapped loosely in foil. This refreshes the softness without melting the filling too much — just like when fresh from the oven!
FAQs
-
Can I substitute ghee with butter in this recipe?
Absolutely! If you’re not avoiding dairy, unsalted butter works well as a one-to-one swap for ghee. Just keep in mind that ghee has a slightly nutty, caramelized flavor that adds extra depth, so the cookies might taste a bit different but still delicious.
-
What’s the best way to avoid the filling from turning watery?
Make sure to sift your powdered sugar before mixing and whip the filling until it’s light and fluffy with no lumps. Also, use full-fat canned coconut milk for richness, and avoid adding too much liquid at once. It’s all about patience and proper mixing!
-
Can I make this recipe vegan?
Yes! Swap the egg for a flax egg (1 tbsp flaxseed meal + 3 tbsp water) and use vegan palm shortening and dairy-free milk as indicated. The texture might be slightly different but still wonderfully tasty.
-
How do I know when the cookies are perfectly baked?
Look for cookies that puff up, and when you press gently in the center, they should spring back without feeling wet or gooey. Overbaking dries them out, so start checking a couple of minutes before the recommended baking time.
Final Thoughts
This Gluten Free Cookie Whoopie Pies Recipe has honestly become one of my absolute favorites for both everyday treats and special occasions. It’s perfect for anyone who needs a gluten-free option but doesn’t want to sacrifice flavor or that nostalgic, homemade feeling. I hope you enjoy baking and sharing these as much as my family and I do — once you try them, I bet you’ll agree it’s a keeper!
Print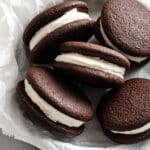
Gluten Free Cookie Whoopie Pies Recipe
- Prep Time: 25 minutes
- Cook Time: 12 minutes
- Total Time: 37 minutes
- Yield: 12 whoopie pies
- Category: Dessert
- Method: Baking
- Cuisine: American
- Diet: Gluten Free
Description
Delightful gluten-free whoopie pies made with a rich cocoa-flavored cake and a creamy dairy-free filling. Perfectly soft and fluffy, these treats are sweetened with coconut sugar and maple syrup, using palm shortening and ghee for a tender texture. Ideal for those seeking a gluten-free dessert option without sacrificing taste.
Ingredients
Cake Ingredients
- 1 ¼ cup all purpose gluten free flour blend (Bob’s Red Mill 1-to-1 Gluten Free Baking Flour)
- ½ cup tapioca flour
- ½ cup unsweetened cocoa powder
- 1 ¼ teaspoons baking soda
- ¼ teaspoon sea salt
- ½ cup ghee, room temperature
- ¾ cup coconut sugar
- 1 large egg
- ¼ cup maple syrup
- 1 teaspoon vanilla extract
- ¾ cup canned coconut milk
- ¼ cup dairy-free milk (coconut milk recommended)
Filling Ingredients
- 2 cups powdered sugar, sifted
- ¾ cup palm shortening
- ¾ cup canned coconut milk
- 1 teaspoon vanilla extract (added to filling)
Instructions
- Prep: Preheat the oven to 350°F (175°C). Line two large baking sheets with parchment paper to prevent sticking and ensure even baking.
- Whisk the Flours: In a medium bowl, thoroughly whisk together the gluten free all purpose flour blend, tapioca flour, unsweetened cocoa powder, baking soda, and sea salt. Set this dry mixture aside.
- Mix the Batter: Using a stand mixer or hand mixer fitted with a paddle attachment, beat the ghee and coconut sugar together until creamy and well combined. Add the egg and beat until fully incorporated. Next, add the maple syrup, vanilla extract, and canned coconut milk; mix until combined. Slowly add the dry ingredients into the wet ingredients, mixing on low speed until the batter is smooth, thick, and uniform.
- Scoop the Batter: Using a spring-loaded 2-tablespoon cookie scoop, portion the batter onto the prepared baking sheets, spacing each mound about two inches apart to allow for spreading. You should yield about 24 individual cookies.
- Bake: Place in the preheated oven and bake for 10-12 minutes, or until the whoopie pies puff up and spring back gently when pressed in the center. Remove from oven and transfer cookies to a wire rack to cool completely.
- Prepare the Filling: In a pourable measuring cup, mix the canned coconut milk and sifted powdered sugar until smooth and no lumps remain. In a large bowl, beat the palm shortening using a stand mixer or hand mixer fitted with a paddle attachment for 1-2 minutes until smooth and creamy. Add vanilla extract and mix to combine. Gradually pour in the coconut milk and powdered sugar mixture and whip on medium-high speed for 2-3 minutes until the filling turns light, fluffy, and fully blended.
- Assemble the Whoopie Pies: Transfer the filling to a piping bag fitted with a large round tip. Pipe a generous amount of filling evenly on the flat side of 12 cooled cookies. Gently place the remaining 12 cookies on top, flat side down, twisting slightly to secure and create the classic whoopie pie sandwich.
- Serve and Store: Serve the whoopie pies immediately for best texture. Store any leftovers in an airtight container in the refrigerator for up to 4 days to maintain freshness.
Notes
- Ensure all ingredients, especially the ghee and palm shortening, are at room temperature for proper mixing and texture.
- The gluten-free flour blend should be a 1-to-1 substitute for all-purpose flour to achieve optimal results.
- For a dairy-free version, confirm that the dairy-free milk used is coconut milk or a similar non-dairy alternative.
- The cookies puff up during baking but will flatten slightly as they cool; avoid overbaking to keep them soft.
- Storing in an airtight container in the refrigerator helps the filling maintain its creamy consistency and prevents the cookies from drying out.
Nutrition
- Serving Size: 1 whoopie pie
- Calories: 280 kcal
- Sugar: 18 g
- Sodium: 140 mg
- Fat: 15 g
- Saturated Fat: 8 g
- Unsaturated Fat: 5 g
- Trans Fat: 0 g
- Carbohydrates: 35 g
- Fiber: 3 g
- Protein: 3 g
- Cholesterol: 30 mg

