
If you’re looking for a show-stopping holiday treat that’s as fun to make as it is to eat, you’ve got to try my Festive Christmas Brownie Shapes Recipe. These cut-out brownies decorated with colorful buttercream and sprinkles are a total crowd-pleaser – I promise they’ll disappear fast at your Christmas party or family gathering. Plus, you don’t have to be a professional baker to pull them off; I’ll walk you through every step so you can impress without stress.
Why You’ll Love This Recipe
- Deliciously Chewy Brownies: I use my best-ever chewy brownie base that stays fudgy and moist every time.
- Customizable Decorations: You can get creative with colors, sprinkles, and shapes to fit any festive vibe.
- Perfect for Gifts or Parties: These brownies are not just treats – they’re little works of edible art that wow your guests.
- Easy to Make Ahead: Prep the brownies and frosting in advance to save holiday stress.

Ingredients You’ll Need
All the flavors in this Festive Christmas Brownie Shapes Recipe come from a simple, classic brownie paired with my silky smooth buttercream. I’ve included little tips with each ingredient so you know exactly what to look for when you shop!

- Brownie ingredients: Use quality cocoa powder and real butter for rich flavor – it makes all the difference in chewy brownies.
- Buttercream frosting: Whipped just right to be spreadable yet firm enough to hold your festive shapes.
- Gel food coloring: I love gels over liquids because they give vibrant colors without watering down the frosting.
- Edible decorations: Mini M&Ms, sprinkles, and mini chocolate chips add that extra festive fun – use whatever you (or your kids!) love most.
Variations
One of the best things about the Festive Christmas Brownie Shapes Recipe is how you can make it your own. Over the years, I’ve played around with flavors and decorations and have a few favorites that might spark your creativity.
- Chocolate Peppermint: Adding crushed candy canes to the buttercream gave my brownies a refreshing holiday kick – my family goes crazy for this variation every December.
- Nut-Free: If you’re sharing with friends who have allergies, skip any nut ingredients and choose safe sprinkles so everyone enjoys the festive spirit.
- Gluten-Free: Substitute with your favorite gluten-free brownie mix or flour blend – just be sure the texture stays dense enough to cut neatly.
- Vegan Option: I swapped out butter and eggs for plant-based alternatives once and was surprised how well it still turned out, especially when chilled properly before cutting.
How to Make Festive Christmas Brownie Shapes Recipe
Step 1: Bake Your Double Batch of Brownies
Start by making a double batch of my Best Ever Chewy Brownies – doubling the recipe means you’ll have plenty of brownie to cut into cute shapes. Be sure to line your 9×13-inch metal baking pan with parchment paper or foil; lifting the entire slab out later makes cutting shapes a breeze. I add a few extra minutes to the baking time (about 3 to 5 more minutes) to get that perfect fudgy edge without drying out the middle. Once out of the oven, resist the urge to dig in right away – let them cool completely, and if you can, chill the brownies in the fridge for a couple of hours or even overnight. This makes cutting them a snap and reduces crumble.
Step 2: Whip Up Your Buttercream and Add Color
While the brownies chill, prepare your Best Ever Buttercream Frosting. I love dividing the frosting into bowls and using gel food coloring to create a rainbow of festive colors – reds, greens, whites, or even glittery silver. If you’re short on time, just tint the whole batch green and call it a day (it still looks amazing). Pop each colored frosting into disposable piping bags fitted with your favorite tips – small round tips work great for precise lines, but star tips add a lovely texture. Pro tip: squeeze out a little frosting on a plate first to test your piping pressure.
Step 3: Cut Out Your Brownie Shapes
Time for the fun part! Remove the whole cooled brownie slab from the pan, keeping the parchment or foil underneath for stability. Use tall metal cookie cutters to stamp out your favorite Christmas shapes (trees, stars, bells, you name it). Pack the cutters as close together as possible to minimize waste. Gently slide an offset spatula or small paring knife underneath each shape to lift it cleanly away from the slab – this takes a bit of patience, but you’ll get the hang of it. If the brownies are cold, they’ll hold their shape better and won’t crumble when you pop them out of the cutters. Use your fingers carefully to ease the brownie out, keeping sharp edges intact.
Step 4: Decorate with Festive Buttercream and Toppings
Now for the creative part – frost each brownie shape with your beautifully colored buttercream. I like to pipe the frosting right onto the brownies and immediately sprinkle on mini M&Ms, sprinkles, or chocolate chips before the icing dries, so everything sticks nicely. You can get as fancy or simple as you want; when I’ve made these with my kids, they love just dabbling different colors and toppings everywhere! Serve right away, or keep them in an airtight container to keep the edges soft and chewy.
Pro Tips for Making Festive Christmas Brownie Shapes Recipe
- Chill for Clean Cuts: I discovered chilling the brownies really helps prevent crumbling and keeps your shapes sharp.
- Use Gel Colors Only: Stick to gel food coloring – it gives vibrant tones without ruining frosting texture.
- Pipe and Decorate Quickly: The buttercream starts drying fast, so I frost and sprinkle toppings right away for best adhesion.
- Avoid Overbaking: I learned that a few extra minutes are fine, but too long dries the brownies out and makes cutting frustrating.
How to Serve Festive Christmas Brownie Shapes Recipe

Garnishes
For garnishes, I’m all about keeping things festive and colorful. I use red and green sprinkles, a mix of mini M&Ms, and some edible glitter dust for sparkle. Sometimes a few crushed peppermint candies add a lovely crunch and holiday aroma. I find that these garnishes not only add visual appeal but also texture contrast, making every bite playful and delicious.
Side Dishes
When we serve these at Christmas, I like pairing them with a warm cup of cocoa or spiced tea. They also go surprisingly well with vanilla ice cream for an after-dinner treat. If you want a savory side, simple roasted nuts or a platter of cheese and charcuterie balance the sweetness nicely — perfect for a holiday dessert table.
Creative Ways to Present
Once, I arranged the brownie shapes on a large serving board to look like a giant Christmas tree, layering the shapes by size and scattering tiny edible pearls as “ornaments.” I also love gifting them in little clear boxes layered with parchment paper and tied with festive ribbon – so easy and so impressive. Wrapping individual brownies with a little tag and string makes for perfect party favors too!
Make Ahead and Storage
Storing Leftovers
I keep leftover Festive Christmas Brownie Shapes in an airtight container at room temperature for up to 3 days. If you want them to last longer, refrigeration works well for about 5 days, but I recommend bringing them to room temp before serving so they’re soft and chewy again. Just remember to keep the container sealed tight – brownies dry out fast once they’re cut!
Freezing
If you want to prep in advance, I recommend freezing the brownies before frosting. I wrap the whole slab tightly in plastic wrap and then in a freezer bag or airtight container. When I’m ready, I thaw them overnight in the fridge, cut my shapes, and decorate fresh. This method keeps the brownies fresher and avoids frosting getting damaged from freezing.
Reheating
If your brownies feel a little cold or firm from the fridge, I pop them in the microwave for 10-15 seconds before serving to bring back that homemade warmth and melt-in-your-mouth texture. Be careful not to overheat or the frosting can soften too much.
FAQs
-
Can I use regular food coloring instead of gel?
While you can use regular liquid food coloring, gel colors are preferred because they add vibrant color without thinning your buttercream. Liquid food coloring can change the frosting’s consistency, making it runnier and harder to pipe.
-
What shapes work best for cutting brownies?
Taller metal cookie cutters work best since brownies are thicker than cookies. Christmas trees, stars, bells, or snowflakes are all great options. Make sure to chill brownies first to get clean edges when cutting.
-
My brownies crumble when cutting. What can I do?
Chilling the brownies thoroughly before cutting really helps solidify their structure. Also, using a sharp metal cookie cutter and gently lifting shapes with a spatula or knife can prevent crumbling. Avoid overbaking, as dry brownies break apart more easily.
-
Can I prepare these brownies ahead of time for a party?
Definitely! You can bake and freeze the brownies ahead, then thaw and decorate them the day of your event for fresh, vibrant frosting. This strategy saves time and stress during busy holiday days.
Final Thoughts
I absolutely love how this Festive Christmas Brownie Shapes Recipe brings a playful, cozy vibe to holiday baking. When I first made these, seeing the smiles as my family decorated their own brownies made me realize how this recipe isn’t just about the delicious end result – it’s about making memories together. Whether you’re baking solo or with loved ones, these brownies bring a special warmth to any Christmas celebration. Give them a try – I have a feeling they’ll become a holiday tradition in your kitchen too!
Print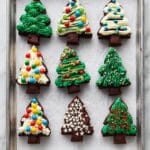
Festive Christmas Brownie Shapes Recipe
- Prep Time: 30 minutes
- Cook Time: 35 minutes
- Total Time: 3 hours 5 minutes
- Yield: 10 servings
- Category: Baking
- Method: Baking
- Cuisine: American
- Diet: Vegetarian
Description
Delight in festive cheer with these Christmas Brownies featuring a double batch of chewy brownies cut into holiday shapes and decorated with colorful buttercream frosting and sprinkles. Perfect for the holiday season, these treats combine rich chocolate goodness with fun, vibrant decoration for an irresistible seasonal dessert.
Ingredients
Brownies
- Double batch of Best Ever Chewy Brownies (all ingredients doubled)
- Parchment paper or aluminum foil (to line baking pan)
Buttercream Frosting
- 1 batch Best Ever Buttercream Frosting
- Gel food coloring (various colors, as desired)
- Disposable piping bags
- Piping tips of your choice
Decorations
- Sprinkles
- Mini M&Ms
- Mini chocolate chips
- Other edible decorations as preferred
Instructions
- Make the Brownies: Prepare a double batch of the Best Ever Chewy Brownies by doubling all the ingredients. Bake the batter in a 9 by 13-inch metal baking pan lined with parchment paper or aluminum foil. Extend the baking time by 3 to 5 minutes beyond the original recommendation. Let the brownies cool completely, and if possible, chill them for a couple of hours or overnight to firm up.
- Make the Buttercream: Prepare a batch of the Best Ever Buttercream Frosting. Divide the frosting into separate bowls and tint each with gel food coloring to achieve your desired palette, or simply color the entire batch green for a classic look. Transfer the colored buttercream into disposable piping bags fitted with your chosen piping tips.
- Cut Out the Brownies: Carefully remove the entire cooled brownie slab from the baking tin while keeping the parchment paper or foil intact underneath. Use a tall metal cookie cutter to stamp out holiday shapes as close together as possible. Gently slide an offset spatula or paring knife under each cut brownie to release it from the paper, then carefully press the brownie shape out of the cutter with your fingers. Cold brownies make this process easier.
- Decorate the Christmas Brownies: Frost each shaped brownie using the colored buttercream and immediately decorate with festive sprinkles, mini M&Ms, or any other edible decorations. Since the buttercream begins to dry as it sits, adding toppings right as you pipe helps them adhere best. Serve immediately or store the decorated brownies in an airtight container to keep edges moist.
Notes
- Storage: Brownies are best enjoyed the day they are baked and decorated. Store in an airtight container at room temperature for up to 3 days or refrigerate for up to 5 days. Cutting exposes edges, which may dry out, so airtight storage is essential.
- Freezing: For optimal results, freeze brownies before frosting, either as an entire slab or pre-cut shapes. Wrap tightly in plastic wrap and place in a freezer-safe bag or container. Freeze for up to one month. Thaw overnight in the refrigerator or for a few hours at room temperature before decorating.
Nutrition
- Serving Size: 1 decorated brownie piece (approx. 80g)
- Calories: 320
- Sugar: 28g
- Sodium: 150mg
- Fat: 18g
- Saturated Fat: 10g
- Unsaturated Fat: 7g
- Trans Fat: 0.3g
- Carbohydrates: 38g
- Fiber: 2g
- Protein: 3g
- Cholesterol: 65mg

