
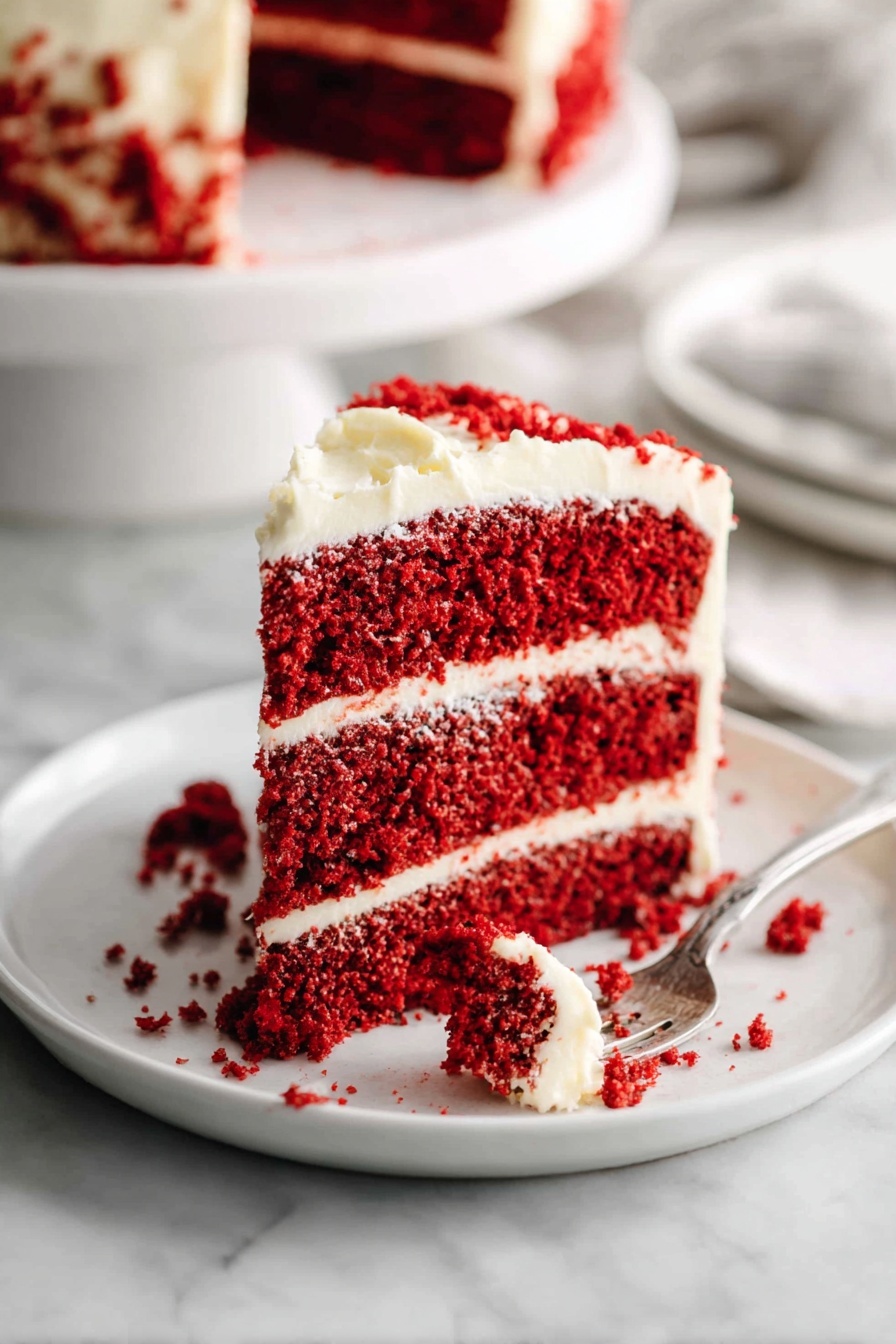
If you’re on the hunt for a dessert that’s as stunning as it is scrumptious, you’ve gotta try this Easy Red Velvet Cake with Cream Cheese Frosting Recipe. I absolutely love how this cake turns out every single time — that vibrant red color, the tender crumb, and that dreamy cream cheese frosting that ties it all together perfectly. Whether you’re baking for a special occasion or simply treating yourself to a slice of heaven, this recipe is my go-to because it’s reliable, delicious, and actually easy to pull off. Stick around, and I’ll walk you through my best tips so you nail it too!
Why You’ll Love This Recipe
- Vibrant, Classic Flavor: The perfect balance between cocoa, tangy sour cream, and luscious cream cheese frosting.
- Reliable and Easy to Make: Simple steps and common ingredients mean you can whip it up anytime.
- Moist and Tender Layers: Thanks to the mix of oil and butter, it’s never dry or heavy.
- Showstopper Presentation: That stunning red color with cream cheese frosting always wows friends and family.

Ingredients You’ll Need
Getting your ingredients right is half the battle won with this Easy Red Velvet Cake with Cream Cheese Frosting Recipe. I always make sure to use room temperature dairy for smooth mixing and picked pure vanilla extract for a clean flavor boost. Here’s what you’ll need and why:
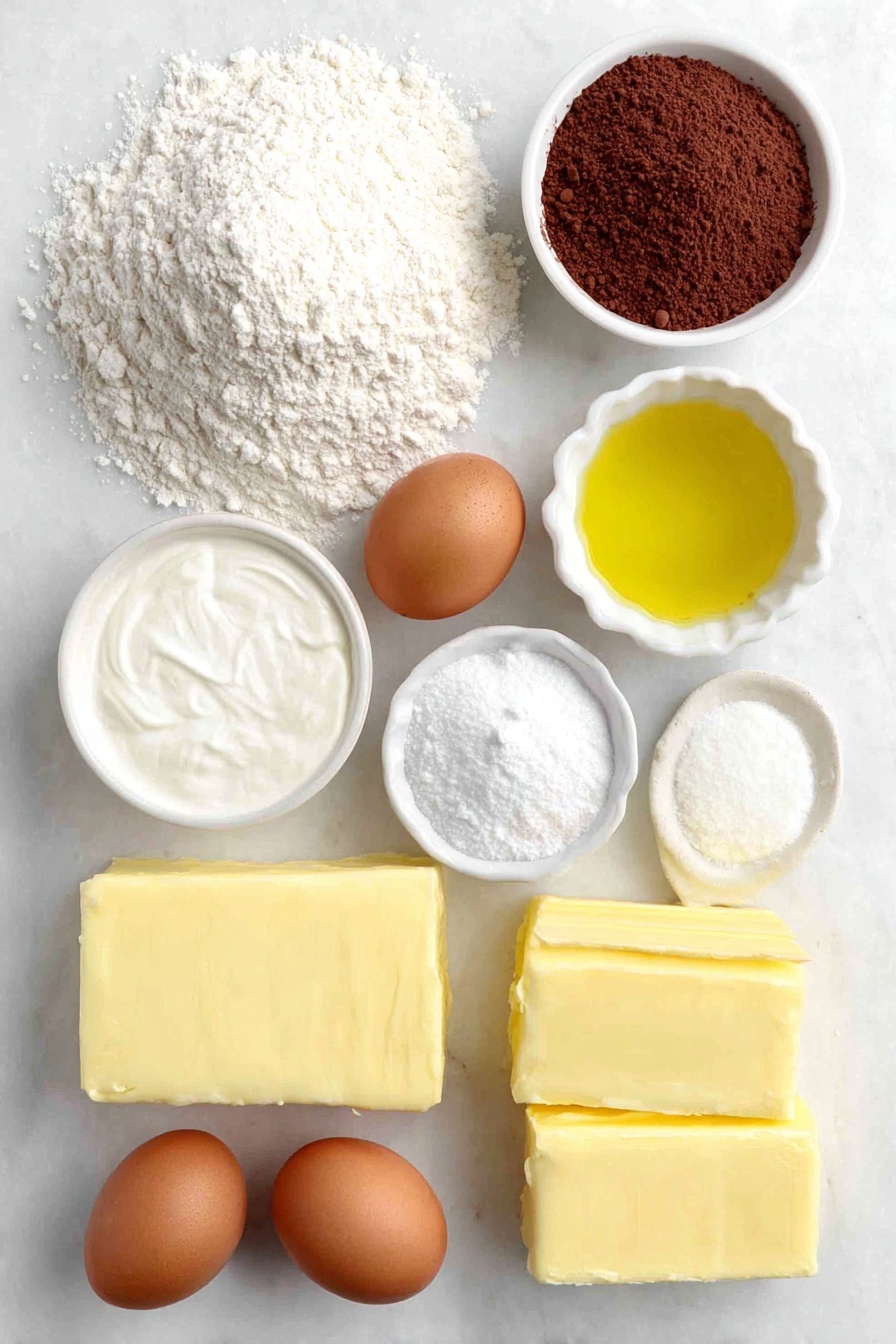
- All-purpose flour: The base for our cake, providing structure but still light enough for tender layers.
- Unsweetened cocoa powder: A little chocolate flavor to balance the sweetness, giving red velvet its signature taste.
- Baking soda: Helps the cake rise perfectly, creating soft, fluffy layers.
- Kosher salt: Just a pinch to enhance all the flavors without overpowering.
- Unsalted butter: Melted for ease of mixing and richness in the cake and frosting.
- Vegetable oil: Keeps the cake moist and tender, giving an unbeatable texture.
- Granulated sugar: Sweetness that’s balanced and not cloying.
- Sour cream: Adds tang and moisture while tenderizing the crumb.
- Milk: Helps blend everything smoothly and moistens the batter.
- Large eggs: For structure and richness; I always use room temp for easier mixing.
- Pure vanilla extract: Adds warmth and depth to every bite.
- Red food coloring: The all-important vibrant red that makes this cake a visual stunner.
- Cream cheese: The star of the frosting—smooth and tangy, it complements the cake perfectly.
- Powdered sugar: For a silky frosting texture that isn’t grainy.
Variations
This Easy Red Velvet Cake with Cream Cheese Frosting Recipe is so versatile that I like to switch it up sometimes depending on the crowd or occasion. Once you’ve nailed the base, feel free to make it your own!
- Egg-Free Version: I tried swapping eggs with applesauce for a moist vegan-friendly version, and it still came out delicious, just a bit denser.
- Less Sweet Frosting: If you prefer a tangier frosting, reduce powdered sugar by a cup and add a little extra cream cheese; my family loves this twist.
- Chocolate Red Velvet: Adding an extra tablespoon of cocoa powder gives a richer chocolate kick without losing that classic red velvet vibe.
- Layering with Fresh Berries: For a fresh contrast, I’ve added raspberries between layers and it’s always a hit during summer gatherings.
How to Make Easy Red Velvet Cake with Cream Cheese Frosting Recipe
Step 1: Preparing Your Pans and Dry Ingredients
I always start by preheating the oven to 350°F and greasing three 9-inch round cake pans—lining the bottoms with parchment paper helps get the cakes out cleanly. Then, whisk together the flour, cocoa powder, baking soda, and salt in a large bowl. This ensures an even distribution so the cocoa and leavening agents blend smoothly into the batter later.
Step 2: Mixing the Wet Ingredients
Next, I use my stand mixer fitted with the paddle attachment to beat together the melted butter, vegetable oil, and sugar. This combination might seem rich, but it’s what creates that moist texture we all love. Once smooth, add the sour cream, milk, eggs, and vanilla extract—make sure they’re all at room temperature to avoid curdling. Lastly, pour in the red food coloring and mix until the color looks evenly vibrant. This step always feels so fun because your batter really starts to look like classic red velvet!
Step 3: Combining Wet and Dry Ingredients
Time to bring it all together! Gently add the dry mixture to the wet ingredients in batches, mixing just until combined. Be careful not to overmix here — I learned the hard way that overworking the batter can make the cake tough instead of tender. When you see no pockets of flour, you’re done.
Step 4: Baking the Cake Layers
Divide the batter evenly among your three pans; I weigh the batter to get about 634 grams per pan to ensure even layers. Pop them in the oven for 25-30 minutes. You’ll know they’re ready when a toothpick comes out clean. Once baked, let them cool in the pans for 10 minutes before turning out to cool completely on wire racks.
Step 5: Making the Cream Cheese Frosting
While your cakes cool, whip up the frosting. Using a stand mixer with the whisk attachment, beat the cream cheese until silky smooth, then add the butter and mix until combined. Sifting in the powdered sugar makes a big difference—I discovered this trick to avoid gritty frosting! Finally, add vanilla and salt, whipping until the frosting is fluffy with stiff peaks. You’ll find that this frosting spreads easily but holds its shape like a dream.
Step 6: Assembling Your Cake
I always use a serrated bread knife to trim off the rounded tops of each cake to create flat layers—that makes stacking so much easier. Place the first layer on your cake stand cut side down and spread a generous layer of frosting. Repeat with the second layer. Add the third layer, then cover the whole cake with the remaining frosting. If you’re like me, you’ll save the cake scraps and crumble them on the sides or top for a rustic, charming look, maybe even pipe some decorative swirls on top. It’s those little touches that make this cake extra special!
Pro Tips for Making Easy Red Velvet Cake with Cream Cheese Frosting Recipe
- Use Room Temperature Ingredients: I learned that eggs and dairy blend much better and create a smoother batter when at room temp.
- Don’t Skip Sifting the Powdered Sugar: It keeps your frosting silky smooth, no lumps or graininess.
- Evenly Divide Batter for Uniform Layers: I weigh my batter for each pan to ensure my cake looks professional and bakes evenly.
- Avoid Overmixing: Mixing until just combined prevents a dense or tough crumb.
How to Serve Easy Red Velvet Cake with Cream Cheese Frosting Recipe
Garnishes
When I serve this cake, I love to keep it simple and elegant with a sprinkle of leftover cake crumbs on the sides. Sometimes I’ll add fresh raspberries or a few edible flowers on top for a pretty, festive touch. Crushed pecans or walnuts also add a lovely crunch if you want texture contrast.
Side Dishes
This cake pairs beautifully with a cup of strong coffee or a frothy cappuccino — the bitterness cuts through the sweetness just right. For gatherings, I sometimes serve it alongside a simple mixed greens salad with vinaigrette to balance the richness.
Creative Ways to Present
For birthdays or holidays, I’ve decorated this cake with piped rosettes of cream cheese frosting and fresh berries in the center. Another time, I wrapped a beautiful ribbon around the base for a gift-worthy presentation. If you want to make it extra special, add a drizzle of melted chocolate or sprinkle edible glitter on top before serving!
Make Ahead and Storage
Storing Leftovers
Leftover cake? No problem. I store mine airtight in the refrigerator wrapped in plastic wrap or in a cake container, and it stays fresh for up to 3 days. This cake actually tastes even better after the flavors have had time to meld!
Freezing
I’ve frozen individual cake layers wrapped tightly in plastic wrap and foil when I wanted to prep ahead. The cake freezes well for up to 3 months. When ready to use, just thaw overnight in the fridge and frost the next day. The texture comes back beautifully.
Reheating
If you want to enjoy leftovers at room temperature, I recommend taking the cake out of the fridge about 30 minutes before serving. If you’re in a hurry, a quick zap in the microwave for 10-15 seconds softens the frosting and cake without drying it out.
FAQs
-
Can I make this Easy Red Velvet Cake with Cream Cheese Frosting Recipe without food coloring?
You can skip the food coloring, but your cake will have a more muted, traditional cocoa color instead of that vibrant red. Some people use natural beet juice for coloring, but be aware it can slightly change the flavor and moisture content.
-
How do I prevent my cream cheese frosting from being too runny?
Make sure your cream cheese and butter are at room temperature but not warm or soft to the point of melting. Gradually adding powdered sugar helps achieve the right consistency. If frosting is still too soft, chill it for 10-15 minutes before spreading.
-
Can I use buttermilk instead of sour cream?
Yes! Buttermilk is a great substitute and will give your cake a similar tangy moisture. If you do, reduce the milk slightly to keep the batter the right consistency.
-
How do I store leftover cake to keep it fresh?
Store the cake in an airtight container in the refrigerator. To keep the frosting from drying out, cover lightly with plastic wrap or place the cake in a cake keeper. This keeps it moist and delicious for up to 3 days.
Final Thoughts
This Easy Red Velvet Cake with Cream Cheese Frosting Recipe has become one of my absolute favorite go-to desserts—it’s the kind of cake that always impresses without the fuss. I love how the flavors and textures come together so beautifully, and honestly, the smiles it brings when I serve it are the best reward. If you’re craving a reliable, delicious, and visually stunning cake, I highly recommend giving this recipe a try. Trust me, once you taste it, you’ll keep coming back for more!
Print
Easy Red Velvet Cake with Cream Cheese Frosting Recipe
- Prep Time: 30 minutes
- Cook Time: 25 minutes
- Total Time: 1 hour 5 minutes
- Yield: 12 servings
- Category: Dessert
- Method: Baking
- Cuisine: American
Description
This classic Red Velvet Cake recipe features moist, tender layers of cake with a subtle cocoa flavor and vibrant red color, paired perfectly with a rich and creamy cream cheese frosting. Ideal for celebrations or a special dessert, this cake is simple to prepare and sure to impress with its stunning appearance and delicious taste.
Ingredients
For the Cake:
- 3½ cups all-purpose flour (420 grams)
- ¼ cup unsweetened cocoa powder (21 grams)
- 1½ teaspoons baking soda (9 grams)
- 1 teaspoon kosher salt (3 grams)
- ½ cup unsalted butter, melted (113 grams, 1 stick)
- 1¼ cups vegetable oil (250 grams)
- 2½ cups granulated sugar (500 grams)
- 1 cup sour cream, room temperature (227 grams)
- ¾ cup milk, room temperature (170 grams)
- 3 large eggs, room temperature (150 grams)
- 1 tablespoon pure vanilla extract (12 grams)
- 2 tablespoons red food coloring (28 grams)
For the Frosting:
- 24 ounces cream cheese, room temperature (680 grams, 3 bricks)
- 1 cup unsalted butter, room temperature (226 grams, 2 sticks)
- 5 cups powdered sugar (565 grams)
- 2 teaspoons pure vanilla extract (8 grams)
- ½ teaspoon kosher salt
Instructions
- Preheat and Prepare Pans: Preheat the oven to 350°F (175°C) and grease three 9-inch round cake pans to ensure the cakes don’t stick. Set the pans aside.
- Mix Dry Ingredients: In a large bowl, whisk together the all-purpose flour, unsweetened cocoa powder, baking soda, and kosher salt until fully combined and evenly distributed.
- Cream Butter, Oil, and Sugar: In the bowl of a stand mixer fitted with the paddle attachment, beat the melted butter, vegetable oil, and granulated sugar together until smooth and creamy, ensuring the sugar is well incorporated.
- Add Wet Ingredients: Add sour cream, milk, eggs, and vanilla extract to the butter mixture and beat until the batter is smooth. Then add the red food coloring and mix until the color is evenly blended throughout the batter.
- Combine Dry and Wet Ingredients: Gradually add the dry ingredient mixture to the wet ingredients and mix just until combined—avoid overmixing to keep the cake tender.
- Divide Batter: Evenly divide the batter among the three prepared cake pans, about 634 grams per pan, smoothing the tops for even baking.
- Bake the Cake: Bake in the preheated oven for 25 to 30 minutes, or until a toothpick inserted into the center comes out clean. Allow the cakes to cool in the pans for at least 10 minutes.
- Prepare Cream Cheese Frosting: Using a stand mixer fitted with the whisk attachment, beat the cream cheese until smooth and creamy.
- Add Butter to Frosting: Add the softened unsalted butter to the cream cheese and beat until fully incorporated and fluffy.
- Add Powdered Sugar: Sift the powdered sugar through a fine-mesh sieve into the cream cheese mixture and mix until fully incorporated and smooth.
- Flavor and Finish Frosting: Add vanilla extract and kosher salt to the frosting and mix until it reaches a smooth, creamy consistency with stiff peaks.
- Trim Cake Layers: Use a bread knife to shave off the rounded tops of each cake layer to create flat surfaces for stacking. Reserve the trimmed cake scraps for decoration if desired.
- Assemble Cake – Layer 1: Place the first cake layer on a cake stand or plate with the cut side down. Spread a generous layer of the cream cheese frosting evenly over the top.
- Assemble Cake – Layer 2: Add the second cake layer on top and spread another layer of frosting evenly across the surface.
- Assemble Cake – Layer 3: Add the third cake layer to complete the stack.
- Frost Exterior: Use the remaining frosting to cover the entire outside of the cake smoothly and evenly.
- Decorate (Optional): Crumble reserved cake scraps and decorate the sides or top of the cake, or pipe additional frosting decorations for an elegant finish.
Notes
- Storage: Store the red velvet cake in an airtight container in the refrigerator for up to 3 days to maintain freshness.
- Freezing: For longer storage, freeze the cake in an airtight container or wrapped tightly in plastic wrap and foil for up to 3 months.
- Allow refrigerated cake to come to room temperature before serving for best texture and flavor.
- Use room temperature ingredients to ensure the cake batter mixes evenly and the cake bakes uniformly.
Nutrition
- Serving Size: 1 slice (1/12 of cake)
- Calories: 510
- Sugar: 38g
- Sodium: 320mg
- Fat: 33g
- Saturated Fat: 14g
- Unsaturated Fat: 16g
- Trans Fat: 0g
- Carbohydrates: 50g
- Fiber: 1g
- Protein: 5g
- Cholesterol: 85mg


