
If you’re hunting for an irresistibly fun and creamy dessert, my dirt cake recipe is an absolute must-try. I remember the first time I made this at a family gathering — everyone was joking about eating “dirt,” but by the end, the dish was wiped clean. It’s so simple yet utterly delicious, combining crunchy Oreos and a rich pudding-cream filling that just melts in your mouth. Trust me, once you make this, it’s going to become a favorite you’ll want to serve over and over.
Why You’ll Love This Recipe
- Quick and Easy: It takes just a handful of ingredients and minimal time to prep, making it perfect for busy days or last-minute gatherings.
- No Baking Required: If you’re not a fan of turning on the oven, this pudding-based dessert has got you covered.
- Rich and Creamy Texture: The combo of cream cheese, whipped cream, and pudding creates a dreamy filling that’s silky yet light.
- Kid-Friendly Crowd-Pleaser: Both adults and little ones go crazy for this playful “dirt” dessert every time.

Ingredients You’ll Need
Choosing the right ingredients is key to nailing this dirt cake recipe — from the perfectly crumbly Oreos to the luscious cream cheese that smooths out the texture. I like grabbing full-fat cream cheese and heavy cream because it makes the dessert so rich and satisfying.
- Oreos: Classic sandwich cookies give that signature “dirt” look and a lovely crunch.
- Butter: Melted to bind the Oreo crust firmly so it holds together but still feels crumbly.
- Instant vanilla pudding mix: For that unmistakably creamy flavor and easy thickening.
- Cold milk: It helps set the pudding just right — don’t use warm or it won’t thicken properly.
- Cream cheese: Adds richness and a slight tanginess that cuts through the sweetness perfectly.
- Powdered sugar: Smoothly sweetens the cream cheese without any graininess.
- Heavy cream: Whipped until stiff peaks for that light, fluffy texture in the filling.
Variations
One of the best things about this dirt cake recipe is how versatile it is. Over time, I’ve tried small tweaks to match different occasions or dietary needs, and I encourage you to do the same — trust me, a little personalization goes a long way!
- Peanut Butter Twist: Swirling in some peanut butter with the cream cheese layer is a game-changer, especially if you love that salty-sweet combo — my family can’t get enough of it.
- Gluten-Free Version: Swap Oreos for a gluten-free cookie brand, and you’re good to go without sacrificing any texture or flavor.
- Fruit Boost: Adding fresh sliced strawberries or bananas on top gives a nice fresh contrast to the creamy dirt.
- Chocolate Lover’s Dream: Mix in some chocolate chips or sprinkle cocoa powder between layers for an extra chocolaty punch.
How to Make Dirt Cake Recipe
Step 1: Create that Crunchy Oreo Crust
Start by finely crushing almost all of your Oreos—using a food processor is my go-to because it makes quick work of crunching without turning the cookies into dust. Hold back about ¾ cup of crushed Oreos for the topping later. Then, mix the crushed Oreos with the melted butter until the crumbs start holding together. This step is crucial because it forms a crust that acts like the base of your dirt cake. Press the mixture firmly into a 9×9-inch baking dish to create an even layer; I like to use the bottom of a glass to really pack it down well.
Step 2: Whip Up the Pudding
In a separate bowl, whisk your instant vanilla pudding mix with cold milk until it thickens nicely. This usually takes a few minutes and is such an easy way to make a creamy base. Pop it in the fridge for about 10 minutes to firm up just a bit. I’ve learned that rushing this step can lead to a runny filling, so don’t skip the chill time.
Step 3: Beat the Cream Cheese and Sugar
Using a hand mixer, blend the softened cream cheese and powdered sugar until smooth and lump-free. This gives the dessert a subtle tang with just the right sweetness, and a creamy consistency that I absolutely love. Make sure your cream cheese is softened at room temperature—it really makes a big difference in the texture here.
Step 4: Whip the Heavy Cream to Perfection
In another bowl, beat the heavy cream until stiff peaks form. This means the cream holds its shape when you lift the beaters—don’t under-whip or it won’t be firm enough to fold in. It’s a small step, but it really makes the filling light and fluffy.
Step 5: Fold Everything Together and Assemble
Gently fold the chilled pudding into the cream cheese mixture, then fold in the whipped cream until the mixture is just combined—don’t overmix or you’ll lose that airy texture. Pour this luscious mixture over your Oreo crust and smooth it out with an offset spatula. Finally, sprinkle the reserved crushed Oreos over the top for that classic “dirt” finish. I usually peek under the edge to make sure the filling covers the crust evenly; this way, every bite has that perfect combo.
Step 6: Chill, Chill, Chill
Pop your assembled dirt cake into the fridge for at least 3 hours to let it firm up completely — overnight is even better if you can wait! This chilling step helps flavors meld and gives you that spoonable, dreamy texture that makes this dirt cake recipe truly special.
Pro Tips for Making Dirt Cake Recipe
- Don’t Skip Softening the Cream Cheese: I learned the hard way that cold cream cheese makes lumpy batter; letting it come to room temp is key for smooth perfection.
- Hold Back the Crumbs: Saving some crushed Oreos for topping gives your dirt cake that instant visual appeal and crunch.
- Use Cold Milk for Pudding: Using cold milk—not warm—is what ensures the pudding thickens just right.
- Fold Gently: When mixing pudding, cream cheese, and whipped cream, folding gently keeps the airy texture intact.
How to Serve Dirt Cake Recipe
Garnishes
I typically keep garnishes classic — extra crushed Oreos work perfectly and add a nice crunch on top. Sometimes, I’ll sprinkle a few mini chocolate chips or add a dollop of fresh whipped cream for an extra indulgent touch. For a fun twist at parties, colorful gummy worms squirming out of the “dirt” always get a big laugh and little hands reaching for more!
Side Dishes
Since dirt cake is quite rich and sweet, I like to serve it alongside lighter, fresh fruit salads or a simple cup of black coffee or tea. The contrast really lets the dessert shine while balancing flavors so you’re not overwhelmed by sweetness.
Creative Ways to Present
For a special occasion, I love layering this dirt cake recipe in clear parfait glasses — that way you can see all the beautiful layers of crushed Oreos and the creamy filling. It looks fancy but is super simple to assemble, making it perfect for birthday parties or summer barbecues. I’ve also made mini dirt cups in mason jars, which guests adore because they’re easy to hold and so portable.
Make Ahead and Storage
Storing Leftovers
Once your dirt cake is made, keep it covered tightly in the refrigerator. I recommend using plastic wrap or a sealed container to prevent it from absorbing any fridge odors. It stays delicious for up to 3 days, although it’s rare to have leftovers!
Freezing
Freezing dirt cake is possible but I prefer to freeze it in individual portions rather than whole to preserve texture. When ready to enjoy, thaw in the fridge overnight. The creamy layers might be slightly softer, but it’s still a tasty treat if you’re planning ahead.
Reheating
This dessert is best enjoyed cold or chilled, so reheating isn’t recommended. If you want to bring it back to room temperature, just let it sit out for 15 minutes before serving to soften the filling slightly without losing that refreshing creaminess.
FAQs
-
Can I make dirt cake recipe ahead of time?
Absolutely! Making it a day ahead actually improves the flavor as the layers meld together. Just be sure to refrigerate it tightly covered, and you’ll have a perfectly set, delicious dessert ready to go when guests arrive.
-
What can I use if I don’t have instant pudding mix?
If you don’t have instant pudding, you can whip up homemade vanilla pudding using cornstarch, sugar, milk, and vanilla extract cooked on the stove. It takes a bit longer but tastes fresh and creamy. Just let it cool completely before folding it into the cream cheese and whipped cream layers.
-
Can I substitute the Oreos with another cookie?
Yes! While Oreos give that classic dirt look, you can get creative with chocolate wafer cookies, graham crackers, or gluten-free cookie options depending on your preference or dietary needs. Just crush them finely for the best texture.
-
How long does dirt cake keep?
Stored properly in the fridge, dirt cake stays fresh for up to three days. After that, the texture of the crust might soften, but it’s still safe to eat for a couple more days.
Final Thoughts
This dirt cake recipe holds a special place in my heart because it’s so easy to make yet always impresses everyone around the table. It brings back fond memories of family get-togethers and laughter, and I’m confident you’ll feel the same joy sharing it with your friends and loved ones. So go ahead, whip it up, grab your favorite spoon, and get ready for some seriously delicious fun!
Print
Dirt Cake Recipe
- Prep Time: 15 mins
- Cook Time: 0 mins
- Total Time: 3 hrs 15 mins
- Yield: 10 servings
- Category: Dessert
- Method: No-Cook
- Cuisine: American
Description
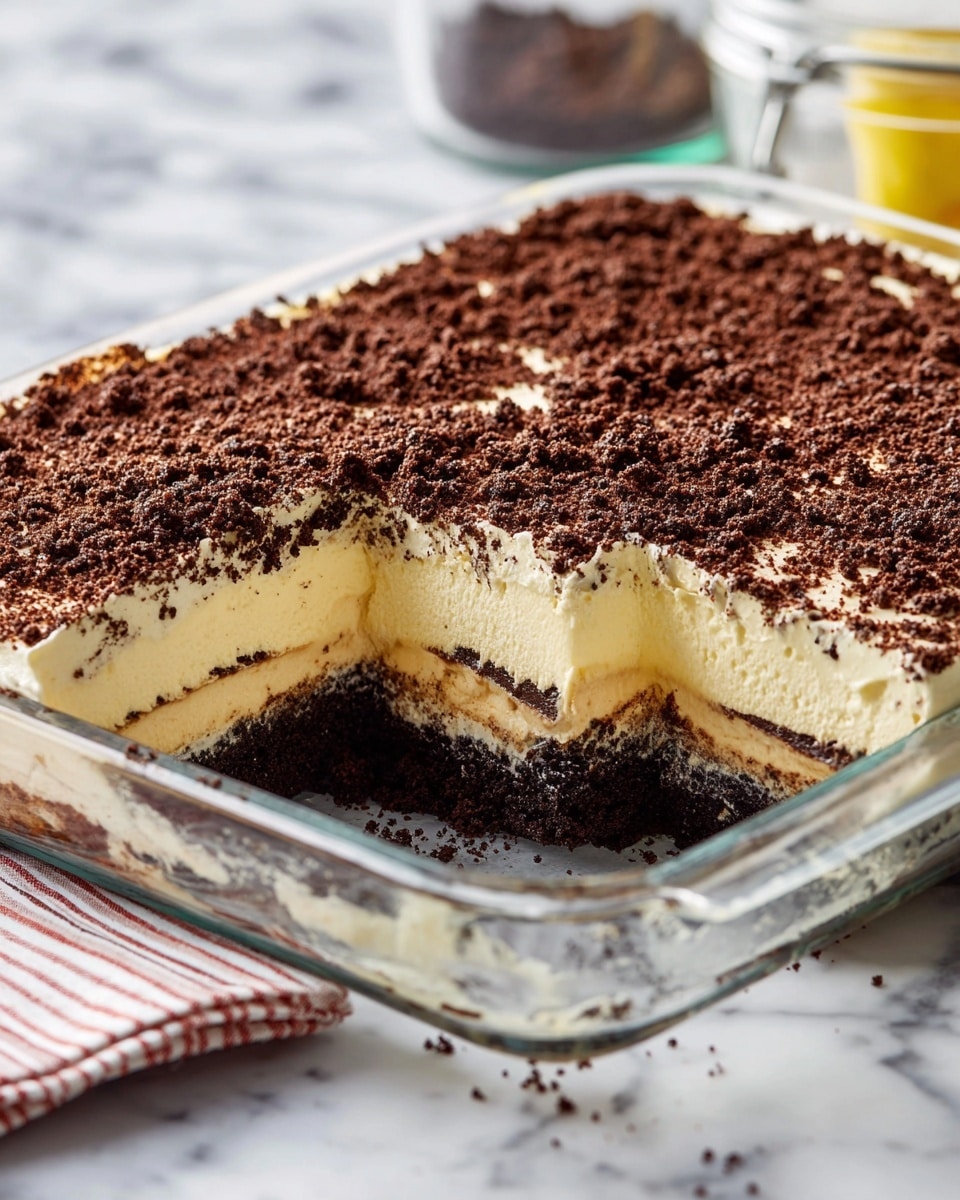
Dirt Cake is a fun and delicious no-bake dessert featuring a crunchy Oreo cookie crust layered with a creamy vanilla pudding and cream cheese filling, topped with crushed Oreos. Perfect for parties, potlucks, or anytime you crave a nostalgic, easy-to-make sweet treat that requires no oven time.
Ingredients
Crust
- 1 (14.3-oz.) package Oreos
- 4 Tbsp. butter, melted
Filling
- 1 (3.4-oz) box instant vanilla pudding
- 1 1/2 cups cold milk
- 1 (8-oz.) block cream cheese, softened
- 1/2 cup powdered sugar
- 1 cup heavy cream
Instructions
- Prepare the crust: Finely crush Oreos in a food processor until crumbly. Reserve 3/4 cup of the crushed Oreos for topping. In a large bowl, combine the remaining crushed Oreos with melted butter, stirring until the mixture begins to hold together. Press this mixture evenly into a 9″-x-9″ baking dish to form the crust.
- Make the pudding: In a medium bowl, whisk together the instant vanilla pudding mix and cold milk until thickened. Refrigerate for 10 minutes to allow the pudding to firm up.
- Prepare the cream cheese base: In a large bowl, use a hand mixer to beat the softened cream cheese with the powdered sugar until smooth and lump-free.
- Whip the cream: In a separate large bowl, beat the heavy cream until stiff peaks form, ensuring the cream holds firm when the beaters are lifted.
- Combine the filling: Gently fold the chilled pudding into the cream cheese mixture until just combined. Then fold in the whipped cream until the mixture is smooth and evenly blended. Pour this creamy filling over the Oreo crust and smooth the top with an offset spatula.
- Add the topping and chill: Sprinkle the reserved 3/4 cup of crushed Oreos evenly over the filling. Refrigerate the assembled dessert for at least 3 hours or overnight, allowing it to set and the flavors to meld beautifully.
Notes
- For best results, use full-fat cream cheese and heavy cream to achieve a rich and creamy texture.
- Ensure the cream is whipped to stiff peaks to give the filling structure and lightness.
- This dessert can be made a day ahead; chilling overnight enhances flavor and texture.
- Use a food processor to crush Oreos quickly and evenly, but crushed cookies by hand also work in a pinch.
- Substitute milk with a non-dairy alternative for a dairy-free version, adjusting pudding mix accordingly.
Nutrition
- Serving Size: 1 slice (1/10th of recipe)
- Calories: 320
- Sugar: 26g
- Sodium: 160mg
- Fat: 20g
- Saturated Fat: 12g
- Unsaturated Fat: 7g
- Trans Fat: 0.5g
- Carbohydrates: 30g
- Fiber: 1g
- Protein: 4g
- Cholesterol: 65mg


