
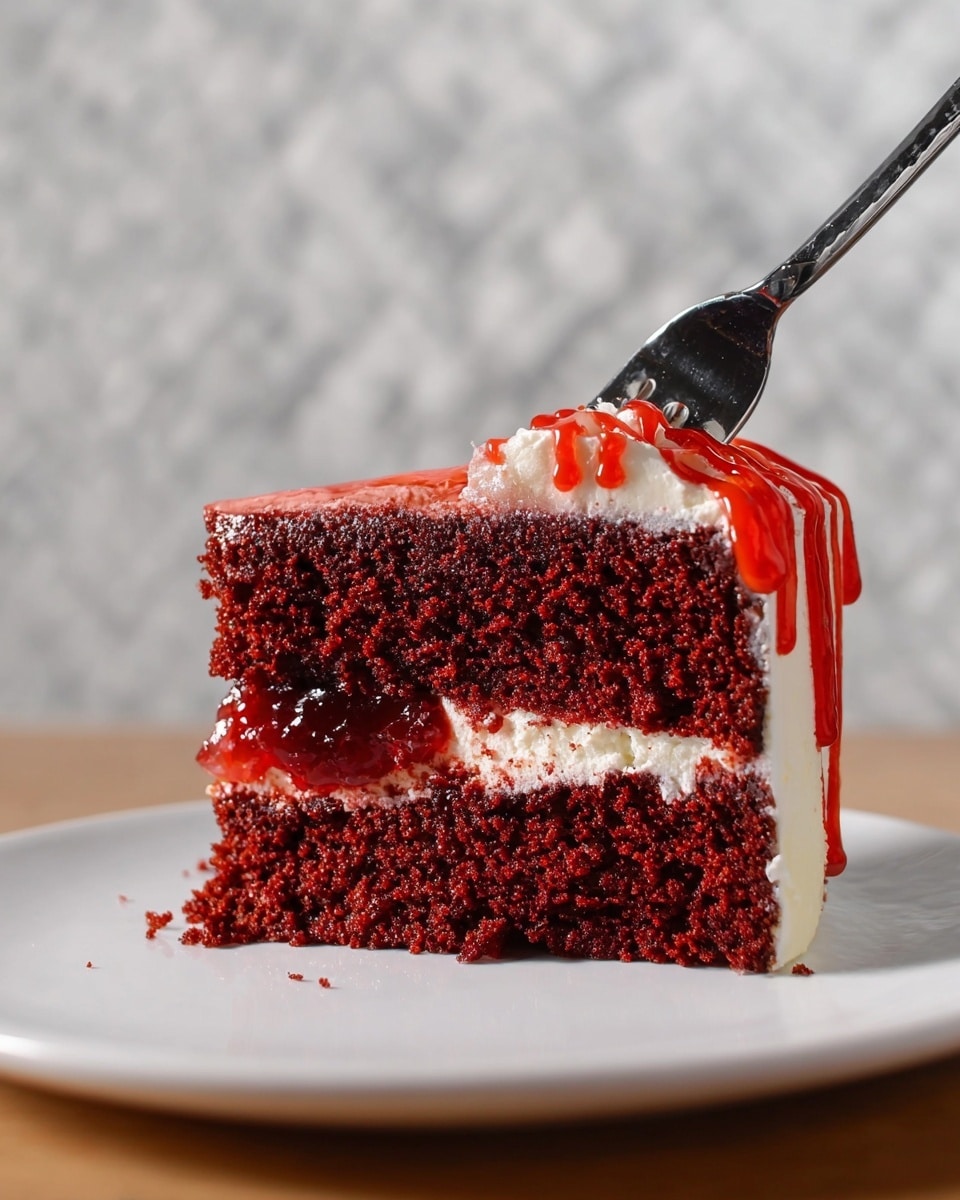
If you’re craving a cake that’s both spooky and delicious, I absolutely love sharing this Dead Velvet Cake Recipe with friends. It’s the perfect blend of classic red velvet flavor with a fun, eerie twist — that “blood” effect on top is just so cool and surprisingly simple to pull off. Whether you’re gearing up for Halloween or just want to impress your crew with something unique, this recipe is fan-freaking-tastic and totally worth the effort. Let me walk you through it so you nail it perfectly at home!
Why You’ll Love This Recipe
- Eye-Catching Presentation: That dripping “blood” effect makes this cake a total conversation starter at any party.
- Classic Flavor with a Twist: The rich red velvet and creamy frosting combo is familiar yet excitingly unique.
- Simple Ingredients: Made with store-bought red velvet cake mix and staple pantry items, making it accessible for any baker.
- Fun and Flexible: Easy to customize for different tastes or occasions with some creative flair.

Ingredients You’ll Need
These ingredients come together to create that classic red velvet experience, plus that fun “blood” topping I discovered. Don’t skimp on the cream cheese or you’ll lose the balance I love — smooth, tangy frosting is a must!
- Red Velvet Cake Mix: Choose a quality mix you trust; it makes the base perfect without fuss.
- Cream Cheese: Make sure it’s softened for the creamiest frosting, which is the star of this cake.
- Butter: Also softened, it adds richness and helps with that fluffy frosting texture.
- Powdered Sugar: For sweetening the frosting, powdered sugar dissolves smoothly without grit.
- Vanilla Extract: Adds depth to both frosting and the “blood” mixture, enhancing flavor beautifully.
- Cold Water: Needed to help activate the cornstarch for the blood effect.
- Cornstarch: This thickens the “blood” so it drips perfectly without running off.
- Light Corn Syrup: Gives the blood a glossy, syrupy finish that looks eerily realistic.
- Red Food Coloring: The secret to that vibrant “blood” color, go bold here!
Variations
I’m all for switching things up, especially when it comes to something as fun as the Dead Velvet Cake Recipe. Feel free to personalize it and make it your own – you’re gonna love experimenting!
- Dairy-Free Version: I swapped cream cheese and butter for vegan alternatives once for a friend’s allergy, and it still came out luscious and delicious.
- Spiced ‘Blood’ Mixture: Adding a pinch of cinnamon or chili powder to the “blood” brought a subtle warmth and an extra layer of flavor that surprised everyone!
- Mini Cake Layers: I tried making cupcakes with this concept once, layering frosting and a tiny drizzle of “blood” on top – a cute, single-serve twist.
- Extra Cream Cheese Filling: For an ultra-decadent version, add a thin layer of cream cheese frosting between the two cake layers before adding the blood syrup on top.
How to Make Dead Velvet Cake Recipe
Step 1: Prepare Your Cake Layers
First things first, get your oven preheated to 350ºF. Then butter and flour two 9-inch cake pans — this helps the cakes release easily later. Follow the red velvet cake mix instructions carefully, but I always like to mix just until combined to keep the cake tender and moist. Divide the batter evenly between your pans and bake as directed, usually around 25-30 minutes. A toothpick inserted should come out clean. Don’t rush cooling — let them cool fully before frosting to prevent frosting melt-down.
Step 2: Whip Up That Cream Cheese Frosting
In a large bowl, beat softened cream cheese and butter together until you get a light, fluffy texture — this usually takes about 3-4 minutes if you’re using an electric mixer. Then add powdered sugar and vanilla, mixing until everything is smooth and creamy. This frosting is downright dreamy and tangy, the perfect balance to the sweet cake. Trust me, don’t skip on beating it well to get that fluffiness!
Step 3: Cook Your Perfect ‘Blood’
This part always feels like a little kitchen magic to me. In a small saucepan, whisk together cold water and cornstarch until no lumps remain. Turn the heat to medium and pour in light corn syrup, stirring frequently. Let this simmer for about 2 minutes until thickened. Then remove from heat and swirl in vanilla and generous drops of red food coloring — I like to keep adding until it looks super vivid. You want it thick enough to drip but not run off like water. This “blood” really sells the look!
Step 4: Assemble Like a Pro
Place one cooled cake layer on your serving plate and carefully trim the dome off for an even surface. Spoon just enough “blood” on top to dampen it — this step keeps the two layers sticking together and gives an eerie wet look under the top layer. Trim the dome off the second cake layer and gently flip it upside down onto the first, so you get that flat “dead” surface on top. It’s all about the presentation here!
Step 5: Frost and Drip the ‘Blood’
Cover the entire cake with a smooth layer of the cream cheese frosting, taking your time to get it as even as possible. The smoother, the better the “blood” will drip. Finally, pour the remaining “blood” on top, allowing it to slowly drip down the sides to create that dramatic, slightly spooky effect. This is when your cake really comes alive!
Pro Tips for Making Dead Velvet Cake Recipe
- Don’t Skip Cake Cooling: I learned the hard way — if the cake is warm, frosting melts and “blood” runs off too fast.
- Use Room Temperature Ingredients: This ensures your frosting whips up smooth and light instead of lumpy or stiff.
- Practice Dripping Control: Pour the blood mixture slowly from the center and watch it drip naturally to avoid too much pooling.
- Trim Dome for Stability: Flattening the cake layers helps them stack neatly for a clean, professional look.
How to Serve Dead Velvet Cake Recipe
Garnishes
For garnishes, I usually keep it simple — a few fresh raspberries around the plate add a nice contrast, and if you want to get fancy, a light sprinkle of edible glitter can add a magical shimmer. Sometimes I toss on a few pieces of candied rose petals for a delicate, bloody rose vibe that’s absolutely stunning!
Side Dishes
This cake shines on its own, but I love pairing it with a scoop of vanilla bean ice cream or a dollop of whipped cream to balance the richness. For drinks, a hot cup of spiced chai or a smooth espresso really rounds out the experience.
Creative Ways to Present
One time, I stacked the whole cake on a slate board surrounded by fresh flowers and some faux cobwebs for a Halloween party—it was the centerpiece! Another fun way is to serve individual slices with a drizzle of extra blood sauce on the plate, making each serving feel extra special and spooky.
Make Ahead and Storage
Storing Leftovers
I store leftovers wrapped tightly in plastic wrap and then in an airtight container in the fridge. This keeps the cake moist and the frosting fresh for up to 3 days. Just bring it to room temperature before serving for best flavor and texture.
Freezing
When freezing, I wrap individual cake slices in parchment paper and then foil before placing them in a freezer bag. The “blood” mixture freezes well too. Thaw overnight in the fridge and it’s almost as good as fresh — a total lifesaver if you want to prep ahead of time.
Reheating
To reheat, I let the cake come to room temp, then pop individual slices into the microwave for 10-15 seconds to refresh that soft cake feel without melting the frosting. You don’t want a steaming hot cake — just gently warmed through.
FAQs
-
Can I make this Dead Velvet Cake Recipe from scratch without a mix?
Absolutely! If you prefer baking red velvet from scratch, just follow your favorite red velvet cake recipe, and then use the same frosting and “blood” steps here. Just be mindful of baking times and cake sizing.
-
What’s the best way to get the “blood” texture right?
Mixing the cornstarch with cold water first and then simmering with corn syrup thickens the mixture perfectly. Keep stirring frequently and don’t walk away! The consistency should be thick but pourable; add more cornstarch if it’s too thin.
-
How long can I make the cake in advance?
You can bake the cake layers a day ahead and store them wrapped airtight. I recommend assembling and frosting on the day you plan to serve to keep the “blood” texture fresh and dripping beautifully.
-
Can I use gel food coloring instead of liquid?
Yes! Gel food coloring works even better because it gives a more intense color without watering down the “blood” mixture. I love that trick for a vivid, dramatic look.
Final Thoughts
This Dead Velvet Cake Recipe holds a special place in my heart — it’s that perfect combo of classic comfort and playful fun that always gets people smiling (and reaching for seconds). Whether you’re impressing guests or just treating yourself, I know you’ll enjoy the delicious flavors and that unforgettable “oozing blood” effect. Give it a try — I promise it’s as easy to make as it is to wow your crowd. Happy baking, friend!
Print
Dead Velvet Cake Recipe
- Prep Time: 30 mins
- Cook Time: 30 mins
- Total Time: 2 hrs
- Yield: 1 9-inch layered cake (serves 10-12)
- Category: Dessert
- Method: Baking
- Cuisine: American
Description
Dead Velvet Cake is a spooky twist on the classic red velvet cake, featuring rich layers of moist red velvet cake filled and frosted with smooth cream cheese frosting. It’s dramatically finished with a glossy, red ‘blood’ syrup made from corn syrup and red food coloring, perfect for Halloween or any eerie occasion.
Ingredients
Cake
- 1 box Red Velvet cake mix, plus ingredients called for on box
Cream Cheese Frosting
- 2 (8-oz.) packages cream cheese, softened
- 1 stick butter, softened
- 2 1/4 cups powdered sugar
- 1 tsp. vanilla extract
“Blood” Syrup
- 1/2 cup cold water
- 2 Tbsp. cornstarch
- 1/2 cup light corn syrup
- 1 tsp. vanilla extract
- Red food coloring, to desired color
Instructions
- Prepare Cake Pans: Preheat the oven to 350ºF. Butter and flour two 9-inch cake pans to prevent sticking.
- Bake Red Velvet Cakes: Prepare the red velvet cake batter according to the box instructions. Divide the batter evenly between the two prepared cake pans. Bake as directed on the box until a toothpick inserted in the center comes out clean. Allow cakes to cool completely.
- Make Cream Cheese Frosting: In a large bowl, beat the softened cream cheese and butter together until the mixture is light and fluffy. Gradually add the powdered sugar and vanilla extract, mixing until smooth and well combined.
- Prepare “Blood” Syrup: In a small saucepan, stir together the cold water and cornstarch until fully combined. Place over medium heat and pour in the light corn syrup. Let the mixture simmer, stirring frequently, for about 2 minutes until thickened. Remove from heat and stir in the vanilla extract and enough red food coloring to achieve a vibrant red color.
- Assemble Cake: Place one cake layer on a serving plate and trim the dome off the top to create a flat surface. Spoon a thin layer of the “blood” syrup on top just enough to moisten the cake. Trim the dome off the second cake layer and invert it onto the bottom layer.
- Frost and Decorate: Frost the entire outside of the cake with the cream cheese frosting, smoothing it evenly on the top and sides. Pour the remaining “blood” syrup onto the top of the cake, allowing some to drip down the sides for a dramatic, gory effect. Serve immediately or refrigerate until ready to serve.
Notes
- Make sure the cakes are completely cooled before frosting to prevent the frosting from melting.
- The “blood” syrup can be adjusted in color and thickness—add more red food coloring for a deeper color, or simmer slightly longer for a thicker consistency.
- For best results, use a stand or hand mixer for the frosting to ensure it becomes fluffy and smooth.
- Store the cake in the refrigerator and bring to room temperature before serving for the best texture.
Nutrition
- Serving Size: 1 slice (1/12 of cake)
- Calories: 360
- Sugar: 38g
- Sodium: 280mg
- Fat: 18g
- Saturated Fat: 9g
- Unsaturated Fat: 7g
- Trans Fat: 0g
- Carbohydrates: 48g
- Fiber: 1g
- Protein: 4g
- Cholesterol: 55mg


