
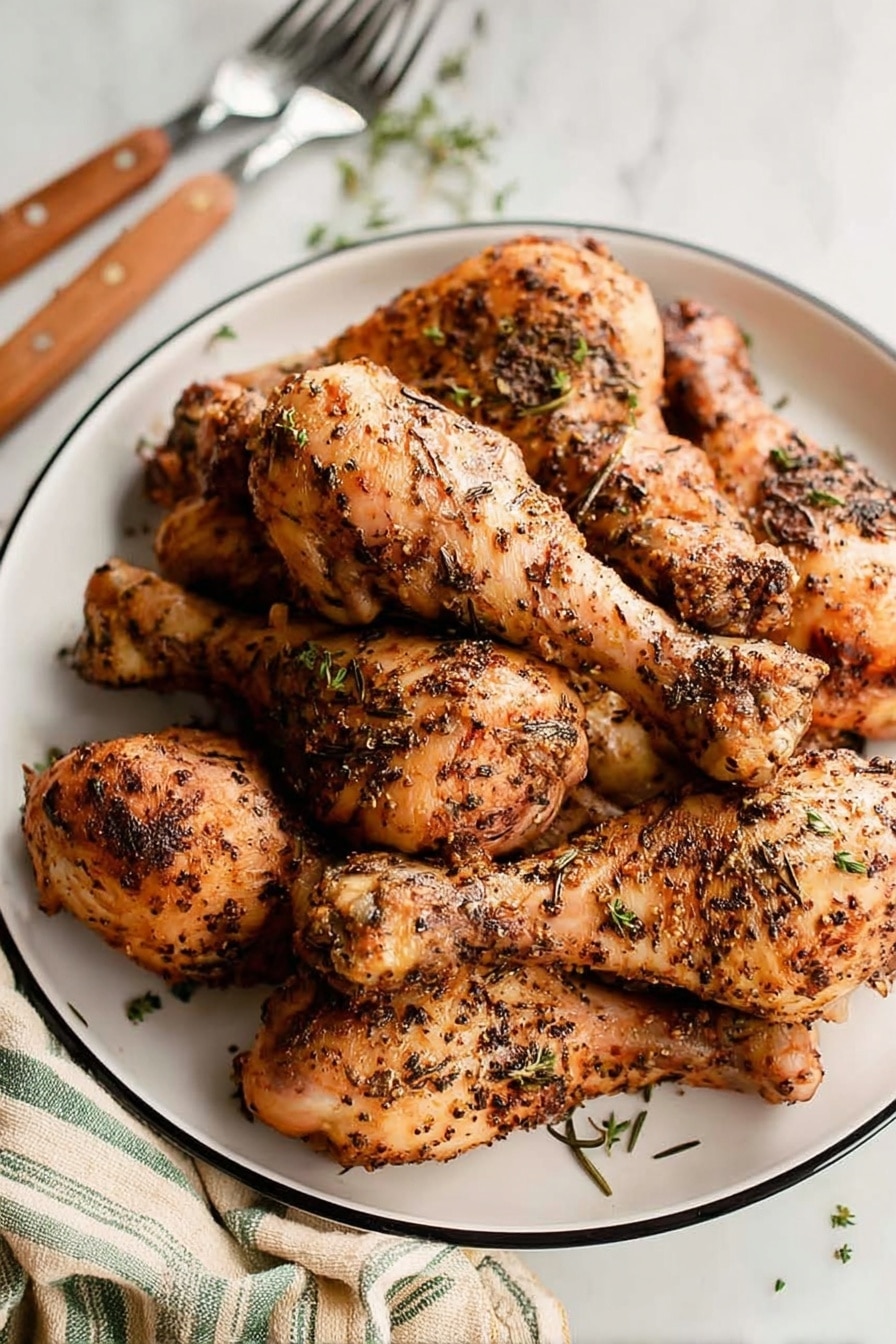
If you’re craving a simple yet incredibly satisfying dinner, you’ve got to try this Crispy Baked Chicken Legs Recipe. It’s one of those dishes I go back to time and again because the chicken skin turns beautifully crispy without the mess of frying, and the meat inside stays juicy and flavorful. Whether you’re cooking for your family or meal prepping for the week, this recipe delivers dependable, crave-worthy results every time.
Why You’ll Love This Recipe
- Perfectly Crispy Skin: Thanks to a clever baking powder trick, the skin gets irresistibly crisp without frying.
- Juicy and Tender Meat: Baking on a wire rack helps the chicken cook evenly, locking in moisture.
- Super Easy to Customize: You can swap out seasonings to match your mood or pantry.
- Minimal Cleanup: Baking instead of frying means you avoid splattered oil and lots of dishes.

Ingredients You’ll Need
These ingredients are simple pantry staples, but combined they create magic. The baking powder is the secret to the skin crispiness, so don’t skip it! Also, using poultry seasoning makes for a classic flavor combo, but feel free to mix in your favorite herbs or spices.

- Chicken drumsticks: I like to buy fresh with skin on for the best crispy texture—and always trim off excess fat.
- Olive oil: Helps seasonings stick and promotes browning.
- Poultry seasoning: This blend adds an earthy, herby depth; store-bought works fine or mix your own.
- Salt: Enhances all the flavors; adjust to taste.
- Black pepper: Freshly cracked pepper gives a nice bite.
- Baking powder: Not baking soda! This raises the skin and draws moisture away, making it crispy.
Variations
I love how flexible this Crispy Baked Chicken Legs Recipe is—you can easily tweak it to suit what you have on hand or your flavor preferences. Play around and make it your own!
- Spicy Kick: Add a teaspoon of smoked paprika and cayenne pepper to the seasoning mix—my friends go crazy when I do this!
- Herb Lovers: Try fresh chopped rosemary and thyme instead of poultry seasoning for a garden-fresh vibe.
- Low Sodium: Reduce the salt and swap in garlic powder or onion powder for extra flavor without added saltiness.
- Gluten-Free: This recipe is naturally gluten-free as long as your seasoning blend is gluten-free.
How to Make Crispy Baked Chicken Legs Recipe
Step 1: Dry Out the Chicken Skin
This step is a game changer. I always place the chicken on a wire rack lined with paper towels, then cover and refrigerate for at least two hours—overnight is best if you have the time. It sucks moisture out of the skin, which leads to crispiness in the oven. If you’re in a rush, just pat the chicken super dry with paper towels before seasoning.
Step 2: Preheat the Oven and Prep the Rack
Set your oven to 400°F and get your wire rack ready by removing the paper towels and giving it a light spray with non-stick cooking spray. This keeps the chicken from sticking and helps air circulate all around for even cooking.
Step 3: Season the Chicken
Mix olive oil, poultry seasoning, salt, black pepper, and baking powder in a big bowl. I like to toss the chicken in the bowl then use my hands to rub the seasoning on evenly—you’ll find this helps coat every nook and cranny. Be gentle so you don’t tear the skin.
Step 4: Bake to Perfection
Arrange the chicken legs spaced apart on the wire rack and slide them into the oven. Bake for about 35-40 minutes. Use a digital meat thermometer to check that the thickest part hits 165°F. The skin should be golden and crackly; if it’s not quite there, leave it in a couple minutes longer but watch so it doesn’t burn.
Step 5: Rest Before Serving
Let the chicken rest for 5 minutes right on the rack after baking. This locks in the juices and lets the skin crisp just a tad more. Then serve and enjoy!
Pro Tips for Making Crispy Baked Chicken Legs Recipe
- Dry Skin is Key: Leaving the chicken uncovered in the fridge overnight dries out the skin and makes it crisp up so much better.
- Use Baking Powder, Not Soda: Baking powder is alkaline and raises the skin’s pH, cracking the proteins and creating crispiness; baking soda can leave odd flavors.
- Don’t Crowd the Pan: Space the legs so hot air circulates evenly, preventing soggy spots.
- Check Doneness with a Thermometer: This is foolproof and keeps your chicken juicy and perfectly cooked, avoiding dryness.
How to Serve Crispy Baked Chicken Legs Recipe
Garnishes
I usually sprinkle chopped fresh parsley or cilantro over the chicken for a pop of color and brightness. A squeeze of lemon or lime really elevates the flavor too—don’t skip the citrus!
Side Dishes
My go-to sides with these crispy chicken legs are roasted veggies like carrots and Brussels sprouts or a crisp green salad for contrast. Mashed potatoes or buttery rice also work beautifully to soak up all those delicious juices.
Creative Ways to Present
For special dinners, I like to serve these on a wooden board surrounded by rosemary sprigs and lemon wedges—it looks rustic and inviting. You can also wrap each leg in a lettuce leaf for a fresh, handheld bite at casual gatherings.
Make Ahead and Storage
Storing Leftovers
I place leftovers in an airtight container and keep them refrigerated for up to 3-4 days. The skin loses a bit of crispness overnight, but reheating can help bring it back.
Freezing
If I want to save some for later, I freeze cooked chicken legs in freezer-safe bags, laid flat to save space. They keep well for about 2-3 months. Just thaw overnight in the fridge before reheating.
Reheating
To bring the crispiness back, I reheat leftover chicken legs in a 375°F oven on a wire rack for 10-15 minutes instead of the microwave. This keeps the skin nice and crunchy and reheats the meat evenly.
FAQs
-
Can I use other chicken parts for this Crispy Baked Chicken Legs Recipe?
Absolutely! This method works really well with chicken thighs or wings too. Just adjust the cooking time based on size—thighs may take a little less time, wings even less. The key is maintaining dry skin and using the baking powder coating for crispiness.
-
Is the baking powder safe to eat on chicken skin?
Yes, it’s totally safe! The small amount of baking powder reacts during baking to crisp the skin but isn’t present in any noticeable taste or texture after cooking. Just be sure to use baking powder, not baking soda, which has a different chemical makeup.
-
How do I know when the chicken is fully cooked?
The best way is to use an instant-read thermometer—insert it into the thickest part of the drumstick (avoiding bone). When it reads 165°F, your chicken is safe and juicy. This avoids guesswork and ensures perfect results every time.
-
Can I skip the refrigeration step before baking?
You can, but the skin won’t get as crispy. If you’re short on time, just pat the drumsticks dry with paper towels before seasoning and baking. It’s a handy shortcut but I really recommend the fridge step when you can—it makes a big difference!
Final Thoughts
I absolutely love how this Crispy Baked Chicken Legs Recipe delivers incredible flavor and crunch without the hassle of frying. It’s become a family favorite for busy weeknights or casual weekend dinners, and I know you’ll enjoy how easy it is to pull off. Give it a try—you might just find your new go-to chicken recipe that everyone asks for again and again!
Print
Crispy Baked Chicken Legs Recipe
- Prep Time: 15 minutes
- Cook Time: 35-40 minutes
- Total Time: 50-55 minutes
- Yield: 8 servings
- Category: Main Dish
- Method: Baking
- Cuisine: American
Description
This Crispy Baked Chicken Legs recipe delivers juicy, tender chicken with a perfectly crispy skin using simple ingredients and an easy baking method. The use of baking powder and poultry seasoning ensures flavorful, golden-brown drumsticks that are ideal for a quick weeknight dinner or casual gathering.
Ingredients
Chicken and Seasoning
- 2 pounds chicken drumsticks, cleaned, with excess fat removed
- 2 tablespoon olive oil
- 2 tablespoon poultry seasoning, or seasoning of choice
- ½ teaspoon salt, plus more if desired
- ½ teaspoon black pepper, plus more if desired
- 2 teaspoon baking powder
Instructions
- Dry the Chicken: Place a cooling rack over a large baking sheet and layer it with paper towels. Arrange the chicken drumsticks on the wire rack and cover with additional paper towels. Refrigerate for at least two hours or preferably overnight to dry out the skin for extra crispiness. If short on time, pat the chicken legs dry thoroughly with paper towels before seasoning.
- Preheat Oven and Prepare Rack: Set the oven to 400 ℉ (204 ℃). Remove the paper towels from the wire rack, then spray the rack with non-stick cooking spray to prevent sticking.
- Season the Chicken: In a large bowl, mix the olive oil, poultry seasoning, salt, black pepper, and baking powder. Add the chicken drumsticks and gently toss or use your hands to evenly coat all pieces with the seasoning mixture.
- Bake the Chicken: Arrange the seasoned chicken legs on the wire rack spaced apart for even heat circulation. Bake in the preheated oven for 35-40 minutes or until a meat thermometer inserted into the thickest part of the drumstick reads 165 ℉ (74 ℃).
- Rest and Serve: Remove the chicken from the oven and let it rest for 5 minutes to allow juices to redistribute before serving.
Notes
- Store leftovers in an airtight container in the refrigerator for 3-4 days.
- Using baking powder helps achieve crispy skin without frying.
- Adjust seasoning to taste if you prefer spicier or more herbaceous flavoring.
- Ensure chicken skin is dry before seasoning for best crispiness.
Nutrition
- Serving Size: 1 chicken drumstick (approx. 4 oz)
- Calories: 220
- Sugar: 0 g
- Sodium: 350 mg
- Fat: 12 g
- Saturated Fat: 3 g
- Unsaturated Fat: 8 g
- Trans Fat: 0 g
- Carbohydrates: 1 g
- Fiber: 0 g
- Protein: 25 g
- Cholesterol: 80 mg


