
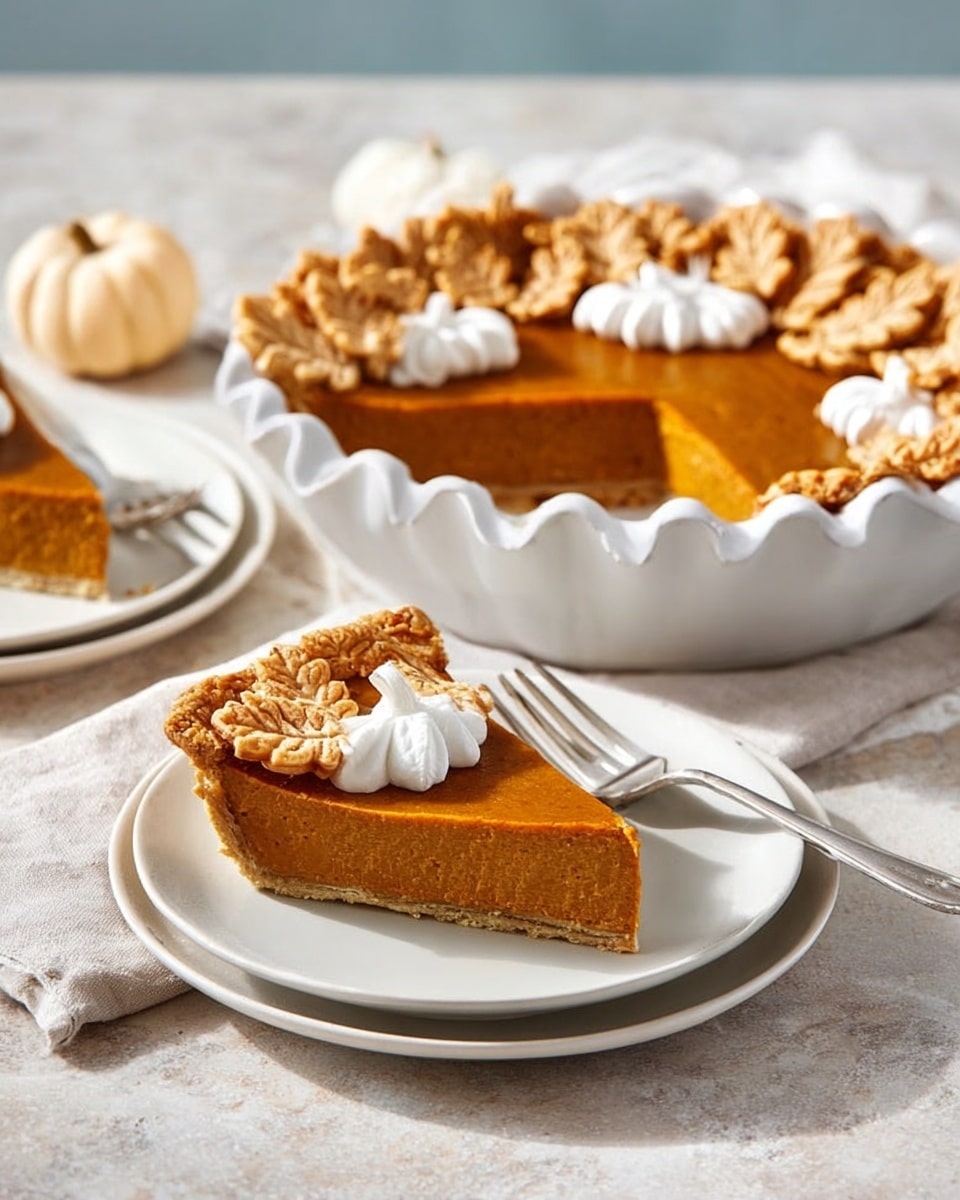
If you’ve been on the hunt for a truly standout pumpkin pie, I can’t wait to share my Creamy Pumpkin Pie with Homemade Spiced Crust and Decorative Edible Accents Recipe with you. This isn’t just any pumpkin pie—it’s all about the rich, velvety filling paired with a spiced crust that adds just the right amount of warmth and complexity. And those little decorative accents? They turn a humble pie into a centerpiece that’ll wow your guests and make your family go crazy for more. Seriously, once you try this, you’ll want to make it every fall and holiday season.
Why You’ll Love This Recipe
- Velvety Smooth Filling: The creamy pumpkin filling is perfectly balanced with warm spices and brown sugar, creating a luscious texture you’ll savor with every bite.
- Homemade Spiced Crust: The crust is infused with subtle spices, bringing extra flavor and that flaky, buttery crunch that homemade dough always delivers.
- Fun Edible Decorations: The charming pumpkins, leaves, and vines you can bake from extra dough not only look adorable but add special flair to your dessert table.
- Perfect for Gatherings: This recipe makes two pies, ideal for sharing with family and friends or saving a second one for later.

Ingredients You’ll Need
Everything in this recipe works together beautifully—from the simple, dependable flour for the crust to the warm, comforting spices that make this pumpkin pie feel like a cozy hug. When picking your pumpkin, canned pumpkin puree works wonderfully, but make sure it’s 100% pure pumpkin for that authentic flavor.
- All-purpose flour: The base for your crust, simple and reliable for that flaky texture.
- Salt: Just enough to enhance the crust’s flavor without being salty.
- Shortening: Using shortening in the crust helps keep it tender and flaky—my secret weapon here!
- Cold water: Vital to bring the dough together while keeping it light and easy to roll.
- Large eggs: They set the pie and add richness to the filling.
- Pumpkin puree: The star of the show; go for canned 100% pumpkin for convenience and consistency.
- Brown sugar: Adds depth and a hint of caramel-like sweetness that plays so well with pumpkin.
- Ground cinnamon: Classic warm spice for that unmistakable pumpkin pie aroma.
- Ground cloves, nutmeg, and ginger: Spices that bring complexity and cozy spice notes to the filling and crust.
- Evaporated milk: Creates that creamy, custard-like texture I love in pumpkin pie filling.
- Large egg (for decorations): Beaten to brush over dough accents, adding a glossy finish.
Variations
This recipe is wonderfully adaptable! Over the years, I’ve tried a few twists that might inspire you to personalize it to your taste or dietary needs. Don’t be shy about making it your own.
- Dairy-Free Version: I swapped evaporated milk for canned coconut milk once, and it gave a subtle tropical note while keeping the filling creamy.
- Spice Mix Adjustments: Sometimes I jazz it up with extra ginger and a pinch of cardamom for an exciting twist; you might enjoy experimenting here.
- Crust Alternatives: If short on time, a store-bought pie dough can work—just be sure to add your own cinnamon and nutmeg for that spiced crust effect.
- Mini Pies: I once made this as mini tarts for a Thanksgiving appetizer and they disappeared faster than you could say “pumpkin!”
How to Make Creamy Pumpkin Pie with Homemade Spiced Crust and Decorative Edible Accents Recipe
Step 1: Make Your Spiced Pie Dough
Start by mixing your flour and salt in a large bowl. Then, cut in the shortening until the mixture becomes crumbly — this step is where I really make sure the fat is evenly distributed so the crust stays flaky. Gradually sprinkle in your cold water, just a tablespoon at a time, tossing with a fork until the dough clumps together into a ball. Don’t overwork it here; a light touch keeps the dough tender. Divide and roll out the dough on a floured surface to fit two 9-inch pie plates, trimming and fluting the edges. This spiced crust sets the stage perfectly for the pumpkin filling.
Step 2: Prepare the Lusciously Creamy Pumpkin Filling
In a large bowl, whisk those six eggs first—this gives a nice structure to the filling. Then add your canned pumpkin, the packed brown sugar, cinnamon, salt, and the trio of cloves, nutmeg, and ginger. Beat these together until just combined. Last, slowly stir in the evaporated milk to keep everything silky and smooth. Trust me, this is where the magic truly happens—you want to mix gently so you don’t incorporate too much air, which can cause cracks.
Step 3: Bake to Perfection, with a Little Trick
Pour your filling evenly into the prepared crusts, then pop them in the oven at a high temperature of 450°F (230°C) for the first 10 minutes — this initial blast helps set the crust edge and prevents sogginess. After that, lower the temp to 350°F (175°C) and bake for around 40-45 minutes longer, or until a knife inserted near the center comes out clean. I often rotate my pies halfway through baking to make sure the crust cooks evenly. Once out, cool the pies on wire racks for an hour, then chill them for at least 3 hours before serving. Patience here really pays off!
Step 4: Craft Decorative Edible Accents to Wow Everyone
If you have some extra dough left, this is a fun extra step that I discovered one year when I wanted to glam up my pie. Roll small balls for miniature pumpkins, score delicate ridges with the back of a knife, and press a whole clove into the top to make a stem. Flatten them a bit on parchment and bake at 400°F (205°C) until golden, about 15-20 minutes. For vines, roll out thin strips and coil them on a lined baking sheet before baking for 8-10 minutes. Leaves are cut with mini cutters and scored with veins—bake these alongside the vines. Once cooled, arrange these cuties on the chilled pie for a charming, rustic look that’ll elicit many compliments.
Pro Tips for Making Creamy Pumpkin Pie with Homemade Spiced Crust and Decorative Edible Accents Recipe
- Keep Your Ingredients Cold: Chilling your shortening and water before mixing into the dough helps achieve that flaky crust everyone raves about.
- Don’t Overmix the Filling: I learned that beating the filling just until combined keeps your pie smooth and crack-free.
- Use a Wire Rack to Cool Pies: This ensures air circulates beneath, preventing a soggy crust bottom as it cools.
- Chill Before Serving: Refrigerating for at least three hours lets the flavors meld perfectly and the filling set just right.
How to Serve Creamy Pumpkin Pie with Homemade Spiced Crust and Decorative Edible Accents Recipe
Garnishes
I love topping each slice with a dollop of lightly sweetened whipped cream—freshly whipped, of course! Sometimes, a sprinkle of cinnamon or a drizzle of maple syrup adds that cozy autumn touch. If you’re feeling fancy, adding a few crushed toasted pecans brings a delightful crunch. The edible dough accents also serve double duty as edible garnishes, making your slices picture-perfect.
Side Dishes
This pie pairs beautifully with classic fall beverages like hot apple cider or a spiced chai latte. For a meal, I like serving it alongside roasted turkey or ham with savory sides like green beans almondine or a fresh cranberry relish to balance the sweetness.
Creative Ways to Present
One of my favorite tricks is to bake this pie in decorative tart pans for individual servings—great for holiday parties! Adding a sprig of fresh rosemary or sage alongside the edible leaf accents gives an elegant, earthy vibe. For Thanksgiving, placing the pie on a rustic wooden board with gourds and fall leaves scattered around really sets the festive mood.
Make Ahead and Storage
Storing Leftovers
I always store leftover pie covered tightly with plastic wrap or in an airtight container in the fridge. It stays fresh and creamy for up to four days—which is usually how long it takes my family to finish it off! Keeping it chilled helps the filling maintain its custardy texture without becoming watery.
Freezing
Freezing pumpkin pie can be a little tricky — I’ve found that wrapping the pie tightly in plastic wrap and then foil works best to prevent freezer burn. When thawed in the fridge overnight, the texture holds up surprisingly well, and you can refresh it with a quick warm-up in a low oven if you like a slightly heated slice.
Reheating
If your family likes warm pie, I recommend reheating slices in a 300°F oven for 10-15 minutes, loosely covered with foil to avoid drying out. It brings back that just-baked feel without compromising creaminess. Just be sure not to microwave as it can make the custard watery or rubbery.
FAQs
-
Can I make the crust ahead of time?
Absolutely! You can prepare the spiced pie dough a day or two in advance, wrap it tightly in plastic wrap, and keep it refrigerated. This actually helps the dough relax and makes it easier to roll out when you’re ready.
-
What’s the best type of pumpkin to use?
For ease and consistency, canned 100% pumpkin puree works wonderfully in this recipe. If you prefer fresh, roasting and pureeing your own sugar pumpkins is great, but be sure to cook down excess moisture to avoid a runny filling.
-
How do I prevent my pumpkin pie from cracking?
Don’t overbeat the filling, and avoid overbaking. Bake at a higher temperature at the start to set the crust, then lower it, and keep an eye during the final bake—remove the pie as soon as a knife inserted comes out clean. Cooling the pie slowly on a wire rack before refrigerating also helps prevent cracks.
-
Are the decorative accents edible?
Yes, the pumpkins, leaves, and vines made from the extra pie dough are fully edible. They bake to a crisp, buttery finish and make your pie look extra special. Just be sure to brush them with beaten egg for that beautiful golden shine.
Final Thoughts
This Creamy Pumpkin Pie with Homemade Spiced Crust and Decorative Edible Accents Recipe holds a special place in my heart—and at my family’s holiday table. It’s that kind of pie that everyone asks about year after year. The homemade crust with its warm spices, combined with the creamy, smooth filling, makes it a labor of love with a joyful payoff. And the decorative accents? They add whimsical charm that’ll make your pie unforgettable. I hope when you try this recipe, you find the same cozy satisfaction and happy memories I have. You deserve to serve a pie that’s as delicious as it is beautiful. Happy baking!
Print
Creamy Pumpkin Pie with Homemade Spiced Crust and Decorative Edible Accents Recipe
- Prep Time: 20 minutes
- Cook Time: 50 minutes
- Total Time: 3 hours 10 minutes (including chilling time)
- Yield: 2 pies (8 servings each)
- Category: Dessert
- Method: Baking
- Cuisine: American
Description
This classic Pumpkin Pie recipe features a homemade flaky pastry crust filled with a spiced pumpkin custard. Perfectly baked to a golden finish, it’s a timeless dessert that offers rich autumn flavors with notes of cinnamon, cloves, nutmeg, and ginger. Optional decorative dough shapes add a festive touch, making it ideal for holiday celebrations or cozy family gatherings.
Ingredients
Pie Crust
- 2 cups all-purpose flour
- 3/4 teaspoon salt
- 2/3 cup shortening
- 4 to 6 tablespoons cold water
Filling
- 6 large eggs
- 1 can (29 ounces) pumpkin
- 2 cups packed brown sugar
- 2 teaspoons ground cinnamon
- 1 teaspoon salt
- 1/2 teaspoon ground cloves
- 1/2 teaspoon ground nutmeg
- 1/2 teaspoon ground ginger
- 2 cups evaporated milk
Decorations (Optional)
- Dough for single-crust pie (reuse some prepared pie dough)
- 1 large egg, beaten (for brushing)
- Whole cloves (for stems of decorative pumpkins)
Instructions
- Prepare the Pie Crust: Preheat the oven to 450°F. In a large bowl, combine the all-purpose flour and salt. Cut in the shortening using a pastry blender or two knives until the mixture is crumbly. Gradually add cold water, tossing the mixture with a fork until a dough ball forms. Divide the dough into two equal parts.
- Roll and Fit Crusts: On a lightly floured surface, roll out each dough portion to fit a 9-inch pie plate. Place each rolled dough into a pie plate and trim the crust edges to extend about 1/2 inch beyond the plate’s edge. Crimp or flute the edges for decoration.
- Make the Pumpkin Filling: In a large bowl, beat the six eggs. Add the canned pumpkin, packed brown sugar, ground cinnamon, salt, ground cloves, nutmeg, and ginger. Beat until just combined. Gradually stir in the evaporated milk until fully incorporated.
- Fill the Pies and Bake Initially: Pour the pumpkin filling evenly into the prepared crusts. Bake in the preheated oven at 450°F for 10 minutes to set the crust edges and begin cooking the filling.
- Reduce Temperature and Finish Baking: Lower the oven temperature to 350°F. Continue baking the pies for 40 to 45 minutes, or until a knife inserted into the center comes out clean, indicating the custard is fully set.
- Cool and Chill: Remove the pies from the oven and cool on wire racks for 1 hour. Then refrigerate for at least 3 hours before serving to ensure the filling is firm and flavors meld.
- Prepare Optional Decorative Dough Shapes: Use extra pie dough to create festive decorations. For pumpkins, roll small balls of dough, score them with the blunt side of a knife to form ridges, flatten slightly, insert a whole clove as the stem, refrigerate until firm, brush with beaten egg, and bake at 400°F for 15-20 minutes until light golden and baked through.
- Create Vines: Roll out the dough to 1/8-inch thickness; cut narrow strips of various lengths. Shape strips into coils on a parchment-lined baking sheet, refrigerate until firm, brush with beaten egg, and bake at 400°F for 8-10 minutes until lightly golden.
- Shape Leaves: Roll dough to 1/8-inch thickness and cut out leaves using mini leaf cutters. Score veins on the surface with a knife, refrigerate until firm, brush with beaten egg, and bake at 400°F for 8-10 minutes or until golden brown.
- Assemble Decorations: Once baked and cooled, arrange the decorative pumpkins, vines, and leaves elegantly on the chilled pie’s surface before serving.
Notes
- Use chilled ingredients for the crust to ensure flakiness.
- Do not overbeat the filling mixture to prevent air bubbles in the custard.
- Pie must be well chilled before serving to allow proper setting of the custard.
- Decorative dough shapes add a festive touch, but are optional.
- Store leftover pie covered in the refrigerator for up to 3 days.
Nutrition
- Serving Size: 1 slice (1/16th of a pie)
- Calories: 330
- Sugar: 22g
- Sodium: 250mg
- Fat: 16g
- Saturated Fat: 6g
- Unsaturated Fat: 8g
- Trans Fat: 0.2g
- Carbohydrates: 40g
- Fiber: 2g
- Protein: 5g
- Cholesterol: 110mg


