
If you’re looking for a fun and festive treat to bring some holiday cheer into your kitchen, you’re in for a real treat. This Christmas Tree Rice Krispies Treats Recipe is not only adorable but also ridiculously easy to make — perfect for holiday parties, classroom snacks, or just a cozy afternoon baking with loved ones. Trust me, once you see how charming and delicious these little green trees turn out, you’ll be whipping them up every December!
Why You’ll Love This Recipe
- Super Simple to Make: This recipe uses just a handful of classic ingredients you probably already have, and it’s ready in under an hour.
- Festive and Fun: Shaping the treats into Christmas trees and decorating with sprinkles makes this a joyful holiday activity for kids and adults alike.
- Perfect for Gifting: These sweet little trees look so cute, they make fabulous edible gifts for neighbors and friends.
- Customizable Decorations: You can switch up the embellishments to match your holiday style or dietary needs.

Ingredients You’ll Need
These ingredients come together effortlessly to create the classic Rice Krispies treat you love, but with a fun festive twist! Let me share a few little tips to make shopping a breeze.
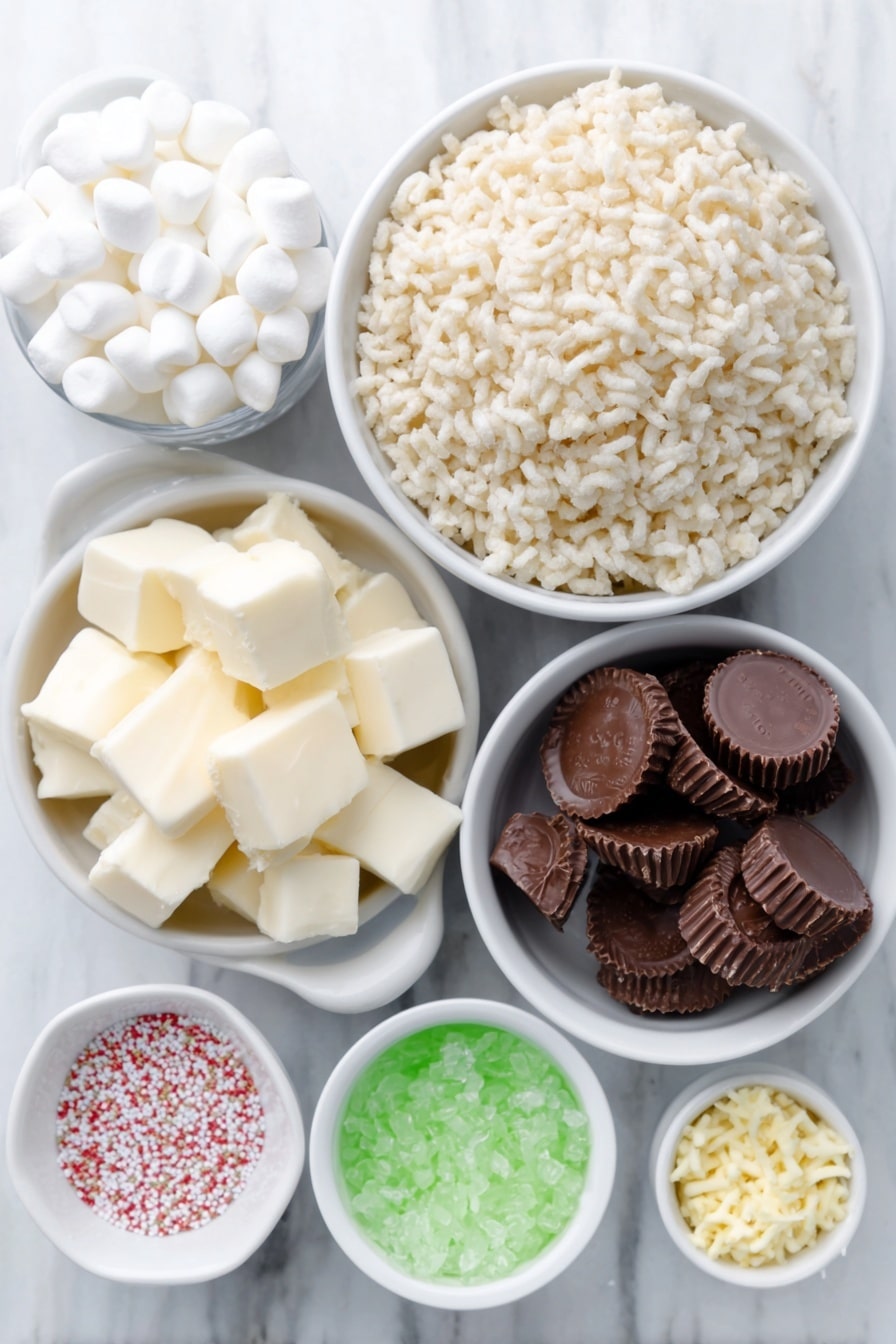
- Salted Butter: I recommend using real salted butter over margarine or light butter for the best flavor and texture.
- Mini Marshmallows: Mini marshmallows melt more evenly than large ones, making your mixture smooth and easy to work with.
- Green Gel Food Coloring: Gel colors are more concentrated, so you get a vibrant green without thinning your marshmallow mixture.
- Rice Krispies Cereal: Classic Rice Krispies work best here—avoid knockoff brands for that perfect crisp texture.
- White Decorating Icing: Store-bought icing is just fine and makes decorating simple; you don’t have to get fancy.
- Miniature Reese’s Peanut Butter Cups: These form the base ‘tree trunks’ and add a yummy chocolate-peanut butter combo.
- Round Red Sprinkles: Think of these as tiny ornaments to make your trees pop with holiday spirit.
- Star Sprinkles or Yellow Mini M&Ms: Use these to create charming star-topped Christmas trees that look straight out of a holiday card.
Variations
One of the best things about this Christmas Tree Rice Krispies Treats Recipe is how easy it is to tweak to suit your tastes or dietary needs. I love experimenting with different decorations and even adding mix-ins just for fun!
- Nut-Free Variation: Swap the Reese’s peanut butter cups with plain chocolate chips or mini wafer rolls to avoid nuts and still have a sturdy base.
- Vegan Modification: Use vegan butter and vegan marshmallows—brands like Dandies work well—and you’ll still get great results.
- Extra Festive: Add tiny edible glitter or crushed candy cane sprinkles for a sparkling winter wonderland effect. My family goes crazy for that peppermint crunch!
- Flavor Boost: Stir in a teaspoon of vanilla or almond extract when melting the marshmallows for an irresistible aroma and flavor.
How to Make Christmas Tree Rice Krispies Treats Recipe
Step 1: Melt and Color Your Marshmallow Mixture
Start by melting your salted butter over medium-low heat in a large saucepan. Once melted, toss in the mini marshmallows and stir gently but continuously. As they begin to melt and come together, add the green gel food coloring little by little until you reach that perfect Christmas tree green. I discovered that adding the gel coloring while the marshmallows are melting ensures a vibrant, even color without clumps.
Step 2: Fold in the Rice Krispies
Once your marshmallow mixture is smooth and colored, immediately remove the pan from heat. Sprinkle in your Rice Krispies cereal next and fold gently but thoroughly so every morsel is coated. You want them well covered but try not to mash the cereal—keeping that crispy texture is half the magic here. Let the mixture cool for about 5 minutes; this makes it easier to handle when shaping the trees.
Step 3: Shape Your Christmas Tree Treats
Spray your hands generously with non-stick cooking spray (trust me, this step is a lifesaver). Take about 1/3 to 1/2 cup of the mixture, and press it firmly into a cone shape that resembles a little Christmas tree. The key is to press really well so your trees stick together and hold their shape without crumbling. I like to work on wax paper for easier cleanup.
Step 4: Decorate and Assemble
Here’s where the fun really begins! Use white decorating icing as your ‘glue’ to attach round red sprinkles as ornaments on the trees. Then place a star sprinkle or yellow mini M&M right on top to be the tree topper. For the ‘trunks,’ spread a bit of icing on one side of the miniature Reese’s peanut butter cups and stick a tree on top. If you want your icing to set nicely, let your treats rest overnight. Otherwise, dive right in — they’re delicious even fresh!
Pro Tips for Making Christmas Tree Rice Krispies Treats Recipe
- Get the Color Just Right: I found that using gel coloring rather than liquid prevents the marshmallow mixture from becoming too runny.
- Work Quickly but Carefully: Marshmallow mixture cools fast, so have your hands sprayed and your decorating items ready before shaping.
- Use Non-Stick Spray Generously: This keeps the sticky treats from clinging to your hands — it’s a total game-changer.
- Press Firmly for Stability: I learned that shaping the trees firmly ensures they don’t fall apart, especially when you add the Reese’s bases.
How to Serve Christmas Tree Rice Krispies Treats Recipe
Garnishes
I usually stick to classic red round sprinkles and star toppers for the trees because they give that nostalgic Christmas vibe. But sometimes I add edible glitter or crushed peppermint for a little festive sparkle. It’s all about what makes you smile when you look at your creation.
Side Dishes
These treats are sweet and rich enough on their own, but they pair nicely with a cup of hot cocoa or a glass of cold milk. If you want to serve a holiday spread, consider pairing them with gingerbread cookies or peppermint bark for a festive dessert table.
Creative Ways to Present
For parties, I like to arrange the Christmas Tree Rice Krispies Treats Recipe on a platter lined with faux snow or green shredded paper to look like a forest. Wrapping them individually in cellophane tied with a ribbon turns them into charming party favors that guests adore. Last year, I made a whole ‘woodland’ scene on a cake stand—friends couldn’t stop snapping photos!
Make Ahead and Storage
Storing Leftovers
I store leftover treats in an airtight container at room temperature. They usually stay perfectly chewy and fresh for 3-4 days if sealed well. I avoid refrigerating since that can make them a bit tough.
Freezing
I once froze a batch wrapped tightly in plastic wrap and then in a freezer bag – this worked great! When you’re ready, let them thaw at room temperature for about an hour. They keep their shape and taste pretty much like fresh.
Reheating
Rather than reheating, I prefer enjoying these treats as is since melting marshmallows can get sticky. But if you want to soften them slightly, pop one in the microwave for 5-7 seconds—just be careful not to overdo it or it’ll get gooey.
FAQs
-
Can I use regular food coloring instead of gel?
You can, but gel food coloring is better here because it’s more concentrated and won’t thin out the marshmallow mixture. Using regular liquid can make your Rice Krispies treats too soft or sticky.
-
What if I don’t have Reese’s peanut butter cups for the tree trunks?
No worries! You can substitute with mini chocolate bars, pretzel sticks, or even a bit of rolled fruit leather—anything sturdy enough to hold the tree upright.
-
How can I make these treats less sticky to handle?
Spray your hands generously with non-stick cooking spray or lightly oil them. Working with slightly cooled marshmallow mixture (after a 5-minute rest) also helps a lot.
-
Can I make these treats ahead of time for a party?
Absolutely! You can make and decorate them a day or two ahead, just store them in an airtight container at room temperature to keep them fresh and yummy.
Final Thoughts
I absolutely love how this Christmas Tree Rice Krispies Treats Recipe brings a bit of magic into my kitchen every holiday season. It’s a delightful mix of simplicity, tradition, and a little creative sparkle that never fails to put smiles on faces. Whether you’re making them with kids, gifting them to friends, or just craving a nostalgic holiday treat, these little trees will warm your heart and sweet tooth alike. Give it a try—you’ll be amazed at how easy and fun it is, and I’m pretty sure this recipe will become a yearly favorite in your home too!
Print
Christmas Tree Rice Krispies Treats Recipe
- Prep Time: 45 minutes
- Cook Time: 10 minutes
- Total Time: 55 minutes
- Yield: 16 servings
- Category: Dessert
- Method: Stovetop
- Cuisine: American
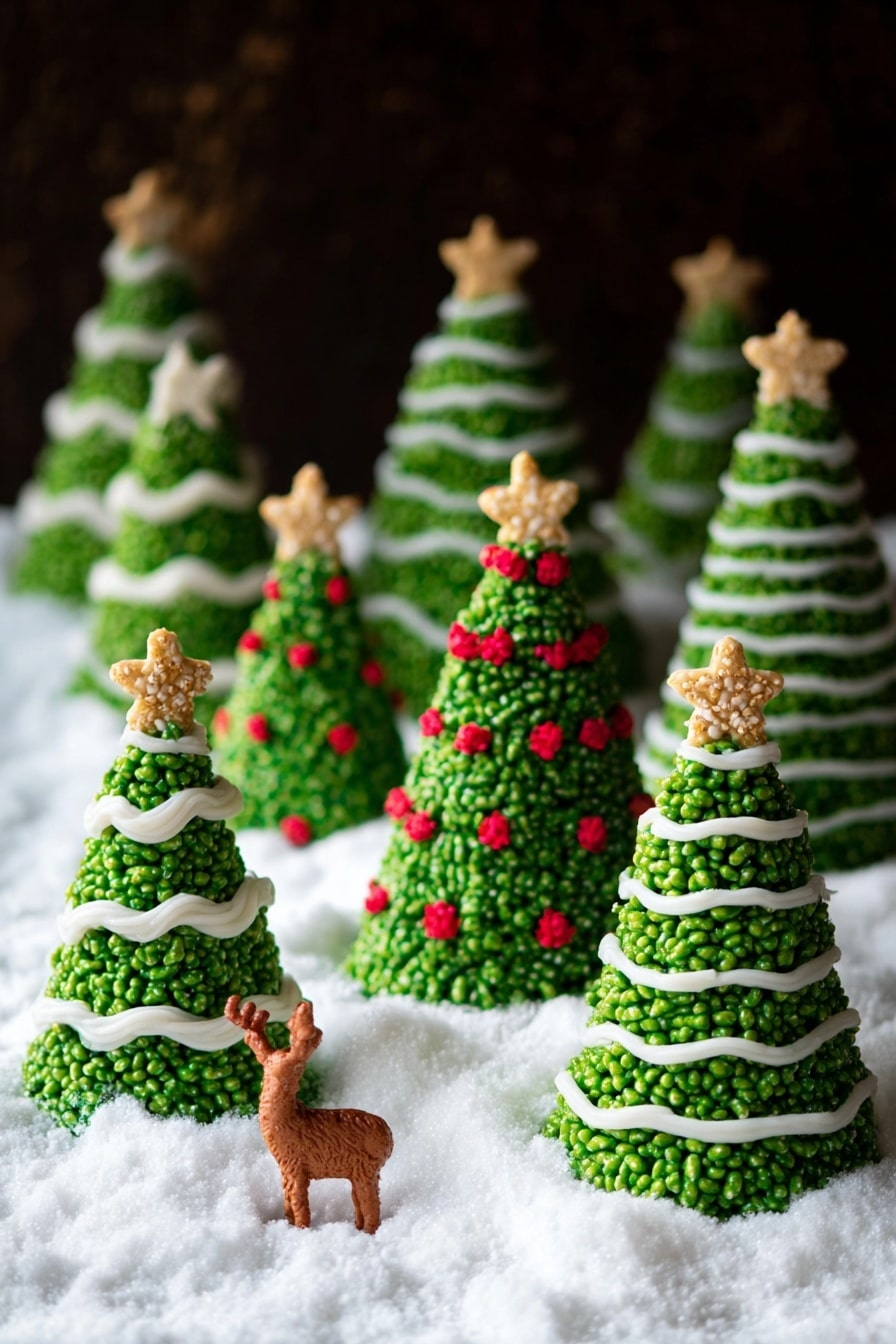
Description
These Christmas Tree Rice Krispies Treats are a festive and fun holiday dessert that’s perfect for parties and family gatherings. Made with classic crispy rice cereal and melted marshmallows tinted green to resemble Christmas trees, these treats are shaped into cones and beautifully decorated with red sprinkles, star candies, and miniature Reese’s peanut butter cups acting as tree trunks. Easy to make and visually delightful, they bring a playful holiday spirit to any occasion.
Ingredients
Main Ingredients
- 3 Tbsp (42g) salted butter, diced into 1-Tbsp pieces
- 1 (10 oz) bag mini marshmallows
- Green gel food coloring (such as Wilton brand)
- 6 cups (170g) Rice Krispies cereal
Decorations
- White decorating icing (store-bought)
- 16 miniature Reese’s peanut butter cups, unwrapped
- Round red sprinkles
- 16 star sprinkles or yellow mini M&Ms
Instructions
- Melt Butter: Melt the diced butter in a large saucepan over medium-low heat until fully liquid but not browned, which helps create a smooth marshmallow mix.
- Add Marshmallows and Color: Stir in the mini marshmallows continuously until they completely melt into a gooey, smooth mixture. Add green gel food coloring a few drops at a time, stirring until you achieve your desired shade of green resembling a Christmas tree.
- Mix in Rice Krispies Cereal: Remove the saucepan from heat and immediately fold in the Rice Krispies cereal, stirring gently but thoroughly until every piece is evenly coated with the green marshmallow mixture. Let the mixture cool for about 5 minutes to make shaping easier and prevent burns.
- Shape Trees: Lightly spray your hands with non-stick cooking spray to prevent sticking. Take about 1/3 to 1/2 cup of the mixture and firmly press and shape it into cone shapes to simulate Christmas trees. Press firmly so the cones hold their shape without crumbling.
- Decorate: Use the white decorating icing as glue to attach round red sprinkles like ornaments and star sprinkles or yellow mini M&Ms as tree toppers onto each cone. Also, pipe some icing on the base of each tree and press a miniature Reese’s peanut butter cup underneath to form the tree trunk.
- Set and Serve: You can enjoy your Christmas tree treats immediately or allow the icing to harden overnight to help decorations set firmly. Store in an airtight container to keep fresh.
- Recipe Source: Adapted from Family Circle.
Notes
- Spray your hands well with non-stick cooking spray to prevent the mixture from sticking while shaping.
- If you prefer sturdy decorations, let the icing harden overnight before serving.
- For allergy-friendly alternatives, substitute Reese’s cups with similar nut-free candies.
- Use gel food coloring to avoid thinning the marshmallow mixture.
- Store the treats in an airtight container for up to 3 days to maintain freshness.
Nutrition
- Serving Size: 1 treat
- Calories: 150
- Sugar: 14g
- Sodium: 85mg
- Fat: 7g
- Saturated Fat: 4g
- Unsaturated Fat: 3g
- Trans Fat: 0g
- Carbohydrates: 20g
- Fiber: 0.5g
- Protein: 2g
- Cholesterol: 15mg


