
If you’re looking for a festive treat that’s both delicious and fun to make, you’re in the right place! This Christmas Tree Cookie Recipe is one of my absolute favorites because of how festive and delightful these cookies turn out—perfect for sharing with family or gifting to friends. I love how the rich chocolate base pairs with the colorful vanilla icing, making these cookies as pretty as they are tasty. Stick with me here, and I’ll walk you through everything you need to make these little holiday gems a total success!
Why You’ll Love This Recipe
- Flavor and Texture: These cookies bring together the perfect balance of soft, chewy chocolate with a crisp sugar coating that your taste buds will adore.
- Festive and Fun: Decorating these Christmas tree-shaped cookies with vibrant icing is a joyful activity that even kids can join in on.
- Simple Ingredients: All the ingredients are easy to find, and the recipe is straightforward—no fancy gadgets required.
- Reliable Results: I’ve tested this recipe multiple times and tweaked it to avoid puffing or cracking, ensuring your cookies come out picture perfect.

Ingredients You’ll Need
The ingredients in this Christmas Tree Cookie Recipe come together beautifully to create that rich chocolate flavor with a melt-in-your-mouth texture. I always suggest using the best-quality cocoa powder and unsalted butter you can find—it makes a noticeable difference. Also, the special mix of sugars creates a subtle caramel note that’s just heavenly.
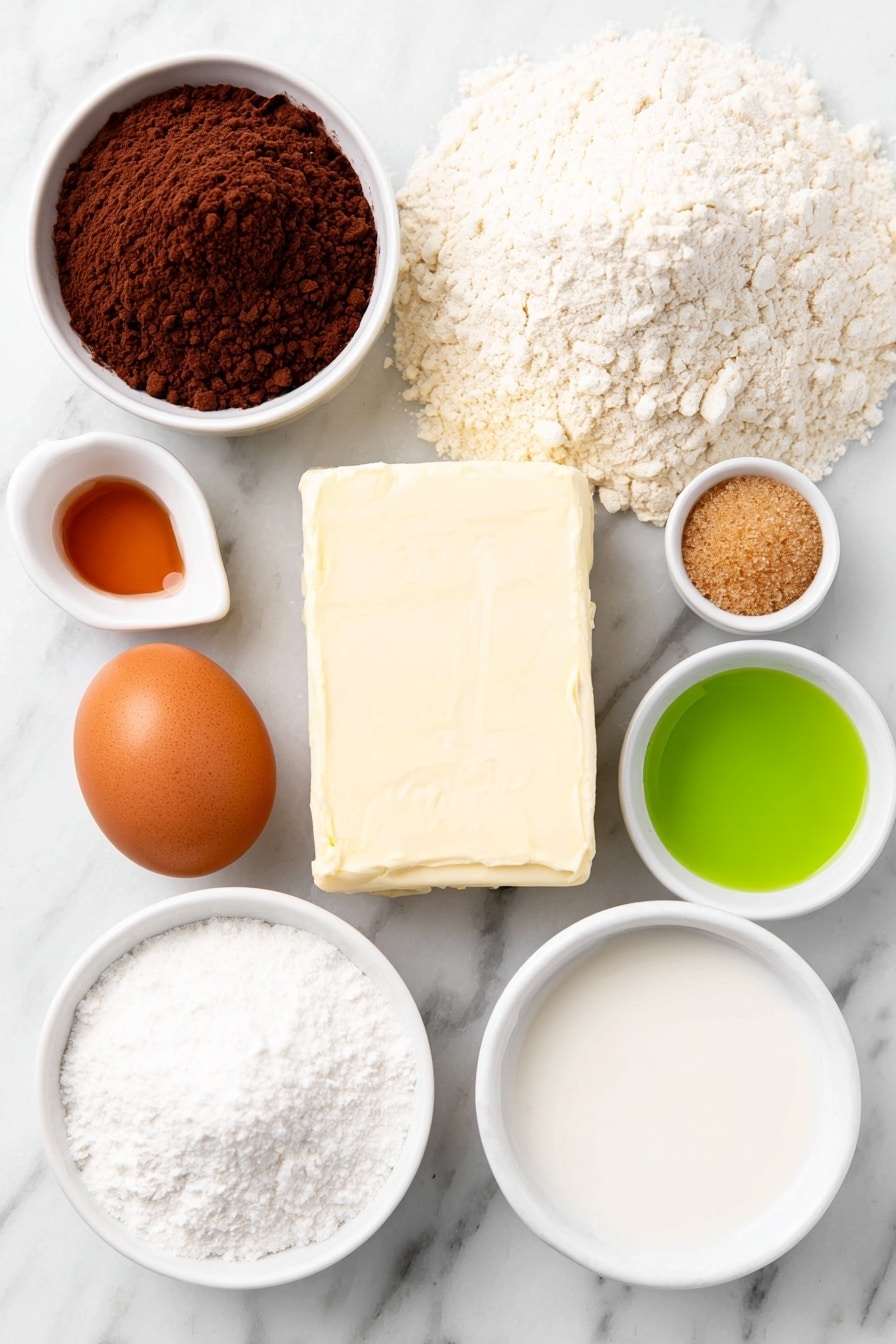
- All-purpose flour: Use spooned and leveled flour or weigh it for best results to avoid dry cookies.
- Unsweetened cocoa powder: Choose high-quality for a deep chocolate taste.
- Salt: Enhances all the other flavors.
- Baking soda: Helps the cookies rise just right; don’t substitute with baking powder.
- Cornstarch: This is a game-changer for that tender, soft texture.
- Unsalted butter: Melted and cooled—makes the dough rich but not greasy.
- Regenerative Organic Certified® Cane Sugar from Wholesome & Light Brown Sugar: The combo gives a nice depth and slight chewiness.
- Pure vanilla extract: Adds warmth and balance to the rich batter.
- Egg yolk: Adds richness and helps bind everything together.
- Powdered confectioners sugar: For the classic smooth vanilla icing.
- Milk: To adjust the icing consistency just right.
- Food dye (green, brown, yellow): For that festive touch to decorate your cookies like Christmas trees.
Variations
I love to play around with this Christmas Tree Cookie Recipe during the holidays. It’s so easy to tailor it to your own taste or dietary needs, and honestly, customizing always makes the baking process feel even more special and cozy.
- Gluten-free variation: I swapped regular flour for a gluten-free blend once, and it worked well—just add a bit more cornstarch to keep that soft texture I adore.
- Natural food coloring: I sometimes use spinach powder or turmeric instead of artificial dyes for a natural twist that still looks festive.
- Nutty upgrade: Adding finely chopped toasted pecans or walnuts to the dough kicks the flavor up a notch, which my family goes crazy for.
- Vegan adaptation: Try replacing butter with coconut oil and using flax egg instead of egg yolk; just remember the texture might be a touch different but still yummy!
How to Make Christmas Tree Cookie Recipe
Step 1: Prep the Dry Ingredients
Start by sifting together all-purpose flour, unsweetened cocoa powder, baking soda, cornstarch, and salt in a medium bowl. This step might seem small, but trust me on this: sifting ensures there are no lumps, and the dry ingredients mix evenly, which is key for cookies that bake uniformly. I like to use a fine mesh sieve here, and it makes a noticeable difference in the final crumb.
Step 2: Mix the Sugars and Butter
In your mixer, beat the melted and cooled unsalted butter with the cane sugar and light brown sugar on high speed for about 2 minutes. This is when the magic happens—the sugars start dissolving a little and you get a smooth, glossy base that’s going to make your cookies wonderfully tender. If you skip this step or rush it, your final cookie might miss that luscious texture I love.
Step 3: Add Egg Yolk and Vanilla
Next, add the vanilla extract and egg yolk. Mix on medium speed until everything is nicely combined but don’t overbeat! Over mixing can make cookies tough, and we want soft, snuggly treats.
Step 4: Combine Wet and Dry
Slowly add your dry ingredients to the wet mixture. Mix on low speed just until combined—this helps keep the gluten from developing too much, which could make the cookies dense or rubbery. A little bit of resistance in the dough is okay; you want that slightly thick feel for the perfect scoop.
Step 5: Prep to Bake
Preheat your oven to 350℉ and line two cookie sheets with parchment paper. Let the dough rest for about 10 minutes—it helps hydrate the flour and gives you a dough that’s easier to scoop and shape.
Step 6: Scoop and Sugar-Coat the Dough
Using a small cookie scoop, portion the dough into balls. Here’s a fun little trick I picked up: roll each ball in the cane sugar before placing it on the sheet. This sugar layer adds a subtle crunch and a sparkling look to the cookies that just scream holiday cheer. Place 12 per cookie sheet, giving them enough space—they don’t spread much, but a little room goes a long way.
Step 7: Bake with Care
Bake one sheet at a time for 8 to 10 minutes. You’ll want edges that are set but still soft in the middle. I always watch the first batch closely so I can perfect the timing for my own oven. Remember, ovens vary! The cookies might puff up—if that happens, gently press them down while warm using your hand. This helps when it comes time to add the icing and decorate.
Step 8: Cool Completely
Once baked, let the cookies rest on the hot sheet for 5 minutes before moving them to a cooling rack. Patience here is key! Decorating warm cookies leads to icing melting off and a sad mess. Cool cookies mean your design will stay crisp and neat.
Step 9: Make the Vanilla Icing
Sift the powdered sugar into a medium bowl. Add vanilla extract and one tablespoon of milk, then whisk until you get a thick icing. This consistency is important—it lets you pipe clear, beautiful lines. Add more milk if needed, but carefully. I keep an eye on this part because if it gets too runny, your decorations can spread and lose that sharpness that makes these cookies look so charming.
Step 10: Color and Pipe Your Trees
Divide the icing evenly into three bowls and color them green, brown, and yellow for the tree branches, trunk, and star respectively. Transfer each to piping bags and cut just a small opening at the tip—different sizes for different parts is my favorite trick. For the tree, I use a back-and-forth motion with the green, then add the trunk with brown and a tiny star at the top with yellow. If you want an extra touch of wonder, sprinkle a little white nonpareil on top—it looks like snow!
Pro Tips for Making Christmas Tree Cookie Recipe
- Flour Measurement Matters: I learned the hard way that spooning and leveling your flour is crucial—too much flour dries out cookies and prevents spreading.
- Rest the Dough: Letting the dough sit for 10 minutes before scooping makes it easier to handle and helps flavors meld.
- Watch Your Oven: Ovens differ, so keep a close eye on the first batch; the cookies are best when edges are set but centers still soft.
- Decorate on Cool Cookies: Always cool cookies completely before icing—warm cookies melt the icing and ruin your careful work.
How to Serve Christmas Tree Cookie Recipe
Garnishes
When I serve these cookies, I love topping them with a tiny splash of extra sparkle like edible glitter or a pinch of white nonpareil sprinkles to resemble snowflakes. It makes the presentation pop and guests always comment on the festive vibe.
Side Dishes
These cookies are perfect paired with a warm mug of hot cocoa or spiced chai tea—both flavors complement the chocolate and vanilla icing beautifully. At holiday parties, I also like serving them alongside peppermint bark or eggnog to keep the seasonal cheer rolling.
Creative Ways to Present
For gift-giving or parties, I arrange the cookies standing up in a decorated cookie box lined with parchment or tissue paper. Another fun idea I’ve tried is posting cookies on wooden skewers and standing them in a festive mug to create an edible “cookie tree centerpiece”—it’s always a hit!
Make Ahead and Storage
Storing Leftovers
Once decorated, store your Christmas tree cookies in an airtight container at room temperature. I keep mine layered between sheets of parchment paper to avoid messes. They usually stay fresh and soft for about 5 days, perfect for enjoying throughout the week.
Freezing
I’ve frozen these cookies both before and after decorating. For undecorated dough balls, freeze them on a tray first, then transfer to a bag—bake straight from frozen adding a couple of extra minutes. For decorated cookies, place them in a single layer in a container with parchment between layers and freeze; thaw gently before serving to keep icing intact.
Reheating
I usually enjoy these cookies at room temperature, but if you want a slightly warm cookie, pop one in the microwave for just 10-15 seconds. Be careful—it’s easy to overheat and soften the icing too much. This quick heat-up brings out the chocolate’s richness beautifully.
FAQs
-
Can I make this Christmas Tree Cookie Recipe without cocoa powder?
While the cocoa powder is key for the rich chocolate flavor and the cookie’s characteristic color, you can omit it for vanilla sugar cookies instead. However, you’ll need to adjust the flour slightly and expect a different flavor and appearance. For best results, try a different recipe tailored to vanilla cookies if you want to skip cocoa entirely.
-
How do I prevent my cookies from puffing up too much during baking?
This is a common issue! I found that gently flattening the cookies with your hand while they’re still warm on the baking sheet helps keep them flat and easier to decorate. Also, make sure not to overmix the dough or add too much flour, which can cause puffiness. Following the recipe’s resting and mixing tips usually keeps the shape just right.
-
Can I use store-bought frosting instead of homemade vanilla icing?
You absolutely can! Just pick a frosting that’s pipeable and not too runny. Keep in mind that store-bought icings may not stiffen like homemade royal or vanilla icing, so your decorating lines might not be as sharp. If you go this route, chill the cookies before decorating for the best results.
-
How far in advance can I make these cookies?
You can bake these cookies up to 3 days ahead and decorate them on the day you plan to serve for the freshest frosting look. Alternatively, bake and freeze undecorated dough or fully decorated cookies as described above, which lets you prepare much earlier without losing quality.
Final Thoughts
This Christmas Tree Cookie Recipe holds a special place in my heart—it brings me back to cozy kitchen days filled with laughter, icing-streaked smiles, and that joyful anticipation of the holidays. If you’re looking for a cookie that tastes as good as it looks and doubles as a fun holiday activity, this is it. Try it, decorate it, and watch how quickly these festive treats disappear. I promise, once you make these, they might just become your family’s new holiday tradition, too!
Print
Christmas Tree Cookie Recipe
- Prep Time: 20 minutes
- Cook Time: 9 minutes
- Total Time: 44 minutes
- Yield: 18 cookies
- Category: Dessert
- Method: Baking
- Cuisine: American
- Diet: Vegetarian
Description
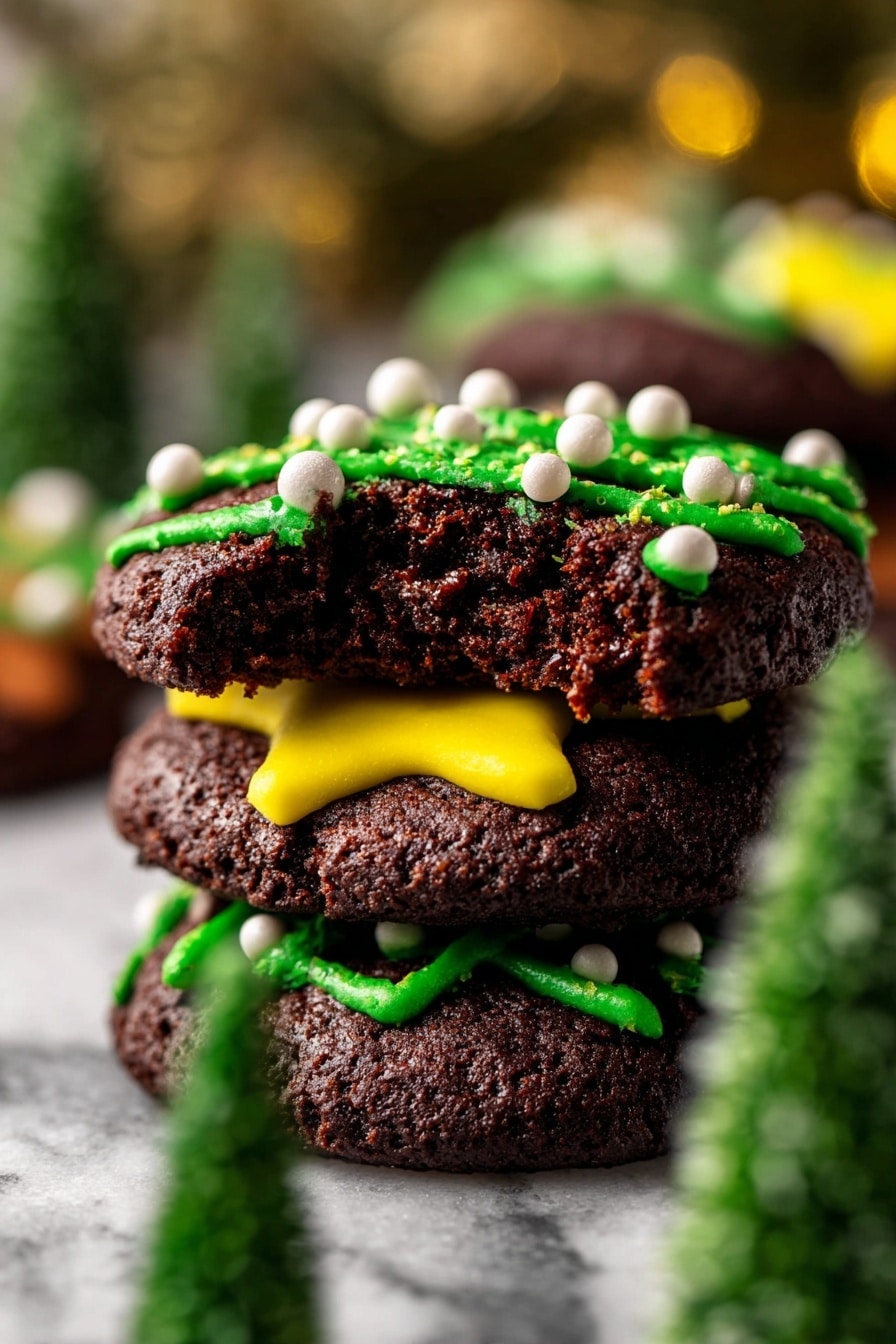
These festive Christmas Tree Cookies combine rich chocolate cookie bases with vibrant vanilla icing to create a delightful and visually appealing holiday treat. The cookies are soft and slightly chewy with a deep cocoa flavor, while the green, brown, and yellow icing add an artistic touch resembling Christmas trees complete with trunks and stars. Perfect for holiday gatherings or gift-giving, this easy-to-follow recipe delivers flavorful and charming cookies that bring holiday cheer to any occasion.
Ingredients
Chocolate Cookies:
- 1 1/4 cups All-purpose flour
- 1/4 cup Unsweetened cocoa powder
- 1/2 tsp Salt
- 1/2 tsp Baking soda
- 1 TBSP Cornstarch
- 1/2 cup Unsalted butter, melted and cooled
- 3/4 cup Regenerative Organic Certified® Cane Sugar from Wholesome
- 2 TBSP Wholesome Organic Fair Trade Light Brown Sugar
- 1 tsp Pure vanilla extract
- 1 Egg yolk, room temperature
- 1/2 cup Regenerative Organic Certified® Cane Sugar from Wholesome (for coating)
Vanilla Icing:
- 1 cup Wholesome Organic Fair Trade Powdered Confectioners Sugar, sifted
- 1-2 TBSP Milk
- 1 tsp Pure vanilla extract
- Green food dye
- Brown food dye
- Yellow food dye
Instructions
- Mix dry ingredients: In a medium bowl, sift together all-purpose flour and unsweetened cocoa powder. Add baking soda, cornstarch, and salt. Stir well to combine all dry ingredients evenly.
- Cream sugars and butter: Using a mixer on high speed, beat the melted and cooled unsalted butter together with the cane sugar and light brown sugar for 2 minutes until well combined and fluffy.
- Add eggs and dry ingredients: Mix in the pure vanilla extract and egg yolk on medium speed until smooth. Then add the sifted dry ingredients and mix on low speed just until the dough comes together. Avoid overmixing.
- Preheat oven and prepare sheets: Preheat the oven to 350°F (175°C). Line two baking sheets with parchment paper. Let the dough rest for 10 minutes before scooping.
- Form dough balls: Use a small cookie scoop to portion out the dough. Roll each dough ball in the reserved 1/2 cup cane sugar, then place 12 dough balls evenly spaced on each prepared cookie sheet.
- Bake cookies: Bake one sheet at a time in the preheated oven for 8-10 minutes or until the edges are set but the centers remain soft. The cookies may puff up during baking.
- Cool cookies: Allow the cookies to rest on the hot baking sheet for 5 minutes, then transfer them to a wire rack to cool completely. If any cookies puff excessively, gently flatten them while warm to ensure easier decorating.
- Prepare vanilla icing: In a medium bowl, sift the powdered sugar. Add vanilla extract and start with 1 tablespoon of milk, whisking to combine. Add more milk as necessary to achieve a thick consistency suitable for piping precise lines.
- Color icings: Divide the icing evenly into three small bowls. Tint one with green, one with brown, and one with yellow food dye. Transfer each colored icing into separate piping bags, cutting the tips accordingly—slightly larger for green, small openings for brown and yellow.
- Decorate cookies: Use the green icing with a back-and-forth motion to pipe the Christmas tree shape on each cookie. Use the brown icing to pipe the trunk at the base, and the yellow icing to create a star on top. Optionally, add white nonpareil sprinkles as decorative snow.
Notes
- Flour measurement is critical: spoon and level your flour or weigh it for best results; compacted flour can lead to dry cookies that do not spread.
- If baking at high altitude, increase flour by 1 tablespoon to maintain texture and structure.
- Bring dairy ingredients such as butter and eggs to room temperature by removing them from the fridge 2 hours prior to baking for optimal mixing and dough consistency.
Nutrition
- Serving Size: 1 cookie
- Calories: 130
- Sugar: 12g
- Sodium: 70mg
- Fat: 6g
- Saturated Fat: 3.6g
- Unsaturated Fat: 2g
- Trans Fat: 0g
- Carbohydrates: 18g
- Fiber: 1g
- Protein: 1.5g
- Cholesterol: 25mg


