
If you’re on the hunt for a festive treat that’s as fun to make as it is to eat, you’re going to adore this Christmas Tree Cake Balls Recipe. These adorable bite-sized delights capture all the charm and flavor of Little Debbie’s Christmas Tree Cakes but kick it up a notch with creamy, dreamy coating and sprinkles that scream holiday joy. Trust me, once you try these, they’ll be the star of your holiday parties and snack trays!
Why You’ll Love This Recipe
- Easy and Quick: This recipe comes together in just about 30 minutes of prep with minimal fuss.
- Kid-Friendly Fun: Rolling and decorating cake balls is a great activity to do with the little ones during the holidays.
- Festive Flair: The red drizzle and green sprinkles make these cake balls look just like tiny Christmas trees on a plate.
- Make-Ahead Friendly: You can prepare them ahead of time and keep them chilled or frozen for whenever you need a festive treat.

Ingredients You’ll Need
All the ingredients here work together to give you the perfect balance of creamy, sweet, and crunchy that makes these Christmas Tree Cake Balls absolutely irresistible. Little Debbie Christmas Tree Cakes bring the nostalgic holiday flavor, and cream cheese adds just the right amount of moisture and richness. Don’t skip the candy melts and sprinkles — they’re what turns these into eye-catching festive bites!

- Little Debbie Christmas Tree Cakes: Using two boxes gives plenty of cake base; make sure they’re fresh for the best texture.
- Cream cheese: Softened to room temperature so it blends smoothly without lumps.
- Vanilla almond bark: This melts nicely and hardens quickly to give a smooth coating.
- Red candy melts: For that bright, bold drizzle that adds both flavor and festive color.
- Green sugar sprinkles: The final touch to mimic the look of Christmas tree branches.
Variations
I love mixing things up with this Christmas Tree Cake Balls Recipe — it’s so customizable and forgiving. Whether you want to experiment with different coatings or add a personal twist, these cake balls welcome creativity.
- Chocolate Coating: I once swapped the vanilla almond bark for dark chocolate, and it gave the balls a richer taste that my family adored.
- Nutty Crunch: Adding crushed pecans or walnuts to the mixture or sprinkled on top gives a delightful texture contrast.
- Festive Flavors: Try peppermint extract in place of some cream cheese if you want that cool holiday kick.
- Allergy-Friendly: Use dairy-free cream cheese and vegan candy melts to make these suitable for everyone.
How to Make Christmas Tree Cake Balls Recipe
Step 1: Prep Your Base by Crushing the Christmas Tree Cakes
First things first: line a rimmed baking sheet with parchment paper. This saves you from sticky fingers later. Then, in a large mixing bowl, break up those Little Debbie Christmas Tree Cakes — I like to crumble them up myself for best control, but a food processor works too if you’re short on time. Next, add the softened cream cheese and beat everything together until the mixture is smooth and easy to shape. This step might take a couple of minutes — don’t rush! You want a uniform, pliable dough without lumps.
Step 2: Roll Into Perfectly Sized Balls and Chill
Scoop out the dough with roughly a tablespoon or use a cookie scoop to get even sizes—around 1 to 1.5 inches in diameter. Roll each scoop gently between your palms to form round balls. Place them spaced out on your lined baking sheet. Cover with plastic wrap and pop them into the fridge for at least two hours, or better yet, overnight. This cooling step helps the balls firm up so they dip easier without falling apart.
Step 3: Melt the Vanilla Almond Bark for the Coating
While the balls chill, melt your vanilla almond bark. I do this in short 30-second bursts in the microwave, stirring in between, until it’s silky smooth and lump-free. You want it pourable but not hot — otherwise, your cake balls might start to melt!
Step 4: Dip, Decorate, and Drizzle
Using a fork or dipping tool, carefully lower each chilled cake ball into the melted vanilla almond bark. Give the fork a gentle tap on the side of your bowl to shake off excess coating before setting the dipped balls back on the parchment. Immediately sprinkle the green sugar sprinkles on top so they stick before the coating sets. Once all balls are coated, melt your red candy melts the same way you did the almond bark. Spoon the melted red candy into a piping bag, snip a tiny tip, and drizzle it over the cake balls—this part always feels so festive and fun! Pop them into the fridge again until fully set, about 10 minutes.
Pro Tips for Making Christmas Tree Cake Balls Recipe
- Use Room Temperature Cream Cheese: This avoids lumps and ensures a smooth mixture that’s easy to roll.
- Don’t Skip Chilling: Chilling the balls prevents them from crumbling when dipping and keeps the coating crisp.
- Work Quickly When Dipping: The melted coating hardens as it cools, so dip and decorate efficiently for the best finish.
- Layer Parchment Between Storage: When storing, layer the cake balls between parchment paper to keep them from sticking together.
How to Serve Christmas Tree Cake Balls Recipe

Garnishes
I always stick to the classic green sugar sprinkles because they really nail that Christmas tree vibe. But if you want to get fancy, try edible glitter or tiny nonpareils in gold or red — they add sparkle and make your festive platter pop even more.
Side Dishes
These cake balls pair wonderfully with a hot cup of cocoa or mulled cider. They’re also great alongside other holiday cookies and treats if you’re prepping a dessert buffet for your guests — variety really is the spice of holiday parties!
Creative Ways to Present
For a fun twist, arrange your Christmas Tree Cake Balls on a skewered wooden stick, alternating with fresh cranberries or mint leaves for a festive look. Or, set them up on a tiered cake stand resembling a mini forest of treats — your guests will be impressed without you breaking a sweat!
Make Ahead and Storage
Storing Leftovers
Keep your cake balls in an airtight container in the fridge for up to a week — I like to layer parchment paper between to keep them from sticking. This way, you can grab a festive bite anytime without worrying about stale or soggy treats.
Freezing
If you’re prepping in advance (which I totally recommend), freeze the uncoated cake balls in a single layer on a baking sheet, then transfer them to a sealed freezer bag for up to three months. When you’re ready, thaw them overnight in the fridge before dipping and decorating.
Reheating
Because these are chilled treats, I don’t recommend reheating. Instead, simply let frozen or refrigerated cake balls sit at room temperature for about 10 minutes before serving — this softens them to a perfect texture without melting the coating.
FAQs
-
Can I use other flavors of Little Debbie cakes for this recipe?
Absolutely! While the Christmas Tree Cakes have that classic holiday flavor perfect for this recipe, you can experiment with other Little Debbie cakes like Fudge Rounds or Zebra Cakes for a different twist.
-
What if I don’t have almond bark—can I use chocolate chips?
You can use chocolate chips, but you’ll want to add a little vegetable shortening or coconut oil to help them melt smoothly and set with a nice shine, similar to almond bark.
-
How do I avoid cake balls from cracking or falling apart during dipping?
The key is chilling them well before dipping to firm up the internal mixture. Also, make sure the coating isn’t too hot, as that can cause the balls to break down.
-
Can I make this recipe dairy-free?
Yes! Substitute the cream cheese with a dairy-free alternative and pick dairy-free candy melts or coatings to keep this recipe vegan-friendly.
-
How long do these cake balls last once made?
When stored in an airtight container in the fridge, they stay fresh for about a week. For longer storage, freezing them works well for up to two months.
Final Thoughts
I absolutely love how this Christmas Tree Cake Balls Recipe takes a beloved holiday snack and transforms it into something elegant and bite-sized. It’s the kind of treat that brings out smiles and holiday cheer with very little effort. Whether you’re looking for a fun activity to share with the family or a crowd-pleaser for your next Christmas gathering, I can’t recommend making these enough. So grab those Little Debbie Christmas Tree Cakes, roll up your sleeves, and let’s make some magic happen in the kitchen this season!
Print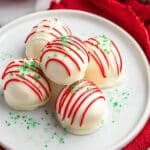
Christmas Tree Cake Balls Recipe
- Prep Time: 30 minutes
- Cook Time: 0 minutes
- Total Time: 2 hours 30 minutes
- Yield: 24 truffles
- Category: Dessert
- Method: No-Cook
- Cuisine: American
Description
Delight in festive Little Debbie Christmas Tree Cake Balls, a no-bake holiday treat combining moist Christmas Tree cakes with creamy cream cheese, coated in smooth vanilla almond bark and decorated with red candy melts and green sugar sprinkles. Perfect for holiday parties or gift-giving.
Ingredients
Main Ingredients
- 10 Little Debbie Christmas Tree Cakes (2 boxes)
- 8 ounces cream cheese, softened
Coating and Decoration
- 16 ounces vanilla almond bark
- 1 cup red candy melts
- Green sugar sprinkles
Instructions
- Prepare the baking sheet: Line a rimmed baking sheet with parchment paper and set it aside for placing the cake balls later.
- Mix cake and cream cheese: In a large mixing bowl, beat together the softened cream cheese and Little Debbie Christmas Tree cakes until fully combined and smooth.
- Form the balls: Scoop out the mixture using a cookie scoop or spoon and roll into 1-inch to 1.5-inch balls. Place the balls on the prepared baking sheet, cover with plastic wrap, and refrigerate for at least 2 hours or overnight to firm up.
- Melt the almond bark: In a microwave-safe bowl, melt the vanilla almond bark in 30-second intervals, stirring thoroughly after each until smooth and completely melted, following package instructions if available.
- Coat the truffles: Using a fork or dipping tool, dip each chilled truffle into the melted almond bark to coat completely. Tap gently on the side of the bowl to remove excess coating and place the coated truffles back onto the lined baking sheet.
- Add sprinkles: Immediately sprinkle each coated truffle with green sugar sprinkles to decorate before the coating sets.
- Melt red candy melts and drizzle: Melt the red candy melts in a microwave-safe bowl using 30-second intervals, stirring between each until smooth. Transfer melted candy to a piping bag or freezer bag with a small cut corner and drizzle over the truffles for a festive touch.
- Set and serve: Allow the truffles to fully set by refrigerating for about 10 minutes before serving or storing.
Notes
- Storage: Store truffles in an airtight container in the refrigerator for up to 1 week. Place parchment or wax paper between layers to prevent sticking. For longer storage, freeze up to 2 months.
- Prep ahead: Truffles can be made ahead and frozen for up to 3 months. Thaw in the refrigerator before dipping in chocolate coating.
- Chocolate alternative: You can also use the chocolate from the Little Debbie Christmas Tree cakes for a unique flavor variation.
Nutrition
- Serving Size: 1 truffle
- Calories: 150
- Sugar: 18g
- Sodium: 120mg
- Fat: 7g
- Saturated Fat: 4g
- Unsaturated Fat: 2g
- Trans Fat: 0g
- Carbohydrates: 22g
- Fiber: 0.5g
- Protein: 2g
- Cholesterol: 15mg

