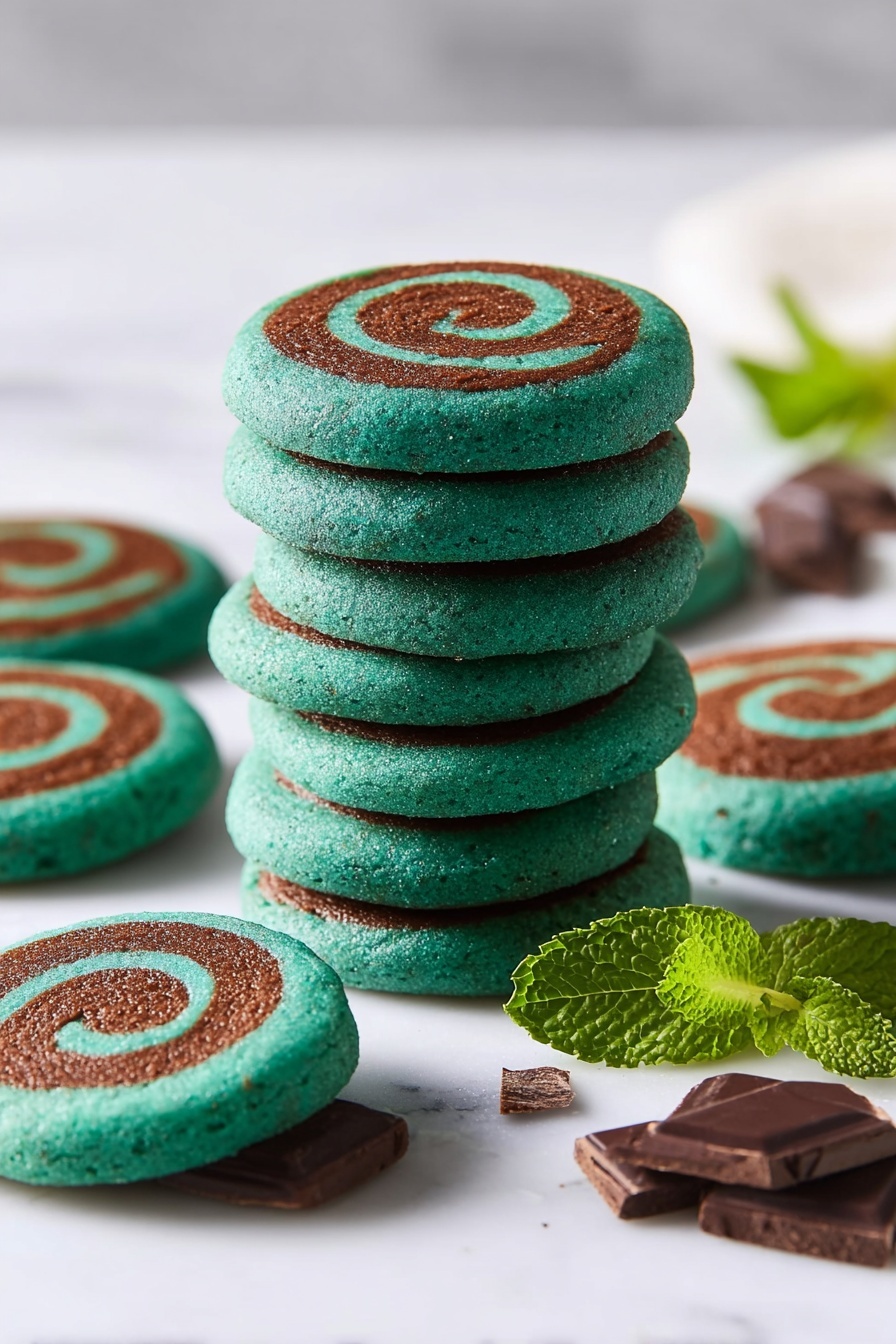
If you’re anything like me and love the refreshing combo of mint and chocolate in cookie form, then you’re going to adore this Chocolate Mint Pinwheel Cookies Recipe. These cookies are not only a feast for your taste buds but also a delightful treat for the eyes with their classic, swirly design. I love how they strike the perfect balance—rich cocoa meets cool peppermint in every bite. Stick with me, and I’ll take you through every step to make sure your batch comes out just as fantastic as mine!
Why You’ll Love This Recipe
- Perfect Balance of Flavors: The combo of peppermint and chocolate in a tender cookie will win over any sweet tooth.
- Eye-Catching Design: The pinwheel spiral looks stunning and festive, making these ideal for sharing or gifting.
- Easy to Customize: You can tweak the mint intensity and colors to match any occasion or preference.
- Make-Ahead Friendly: Dough can be frozen and sliced for fresh bakes anytime without losing quality.

Ingredients You’ll Need
The ingredients list is straightforward, using pantry staples blended with just the right peppermint punch. I always recommend using gel food coloring because it gives vibrant color without altering dough consistency — but I’ll share more on that below!

- All-purpose flour: The base that provides structure to these tender cookies.
- Baking powder: Helps the cookies stay light and not too dense, essential for that delicate texture.
- Fine sea salt: Enhances the flavors — don’t skip or use too coarse a salt.
- Unsalted butter: Use cool room temperature butter for best creaming results and flavor control.
- Granulated sugar: Sweetens while contributing to the cookie’s slight crisp edges.
- Large egg: Bind the dough and add moisture — make sure it’s not cold straight from the fridge.
- Peppermint extract: The star flavor here — pure or high-quality extract works best to avoid medicinal taste.
- Vanilla extract: Balances the mint with a warm undertone.
- Green gel food coloring: Gives the dough that lovely minty hue without making it runny; I love Americolor’s Forest Green for classic Christmas vibes.
- Unsweetened cocoa powder: Adds rich chocolate flavor to one half of the dough; choose a good-quality powder for depth.
- Milk: Just a touch to help mix the cocoa powder smoothly into the dough.
Variations
I love that this Chocolate Mint Pinwheel Cookies Recipe is so flexible — you can easily switch things up to suit your mood or dietary needs. Here are a few ways I’ve personalized it over time and loved the results.
- Less Mint, More Chocolate: If you’re not a huge mint fan, I usually dial back the peppermint extract and amp up the cocoa for a more chocolate-dominant cookie that still has that cool hint.
- Vegan Adaptation: I once swapped butter with vegan margarine and used a flax egg; the texture was a bit different but still enjoyable — just watch the dough firmness as vegan butter can be softer.
- Color Play: For special occasions, I’ve swapped the green gel coloring for red or blue to match holidays or party themes — it’s a fun way to customize without changing the flavor.
- Adding Chocolate Chips: For an extra chocolate punch, sprinkling mini chocolate chips on the chocolate layer before rolling was a big hit with my family.
How to Make Chocolate Mint Pinwheel Cookies Recipe
Step 1: Mix the Dry Ingredients
Start by whisking together the flour, baking powder, and salt in a medium bowl. This ensures the leavening and seasoning are evenly distributed in the dough, which is key for consistent cookies. I always take a minute to sift if my flour is clumpy — it makes the texture smoother.
Step 2: Cream Butter and Sugar, Then Add Flavor
Using an electric mixer, beat the butter and sugar on medium-high speed until the mixture is silky smooth and well combined — about 2 minutes. This aerates the dough, giving your cookies a tender crumb. Then, add the egg, peppermint extract, and vanilla extract, beating until everything’s fully incorporated. Remember to scrape down the sides of your bowl a couple of times; it helps make sure nothing’s missed.
Step 3: Divide and Color the Dough
Divide your dough roughly in half—no need to be super precise. In one half, gradually mix in green gel food coloring, starting with about ¼ teaspoon. I’ve found that adding little bits at a time helps you control the shade and avoid over-coloring. The other half gets the unsweetened cocoa powder and milk mixed in on low speed until just combined, creating that rich chocolate layer.
Step 4: Chill and Shape into Rectangles
Wrap each dough half in plastic wrap and shape into neat rectangles. Refrigerate for about an hour until firm but still pliable—this step is crucial for clean pinwheels. I like to check by pressing gently; if it’s too soft, the rolling gets messy, too hard and it can crack.
Step 5: Roll Out Dough Layers
Place one dough half on parchment over a silicone-lined mat, cover with plastic wrap, and roll into an 8×14-inch rectangle, roughly ¼-inch thick. Repeat for the second dough. Chill them briefly until firm yet workable—about 10 minutes. This double rolling ensures your layers are thin and even for a perfect swirl.
Step 6: Assemble the Pinwheel
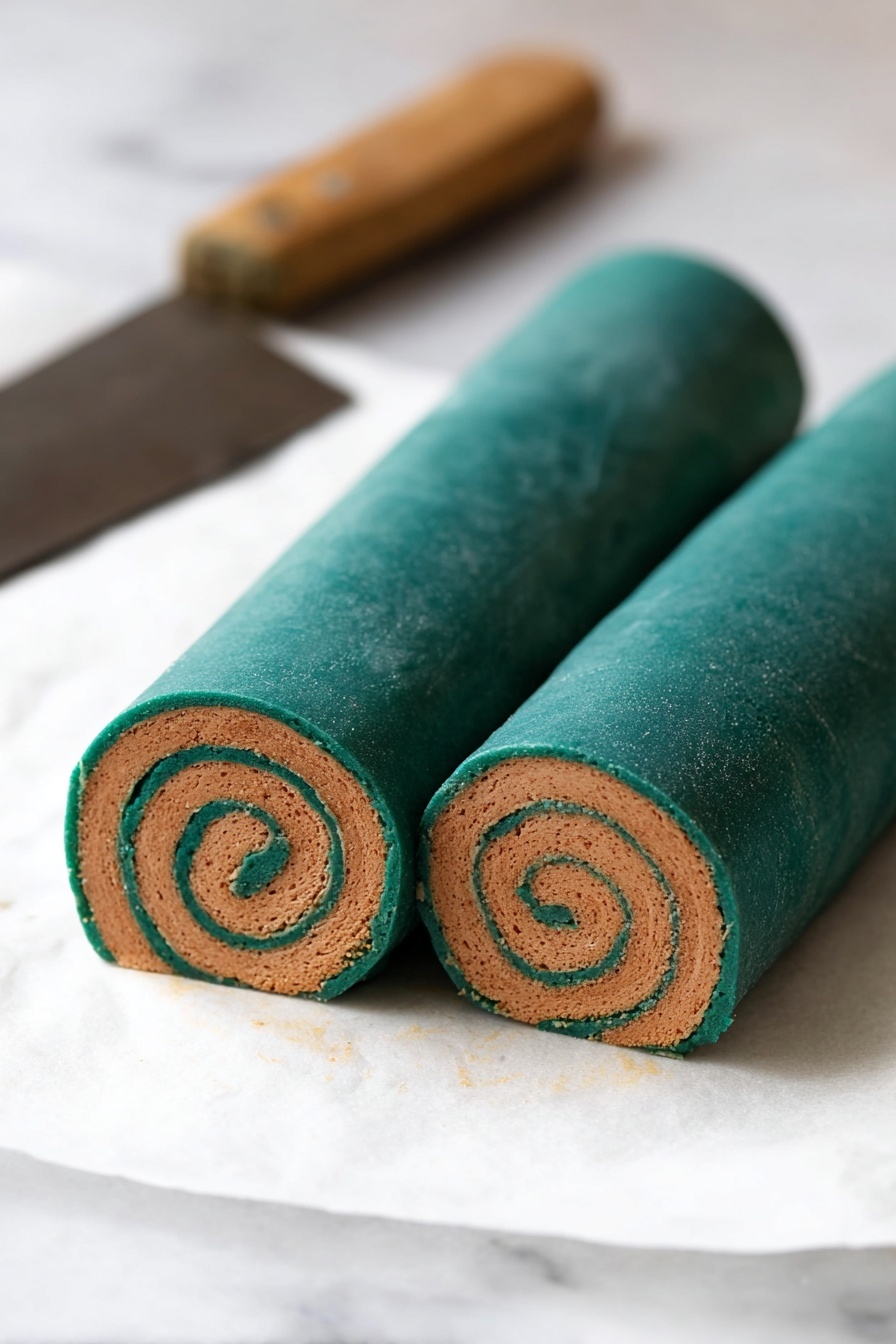
Peel the plastic from the green dough first and place it on fresh parchment. Carefully remove any parchment stuck to it, then layer the chocolate dough on top, matching edges as closely as possible. Press gently to seal layers together, then trim any uneven edges for a clean rectangle. A neat edge really helps the rolling step.
Step 7: Roll Dough Into a Log
Using the parchment under the green dough as your guide, slowly roll the rectangle from the long side into a tight log. Take your time here—it might feel a little tricky at first, but working slowly ensures your pinwheel stays neat and your layers don’t separate. Wrap the log in parchment or plastic wrap and freeze for an hour until firm. Freezing helps you slice clean, even cookies.
Step 8: Slice and Bake
Preheat your oven to 350°F and line baking sheets with parchment. Trim the log’s edges, then slice into ½-inch thick rounds with a sharp knife. Place slices on prepared sheets, leaving 2 inches between each to allow for spreading. If the bottoms look a bit flat from resting, don’t worry—they still bake up nicely rounded. Bake for 10 to 12 minutes until set but not overbaked; a little softness inside is perfect.
Step 9: Cool and Store
Let cookies cool on the baking sheets for a couple of minutes before transferring to wire racks to cool completely. They’ll firm up as they sit. Store in an airtight container at room temperature for up to 5 days or freeze for longer storage. I usually find these last about two days in my house—too irresistible to keep for longer!
Pro Tips for Making Chocolate Mint Pinwheel Cookies Recipe
- Use Gel Food Coloring: I learned this the hard way—liquid food coloring can turn your dough too wet and sticky, but gel gives you vibrant color without mess.
- Chill Dough Just Right: Dough that’s too cold can crack when rolling, too warm and it’s sticky; aim for firm but pliable for easy layers and rolling.
- Roll Slowly and Evenly: Take your time rolling up the dough to avoid gaps or tears in the pinwheel pattern—this step made a huge difference for me!
- Sharp Knife for Slicing: Using a sharp, non-serrated knife helps you make clean bites with crisp edges, so your beautiful swirl shows perfectly.
How to Serve Chocolate Mint Pinwheel Cookies Recipe
Garnishes
I typically skip garnishes because these cookies look amazing on their own, but a light dusting of powdered sugar or a drizzle of melted white chocolate adds a nice touch for special occasions. Plus, crushed peppermint candies sprinkled on top make the mint theme pop visually and taste-wise.
Side Dishes
These pinwheel cookies pair wonderfully with a hot cup of coffee, peppermint tea, or even a cold glass of milk. For holiday gatherings, I love serving them alongside a cheese board with dark chocolate truffles and fresh berries—there’s something so festive about the combo!
Creative Ways to Present
For parties, I like arranging these on a tiered dessert stand or stacking them in clear jars tied with festive ribbons. They also make wonderful edible gifts—wrap a dozen slices in parchment, tie with baker’s twine, and add a sprig of fresh mint or holly for a classic look.
Make Ahead and Storage
Storing Leftovers
After cooling completely, I store leftover Chocolate Mint Pinwheel Cookies in an airtight container at room temp. They stay fresh and slightly soft for about 5 days, but honestly, mine rarely last that long. If you prefer a bit of crispness, placing a slice of bread in the container helps maintain moisture balance.
Freezing
I’m a big fan of freezing the dough log after rolling for quick cookie prep later. When I want fresh cookies, I take out the frozen log, slice, and bake directly—no thawing needed. Baked cookies freeze well too; just wrap tightly and thaw at room temperature before serving.
Reheating
If you want warm cookies, I pop slices right into a 300°F oven for 5 minutes or microwave a baked cookie for about 10-15 seconds. This softens the cookie nicely without drying it out. It’s a little trick I rely on when craving a fresh-baked feel without all the effort.
FAQs
-
Can I make the Chocolate Mint Pinwheel Cookies Recipe without a mixer?
Yes! While using a mixer makes creaming the butter and sugar easier and lighter, you can still make these cookies by hand using a sturdy whisk or wooden spoon. It will take a little more elbow grease, so make sure to beat the butter and sugar well until fluffy before adding the other ingredients.
-
What if I don’t have peppermint extract? Can I substitute?
If you don’t have peppermint extract on hand, you can substitute with a few drops of peppermint oil (be cautious—it’s very concentrated) or even crushed fresh peppermint leaves infused in the melted butter before starting. Still, pure peppermint extract is best for the authentic flavor.
-
How do I get a neater pinwheel shape?
The key is chilling the dough well and rolling it evenly. Make sure your dough rectangles are the same size and thickness before layering. Use parchment paper to help guide you when rolling into the log—rolling slowly and tightly ensures a clean spiral without gaps.
-
Will these cookies spread a lot during baking?
Because of the balanced dough ingredients and chilling steps, these pinwheel cookies hold their shape well with minimal spreading. Just make sure to chill your dough slices before baking and leave enough space between cookies on the baking sheet.
-
Can I make these ahead for parties?
Absolutely! The dough log can be frozen for up to a month, so you can slice and bake fresh cookies whenever you like. You can also bake them ahead and store in airtight containers; just bring to room temperature or warm slightly before serving.
Final Thoughts
This Chocolate Mint Pinwheel Cookies Recipe holds a special place in my kitchen because it combines two classic flavors into an irresistible package that looks as good as it tastes. I remember the first time I pulled these pinwheels out of the oven — the smell of fresh peppermint and cocoa filled the house, and my whole family was hooked immediately. Whether you’re baking for a holiday, a party, or just to treat yourself, these cookies are a guaranteed crowd-pleaser. Trust me, once you try them, this recipe will be one you come back to again and again.
Print
Chocolate Mint Pinwheel Cookies Recipe
- Prep Time: 20 minutes
- Cook Time: 11 minutes
- Total Time: 2 hours 41 minutes
- Yield: 24 cookies
- Category: Dessert
- Method: Baking
- Cuisine: American
Description
These Chocolate Mint Pinwheel Cookies are delightful, festive treats combining rich chocolate flavor with refreshing peppermint essence. Featuring a vibrant green mint dough rolled with a chocolate layer, these visually stunning cookies are perfect for holiday celebrations or anytime you want a sweet minty indulgence. The dough is chilled and rolled into a pinwheel shape, then sliced and baked to tender perfection with a melt-in-your-mouth texture.
Ingredients
Dry Ingredients
- 2 1/4 cups (286 grams) all-purpose flour
- 1/2 teaspoon baking powder
- 1/4 teaspoon fine sea salt
- 3 tablespoons (16 grams) unsweetened cocoa powder
Wet Ingredients
- 2 sticks (226 grams) unsalted butter, at cool room temperature
- 3/4 cup (150 grams) granulated sugar
- 1 large egg, at cool room temperature
- 1 teaspoon peppermint extract
- 1/2 teaspoon vanilla extract
- 1 tablespoon milk
Additional
- ¼-½ teaspoon green gel food coloring
Instructions
- Mix Dry Ingredients: In a medium bowl, whisk together the flour, baking powder, and salt thoroughly to ensure even distribution.
- Cream Butter and Sugar: In a large bowl, beat the butter and sugar on medium-high speed with an electric mixer until smooth and well-combined, about 2 minutes. Scrape the bowl sides and bottom.
- Add Wet Flavorings: Add the egg, peppermint extract, and vanilla extract to the butter mixture and beat until fully combined, scraping down the bowl again.
- Combine Dry and Wet Mixtures: On low speed, gradually add the flour mixture to the wet ingredients until just incorporated to avoid overmixing.
- Divide and Color Dough: Split dough roughly in half. Mix green gel food coloring into one half starting with ¼ teaspoon until evenly colored, adding more if desired. To the other half, add cocoa powder and milk, beating until combined on low speed.
- Shape and Chill Dough: Wrap each half of dough in plastic wrap, forming small rectangles. Refrigerate until firm but pliable, about 1 hour.
- Roll Dough Sheets: On a parchment-lined silicone baking mat, roll each dough half covered in plastic wrap into an 8×14-inch rectangle about 1/4-inch thick. Chill both sheets until firm, around 10 minutes.
- Layer and Roll Log: Remove plastic from green dough and place on fresh parchment. Peel away any attached parchment. Layer chocolate dough on top, pressing edges together to seal and trim for evenness. Using the parchment as a guide, roll the layered dough tightly into a log, wrap tightly, and freeze for 1 hour until firm.
- Prepare for Baking: Line baking sheets with parchment paper. Trim dough edges and slice into 1/2-inch rounds. Place slices 2 inches apart on sheets. Chill dough slices in fridge or freezer while preheating the oven to 350°F.
- Bake Cookies: Bake for 10-12 minutes until set. Let cookies rest on baking sheets for 2 minutes, then transfer to wire racks to cool completely.
- Store Properly: Store cooled cookies in an airtight container at room temperature for up to 5 days or freeze for up to 1 month. Note, cookies soften over time.
Notes
- Use gel food coloring for vibrant and consistent color. Americolor’s Forest Green is ideal for a classic Christmas look, while Americolor Leaf Green offers a brighter tone.
- Wrapping the dough log in parchment paper ensures a smooth exterior when slicing the cookies.
- Dough chill times are important for workability and clean slices of the pinwheel shapes.
Nutrition
- Serving Size: 1 cookie
- Calories: 140
- Sugar: 9g
- Sodium: 65mg
- Fat: 8g
- Saturated Fat: 5g
- Unsaturated Fat: 2.5g
- Trans Fat: 0g
- Carbohydrates: 17g
- Fiber: 1g
- Protein: 2g
- Cholesterol: 30mg


