
If you’re on the hunt for a fun, festive treat that’s both spooky and delicious, you’re in for a real treat with this Chocolate Covered Halloween Oreos Recipe. I absolutely love how easy and impressive these turn out, especially when you want something that’s as cute as it is tasty. Whether you’re throwing a Halloween party or need an easy dessert for trick-or-treaters, this recipe will become your go-to. Stick around—I’ll walk you through all the tips and tricks I’ve learned to nail it every single time!
Why You’ll Love This Recipe
- Super Simple: You only need a handful of ingredients, and no fancy tools are required.
- Kid-Friendly Fun: Decorating these is a blast with the kids or anyone who loves Halloween vibes.
- Perfect for Parties: They look stunning arranged on a platter and vanish fast at any gathering.
- Lasts Well: Keeps fresh and delicious for up to two weeks if stored properly.

Ingredients You’ll Need
Choosing brightly colored candy melts and fun Halloween sprinkles is the secret to really making these stand out. I like to grab candy eyeballs—they add such a playful spooky touch that guests always comment on.
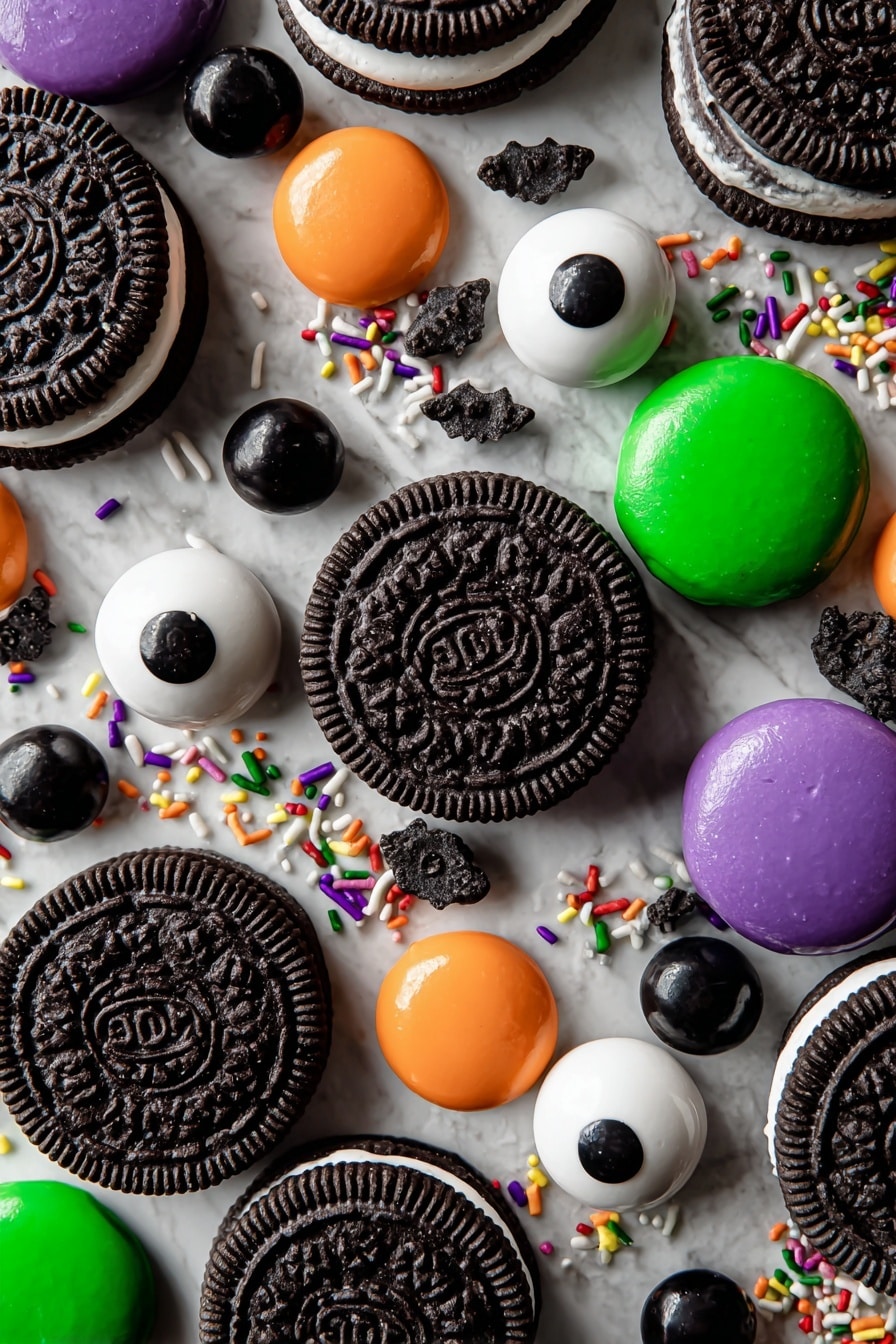
- Chocolate Sandwich Cookies: Classic Oreos work best because their creamy center is perfect under the candy coating.
- White Candy Melts: Melts smoothly and makes a great base for decorating or a clean white canvas.
- Green Candy Melts: Adds that perfect eerie Halloween hue; go for bright green for the best pop.
- Purple Candy Melts: Purple is one of my favorite festive colors—it pairs well with orange and black for Halloween.
- Orange Candy Melts: You want a classic Halloween orange, not too pale or too dark, for the perfect effect.
- Black Candy Melts: Used for piping spooky details and faces—make sure you have a piping bag handy for this step.
- Halloween Sprinkles: Choose a mix of shapes and colors to add texture and fun vibes.
- Candy Eyeball Decorations: These instantly add character and a little creepiness that’s so on theme.
Variations
I love mixing things up sometimes, so here are a few ways you can make this Chocolate Covered Halloween Oreos Recipe totally your own. You’ll find it’s flexible enough to get creative with colors and add-ins.
- Use Dark or Milk Chocolate Melts: For a richer, less sweet coating, swap some of the candy melts for dark or milk chocolate—my family loves this twist.
- Dare to Dye Your Own: You can tint white melts with oil-based food coloring if you want custom shades beyond the standard colors.
- Nutty Twist: Add finely chopped nuts or crushed Halloween candies on top of the wet coating for some crunch.
- Vegan or Allergy-Friendly: Use dairy-free candy melts and check your decorations to keep it allergy-safe.
How to Make Chocolate Covered Halloween Oreos Recipe
Step 1: Prep Your Workspace
Start by lining a cookie sheet with wax paper or a smooth, reusable silicone mat. This is essential because it keeps your coated Oreos from sticking and makes cleanup a breeze. Having everything ready before you melt your candy melts prevents any last-minute messes.
Step 2: Melt the Candy Coating
Pop one color of the candy melts into a microwave-safe glass bowl. Heat at 50% power in 30-second intervals, stirring after each time. This low-heat method avoids burning and keeps the chocolate silky smooth. Once fully melted, you’ll want to work quickly while it’s fluid.
Step 3: Dip and Decorate
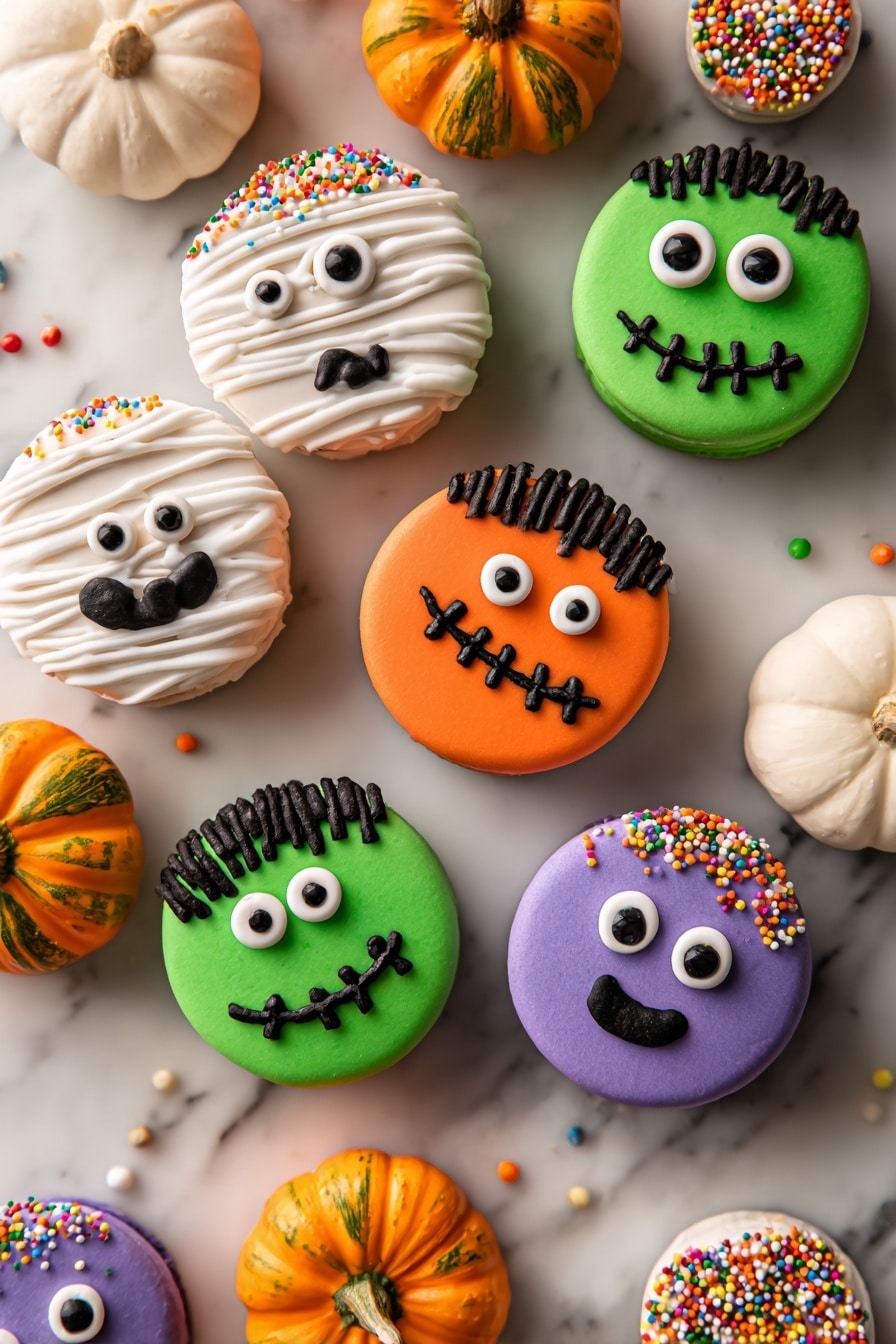
Drop one Oreo into the melted candy and use a spoon to flip it over so it’s totally coated. Then, use a fork to scoop it out and gently shake off excess coating. Place it onto your parchment-lined sheet. Immediately press on Halloween sprinkles or candy eyeballs before the chocolate sets—that’s the secret to making it look festive and fun.
Step 4: Add Black Candy Details
Once the chocolate coating hardens (this usually takes about 15-20 minutes), melt your black candy melts and transfer them into a small piping bag with a tiny tip. Pipe on spooky faces, spider webs, or whatever creepy designs you like. This final touch really brings the Halloween vibe to life!
Step 5: Let Set Completely
Allow your decorated Oreos to set fully at room temperature before moving them. This ensures the coating stays intact and the details don’t smudge. Once set, store them in an airtight container to keep them perfectly fresh for up to two weeks (if they last that long!).
Pro Tips for Making Chocolate Covered Halloween Oreos Recipe
- Temper Your Candy Melts: I learned the hard way that stirring often while melting keeps the candy smooth and shiny, preventing clumps and dullness.
- Use the Right Tools: A fork works wonders for lifting coated Oreos without smudging, and a piping bag with a fine tip makes decorating so much easier.
- Work Fast but Gently: Coat your Oreos and add sprinkles right away before the candy sets—this helps them stick perfectly without mess.
- Store Properly: Avoid humidity or warm spots; I always keep mine in a cool, dry place for best texture and shelf life.
How to Serve Chocolate Covered Halloween Oreos Recipe
Garnishes
I personally love adding a sprinkle mix with little ghosts, bats, and pumpkin shapes—just because they look so festive. Candy eyeballs are my absolute favorite; they add a playful touch that always gets oohs and ahhs. If you want to get fancy, drizzle a little contrasting colored candy melt over the top for extra flair.
Side Dishes
These Chocolate Covered Halloween Oreos pair wonderfully with a cold glass of milk or a warm cup of spiced apple cider. If you’re setting up a Halloween dessert table, I like to serve them alongside pumpkin-shaped sugar cookies or mini caramel apples for a festive variety.
Creative Ways to Present
For a Halloween party, I’ve set these Oreos up standing upright in glass jars with colored cellophane wrapped around for a candy-shop feel. Another favorite is arranging them on a black cake stand with fake spider webs and tiny plastic spiders scattered around—it’s equal parts delicious and spooky. Trust me, your guests will be impressed!
Make Ahead and Storage
Storing Leftovers
Once your Chocolate Covered Halloween Oreos are fully set, store them in a single layer in an airtight container at room temperature. I’ve found this keeps them crisp and prevents any melting or sticking together. Just make sure to avoid humid areas, as moisture can dull the candy shell.
Freezing
If you want to make these ahead and freeze them, wrap the Oreos individually in parchment paper to avoid sticking, then place them in a freezer-safe container. When I’ve done this, they thaw beautifully without losing any of their chocolatey crunch.
Reheating
There’s no reheating needed here! Just let frozen Oreos thaw at room temperature for about 20 minutes before serving. This keeps the candy coating firm but slightly soft—not because they need warming, but because you want the ideal texture.
FAQs
-
What type of cookies work best for this recipe?
I recommend using classic sandwich cookies like Oreos, as their creamy center pairs perfectly with the candy coating and holds up well when dipped. Using thinner or softer cookies may make dipping tricky or cause sogginess.
-
Can I use regular chocolate instead of candy melts?
Yes, you can! Just be careful to temper the chocolate properly so it sets nicely and is less likely to melt at room temperature. Candy melts are easier for beginners because they’re designed to melt smoothly without tempering.
-
How long do Chocolate Covered Halloween Oreos stay fresh?
When stored in an airtight container at room temperature, these treats stay fresh and delicious for up to two weeks. Keep them away from humidity and heat to maintain their crisp candy shell.
-
What’s the best way to avoid messy decorations?
Work quickly after dipping for adding sprinkles or candy eyes while the coating is still wet, and use a small piping tip for detailed black candy melt designs. Practice steady hands and don’t overload sprinkles to keep things tidy.
Final Thoughts
Making this Chocolate Covered Halloween Oreos Recipe always brings me back to those chilly October evenings spent baking with family and friends. It’s such an easy, joyful way to bring a little magic (and a lot of sweetness) to your Halloween celebrations. If you want an impressive yet simple treat that everyone will rave about, give it a whirl—you’ll love how fun and delicious these little edible works of art turn out!
Print
Chocolate Covered Halloween Oreos Recipe
- Prep Time: 30 minutes
- Cook Time: 0 minutes
- Total Time: 30 minutes
- Yield: 40 cookies
- Category: Dessert
- Method: No-Cook
- Cuisine: American
Description
Delightfully festive and fun, these Chocolate Covered Halloween Oreos are perfect for spooky celebrations. Each Oreo is dipped in vibrant colored candy melts and decorated with spooky sprinkles and candy eyeballs, creating a playful treat that’s both easy to make and irresistibly delicious.
Ingredients
Cookies
- 40 chocolate sandwich cookies
Candy Coating
- 6 ounces white candy melts
- 6 ounces green candy melts
- 6 ounces purple candy melts
- 6 ounces orange candy melts
- 2 ounces black candy melts
Decorations
- Halloween sprinkles
- Candy eyeball decorations
Instructions
- Prepare the workspace: Line a cookie sheet with wax paper or a smooth reusable silicone baking sheet to ensure the dipped Oreos don’t stick and can set properly.
- Melt the candy melts: Place one color of candy melts in a microwave-safe glass bowl. Heat at 50% power in 30-second intervals, stirring after each, until the candy melts are fully melted and smooth without lumps.
- Dip the Oreos: Drop one Oreo cookie into the melted candy melts. Using a spoon, carefully flip the Oreo upside down so it is fully coated on all sides.
- Remove excess coating: Use a fork to scoop the coated Oreo from the candy melts. Gently shake or tap the fork to remove excess coating to get an even layer.
- Set the Oreos: Transfer the coated Oreo to the prepared cookie sheet to set and harden slightly before decorating.
- Add decorations: While the candy coating is still wet, immediately add Halloween-themed sprinkles or candy eyeballs to the top of each Oreo for a festive look.
- Pipe additional designs: Once the candy coating has fully hardened, melt the black candy melts. Using a piping bag fitted with a small tip, pipe spooky designs or outlines onto the Oreos for extra detail.
- Storage: Store the fully set chocolate-covered Halloween Oreos in an airtight container at room temperature for up to 2 weeks to maintain freshness.
Notes
- Melting candy melts at half power prevents burning and ensures smooth consistency.
- Immediately decorate while coating is wet to ensure sprinkles and eyeballs stick well.
- Work with one color at a time for better control and presentation.
- Use a silicone baking mat as an eco-friendly alternative to wax paper.
- Allow plenty of time for the candy coating to set completely before piping black designs.
- These treats can also be refrigerated to speed up candy melt hardening but best stored at room temperature after.
Nutrition
- Serving Size: 1 cookie
- Calories: 120
- Sugar: 15g
- Sodium: 90mg
- Fat: 5g
- Saturated Fat: 3g
- Unsaturated Fat: 2g
- Trans Fat: 0g
- Carbohydrates: 20g
- Fiber: 1g
- Protein: 1g
- Cholesterol: 0mg


