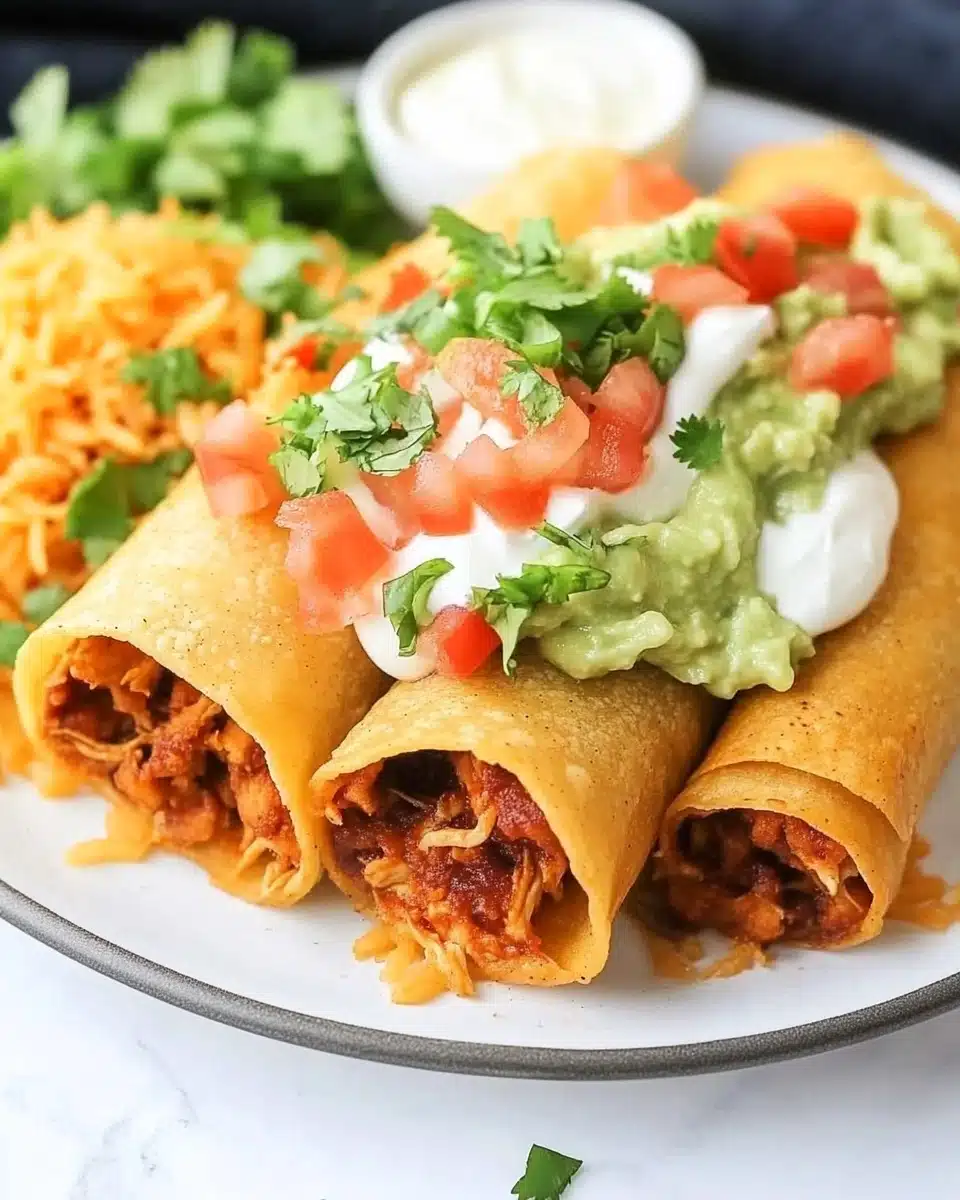
Chicken Flautas are irresistibly crispy rolled tortillas stuffed with flavorful chicken and gooey cheese—every bite is pure comfort and crunch! This recipe guarantees a restaurant-worthy Mexican classic that’s easy to make at home, perfect for busy weeknights or lively gatherings.
Why You’ll Love This Recipe
- Incredible Crunch: Each Chicken Flauta fries up golden and crisp, delivering that satisfying crackle with every bite.
- Quick and Simple: You can whip these up in under 30 minutes, perfect for a spontaneous craving or last-minute guests.
- Crowd-Pleasing Favorite: Flautas are fun to eat and even more fun to pile high with your favorite toppings—everyone can build their perfect bite!
- Customizable Filling: Use chicken, beef, or even veggies to suit everyone at the table—this recipe plays well with whatever’s in your fridge.

Ingredients You’ll Need
These Chicken Flautas come together with a handful of kitchen staples, each chosen for flavor, texture, and that classic Mexican flair. Every ingredient plays a starring role in delivering crispy, cheesy perfection in every roll.
- Vegetable or canola oil: For frying—choose a neutral oil with a high smoke point to achieve that irresistible crunch.
- Shredded cooked chicken: Whether rotisserie or homemade, juicy, tender chicken forms the backbone of your filling.
- Shredded Mexican blend cheese: Melts beautifully for creamy pockets throughout the flautas.
- Salsa: Adds moisture and tangy brightness—choose your favorite brand or a quick homemade version.
- Diced chiles: These bring gentle heat and a boost of flavor to the filling.
- Garlic salt with parsley flakes: This seasoned salt layers in savory depth with a pop of herbiness.
- Pepper: For just a hint of warmth and depth with every bite.
- Flour tortillas (or corn tortillas): They’re your crispy canvas! Both varieties work—flour gives a flexible roll, while corn delivers classic flavor and added crunch.
- Salt: Essential to finish, lending that addictive “just one more” effect to each flauta.
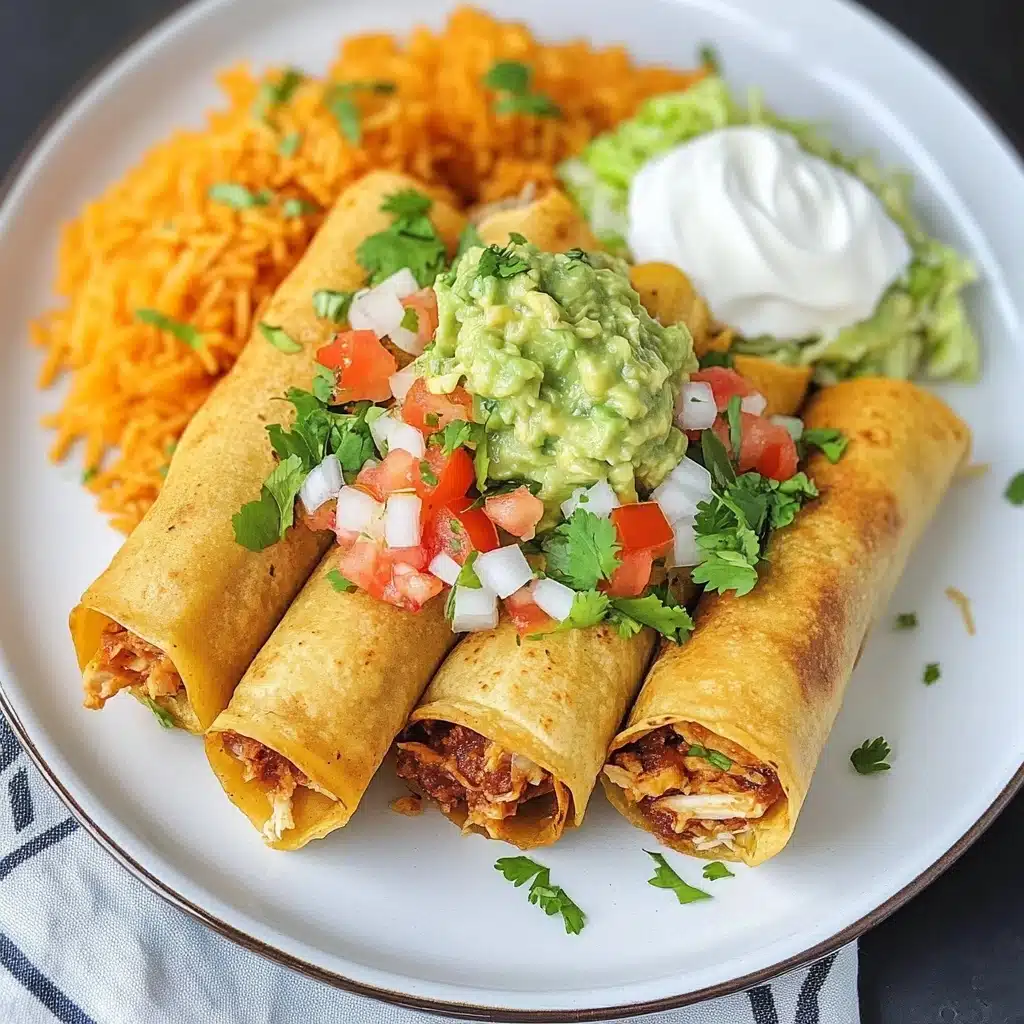
- Toppings (lettuce, tomatoes, green salsa, guacamole, Cilantro Ranch): Toppings take these Chicken Flautas over the top—get creative and pile them high.
Variations
One of the best things about Chicken Flautas is how versatile they are—don’t be afraid to mix things up! Use this recipe as a base and make it your own, swapping ingredients to suit your cravings or dietary needs.
- Beef Flautas: Swap the chicken for shredded beef or brisket for a savory, heartier twist.
- Veggie Flautas: Use sautéed mushrooms, beans, corn, and spinach for a delightful vegetarian version.
- Spicy Kick: Stir in chipotle peppers or a spoonful of jalapeños if you love a little extra heat.
- Baked Flautas: Ditch the oil and bake the rolled flautas at 425°F for 18-20 minutes, brushing lightly with oil for that golden finish.
How to Make Chicken Flautas
Step 1: Mix the Filling
Start by combining the shredded chicken, cheese, salsa, diced chiles, garlic salt, and pepper in a medium bowl. Toss everything together until it’s evenly coated—this mixture should be moist and flavorful, the perfect base for your flautas.
Step 2: Roll and Secure
Lay out your tortillas and, working with about four at a time, spoon the chicken filling down the center of each. Roll them up tightly—think little taquito-style cigars—and secure the seam with a toothpick to help them hold their shape as they fry.
Step 3: Fry to Crispy Perfection
Heat your oil in a deep saucepan to around 375°F. Using tongs, carefully hold each flauta seam-side down in the oil until it sets and holds—then let go, allowing it to cook for about 2 minutes, or until golden and crisp. Transfer to a paper towel–lined plate and sprinkle with salt right away.
Step 4: Keep Warm & Serve
Place the finished Chicken Flautas on a foil-lined baking sheet in a low oven (about 200°F). This trick keeps them piping hot and ultra-crispy while you finish frying the rest. When all are ready, pile them high and serve immediately with your favorite toppings!
Pro Tips for Making Chicken Flautas
- Tortilla Choice: Warm your tortillas slightly before rolling—microwaving them for 15 seconds under a damp towel helps prevent cracks and makes rolling a breeze.
- Oil Temperature Sweet Spot: Monitor your oil’s temperature with a thermometer; too cool and your flautas absorb oil, too hot and they brown too quickly. 375°F is the golden number!
- Batch Frying: Don’t overcrowd the pan—work in batches so each Chicken Flauta has space to fry up evenly and stay crispy.
- Toothpick Trick: Secure each roll snugly with a toothpick to help the flauta hold its shape—just don’t forget to remove them before serving!
How to Serve Chicken Flautas
Garnishes
Chicken Flautas are all about the toppings! A tangle of shredded lettuce adds fresh crunch, while chopped tomatoes and green salsa bring brightness and a pop of color. Don’t forget a drizzle of Cilantro Ranch or a dollop of guacamole—these creamy finishes make every flauta completely irresistible.
Side Dishes
Round out your Chicken Flautas feast with sides like Mexican rice, refried beans, or a tangy corn salad. Simple chips and salsa are always a hit, and a chilled aguas frescas, like horchata or hibiscus, will make it feel like your very own cantina night.
Creative Ways to Present
Flautas shine on a platter piled high and sprinkled with colorful toppings, but try serving them standing upright in a mason jar for a fun party appetizer. Create a “build-your-own flauta bar” for gatherings, setting out a variety of salsas and dips for everyone to customize their plate.
Make Ahead and Storage
Storing Leftovers
Leftover Chicken Flautas keep beautifully! Simply cool them completely, then wrap in foil or an airtight container. They’ll stay crisp and tasty in the fridge for up to 3 days—if they last that long.
Freezing
For longer storage, freeze the cooked, cooled flautas in a single layer until firm, then store in a zip-top bag for up to 2 months. This is a lifesaver for busy weeks and last-minute snacks or meals!
Reheating
To revive their signature crispiness, reheat Chicken Flautas in a 400°F oven or toaster oven for 8-10 minutes. Air fryers also work wonders for a quick, crunchy makeover—just skip the microwave if you want to keep them crispy!
FAQs
-
Can I use rotisserie chicken for Chicken Flautas?
Absolutely! Rotisserie chicken is a time-saving shortcut and brings plenty of flavor and tenderness to the filling. Just shred it and mix it right in—it’s a fantastic swap.
-
Should I use flour or corn tortillas?
Both work beautifully for Chicken Flautas. Flour tortillas are more pliable and easier to roll, while corn tortillas offer a classic, earthy flavor. If you use corn, make sure to warm them so they don’t crack.
-
How do I keep flautas from unrolling while frying?
Secure rolled flautas with a toothpick before frying, and begin by holding them seam-side down in the oil for a few seconds so they seal up and hold their shape.
-
Can I make Chicken Flautas ahead of time?
Definitely! You can assemble and refrigerate uncooked flautas a day in advance—just fry when you’re ready to serve, or bake them straight from the fridge for a convenient, hot meal.
Final Thoughts
Give these Chicken Flautas a try and watch your kitchen fill with big smiles and eager hands reaching for seconds. They’re quick, crave-worthy, and so easy to make your own. You’ll want these on repeat—so gather your favorite toppings and dive right in!
Print
Chicken Flautas Recipe
- Prep Time: 10 minutes
- Cook Time: 15 minutes
- Total Time: 25 minutes
- Yield: 12 flautas
- Category: Appetizer, Main Course
- Method: Frying, Baking
- Cuisine: Mexican
- Diet: Vegan
Description
These Chicken Flautas are a delicious and easy-to-make Mexican dish perfect for a quick weeknight dinner or a fun appetizer for a party. Crispy on the outside and filled with flavorful shredded chicken, cheese, and spices, these flautas are sure to be a crowd-pleaser.
Ingredients
For the Flautas:
- vegetable or canola oil, for frying
- 3 cups shredded cooked chicken, or shredded beef
- 1 cup shredded Mexican blend cheese
- 1/2 cup salsa, store-bought or homemade
- 1 (4-ounce) can diced chiles
- garlic salt with parsley flakes, to taste
- pepper, to taste
- 12 (6-inch) flour tortillas (or corn tortillas)
- salt, to taste
For Toppings:
- shredded lettuce
- chopped tomatoes
- green salsa
- guacamole
- Cilantro Ranch dressing
Instructions
- Preheat the oven: Preheat the oven to the warm setting or about 200°F.
- Heat the oil: Fill a large saucepan with about ¾ inch oil. Heat over medium heat to 375°F.
- Prepare the filling: In a medium bowl, combine chicken, cheese, salsa, diced chiles, garlic salt, and pepper.
- Fill and roll: Working with 4 tortillas at a time, spread a heaping spoonful of chicken filling along the middle of each tortilla. Roll the tortillas tightly around the filling and secure each one with a toothpick.
- Fry the flautas: Using tongs, fry each flauta in hot oil until golden brown, about 2 minutes per side. Season with salt.
- Keep warm: Transfer flautas to a foil-lined baking sheet and keep warm in the oven while cooking the remaining tortillas.
- Serve: Serve warm with desired toppings.
Nutrition
- Serving Size: 1 flauta
- Calories: 220
- Sugar: 2g
- Sodium: 400mg
- Fat: 12g
- Saturated Fat: 4g
- Unsaturated Fat: 6g
- Trans Fat: 0g
- Carbohydrates: 15g
- Fiber: 1g
- Protein: 14g
- Cholesterol: 45mg


