
If you’re anything like me, you know that some days call for comfort food that’s both hearty and fuss-free. That’s why I’m excited to share this Cheesy Ground Beef and Rice Casserole Recipe with you—it’s a fan-freaking-tastic one-pot meal that feels like a warm hug on a plate. Whether you’re feeding a hungry family or want an easy dinner to prep ahead, this casserole checks all the boxes with creamy, cheesy goodness layered over tender rice and savory beef. Let me walk you through everything you need to know to make it perfect every time!
Why You’ll Love This Recipe
- Simplicity: It’s basically dump-and-bake, making weeknight dinners stress-free and quick.
- Customizable: You can tweak the ingredients based on what you have on hand or your flavor preferences.
- Family Favorite: My family goes crazy for this casserole, especially the cheesy topping that melts just right.
- Budget-Friendly: Uses everyday pantry staples and affordable ground beef to keep your grocery bill happy.

Ingredients You’ll Need
When I make this casserole, I like to choose simple, wholesome ingredients that blend beautifully to create that signature creamy texture and savory flavor. Here are the essentials you’ll want to get before diving in, plus a few tips to help you shop smartly.
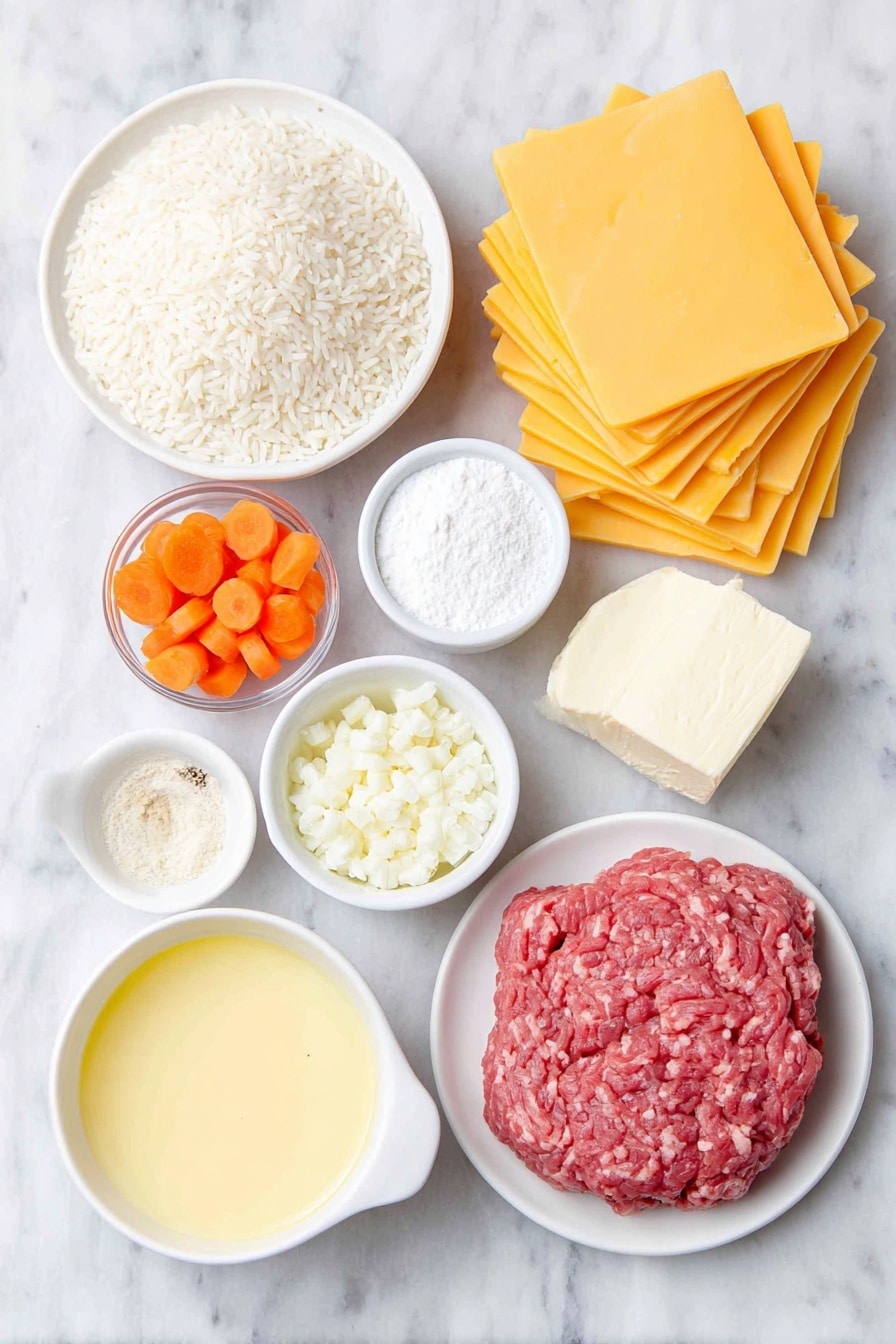
- Cream of Mushroom Soup or Mushroom Gravy: These provide a rich, creamy base—if you want less sodium, try making your own sauce from scratch (more on that later).
- Long Grain White Rice: It cooks nicely during baking, soaking up flavors without turning mushy.
- Ground Beef: Lean or medium-fat, depending on your taste; I prefer 85/15 for juiciness without too much grease.
- Carrots: Sliced carrots add a touch of natural sweetness and nice texture contrast.
- Cheddar or Colby Jack Cheese: Using sliced cheese on top creates that melty, golden finish that makes the dish irresistible.
- Butter, Onion, Garlic, Mushrooms, Flour (for scratch gravy): If you’re going homemade, these ingredients build depth and richness for the sauce.
- Water and Milk: Key liquids for cooking rice and making the sauce creamy.
- Salt and Pepper: Go easy at first—you can always add more after baking.
Variations
I love that this Cheesy Ground Beef and Rice Casserole Recipe is forgiving and open to experimentation. Over the years, I’ve tried a few twists that make it uniquely mine, and you’ll enjoy playing around with the flavors, too!
- Swapping Proteins: Once, I switched ground beef for ground turkey to lighten it up a bit—it worked great with a bit more seasoning added.
- Veggie Boost: Adding bell peppers or peas gives a pop of color and extra nutrition without messing with the core flavors.
- Dairy-Free Option: Use a dairy-free cream soup and vegan cheese slices if you’re avoiding dairy; it still hits that comfort forkful.
- Spice It Up: A pinch of smoked paprika or chili flakes brings a subtle warmth that really wakes up the taste buds.
How to Make Cheesy Ground Beef and Rice Casserole Recipe
Step 1: Prep and Sauté Your Beef
Start by browning your ground beef in a large skillet over medium heat. I like to break it up finely so it cooks evenly and there’s no clumps in the casserole. Season lightly with salt and pepper as it cooks. Once it’s browned and no longer pink, drain any excess fat—this keeps the casserole from getting greasy. Cooking the beef ahead also means it’ll be perfectly tender after baking and packed with flavor.
Step 2: Mix Your Base Ingredients
In a big bowl, combine the uncooked rice, sliced carrots, cooked ground beef, and your choice of sauce—whether that’s cream of mushroom soup, homemade gravy, or mushroom gravy mixed with milk and water. Stir everything gently so the rice gets coated but isn’t smashed. This part is key because you want the rice to absorb all those savory flavors as it bakes.
Step 3: Bake and Let the Magic Happen
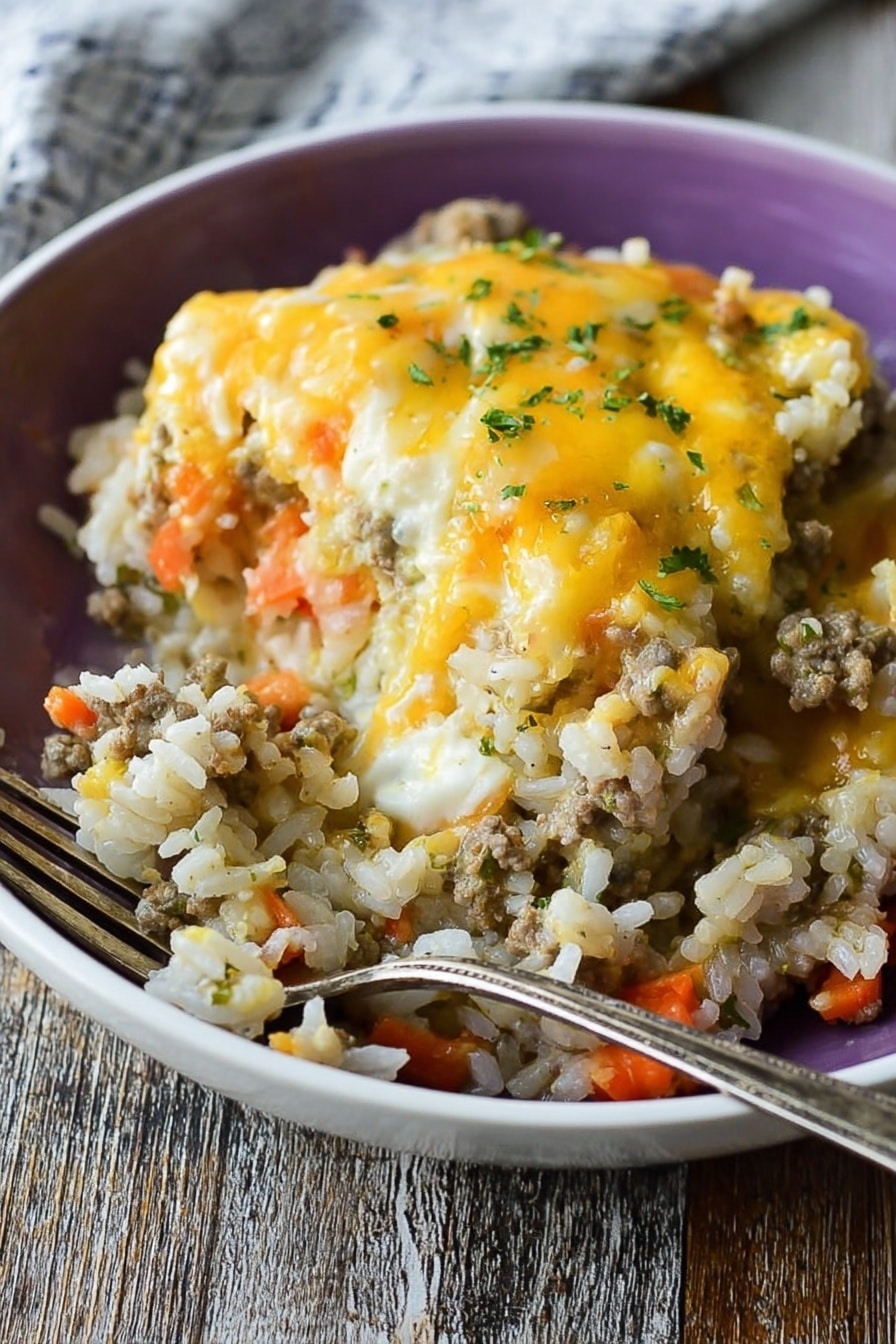
Pour the mixture into a greased 8×9-inch baking dish. Cover with foil if you want a moister casserole or leave it uncovered for a slightly crispy top. Bake at 350°F for about 90 minutes—this lets the rice cook through and the flavors meld perfectly. Halfway through, I sometimes give it a gentle stir to make sure the rice cooks evenly. Once the time’s up, remove the casserole from the oven and get ready for the grand cheesy finale!
Step 4: Add Cheese and Finish Baking
Layer about nine slices of your favorite cheddar or Colby Jack cheese evenly over the hot casserole. Pop it back in the oven for just a few minutes—usually 5 to 7—until the cheese melts and bubbles into glorious golden perfection. This is when your kitchen will start smelling amazing, and you just know dinner’s going to be a hit.
Pro Tips for Making Cheesy Ground Beef and Rice Casserole Recipe
- Rice Coordination: Use long grain white rice for the perfect texture; avoid quick-cook types that can get mushy.
- Cheese Timing: Add cheese near the end of baking so it melts beautifully without drying out.
- Drain Your Beef: This simple step prevents greasy casserole and keeps flavors bright.
- Check Doneness: If rice isn’t quite tender after 90 minutes, cover and bake another 10-15 minutes—patience pays off.
How to Serve Cheesy Ground Beef and Rice Casserole Recipe
Garnishes
Whenever I serve this casserole, I like to sprinkle some chopped fresh parsley or green onions on top. It adds a pop of color and a bit of freshness that cuts through the richness. If you like a little heat, a light dusting of crushed red pepper or a drizzle of hot sauce works wonders.
Side Dishes
Pair this dish with a simple green salad tossed in vinaigrette or some roasted veggies like broccoli or green beans. A crusty bread or garlic bread on the side rounds out the meal perfectly. The casserole is pretty filling on its own, but I love contrasting the creamy rice with crisp or acidic sides.
Creative Ways to Present
For special occasions, I like to bake the casserole in individual ramekins for cute single servings. You could also top each portion with a dollop of sour cream or a slice of avocado. Another fun twist is layering with sautéed mushrooms or caramelized onions under the cheese for an extra flavor boost.
Make Ahead and Storage
Storing Leftovers
Once cooled, I store leftovers in an airtight container in the fridge for up to 3 days. The casserole flavors actually deepen overnight, so it tastes even better the next day. Just be sure to cover it tightly to keep the cheese from drying out.
Freezing
I’ve had great luck freezing this casserole—either before or after baking. Freeze portions or the whole dish in a freezer-safe container or wrapped tightly in foil and plastic wrap. It keeps well for up to 3 months, so it’s perfect for meal prep or busy weeknights.
Reheating
For leftovers, I usually reheat individual portions in the microwave, stirring halfway through to keep things even. If reheating the whole dish, cover with foil and warm in the oven at 350°F until hot and bubbly, about 20-30 minutes. Adding a sprinkle of fresh cheese on top before reheating brings back that melty magic!
FAQs
-
Can I use brown rice instead of white rice in this casserole?
Yes, you can absolutely use brown rice, but keep in mind that it will require a longer baking time and more liquid since brown rice takes longer to cook. To avoid drying out, I recommend pre-cooking the brown rice partially or increasing the water by about 1/2 cup, and baking covered for around 90-100 minutes.
-
What’s the best way to prevent the casserole from becoming soggy?
Make sure to drain excess fat from the cooked ground beef before mixing, and avoid overloading with too much liquid. Also, using long grain white rice helps keep the texture just right. Baking uncovered towards the end helps the top set nicely without sogginess.
-
Can I make this casserole vegetarian?
Definitely! Swap the ground beef for cooked lentils, mushrooms, or a plant-based meat substitute. Use vegetable broth in your sauce, and you’ll still get a hearty, cheesy casserole that satisfies the craving.
-
What cheese works best for this recipe?
I usually stick with cheddar or Colby Jack for their meltability and mild flavor, which complements the beef and rice perfectly. You can also experiment with Monterey Jack or even pepper jack if you want a bit of a kick.
-
Can I prepare this casserole ahead of time?
Yes! You can assemble it a day ahead, cover tightly, and refrigerate. When you’re ready, bake as directed—just add a little extra baking time since the casserole will be cold. Adding cheese near the end keeps it fresh and melty.
Final Thoughts
This Cheesy Ground Beef and Rice Casserole Recipe has become one of my absolute go-tos when I want something comforting, simple, and crowd-pleasing. It’s one of those dishes that feels like home, bringing my family together with every bite. If you’ve never tried it before, I promise you’ll love how easy it is to whip up and how satisfying it is to eat. Give it a try, and I’d bet you’ll be adding it to your rotation just like I have!
Print
Cheesy Ground Beef and Rice Casserole Recipe
- Prep Time: 5 minutes
- Cook Time: 1 hour 30 minutes
- Total Time: 1 hour 35 minutes
- Yield: 8 servings
- Category: Casserole
- Method: Baking
- Cuisine: American
Description
This Cheesy Ground Beef and Rice Casserole is a comforting, hearty dish perfect for family dinners. Featuring tender ground beef, long grain rice, and sliced carrots baked in a creamy mushroom sauce and topped with melted cheddar or Colby Jack cheese, this recipe offers three variations: Quick, Semi-Homemade, and From Scratch, each delivering rich flavors with simple ingredients and an easy bake method.
Ingredients
Quick Recipe
- 1 Can Cream of Mushroom Soup
- 1 Cup Long Grain White Rice, uncooked
- 2 Cups Water
- 1 Cup Carrots, sliced
- 1/2-1 Pound Ground Beef, cooked
- About 9 slices Cheddar or Colby Jack Cheese
Semi Homemade
- 1 Cup Long Grain White Rice, uncooked
- 2 Cups Water
- 1/2 to 1 Pound Ground Beef, cooked
- 1 Cup Carrots, sliced
- 13.9 ounces Pacific Foods Mushroom Gravy
- 1/2 Cup Milk
- Colby Jack or Medium Cheddar Cheese, for topping
From Scratch
- 3 Tablespoons Unsalted Butter
- 1/4 Cup Onion, minced
- 1 Clove Garlic, minced
- 1/2 Cup White Button Mushrooms, minced
- 3 Tablespoons Flour
- 1/2 Cup Cream
- 1/2 Cup Chicken Broth
- 1/4 teaspoon Freshly Ground Black Pepper
- Salt, to taste
- 2 Cups Water
- 1/2-1 Pound Ground Beef, cooked
- 1 Cup Carrots, sliced
- 1 Cup Long Grain White Rice, uncooked
- About 9 slices Cheddar or Colby Jack Cheese
Instructions
- Prepare for baking: Preheat your oven to 350 degrees Fahrenheit and lightly grease or spray an 8×9″ baking dish with nonstick spray.
- Quick Recipe – Mix ingredients: In a mixing bowl, combine the cream of mushroom soup, uncooked rice, water, sliced carrots, and cooked ground beef. Stir well until all ingredients are evenly distributed.
- Quick Recipe – Bake: Pour the mixture into the prepared baking dish and bake uncovered in the preheated oven for 90 minutes. After baking, arrange about 9 slices of cheddar or Colby Jack cheese on top and return to the oven for a few more minutes until the cheese is melted.
- Semi Homemade – Mix liquid base: Whisk together 2 cups water, mushroom gravy, and 1/2 cup milk until smooth.
- Semi Homemade – Combine ingredients: In a large bowl, add the uncooked rice, cooked ground beef, sliced carrots and the mushroom gravy mixture. Stir until everything is combined evenly.
- Semi Homemade – Bake: Transfer the mixture into the greased 8×9″ baking dish and bake uncovered at 350 degrees Fahrenheit for 90 minutes. Then top with Colby Jack or medium cheddar cheese slices and bake a couple more minutes until melted.
- From Scratch – Make mushroom cream sauce: In a medium pan over medium heat, melt the butter. Add minced onion, garlic and mushrooms and sauté until softened. Whisk in the flour and cook for 30-60 seconds to form a roux.
- From Scratch – Add liquids to sauce: Gradually whisk in cream and chicken broth. Cook, stirring frequently, until the sauce thickens. Season with freshly ground black pepper and salt to taste, then remove from heat.
- From Scratch – Combine casserole: In the prepared baking dish, combine the cream sauce, uncooked rice, water, cooked ground beef, and sliced carrots. Stir until all ingredients are evenly mixed.
- From Scratch – Bake: Bake the casserole uncovered at 350 degrees Fahrenheit for 90 minutes. After this time, top with cheddar or Colby Jack cheese slices and return to the oven for a few more minutes until the cheese melts and bubbles.
Notes
- You can adjust the amount of ground beef from 1/2 to 1 pound depending on preference and portion size.
- Use long grain white rice uncooked for best texture as it cooks thoroughly during baking.
- For a creamier flavor, opt for the From Scratch version using fresh ingredients and homemade mushroom cream sauce.
- Ensure the baking dish is large enough (8×9 inches) to avoid overflow and to cook evenly.
- Allow the casserole to rest 5-10 minutes after baking for easier serving.
- Substitute cheddar cheese with Colby Jack or medium cheddar for varied flavor profiles.
- If you prefer a thicker sauce in the quick and semi homemade versions, reduce water by 1/4 cup.
Nutrition
- Serving Size: 1 cup
- Calories: 350
- Sugar: 3g
- Sodium: 450mg
- Fat: 16g
- Saturated Fat: 8g
- Unsaturated Fat: 6g
- Trans Fat: 0g
- Carbohydrates: 30g
- Fiber: 2g
- Protein: 20g
- Cholesterol: 65mg


