
If you’re looking for a fun and festive treat that’s easy to whip up and sure to wow your guests, I’ve got just the thing for you! This Candy Corn Layered Pudding Dessert Cups Recipe is a colorful, creamy delight that’s perfect for fall parties, Halloween gatherings, or anytime you want a sweet and playful dessert. I absolutely love how this turns out — it’s simple, quick, and the layered look makes it extra special without any fuss. Stick around because I’m sharing all my tips to make sure your pudding cups come out perfect every time.
Why You’ll Love This Recipe
- Super Easy to Make: Combines instant pudding with simple layering—no baking, no stress.
- Perfect for Parties: The candy corn colors and cute presentation make these cups real eye-catchers.
- Customizable Flavors: You can easily tweak colors or toppings to fit any occasion.
- Family Favorite: My crew goes crazy for these during Halloween season and beyond.

Ingredients You’ll Need
These ingredients work beautifully together to create those classic candy corn colors and that creamy, dreamy pudding texture. When shopping, look for good-quality vanilla pudding mix and fresh Cool Whip or homemade whipped cream for that light, fluffy top layer.
- Vanilla Instant Pudding and Pie Filling Boxes: I use vanilla because it’s the perfect neutral base that lets the colors and candy corn shine.
- Cold Milk: Important for getting the pudding to set just right—make sure it’s well chilled.
- Orange Food Coloring: Adds that iconic candy corn hue—start with a few drops and adjust to your favorite shade.
- Cool Whip: I find Cool Whip super convenient, but homemade whipped cream works wonderfully if you prefer a fresh touch.
- Candy Corn: Of course, for that festive decoration and a sweet little crunch on top.
- Orange and Yellow Colored Sugars: Optional but adds extra sparkle and complements the candy corn theme perfectly.
Variations
I love mixing things up sometimes, and this Candy Corn Layered Pudding Dessert Cups Recipe is so versatile that you can really make it your own. Whether you want to swap flavors or change up the colors, I encourage you to get creative!
- Flavor Swaps: Once, I tried using butterscotch pudding instead of vanilla for the base, and it gave a deeper, richer flavor that my family adored.
- Dairy-Free Version: I’ve swapped out regular milk for almond milk and used coconut whipped cream — if you have friends with dietary needs, this works great!
- Color Play: You can use yellow and white food coloring to enhance the layers or even add green for a twist around St. Patrick’s Day.
How to Make Candy Corn Layered Pudding Dessert Cups Recipe
Step 1: Whisk Up Your Vanilla Pudding Base
Start by combining both pudding packages and the cold milk in a large bowl. I like to whisk gently but thoroughly to avoid lumps — trust me, nothing spoils a pudding cup like clumps. Follow the package instructions carefully, because the pudding needs to be just right to set properly. Let it rest for a couple of minutes while you prep your bowls for coloring.
Step 2: Divide and Color the Pudding
Divide your pudding so you have about one-third in one bowl and two-thirds in another. This ratio is key to getting that distinct candy corn layered look. Take the bowl with two-thirds of the pudding and add five drops of orange food coloring, one drop at a time. Stir between drops so you don’t overdo it — you’ll want a nice, vibrant orange but not too dark. I discovered this trick after accidentally making one batch too bright and another too pale!
Step 3: Layer Your Pudding Cups
Grab ten plastic dessert cups (or any clear cups you like) and start by filling each about one-third full with the lighter-colored vanilla pudding. Then carefully spoon on about twice as much of your orange pudding to create the classic two-tone candy corn effect. Leave a little space at the top for the whipped topping — this layering looks best when clean and even, so take your time here. A handy tip: use a small spoon or piping bag for neater layers!
Step 4: Top with Cool Whip and Decorate
Finish off each cup with a generous dollop of Cool Whip or your homemade whipped cream. This final layer adds a lightness that balances the creamy pudding below. Then comes the fun part — decorating! Sprinkle candy corn pieces and a little orange and yellow colored sugar on top for that perfect festive look. My family goes crazy for this step, and it’s a fun little moment to share if you’re making these with kids.
Pro Tips for Making Candy Corn Layered Pudding Dessert Cups Recipe
- Chill Your Milk: Using milk straight from the fridge helps the pudding set faster and thicker.
- Layer With Care: To keep layers neat, spoon the pudding gently and avoid mixing colors by using a spatula or a piping bag.
- Customize Colors Cautiously: Add food coloring a drop at a time to get the perfect candy corn orange — less is more!
- Avoid Overfilling: Leave space at the top for whipped topping — it not only looks better but prevents spills.
How to Serve Candy Corn Layered Pudding Dessert Cups Recipe
Garnishes
I usually stick with classic candy corn as the garnish because it’s thematic and adds a delightful crunch contrast to the creamy pudding. Sometimes I sprinkle extra colored sugars on top for sparkle or even some mini marshmallows for added texture. Fresh mint leaves can add a surprising pop of freshness and color if you want to mix it up.
Side Dishes
These pudding cups shine best as the sweet finale, but I like pairing them with salty snacks like pretzel sticks or caramel popcorn to balance the sweetness. For a party dessert table, throwing in some roasted nuts or cheese platters can create a nice variety around these cups.
Creative Ways to Present
For special occasions, I’ve served these pudding cups in mini mason jars or festive clear shot glasses for a more elegant touch. Adding themed toothpicks or tiny edible flowers on top really makes them stand out. Another fun idea is to add a colored straw or little spoons tied with ribbon — it’s those small details that guests remember!
Make Ahead and Storage
Storing Leftovers
These dessert cups keep really well in the fridge for up to 2 days. I cover each cup tightly with plastic wrap to prevent them from drying out or absorbing fridge odors. I’ve found that the layers hold up nicely, and the whipped topping stays fluffy if covered well.
Freezing
I’ve tried freezing these once or twice, but pudding texture can change when frozen and thawed. If you want to freeze leftovers, I recommend freezing before adding the Cool Whip topping. Thaw overnight in the fridge and add the whipped cream fresh after thawing.
Reheating
This dessert is meant to be served cold, so reheating isn’t really necessary or recommended. If you want softer pudding, just let the cups sit out at room temperature for 15-20 minutes before eating. That usually does the trick to take the chill off without losing the structure.
FAQs
-
Can I use homemade pudding instead of instant for this Candy Corn Layered Pudding Dessert Cups Recipe?
Absolutely! Homemade pudding will work just fine and can add a rich, fresh flavor. Just keep in mind that homemade pudding might be a bit softer, so be gentle when layering to maintain the distinct candy corn layers.
-
How long does this dessert last in the refrigerator?
The pudding cups keep their best texture and flavor for up to 2 days when stored in airtight containers. Beyond that, the whipped topping might start to break down and the pudding layers can lose their firmness.
-
Can I make these ahead for a party?
Yes! I often make them a few hours before guests arrive, just cover securely and keep refrigerated. Just add the candy corn decorations shortly before serving to keep them looking fresh.
-
What’s the best way to get smooth, lump-free pudding?
Use cold milk straight from the fridge and whisk the pudding mix and milk slowly but thoroughly. Pausing to stir helps break any lumps early. Also, don’t rush the setting time; letting the pudding sit in the fridge helps it firm up perfectly smooth.
Final Thoughts
This Candy Corn Layered Pudding Dessert Cups Recipe has become a staple for me whenever I want something festive but fuss-free. It’s such a joy to make and even more fun to eat — especially with kids who love the bright colors and sweet layers. I hope you give this recipe a try because it really brings smiles around our table, and I know you’ll enjoy it just as much as my family does. Go ahead, have fun with it, and let me know how your pudding cups turn out!
Print
Candy Corn Layered Pudding Dessert Cups Recipe
- Prep Time: 15 minutes
- Cook Time: 0 minutes
- Total Time: 25 minutes
- Yield: 10 servings
- Category: Dessert
- Method: No-Cook
- Cuisine: American
Description
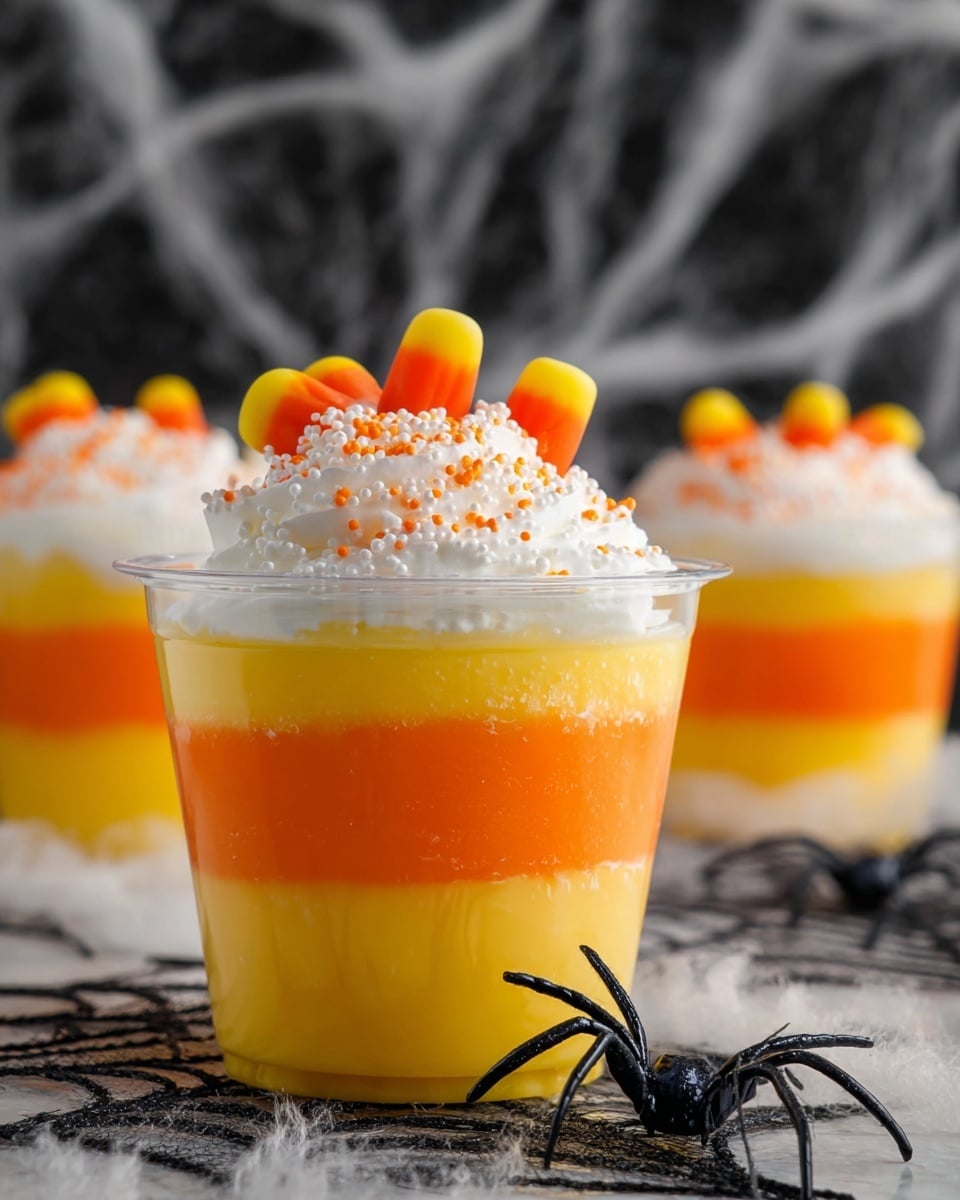
This Candy Corn Layered Pudding Dessert Cups recipe creates a festive and colorful treat perfect for Halloween or any autumn celebration. Layers of creamy vanilla pudding and orange-tinted pudding topped with whipped cream and decorated with candy corn and colored sugars make for a fun and visually appealing dessert that’s easy to assemble and delightfully sweet.
Ingredients
Pudding Layers
- 2 boxes (5.1 oz each) Vanilla Instant Pudding and Pie Filling
- 6 cups cold milk
- Orange food coloring, about 5 drops
Topping and Decoration
- 8 oz Cool Whip, thawed
- Candy corn, for decoration
- Orange and yellow colored sugars, for decoration
Instructions
- Prepare the pudding: In a large bowl, combine both packages of vanilla instant pudding with 6 cups of cold milk. Whisk according to the package directions (make it pudding consistency, not pie filling) until thickened.
- Separate pudding: Divide the prepared pudding into two bowls, placing 1/3 of the pudding in one bowl and 2/3 in the other.
- Color the larger portion: Add orange food coloring drops one at a time into the bowl containing 2/3 of the pudding. Stir well after each drop and stop when the desired orange shade is reached.
- Layer the pudding in cups: Take 10 plastic cups and fill each about 1/3 full with the plain vanilla pudding. Then add the orange-colored pudding on top, roughly double the vanilla amount, creating a two-layer effect with 1/3 yellow vanilla and 2/3 orange pudding. Leave some space on top for the whipped cream.
- Add the topping: Spoon or pipe a generous amount of thawed Cool Whip on top of the pudding layers in each cup.
- Decorate: Garnish each cup with candy corn pieces and sprinkle orange and yellow colored sugars over the whipped topping for an eye-catching, festive finish.
Notes
- Use instant pudding mix for quick preparation; do not use the pie filling instructions.
- For a homemade whipped topping, you can whip heavy cream with sugar until stiff peaks form as an alternative to Cool Whip.
- Chill the assembled dessert cups for at least 30 minutes before serving to enhance texture and flavor.
- Plastic dessert cups are recommended for easy layering, but glass cups can also be used.
- Adjust the amount of food coloring according to your preferred intensity of orange color.
Nutrition
- Serving Size: 1 cup
- Calories: 190
- Sugar: 22g
- Sodium: 120mg
- Fat: 7g
- Saturated Fat: 4.5g
- Unsaturated Fat: 2g
- Trans Fat: 0g
- Carbohydrates: 29g
- Fiber: 0g
- Protein: 2g
- Cholesterol: 10mg


