
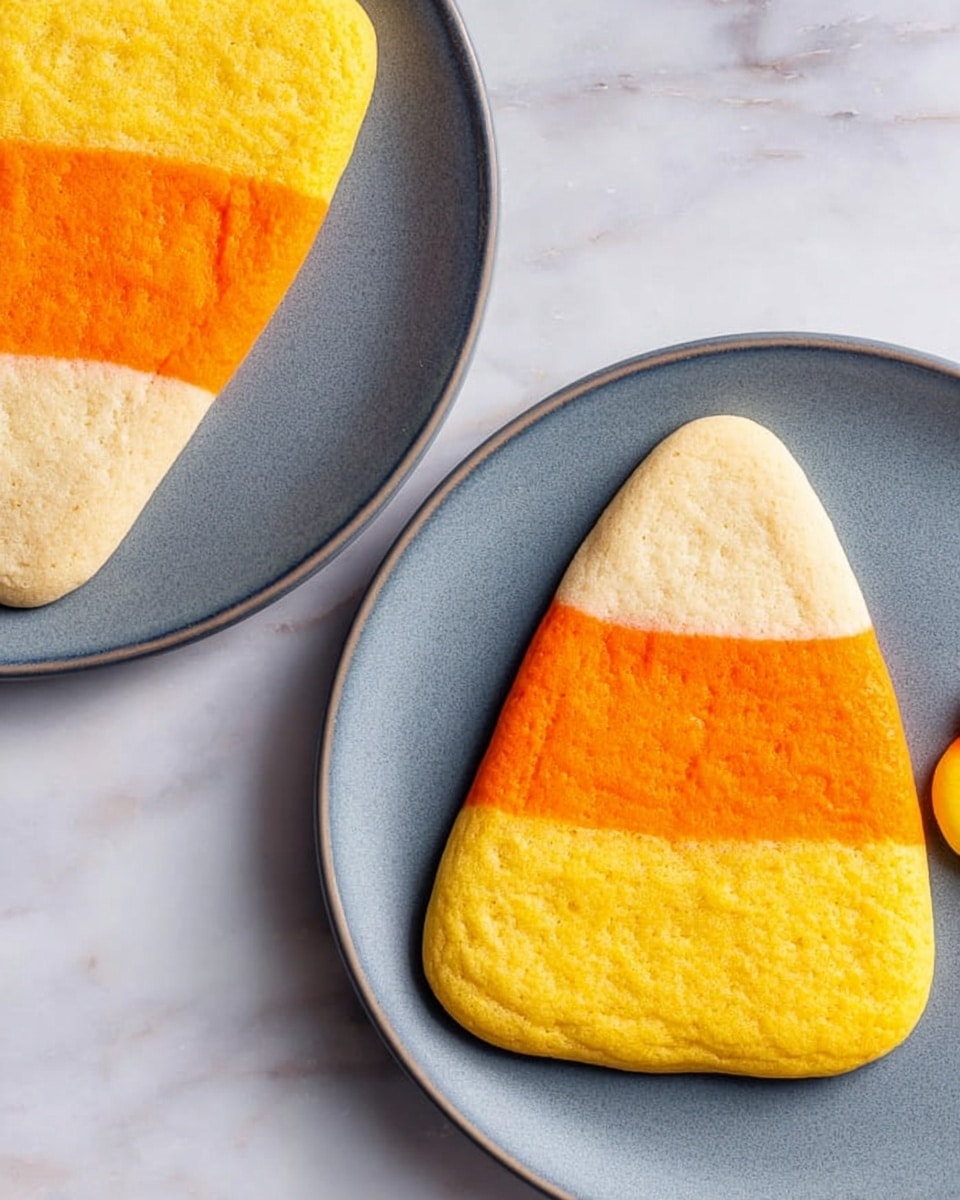
If you’re hunting for a fun, nostalgic, and totally delightful treat this season, I can’t recommend this Candy Corn Cookies Recipe enough. These cookies have all the cheerful colors of the classic fall favorite, candy corn, but in a soft, buttery cookie that melts in your mouth. When I first tried this recipe, I was surprised at just how easy it is to get those vibrant layers that look just like candy corn—plus, they taste incredible. Stick with me, and I’ll walk you through the whole process so you can impress your friends and family with these cute, colorful cookies that are perfect for fall gatherings or Halloween parties.
Why You’ll Love This Recipe
- Vibrant, Eye-Catching Look: The three-layer dough perfectly mimics candy corn’s signature colors for a festive feel.
- Deliciously Buttery Texture: These cookies have a soft crumb with just the right amount of sweetness that everyone loves.
- Simple Technique: You don’t need fancy tools—just basic ingredients and some chill time to get that perfect shape.
- Perfect for Parties: These cookies are showstoppers on any cookie platter and always get compliments.

Ingredients You’ll Need
This Candy Corn Cookies Recipe uses simple pantry staples, but the real magic comes from dividing the dough and tinting the sections to create that iconic layered look. Make sure to use a good quality butter and a reliable paste food coloring for the best results.
- Butter: Softened butter creams beautifully with sugar, giving the cookies their rich, tender texture.
- Sugar: Gives the perfect amount of sweetness without overpowering.
- Vanilla extract: Adds a warm, inviting flavor that complements the buttery dough.
- All-purpose flour: The backbone of your cookie dough; make sure it’s measured well to avoid dry or dense cookies.
- Baking soda: Helps the cookies rise slightly for a soft, tender bite.
- Salt: Balances sweetness and enhances flavors.
- Yellow and orange paste food coloring: I prefer paste over liquid for vibrant, true colors without watering down the dough.
Variations
I’ve played around with this Candy Corn Cookies Recipe in lots of ways, and you can totally get creative based on what you have or your flavor preferences. Feel free to experiment with add-ins or tweak the colors to make it your own!
- Gluten-Free Version: I swapped in a gluten-free flour blend once, and while the texture was a bit different, the cookies still came out tasty and festive.
- Flavor Enhancements: Adding a pinch of cinnamon or nutmeg can give the cookies a warm fall twist that my family really enjoyed.
- Color Variations: If you want to mix it up, try using pastel colors or add a bit of green for a fun Halloween twist.
- Chocolate Chip Addition: For a sweeter surprise, sneak in some mini chocolate chips into the plain dough portion—it adds a delicious bite.
How to Make Candy Corn Cookies Recipe
Step 1: Cream Butter and Sugar Until Fluffy
This is where the magic starts. Use softened butter—not melted—to get that light, fluffy texture when creamed with sugar. I usually set a timer and beat it for about 5 to 7 minutes with my stand mixer, scraping the bowl down a couple of times. You’ll know it’s ready when the mixture looks pale and airy. This step really helps make the cookies tender and soft.
Step 2: Mix Dry Ingredients and Combine
In a separate bowl, whisk together the flour, baking soda, and salt. Gradually add this dry mixture to your creamed butter and sugar, mixing slowly to avoid a floury mess. Don’t overmix here; just combine until you don’t see dry streaks. The dough might feel a bit stiff—that’s okay, we want it that way for shaping.
Step 3: Divide and Color Your Dough
Here’s where the recipe gets fun. Divide your dough in half first. Tint one half yellow using your yellow paste food coloring. Then take the other half and split it into two parts — about two-thirds and one-third. Color the larger portion orange and leave the smaller part plain, which will become the white part of your candy corn cookie. Pro tip: use gloves or a spoon to mix in the coloring so your hands don’t end up looking like a Halloween decoration.
Step 4: Shape Layered Logs
Roll each colored dough portion into two 8-inch logs. Flatten the tops a bit and gently press the sides in at a slight angle to start getting that candy corn shape. Place the orange logs atop the yellow logs and gently push the sides in again to form the triangular shape, then add the plain dough logs on top with a slightly rounded top layer. Wrap them tightly in plastic wrap and refrigerate for about 4 hours or until firm enough to slice cleanly.
Step 5: Slice and Bake
Preheat your oven to 350°F. Unwrap your layered logs and slice them into 1/4-inch thick cookies. Place the slices about 2 inches apart on ungreased baking sheets—these cookies don’t spread much, so spacing mostly helps with even baking. Bake for 10 to 12 minutes until the cookies are set but not browned. Let them cool on the sheet for a few minutes, then transfer to wire racks. The smell at this point is utterly irresistible.
Pro Tips for Making Candy Corn Cookies Recipe
- Use Paste Food Coloring: It gives you vibrant colors without loosening the dough, which is key for clean cookie slices.
- Chill the Dough Thoroughly: I learned the hard way that if the logs aren’t firm, the slices get squished and lose their shape.
- Keep Dough Portions Even: More uniform logs mean your candy corn shapes look consistent and professional.
- Watch Baking Time Closely: Taking cookies out too late can dull the colors and make them too hard—remove as soon as they’re set.
How to Serve Candy Corn Cookies Recipe
Garnishes
I usually keep these cookies simple, but a light dusting of powdered sugar or a drizzle of white chocolate works beautifully if you want to dress them up. Sometimes, for a festive touch, I sprinkle some edible gold glitter or colored sugar crystals on top before baking—it adds a little sparkle that kids love.
Side Dishes
Since these cookies are rich and buttery, I like to serve them alongside a cup of hot apple cider or pumpkin spice latte for the full fall vibe. They also make a great sweet treat after a savory dinner like chili or roasted veggies.
Creative Ways to Present
For Halloween parties, I arrange these cookies in a circle or a candy corn shape on a bright orange platter. Another fun idea is to skewer the slices onto colorful sticks for candy corn cookie pops—these are always a hit at kid’s parties and easy to grab and go.
Make Ahead and Storage
Storing Leftovers
I store leftover cookies in an airtight container at room temperature. They usually stay fresh and soft for about 3 to 4 days. If you live in a humid area, popping them in the fridge will help keep them from getting too sticky.
Freezing
You can freeze the dough logs before slicing or freeze the baked cookies. I like freezing the unbaked logs because when I’m ready to bake, I just slice and bake straight from frozen—adding a minute or two to the bake time.
Reheating
If you want to refresh the cookies after a day or two, a quick 10-second zap in the microwave or warming them in a 300°F oven for 3-4 minutes brings back that fresh-baked softness beautifully.
FAQs
-
Can I make this Candy Corn Cookies Recipe without food coloring?
Yes, but the signature candy corn look depends entirely on the yellow and orange layers. Without color, it’ll just look like a layered sugar cookie. If you prefer a more natural approach, you can experiment with turmeric for yellow and carrot juice or paprika powder for a subtle orange tint, but results will vary.
-
How long should I chill the dough logs before slicing?
A minimum of 4 hours in the refrigerator is ideal to firm up the dough for clean slicing. If you’re in a hurry, you can freeze them for 30-60 minutes, but longer chill times help maintain shape and layering better.
-
Can I bake these on parchment paper or a silicone mat?
Absolutely! Baking on parchment paper or silicone mats prevents sticking and makes cleanup easier. Just adjust your baking time slightly if needed, watching closely so they don’t overbake.
-
What’s the best way to store these cookies if I want them soft?
Store your cookies in an airtight container at room temperature with a slice of bread inside. The bread helps keep the cookies soft by absorbing excess moisture and releasing it slowly back into the cookies.
Final Thoughts
I absolutely love how this Candy Corn Cookies Recipe blends simplicity, nostalgia, and fun into one sweet treat. It’s one of those recipes where the results grab attention, but the process is straightforward enough for beginner bakers to enjoy. Whenever I make these, my family goes crazy for them, and I always get asked to bake another batch. So next time you’re in the mood for something festive, colorful, and delicious, give these cookies a try—you’ll be glad you did. Happy baking!
Print
Candy Corn Cookies Recipe
- Prep Time: 35 minutes plus 4 hours chilling
- Cook Time: 10-12 minutes per batch
- Total Time: Approximately 5 hours
- Yield: 5 dozen cookies
- Category: Dessert
- Method: Baking
- Cuisine: American
Description
These Candy Corn Cookies are a festive treat inspired by the classic Halloween candy. They feature layers of colorful dough shaped to resemble candy corn, offering a visually appealing and deliciously buttery cookie that’s perfect for holiday celebrations or anytime you want a fun, sweet snack.
Ingredients
Cookie Dough
- 1 1/2 cups butter, softened
- 1 1/2 cups sugar
- 1/2 teaspoon vanilla extract
- 3 cups all-purpose flour
- 1 teaspoon baking soda
- 1/2 teaspoon salt
Colors
- Yellow paste food coloring
- Orange paste food coloring
Instructions
- Cream Butter and Sugar: In a large bowl, cream together the softened butter and sugar until the mixture is light and fluffy, about 5 to 7 minutes. This step incorporates air into the dough, creating a tender texture.
- Add Vanilla Extract: Beat in the vanilla extract until fully combined. This adds flavor depth to the dough.
- Mix Dry Ingredients: In a separate bowl, whisk together the all-purpose flour, baking soda, and salt to evenly distribute the leavening and seasoning.
- Combine Dry and Wet Ingredients: Gradually add the dry ingredients into the creamed butter mixture, beating until just combined to form the dough.
- Divide and Color Dough: Split the dough into halves. Tint one half with yellow paste food coloring. Then take the second half and divide it further into two portions: two-thirds of it to be colored orange, and the remaining one-third to remain plain (no coloring).
- Shape Dough Into Logs: Shape each colored portion into two 8-inch logs. Flatten the tops slightly and pinch the sides in at a gentle angle to mimic the candy corn shape.
- Layer Dough Logs: Place the orange logs on top of the yellow logs, pushing the sides in at the slight angle again. Then place the plain dough logs on top to form a layered log with a slightly rounded top.
- Chill the Logs: Wrap the layered logs tightly in plastic wrap and refrigerate until firm, about 4 hours. This makes slicing easier and helps maintain the shape during baking.
- Preheat Oven: Heat the oven to 350°F (175°C).
- Slice Dough Logs: Unwrap the chilled dough logs and slice into 1/4-inch thick pieces carefully.
- Arrange on Baking Sheet: Place the cookie slices about 2 inches apart on ungreased baking sheets to allow for spreading.
- Bake Cookies: Bake for 10 to 12 minutes until the cookies are set and edges are lightly golden.
- Cool: Transfer the baked cookies from the pans to wire racks to cool completely before serving.
Notes
- Use paste food coloring for vibrant colors without altering dough consistency.
- Chilling the dough logs is essential for clean slices and maintaining the candy corn shape.
- Ensure even thickness when slicing for uniform baking.
- Store cookies in an airtight container at room temperature for up to one week.
- These cookies can be frozen after baking for longer storage.
Nutrition
- Serving Size: 1 cookie
- Calories: 110
- Sugar: 7g
- Sodium: 75mg
- Fat: 6g
- Saturated Fat: 3.5g
- Unsaturated Fat: 2g
- Trans Fat: 0g
- Carbohydrates: 13g
- Fiber: 0.3g
- Protein: 1g
- Cholesterol: 20mg


