
If you’re craving comfort food with a delightful Asian twist, you’re going to love this Braised Chicken Thighs with Soy and Sesame Recipe. I absolutely love how the tender chicken soaks up all those rich, savory-sweet flavors — it’s like a warm hug on a plate! Whether you’re cooking for your family or meal prepping for the week, this recipe hits all the right notes and is surprisingly simple to pull off. Stick around and I’ll share everything you need to know to make this dish a regular favorite.
Why You’ll Love This Recipe
- Rich, Balanced Flavors: The combination of soy sauce, sesame oil, and a touch of sweetness creates a sauce that’s utterly addictive.
- Perfectly Tender Chicken: Braising keeps the thighs juicy and tender, making every bite melt in your mouth.
- Simple Ingredients, Big Impact: You likely have most ingredients on hand already, making this an easy midweek meal.
- Great for Meal Prep: This dish tastes even better the next day, so leftovers are something to look forward to.

Ingredients You’ll Need
Each ingredient in this Braised Chicken Thighs with Soy and Sesame Recipe plays its role beautifully. From the aromatic garlic and ginger to the toasted sesame oil that gives that signature nutty finish, these flavors blend harmoniously. When shopping, look for bone-in, skin-on chicken thighs for maximum juiciness and flavor.
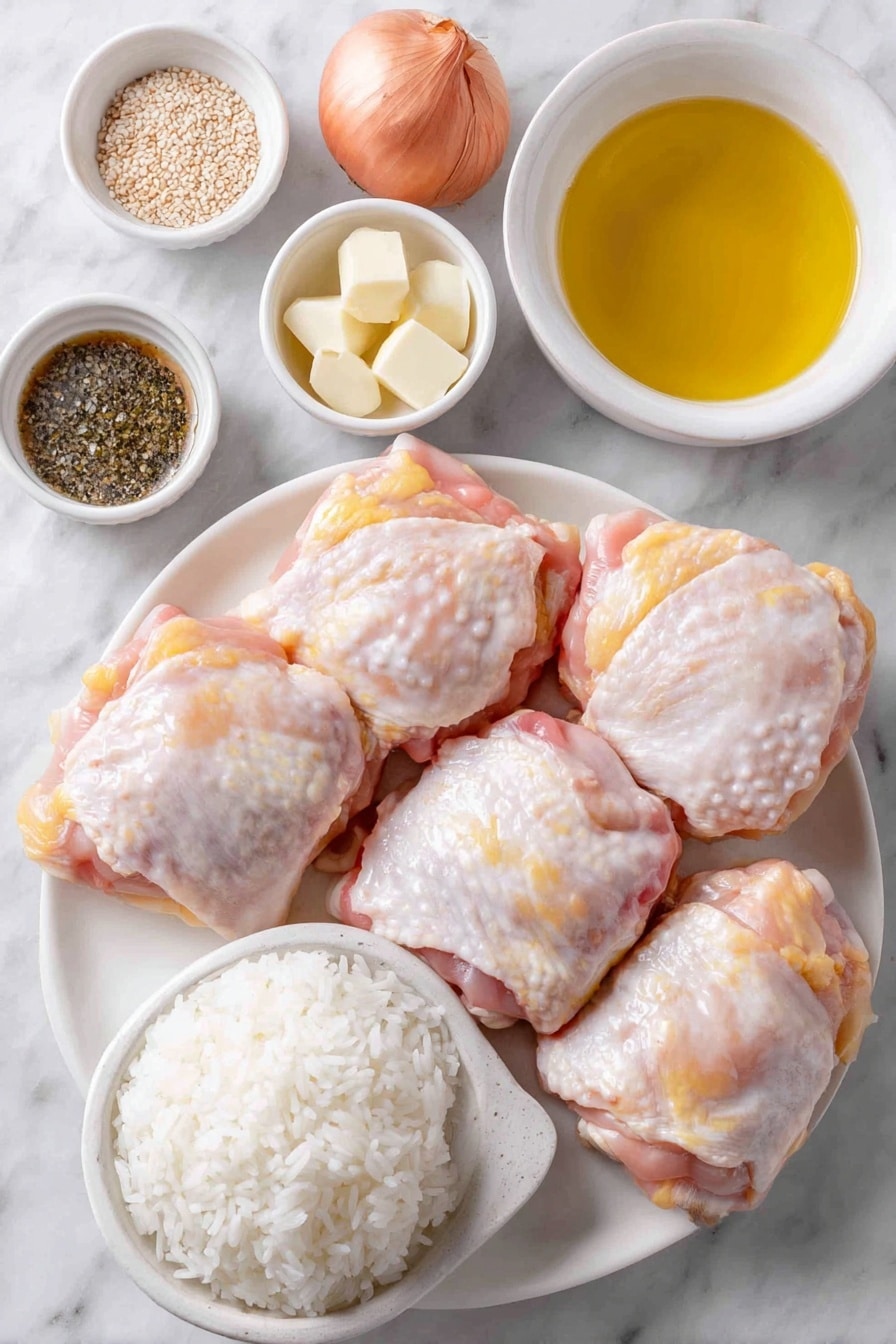
- Vegetable oil: A neutral oil that sears the chicken beautifully without overpowering the delicate soy and sesame flavors.
- Bone-in, skin-on chicken thighs: These are my favorite because the bone offers extra juiciness and the skin crisps up just right when browned.
- Kosher salt & freshly ground black pepper: Simple seasoning amplifies the natural flavor of the chicken.
- Shallots: Cooler and milder than onions, they add a subtle sweetness once cooked.
- Fresh ginger: Adds that fresh, zesty kick that brightens the sauce.
- Garlic cloves: Grating garlic releases more flavor and blends seamlessly into the sauce.
- Sake or dry white wine: This deglazes the pan and adds depth; if you don’t have sake, dry white wine works great.
- Water: Helps create the braising liquid and keeps the chicken tender.
- Reduced-sodium soy sauce: Using reduced-sodium lets you control the saltiness better so the dish doesn’t get too salty.
- Granulated sugar: Just enough sweetness to balance the salty and savory notes.
- Toasted sesame oil: Adds that unmistakable, rich sesame aroma and flavor that makes the dish stand out.
- Toasted sesame seeds, scallions, and cooked white rice: For garnish and serving — these elevate the dish with crunch, color, and a comforting base.
Variations
While the classic Braised Chicken Thighs with Soy and Sesame Recipe is fantastic as is, I love tweaking it depending on the season or what I have on hand. Feel free to personalize it to your taste or dietary needs — cooking should always feel a little like your own signature.
- Spicy Kick: I sometimes add a teaspoon of chili flakes or a dash of sriracha to the braising liquid — my family goes crazy for the subtle heat.
- Vegetable Boost: Toss in some baby bok choy or snap peas during the last 10 minutes of braising for added greens and texture.
- Gluten-Free Option: Swap soy sauce for tamari to keep all the flavor but make it gluten-free friendly.
- Slow Cooker Method: If you’re short on time, you can brown the chicken on the stovetop, then dump everything in your slow cooker and cook on low for 4-5 hours.
How to Make Braised Chicken Thighs with Soy and Sesame Recipe
Step 1: Brown the Chicken to Golden Perfection
This step is where magic starts. Heat your vegetable oil in a large, deep ovenproof skillet over high heat. Season your chicken thighs generously with salt and freshly ground pepper. When the oil shimmers, place the chicken skin side down — you want that skin to develop a deep golden crust, which takes about 6 minutes per side. Don’t rush this part; it’s the foundation of flavor. Once golden and crispy, transfer the chicken to a plate to rest while you prepare the sauce.
Step 2: Build the Flavorful Braising Sauce
Using the same skillet (less cleanup, yay!), reduce heat to medium-high and toss in your shallots, grated ginger, and garlic. Stir them for about a minute until you can smell that heavenly aroma filling your kitchen. Next comes the sake or dry white wine — pour it in and cook it down, stirring constantly, until it’s reduced by about half (roughly 3 minutes). This step intensifies the flavor and removes any harsh alcohol bite. Then add water, soy sauce, and sugar, bringing everything up to a boil. This savory-sweet sauce is going to turn your chicken into a superstar.
Step 3: Braise the Chicken in the Oven
Now comes the slow and steady part. Nestle the browned chicken thighs skin side up back into the skillet, pushing them gently between the shallots so they’re swimming in that beautiful sauce. Transfer the entire skillet to a preheated 425°F oven, uncovered. Braising the chicken like this ensures it finishes cooking evenly while soaking up all those intense flavors. It usually takes about 35 minutes — use an instant-read thermometer to check for 165°F at the thickest part to be safe.
Step 4: Thicken the Sauce and Add Sesame Oil
Once the chicken is out of the oven, transfer it to a serving platter and tent it with foil to keep warm. Place the skillet back on the stovetop over high heat. Stir occasionally as you reduce the sauce for about 3 minutes until it thickens slightly and coats the back of a spoon. This concentrated sauce is pure umami heaven. Stir in the toasted sesame oil off the heat to preserve its delicate flavor, then pour the sauce generously over the chicken.
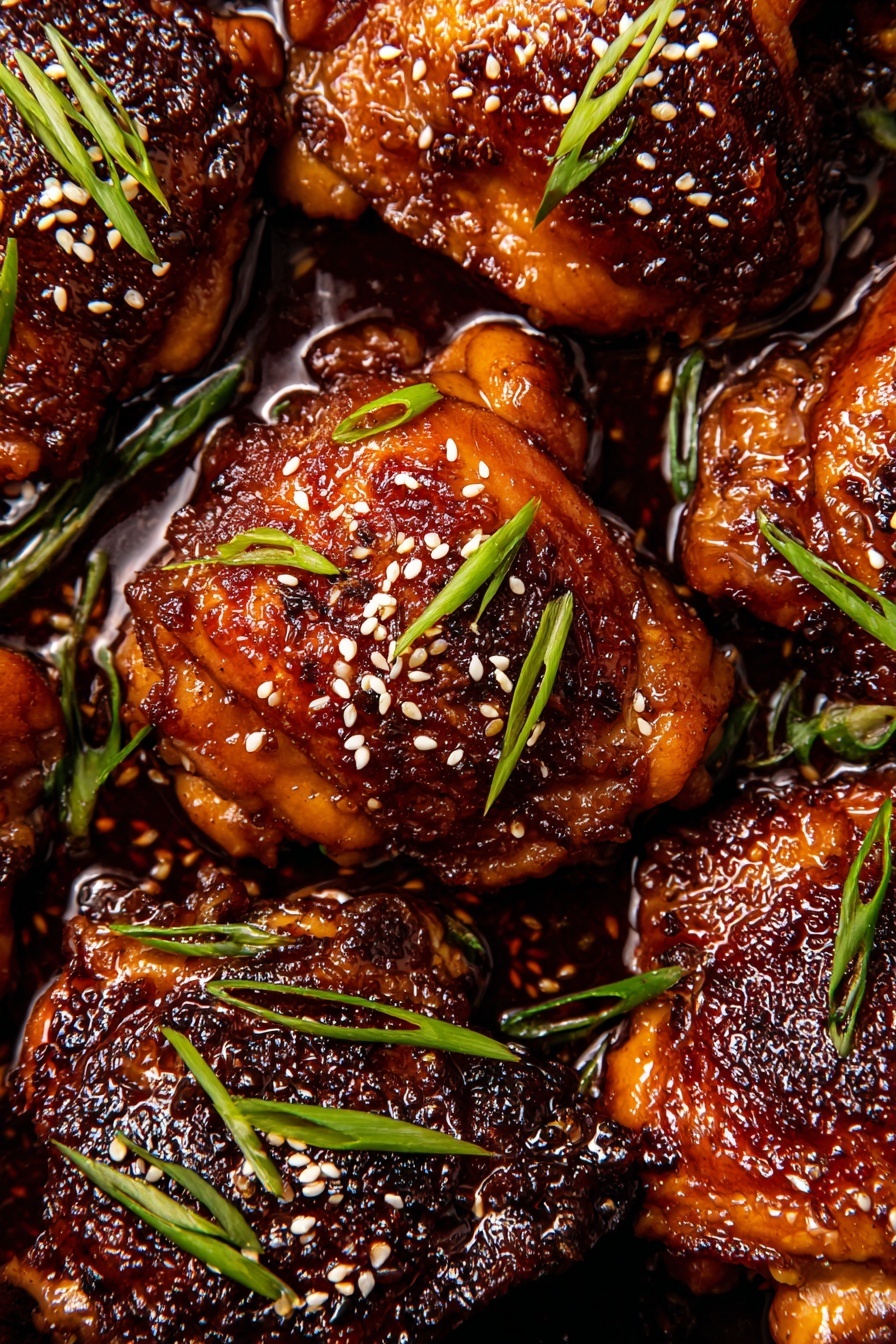
Step 5: Garnish and Serve
Finish your dish with a sprinkle of toasted sesame seeds and thinly sliced scallions for crunch and freshness. Serve alongside steamed white rice — the rice soaks up the sauce beautifully and rounds out the meal. I love watching my family eagerly dig in; this dish never disappoints!
Pro Tips for Making Braised Chicken Thighs with Soy and Sesame Recipe
- Don’t Skip Browning: I used to rush the browning step, but it really adds depth, so be patient and get a gorgeous golden crust on the skin.
- Grate Garlic and Ginger: Grating releases more oils and flavor compared to mincing; it makes the sauce silky and aromatic.
- Use an Ovenproof Skillet: I learned this the hard way—make sure your skillet can safely go from stovetop to oven to avoid extra dishes and uneven cooking.
- Control Saltiness: Go easy on soy sauce next time if your brand is saltier; reduced-sodium soy sauce gives you more room to adjust flavors.
How to Serve Braised Chicken Thighs with Soy and Sesame Recipe
Garnishes
I always top my braised chicken with toasted sesame seeds and thinly sliced scallions — they add texture and a pop of fresh bite that cuts through the richness. Sometimes, if I’m feeling fancy, I’ll sprinkle a few chili flakes or a drizzle of chili oil for some color and subtle heat.
Side Dishes
This dish pairs perfectly with simple steamed white rice or fluffy jasmine rice to soak up the sauce. For some greens, I like quick sautéed bok choy or roasted broccoli with garlic. A crisp cucumber salad dressed in rice vinegar also balances the richness beautifully.
Creative Ways to Present
For special dinners, I like serving this braised chicken family-style in a rustic cast-iron skillet straight from the oven, surrounded by bowls of rice and pickled vegetables. It’s fun to let everyone scoop their portions and helps keep it casual and cozy. Garnishing the dish with extra fresh herbs like cilantro or mint gives it a bright finish.
Make Ahead and Storage
Storing Leftovers
I store leftover Braised Chicken Thighs with Soy and Sesame in an airtight container in the refrigerator for up to 3 days. The sauce thickens as it cools, which actually makes reheating even better because the flavors taste even more concentrated.
Freezing
This recipe freezes wonderfully. I let the chicken cool completely, then pack the chicken and sauce separately when possible. It keeps well for up to 2 months. When thawing, I recommend overnight in the fridge for best texture.
Reheating
To reheat, gently warm leftovers on the stovetop over medium-low heat, adding a splash of water or broth if the sauce gets too thick. This keeps the chicken moist without drying it out. Microwaving works in a pinch, but watch closely to avoid toughening the meat.
FAQs
-
Can I use boneless, skinless chicken thighs instead of bone-in, skin-on?
You absolutely can, but I prefer bone-in, skin-on because they retain more moisture and flavor during braising. Boneless, skinless thighs will cook faster, so reduce cooking time to avoid drying out the meat.
-
What can I substitute for sake if I don’t have it?
Dry white wine is a great substitute for sake in this recipe. If you prefer non-alcoholic options, a mild chicken broth with a splash of rice vinegar can work, though it will slightly alter the flavor profile.
-
How do I ensure the chicken skin stays crispy after braising?
The skin crisps up beautifully in the searing step, but it will soften during braising because it’s cooking in liquid. For extra crispiness, you can broil the chicken for 2-3 minutes after braising, watching closely to avoid burning.
-
Can I make this recipe in a slow cooker?
Yes! Brown the chicken first, then place it in your slow cooker with all sauce ingredients and braise on low for 4-5 hours. This is a great set-it-and-forget-it option if you want to prep in the morning.
-
What’s the best way to thicken the sauce?
After braising, reducing the sauce on high heat while stirring will naturally thicken it. If you need it thicker, a small cornstarch slurry (1 tsp cornstarch mixed with 1 tbsp cold water) added at the end can boost thickness quickly.
Final Thoughts
This Braised Chicken Thighs with Soy and Sesame Recipe is one of those dishes I love to make when I want something comforting but also packed with flavor. It’s approachable, uses familiar ingredients, and yet feels a little special — perfect for both weeknights and weekend dinners. I promise, once you try it, you’ll find yourself reaching for this recipe again and again. So, grab your skillet, invite your loved ones, and enjoy that luscious, soy-sesame goodness together. Happy cooking!
Print
Braised Chicken Thighs with Soy and Sesame Recipe
- Prep Time: 25 minutes
- Cook Time: 55 minutes
- Total Time: 1 hour 20 minutes
- Yield: 4 servings
- Category: Main Course
- Method: Baking
- Cuisine: Asian
Description
This Braised Chicken Thighs recipe offers juicy, flavorful chicken cooked in a savory soy-based sauce with aromatic garlic, ginger, and shallots. The chicken is first seared to golden perfection on the stovetop, then finished by braising in the oven to achieve tender, succulent meat. Served with toasted sesame seeds, scallions, and steamed white rice, it’s a comforting and easy-to-make dish perfect for weeknight dinners or special occasions.
Ingredients
Chicken and Seasoning
- 1 tbsp. vegetable oil
- 2 1/2 lb. bone-in, skin-on chicken thighs (about 6)
- Kosher salt
- Freshly ground black pepper
Aromatics and Sauce
- 4 small shallots, peeled, halved if large
- 1 (2″) piece ginger, peeled, grated
- 5 garlic cloves, grated
- 3/4 cup sake or dry white wine
- 3/4 cup water
- 2/3 cup reduced-sodium soy sauce
- 1/4 cup (50 g) granulated sugar
- 1 tbsp. toasted sesame oil
For Serving
- Toasted sesame seeds
- Thinly sliced scallions
- Cooked white rice
Instructions
- Sear the Chicken: Arrange a rack in the center of the oven and preheat to 425°F (220°C). In a large, deep ovenproof skillet over high heat, warm the vegetable oil. Season the chicken thighs generously with kosher salt and freshly ground black pepper. Place them skin side down in the skillet and cook, turning once halfway through, until the skin is deeply golden and crispy, about 6 minutes per side. Transfer the seared chicken to a plate.
- Sauté Aromatics and Deglaze: In the same skillet over medium-high heat, add the shallots, grated ginger, and garlic. Stir frequently and cook until fragrant, about 1 minute. Pour in the sake or dry white wine, stirring frequently as it cooks down and reduces by about half, approximately 3 minutes.
- Add Sauce Ingredients and Nestle Chicken: Add the water, reduced-sodium soy sauce, and granulated sugar to the skillet. Bring the mixture to a boil. Carefully nestle the chicken thighs back into the skillet, skin side up, arranging them among the shallots and aromatics.
- Braise in the Oven: Transfer the skillet to the preheated oven and braise the chicken uncovered until an instant-read thermometer inserted into the thickest part reads 165°F (74°C), about 35 minutes.
- Thicken the Sauce: Remove the chicken from the skillet onto a platter. Return the skillet to the stovetop over high heat and cook the sauce, stirring occasionally, until it thickens slightly, about 3 minutes. Remove from heat and stir in the toasted sesame oil.
- Serve: Pour the sauce over the chicken. Garnish with toasted sesame seeds and thinly sliced scallions. Serve immediately with steamed white rice alongside.
Notes
- Use a large, deep ovenproof skillet to easily transfer from stovetop to oven.
- For best flavor, use bone-in, skin-on chicken thighs to keep the meat juicy.
- If you don’t have sake, a dry white wine or additional water can be used.
- Monitor the sauce carefully when thickening to prevent burning or sticking.
- Adjust salt levels cautiously due to the soy sauce’s salt content.
- This dish pairs well with steamed vegetables or a simple green salad for a complete meal.
Nutrition
- Serving Size: 1 serving
- Calories: 480 kcal
- Sugar: 8 g
- Sodium: 850 mg
- Fat: 28 g
- Saturated Fat: 7 g
- Unsaturated Fat: 18 g
- Trans Fat: 0 g
- Carbohydrates: 12 g
- Fiber: 1 g
- Protein: 38 g
- Cholesterol: 140 mg


