
If you’re craving a rich, decadent treat that combines the creamy allure of Boston cream with the comforting texture of fudge, you’re in the right place. I’m excited to share my tried-and-true Boston Cream Fudge Recipe with you—a fan-freaking-tastic dessert that’s perfect for sharing or savoring solo. Trust me, once you try this recipe, you’ll find yourself coming back to it again and again because it’s just that good!
Why You’ll Love This Recipe
- Perfect Flavor Balance: The blend of white and dark chocolate layers creates a luscious Boston cream-inspired twist that’s a real crowd-pleaser.
- Easy to Make: You don’t need fancy equipment or complicated steps—just some patience and love to get that silky-smooth fudge texture.
- Versatile Dessert: This fudge shines at parties, makes an incredible gift, or just a special indulgence for yourself after a long day.
- Proven Results: I’ve made this dozens of times, and it never fails to impress—even with fellow fudge skeptics!

Ingredients You’ll Need
Every ingredient in this Boston Cream Fudge Recipe works together to create a rich, creamy, and perfectly balanced treat. From the creamy butter to the marshmallow cream that gives it that classic Boston cream texture, each element is key. Here’s a closer look at what I use and why:
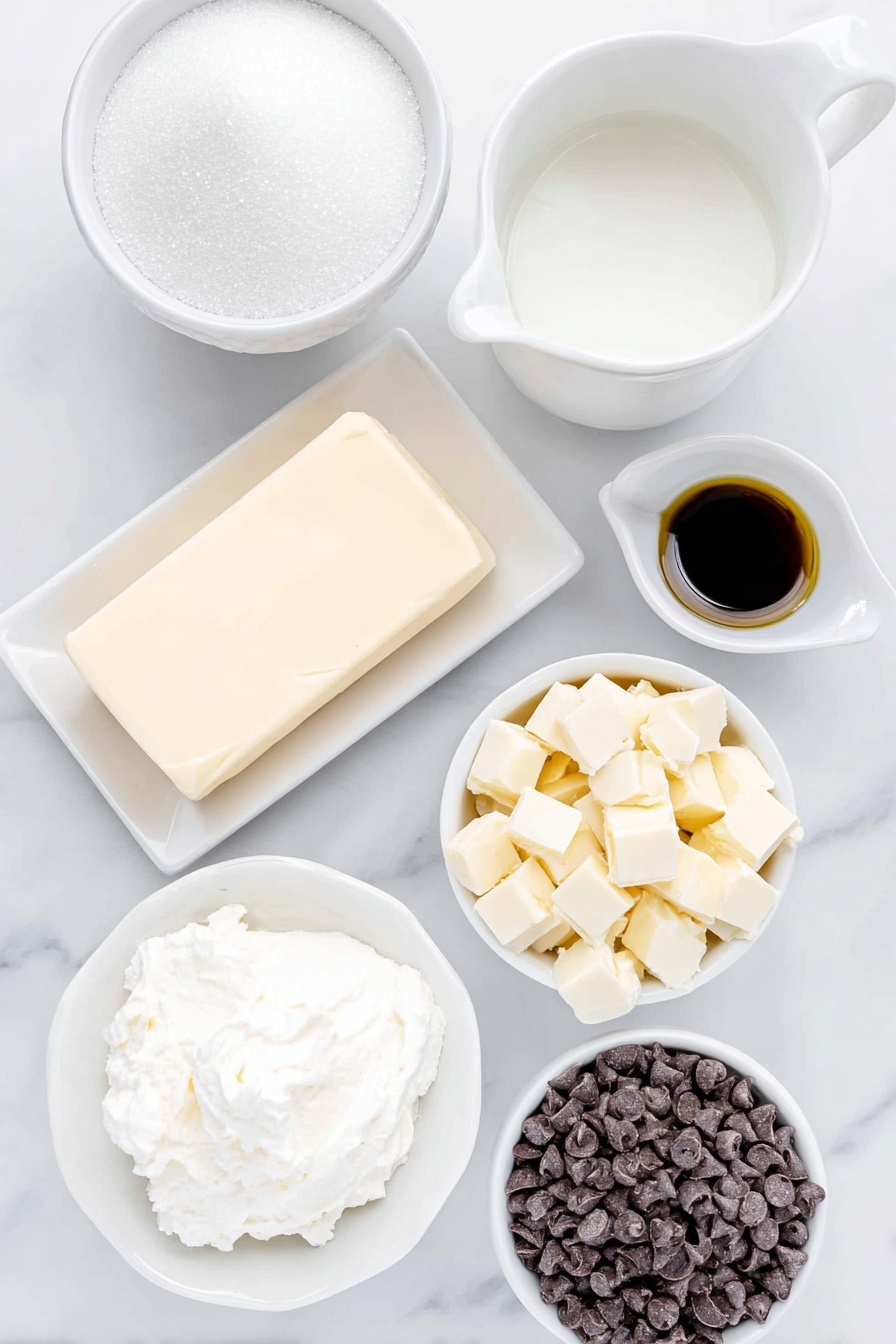
- Granulated Sugar: Provides the classic sweetness and structure that makes fudge fudge.
- Unsalted Butter: Adds richness and helps with that melt-in-your-mouth texture.
- Heavy Cream: Makes the fudge luxuriously creamy—don’t skimp here!
- Light Corn Syrup: This is a game changer for smooth fudge, preventing crystallization and keeping it soft.
- White Baking Chocolate: Gives the fudge its Boston cream base with a sweet, creamy flavor.
- Marshmallow Cream: The secret to that silky, fluffy texture—it blends beautifully in the fudge.
- Vanilla Extract: Enhances all the flavors without overpowering that classic Boston cream taste.
- Unsweetened Cocoa Powder: For the chocolate layer that pairs perfectly with the white chocolate base.
- Semi-Sweet Chocolate Chips: Used for the decadent chocolate dip that seals in all the bliss.
- Vegetable Oil: Helps melt the chocolate chips to a perfect consistency for dipping.
Variations
I love how flexible this Boston Cream Fudge Recipe is! While I stick to the classic version most of the time, sometimes I mix things up depending on what flavors or dietary needs my family has that week. Feel free to get creative—you might be surprised at how well this fudge adapts.
- Nutty Twist: I once added chopped toasted pecans to the white chocolate layer—totally elevated the texture and flavor!
- Dairy-Free: Swap the butter and cream for coconut-based alternatives; the fudge still turns out creamy and delicious.
- Mint Chocolate: Adding a teaspoon of peppermint extract to the cocoa layer makes for a festive holiday treat my family adored.
- Simplicity Mode: If you prefer, skip the chocolate dip on top to avoid extra work—fudge is just as good without it.
How to Make Boston Cream Fudge Recipe
Step 1: Prepare Your Pan Like a Pro
First things first, line your 8×8-inch baking pan with parchment paper. Make sure the paper hangs over the edges—this little trick makes lifting the fudge out effortless, like magic! I also lightly spray the parchment with nonstick spray to prevent sticking. Having this set up ahead of time saves you from a sticky situation—pun intended.
Step 2: Cook the Sugar Mixture to Perfection
In a heavy-bottomed saucepan, combine sugar, butter, heavy cream, and corn syrup. Stir constantly over medium heat until it reaches a rolling boil. This is where patience pays off because you want a smooth texture—if your mixture splashes on the sides, it could crystallize and mess up your fudge’s creamy texture. Keep stirring and let it boil for 4-5 minutes or until your candy thermometer reads between 235-240°F, the soft-ball stage—this is a key step for that perfect fudge firmness without being hard.
Step 3: Blend in the White Chocolate and Marshmallow Cream
Remove the saucepan from heat, then stir in the chopped white baking chocolate until it’s completely melted and silky smooth. Next, add the marshmallow cream and vanilla extract, stirring until everything is beautifully combined. This step gives your fudge that dreamy Boston cream texture and flavor that makes people swoon.
Step 4: Layer and Swirl Your Fudge
Pour about three-quarters of your fudge into the prepared pan—that’s your creamy white chocolate base. To the remaining fudge, whisk in the sifted unsweetened cocoa powder until it’s fully incorporated. Carefully spoon the chocolate layer over the white, then grab a toothpick to swirl the two together—this marbled effect isn’t just pretty; it lets you taste both flavors in every bite!
Step 5: Chill and Set
Let the fudge cool to room temperature for about an hour, then cover it with foil and chill it in the fridge for at least another hour until it’s firm. If your kitchen’s cool, you can let it finish setting on the counter instead—I’ve done this many times when I don’t want my fudge to absorb fridge odors.
Step 6: Cut and Dip in Chocolate
Using the parchment overhang, gently lift the fudge from the pan. Slice into your preferred size—I usually go for 5×5 for just the right bite. For that finishing touch, melt your semi-sweet chocolate chips with vegetable oil in short bursts in the microwave, stirring between intervals until glossy and smooth. Dip the tops of each piece in the melted chocolate and let them set completely. This step adds a shiny, irresistible shell that snaps just right.
Pro Tips for Making Boston Cream Fudge Recipe
- Watch the Temperature: Investing in a reliable candy thermometer is a must—accuracy here means smooth, perfect fudge every time.
- Avoid Crystals: To stop sugar from crystallizing, keep your utensils clean and avoid stirring once boiling begins, except as instructed.
- Warm Your Knife: When slicing fudge, running your knife under hot water and drying it before each cut gives clean, smooth edges without sticking.
- Patience Is Key: Don’t rush cooling—letting fudge set fully ensures perfect texture and easy cutting.
How to Serve Boston Cream Fudge Recipe
Garnishes
I love sprinkling a little powdered sugar or even a pinch of edible gold dust on top of the chocolate layer when serving to guests—it adds a little festive flair without overpowering the rich flavors. Sometimes fresh raspberries on the side add a nice tart contrast that brightens each bite.
Side Dishes
This fudge pairs wonderfully with a cup of freshly brewed coffee or a creamy latte. For parties, I like to include it alongside some fresh fruit or a bowl of vanilla ice cream—because why limit yourself when it comes to dessert?
Creative Ways to Present
For special occasions, I’ve arranged pieces of Boston Cream Fudge on a decorative platter with edible flowers or fresh mint leaves. Layering the fudge between sheets of parchment in decorative tins also makes for a stunning gift presentation. Plus, cutting shapes using small cookie cutters fascinates the kids and makes this treat that much more fun.
Make Ahead and Storage
Storing Leftovers
I keep leftover fudge in an airtight container stored at room temperature if it will be eaten within the week. The texture stays soft and smooth this way, plus it’s super easy to grab a piece as a midday pick-me-up.
Freezing
I’ve found that freezing Boston Cream Fudge works like a charm if you wrap it tightly in parchment paper and then foil or a freezer-safe container. It can stay fresh up to two months—just thaw overnight in the fridge before enjoying to retain that perfect creamy bite.
Reheating
Reheating fudge is rarely necessary, but if you want to soften it after refrigeration, simply leave it out at room temperature for 15-20 minutes or microwave for a few seconds on low—just be cautious not to melt the chocolate dip too much!
FAQs
-
Can I use regular marshmallows instead of marshmallow cream in the Boston Cream Fudge Recipe?
While marshmallow cream provides a smooth, creamy texture that blends seamlessly into the fudge, you can technically melt regular marshmallows to substitute. However, it might require more stirring and careful melting to avoid clumps, and the texture might not be as silky. I recommend sticking with marshmallow cream if possible for the best results.
-
Why is corn syrup used in this recipe?
Corn syrup helps prevent the sugar from crystallizing, which keeps your fudge smooth and soft rather than grainy. It’s particularly important in fudge recipes to maintain that creamy fudge consistency you expect.
-
How do I know when the fudge mixture is ready to remove from heat?
Using a candy thermometer is the most reliable method—remove from heat when it reaches 235-240°F, the soft-ball stage. This ensures the fudge will set perfectly—too low and it will be too soft, too high and it can become hard and crumbly.
-
Can I skip the chocolate dip topping?
Absolutely! The fudge is delicious on its own, but the chocolate dip adds a lovely texture contrast and a polished look. If you’re pressed for time or prefer a lighter treat, skipping it won’t compromise the core flavor.
Final Thoughts
Making this Boston Cream Fudge Recipe feels like sharing a little piece of my kitchen with you—and honestly, it’s become such a beloved staple for my family. I love how it hits that perfect spot between creamy, chocolatey, and just a touch nostalgic. Whether you’re an experienced fudge maker or trying this style for the first time, you’ll enjoy how approachable and impressive this recipe is. Go ahead, treat yourself or your loved ones—once you make this, you’ll see why I keep coming back to it again and again!
Print
Boston Cream Fudge Recipe
- Prep Time: 10 minutes
- Cook Time: 20 minutes
- Total Time: 30 minutes
- Yield: 25 servings
- Category: Dessert
- Method: Stovetop
- Cuisine: American
Description
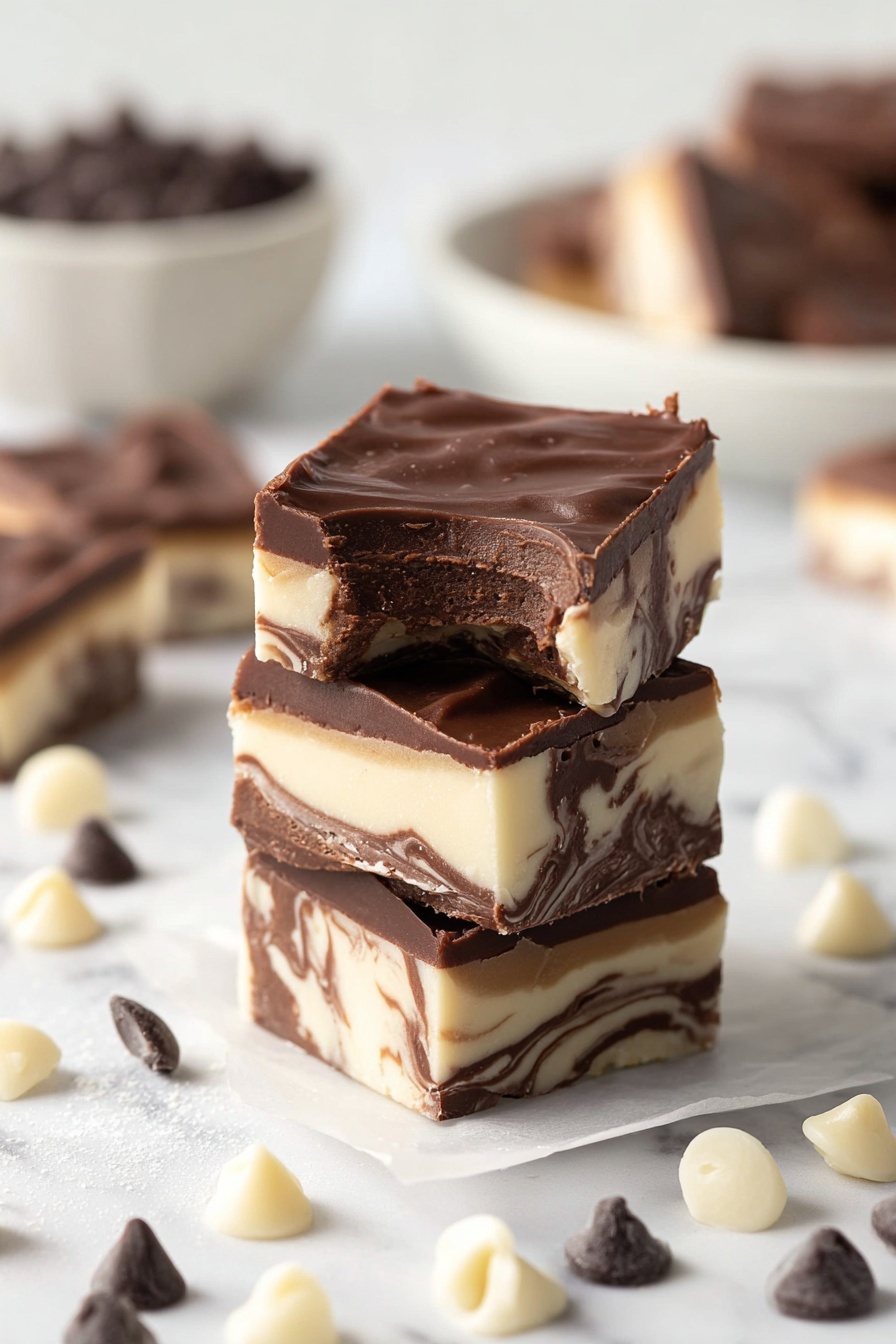
This Boston Cream Fudge recipe offers a decadent layered treat combining creamy white chocolate fudge with a rich cocoa swirl, topped with a glossy semi-sweet chocolate coating. Perfectly smooth and luscious, this fudge captures the classic Boston cream pie flavors in a rich, chewy candy form, ideal for gifts or special occasions.
Ingredients
Fudge Base
- 2 cups granulated sugar
- ¾ cup unsalted butter
- ⅔ cup heavy cream
- ¼ cup light corn syrup
White Chocolate Layer
- 6 ounces white baking chocolate, chopped
- 7 ounces marshmallow cream
- 1 teaspoon vanilla extract
Cocoa Swirl Layer
- 1½ tablespoons unsweetened cocoa powder, sifted
Topping
- 1 cup semi-sweet chocolate chips
- 1½ tablespoons vegetable oil
Instructions
- Prepare the Pan: Line an 8×8-inch baking pan with parchment paper, ensuring there is an overhang on the sides for easy removal later. Lightly spray the parchment with nonstick cooking spray to prevent sticking.
- Combine Ingredients: In a heavy-bottomed saucepan, combine sugar, butter, heavy cream, and corn syrup. Cook over medium heat, stirring constantly to prevent burning.
- Boil Mixture: Continue cooking while stirring until the mixture reaches a rolling boil. Allow it to boil for about 4-5 minutes, or until a candy thermometer registers between 235-240°F (soft-ball stage), indicating proper fudge temperature.
- Melt White Chocolate: Remove the pan from heat and stir in the chopped white baking chocolate until fully melted and smooth.
- Add Marshmallow and Vanilla: Mix in the marshmallow cream and vanilla extract until the mixture is well combined and creamy.
- Pour Base Layer: Pour three-quarters of the fudge mixture into the prepared baking pan, spreading evenly.
- Mix Cocoa Powder: Add the sifted unsweetened cocoa powder to the remaining fudge mixture. Whisk thoroughly to incorporate the cocoa evenly.
- Add Cocoa Layer: Spoon the cocoa-flavored fudge mixture over the white chocolate base layer in the pan carefully.
- Create Marble Effect: Use a toothpick or skewer to gently swirl the two layers together, creating a marbled pattern but keeping layers distinct for visual appeal.
- Cool and Set: Let the fudge cool at room temperature for about 1 hour, then cover with aluminum foil. Refrigerate for an additional hour until the fudge is firm and set. Alternatively, on cooler days, allow it to set fully on the countertop.
- Slice Fudge: Once set, carefully lift the fudge out of the pan using the parchment paper overhang. Using a sharp kitchen knife, cut into 5×5 or 6×6 square slices for serving.
- Prepare Chocolate Topping: In a microwave-safe bowl, combine semi-sweet chocolate chips and vegetable oil. Microwave on high for 30 seconds, stir, then continue heating in 15-second increments until fully melted and smooth.
- Dip and Set Topping: Dip the top of each fudge square into the melted chocolate, then place on wax or parchment paper. Allow the chocolate to harden completely before serving.
Notes
- Storage: Store fudge in an airtight container at room temperature for up to one week. For longer storage, refrigerate for 2-3 weeks.
- Freezing: Wrap fudge tightly in parchment paper and aluminum foil, store in a freezer-safe container for up to 2 months. Thaw overnight in the refrigerator before serving.
- Preparation Tips: Ensure the parchment paper has an ample overhang for easy fudge removal. Avoid sugar crystals on pan sides to prevent grainy texture by not letting sugar splash up during boiling.
- Temperature Tips: Use a candy thermometer to reach the soft-ball stage (235-240°F) for optimal fudge texture.
- Cutting Fudge: Warm a knife under hot water, dry it, then slice fudge cleanly for smooth edges.
- Setting: In cooler kitchens, fudge can finish setting undisturbed at room temperature instead of refrigeration for a softer texture.
Nutrition
- Serving Size: 1 piece (approx. 1.5 inch square)
- Calories: 180
- Sugar: 22g
- Sodium: 60mg
- Fat: 9g
- Saturated Fat: 5g
- Unsaturated Fat: 3g
- Trans Fat: 0g
- Carbohydrates: 25g
- Fiber: 1g
- Protein: 1.5g
- Cholesterol: 20mg
