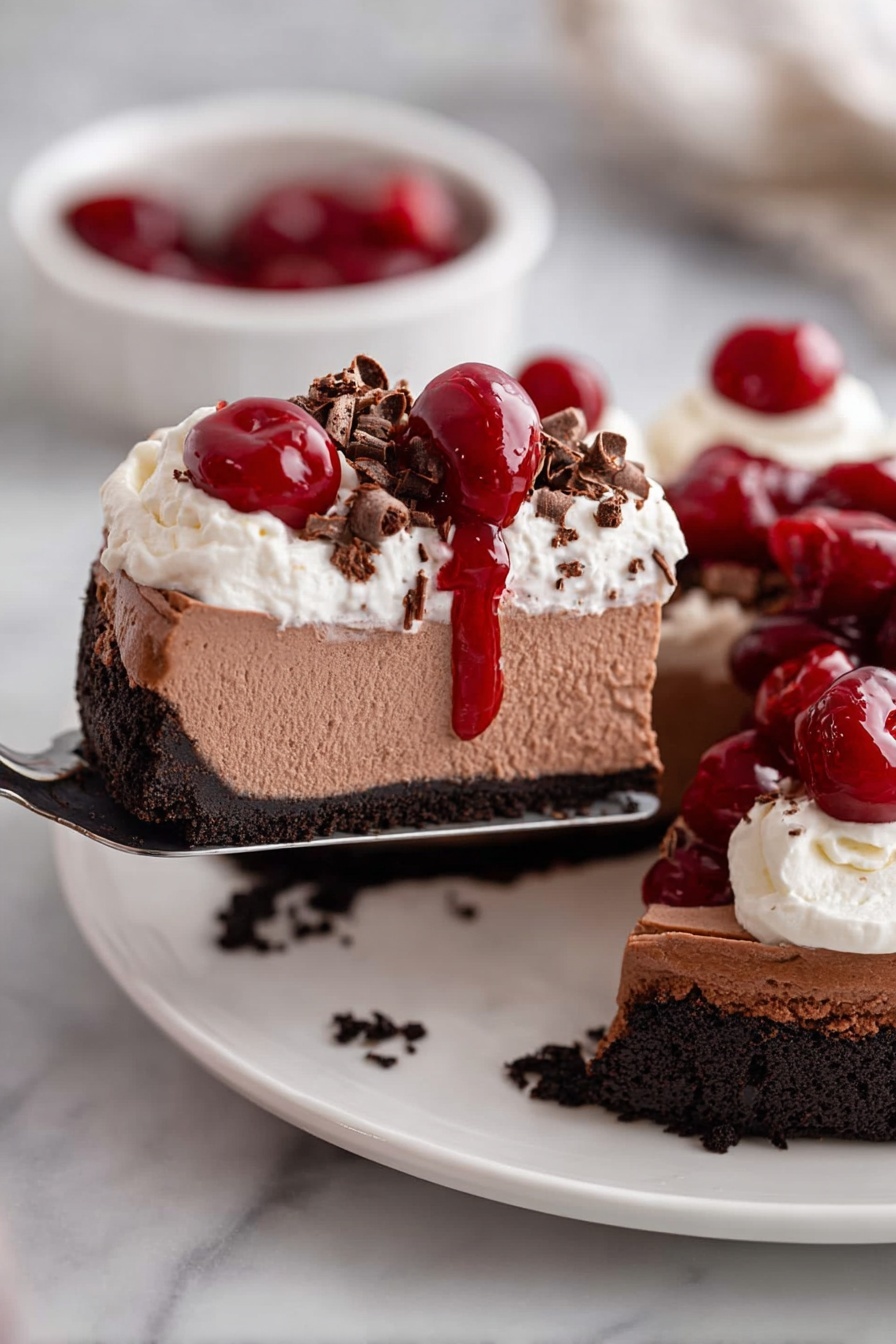
If you’re a fan of rich, creamy desserts with a hint of chocolate and a burst of fruity sweetness, you’re going to absolutely love my Black Forest Cheesecake with Cherry Topping Recipe. It’s the perfect blend of classic Black Forest cake flavors—chocolate, cherries, and cream—transformed into a smooth, indulgent cheesecake that melts in your mouth. Whether you’re making it for a special occasion or just treating yourself (because you deserve it!), this recipe will quickly become a favorite in your kitchen. Stick with me and I’ll share everything you need to make this showstopper as perfect as possible!
Why You’ll Love This Recipe
- Decadent Flavor Fusion: Combines creamy cheesecake with rich chocolate and tart cherry topping for that unforgettable Black Forest taste.
- Simple Yet Impressive: Uses a crust made from Oreo cookies for an easy twist that packs big flavor without fuss.
- Water Bath Baking Technique: Ensures a perfectly smooth and creamy texture without cracks, making your cheesecake look as good as it tastes.
- Family Favorite: My loved ones go crazy for this dessert, and I bet yours will too once you share it.

Ingredients You’ll Need
Gathering the right ingredients is half the battle with any cheesecake, and this Black Forest Cheesecake with Cherry Topping Recipe is no exception. I love how the Oreo crust adds a chocolatey crunch that pairs perfectly with the smooth filling. Plus, using real cream cheese and heavy cream gives you that luxurious texture you crave.
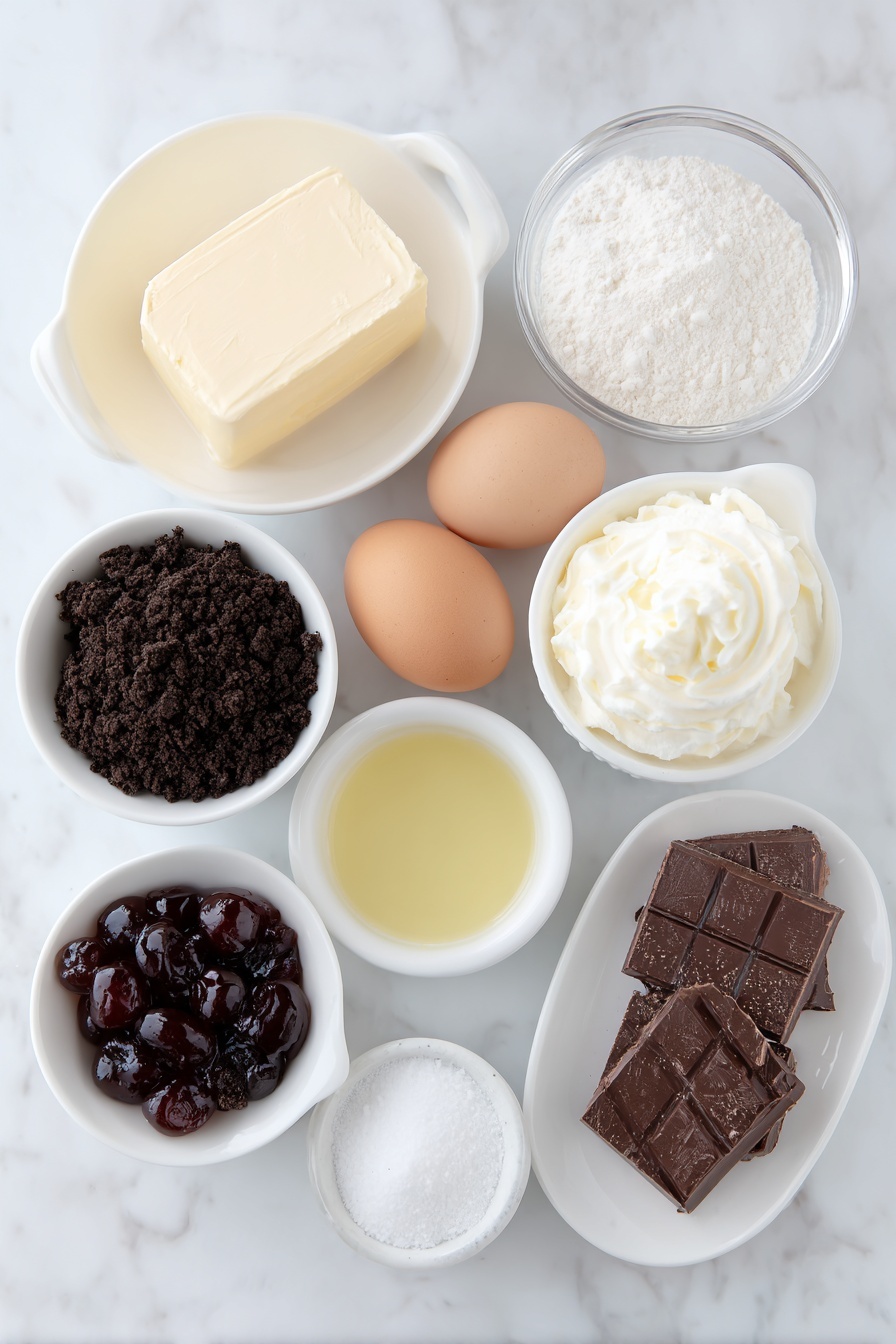
- Oreo cookies: Crushed finely for a chocolatey, sturdy crust that holds everything together.
- Unsalted butter: Melted and mixed with the Oreo crumbs to create that perfect base.
- Cream cheese: Make sure it’s room temperature so it blends smoothly without lumps.
- Granulated sugar: Sweetens the cheesecake filling just right—don’t skip!
- Large eggs: Also room temperature for a smooth, even batter.
- Pure vanilla extract: Adds warmth and depth to the cheesecake flavor.
- Heavy cream: Heated to melt chocolate and enrich the filling.
- Semisweet chocolate chips: Melted into the filling to give you that signature Black Forest chocolate richness.
- All-purpose flour: Helps stabilize the cheesecake without changing the texture.
- Cherry pie filling: Use homemade or a good-quality store-bought kind for that classic cherry topping.
- Whipped cream: For dolloping on top before serving—because it’s not a Black Forest dessert without it!
- Chocolate shavings: To sprinkle over the topping for an elegant finishing touch.
Variations
One of my favorite parts about the Black Forest Cheesecake with Cherry Topping Recipe is making it your own. Over time, I’ve experimented with tweaks to suit different tastes and dietary needs—feel free to do the same!
- Kirsch Addition: I once added a few tablespoons of kirsch (cherry brandy) to the cherry pie filling and the cheesecake batter—it gave the dessert an authentic Black Forest flair that my family absolutely adored.
- Gluten-Free Option: Substitute the Oreo crust with gluten-free chocolate cookies or make a nut-based crust for a similarly delicious, gluten-free friendly treat.
- Vegan Adaptation: You can swap in vegan cream cheese and coconut cream, though the texture will be slightly different; it’s worth trying if you’re accommodating dietary preferences.
- Fresh Cherry Topping: When cherries are in season, I often make fresh cherry compote instead of using pie filling—it adds a brighter, more natural flavor.
How to Make Black Forest Cheesecake with Cherry Topping Recipe
Step 1: Prepare Your Crust
Start by preheating your oven to 350°F. Crush 20 Oreo cookies in a food processor until they become fine crumbs, and then stir in 3 tablespoons of melted unsalted butter. Press this mixture firmly and evenly into the bottom of a lightly greased 9-inch springform pan. I like to use the bottom of a glass or measuring cup to really pack the crust tightly—this helps it hold together better after baking. Pop the crust in the oven for 8 minutes to set, then let it cool while you prepare the filling.
Step 2: Make the Chocolate Mixture
While your crust cools, warm ½ cup heavy cream in a small saucepan over medium heat until it’s steaming hot but not boiling. Pour the hot cream over 2 cups semisweet chocolate chips in a heat-safe bowl, then let it sit for about 3-4 minutes. Whisk the mixture until it’s glossy and smooth—this will be the luscious chocolate base for your cheesecake filling. Let it cool off a bit as you move on to mixing the batter.
Step 3: Make the Cheesecake Batter
In the bowl of your stand mixer fitted with the paddle attachment, beat 32 ounces of room-temperature cream cheese until it’s perfectly smooth. Add ½ cup granulated sugar and mix just until combined. Next, add 4 large eggs, one at a time, making sure to fully incorporate each egg before adding the next. Don’t forget to scrape down the sides of your bowl between each egg to avoid lumps. Add 2 teaspoons pure vanilla extract and blend again.
Now add your cooled chocolate mixture and beat until fully incorporated. Finally, mix in 2 tablespoons all-purpose flour on low speed until everything is smooth. The flour is a little secret ingredient I learned—it helps stabilize the cheesecake so it’s silky but not crumbly.
Step 4: Bake in a Water Bath
This next step is key for that creamy, crack-free cheesecake texture. Lightly spray your springform pan with nonstick spray and then wrap it tightly with heavy-duty foil to prevent leaks. I always put my foil-wrapped pan inside a larger roasting pan—you can even use an extra oven bag for peace of mind during baking. Bring a kettle or pot of water to a rolling boil.
Pour the cheesecake batter onto your prepared crust, then place the springform pan inside the larger pan. Carefully pour hot water into the roasting pan so it reaches halfway up the sides of your cheesecake pan. Bake at 350°F for 60-70 minutes. The edges should look set, but the center will jiggle slightly when you gently shake the pan—that’s exactly what you want. Turn off your oven and crack the oven door, allowing the cheesecake to rest inside for 1 hour. This slow cool-down helps prevent cracks.
Step 5: Chill and Add Topping
After your hour of resting, carefully remove the cheesecake from the water bath and place it on a wire rack to cool completely to room temperature. Then, pop it into the fridge for at least 8 hours or overnight. This chilling time allows the flavors to fully come together and the texture to set beautifully.
When you’re ready to serve, generously top the cheesecake with cherry pie filling, dollops of freshly whipped cream, and a scattering of chocolate shavings. The combination is pure magic.
Pro Tips for Making Black Forest Cheesecake with Cherry Topping Recipe
- Room Temperature Ingredients: Bringing eggs and cream cheese to room temp before mixing prevents lumps and gives you a silky batter every time.
- Foil Wrap Your Springform Pan: This little trick keeps water from seeping in during the water bath and ruining your crust.
- Don’t Overbake: The slight jiggle in the center means it’s perfectly baked; overbaking dries out the cheesecake.
- Slow Cooling: Letting it cool in the oven with the door cracked prevents cracking and keeps your cheesecake smooth.
How to Serve Black Forest Cheesecake with Cherry Topping Recipe
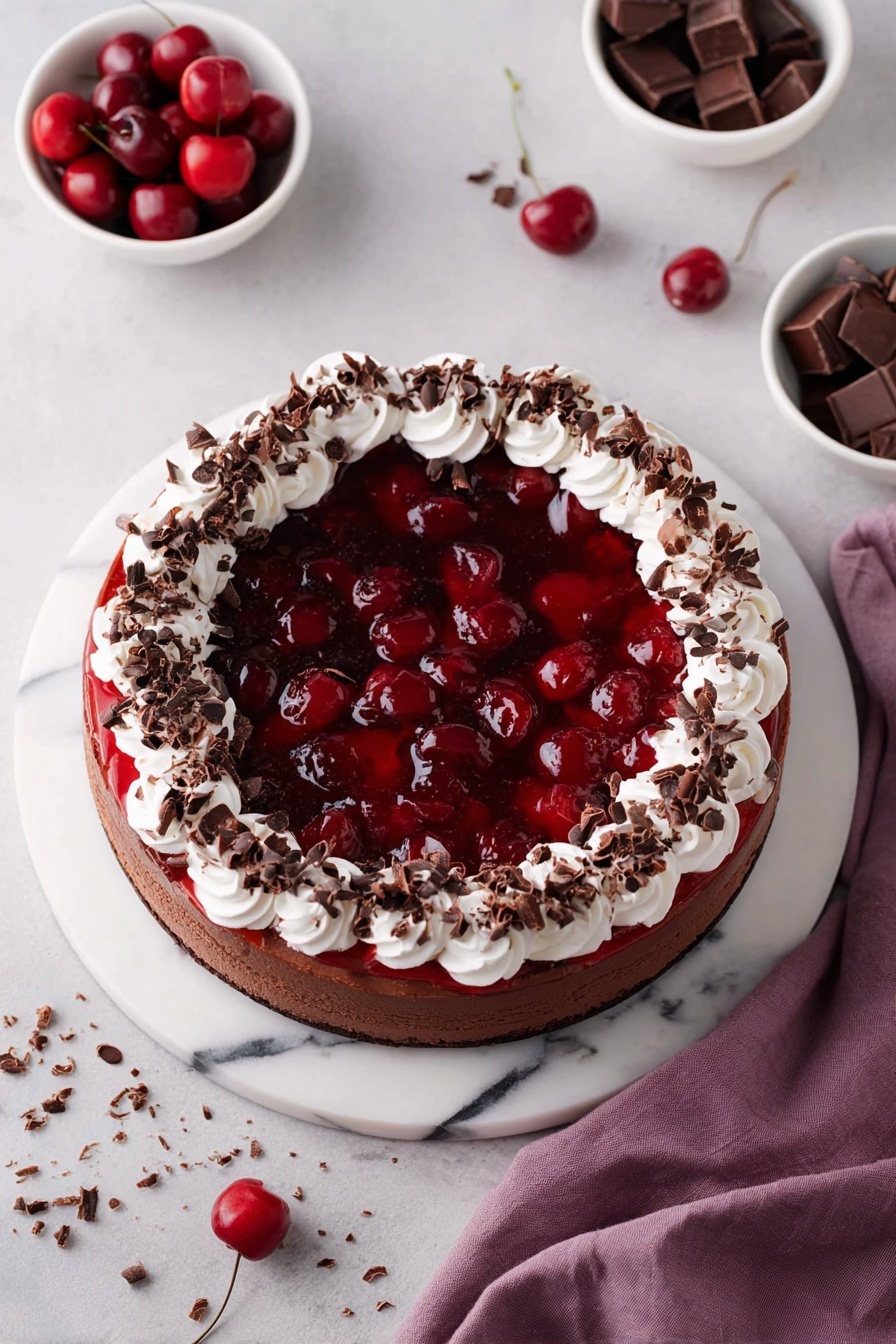
Garnishes
I always finish mine with a generous scoop of pillowy whipped cream and fresh-made chocolate shavings for that extra touch of decadence. If I’m feeling fancy, I sprinkle a few fresh cherries on top—they look stunning and amp up the cherry flavor. These tiny details really take your presentation (and taste) from great to unforgettable.
Side Dishes
This cheesecake stands out as the star dessert, but if you want to serve along a light side, I recommend something refreshing like a cucumber and mint salad or a simple green tea. The crispness contrasts delightfully with the richness of the cheesecake and cherries.
Creative Ways to Present
For a party, I’ve served individual cheesecakes in mini springform pans—the look is impressive and guests get their very own size portion. You can also layer the cherry topping and cheesecake in a clear glass trifle to show off the beautiful layers. Trust me, your friends will be asking for the recipe instantly!
Make Ahead and Storage
Storing Leftovers
I store leftover cheesecake tightly wrapped in plastic wrap and a second layer of foil to preserve freshness. Kept in the fridge, it stays creamy and delicious for up to 4 days. Just be sure to keep it chilled—this is one dessert you don’t want to leave out too long!
Freezing
I’ve frozen slices of this cheesecake wrapped well in plastic wrap and foil with great results. When ready to eat, I thaw them overnight in the fridge. The texture stays nice and smooth if you freeze it properly, making this a great make-ahead dessert option.
Reheating
I usually serve this cheesecake cold, but if you want it slightly softer, just let it sit on the counter for 20-30 minutes before serving. Avoid microwaving—it can disrupt the creamy texture. A gentle thaw in the fridge overnight is always best for frozen portions.
FAQs
-
Can I use store-bought cherry pie filling for the topping?
Absolutely! Using store-bought cherry pie filling is a perfect time-saver and works wonderfully. If you want a fresher flavor, you can also make your own cherry topping with fresh or frozen cherries cooked down with sugar and a little lemon juice.
-
Why do I need to bake the cheesecake in a water bath?
Baking in a water bath provides gentle, even heat around the cheesecake pan, which helps prevent cracks and ensures a silky smooth texture. The moisture also keeps the cheesecake from drying out during baking.
-
Can I make this cheesecake ahead of time?
Yes! In fact, it’s best if you prepare it at least 8 hours (or overnight) ahead so the flavors meld and the texture sets perfectly. It also stores well, making it great for holiday meals or special occasions.
-
What should I do if my cheesecake cracks?
Cracks usually mean overbaking or rapid cooling. To prevent cracks, avoid overbaking and cool the cheesecake slowly in the oven with the door cracked open. If cracks happen, you can cover them with the cherry topping and whipped cream—no one will ever know!
Final Thoughts
I absolutely love how this Black Forest Cheesecake with Cherry Topping Recipe turns out every time. It feels luxurious yet comforting—a dessert that impresses without stress. When I first tried making a similar recipe, I struggled with cracks and a bland cherry topping. But since perfecting this method, it’s become a guaranteed crowd-pleaser at family gatherings and holiday dinners. Give it a try—you’ll find that it’s easier than it looks and totally worth every bite. Trust me, this is one dessert you’ll want to bake again and again.
Print
Black Forest Cheesecake with Cherry Topping Recipe
- Prep Time: 25 minutes
- Cook Time: 1 hour 10 minutes
- Total Time: 10 hours 35 minutes
- Yield: 12 servings
- Category: Dessert
- Method: Baking
- Cuisine: American
Description
This Black Forest Cheesecake combines the rich, creamy texture of classic cheesecake with indulgent layers of chocolate and cherry flavors. Featuring an Oreo cookie crust, a luscious chocolate-infused cream cheese filling, and topped with homemade cherry pie filling, whipped cream, and chocolate shavings, this dessert is perfect for special occasions or a decadent treat.
Ingredients
For the crust:
- 20 Oreo cookies, crushed in a food processor until they form fine crumbs
- 3 tablespoons unsalted butter, melted
For the cheesecake:
- 32 ounces cream cheese, room temperature
- ½ cup granulated sugar
- 4 large eggs, room temperature
- 2 teaspoons pure vanilla extract
- ½ cup heavy cream
- 2 cups semisweet chocolate chips
- 2 tablespoons all-purpose flour
For the topping:
- Homemade cherry pie filling
- Whipped cream
- Chocolate shavings
Instructions
- Preheat Oven: Preheat your oven to 350°F (175°C) to prepare for baking the cheesecake.
- Prepare Springform Pan: Wrap a 9-inch springform pan tightly in heavy-duty foil to prevent leaks for the water bath. You can also place it inside an oven bag to avoid water seepage (optional). Lightly spray the pan with nonstick cooking spray and set aside.
- Make Crust: Combine the crushed Oreo cookie crumbs with melted butter, then press the mixture firmly into the bottom of the prepared pan. Bake in the oven for 8 minutes, then remove and place on a wire rack to cool.
- Boil Water: Begin to boil a pot or kettle of water to create the water bath for baking the cheesecake evenly and preventing cracking.
- Prepare Chocolate Mixture: Warm the heavy cream in a small saucepan over medium heat until very hot but not boiling. Place chocolate chips in a heat-safe bowl, pour the hot cream over them, and let sit for 3-4 minutes. Whisk until smooth and fully combined, then set aside to cool while preparing the filling.
- Mix Cream Cheese Base: Using a stand mixer fitted with a paddle attachment, beat the softened cream cheese until smooth. Add sugar and mix until combined. Add eggs one at a time, fully incorporating each and scraping down the bowl between additions. Stir in vanilla extract.
- Combine Chocolate and Flour: Add the cooled chocolate mixture to the cream cheese batter and beat until fully incorporated. Add flour and mix until combined. Scrape down the bowl and mix again until the batter is completely smooth.
- Assemble and Bake: Pour the batter over the cooled crust in the springform pan. Place this pan inside a larger roasting pan and pour the boiling water into the larger pan until it reaches halfway up the sides of the cheesecake pan. Bake for 60-70 minutes until the edges are set but the center still jiggles slightly.
- Cool in Oven: Turn off the oven but leave the door cracked open. Let the cheesecake rest inside the cooling oven for 1 hour for gradual cooling to prevent cracking.
- Chill: Remove the cheesecake from the water bath and transfer to a wire rack to cool completely. After cooling, refrigerate for at least 8 hours or overnight to set fully.
- Serve: Before serving, top the cheesecake with homemade cherry pie filling, whipped cream, and chocolate shavings for the classic Black Forest finish.
Notes
- Optionally, add 2-3 tablespoons of kirsch to the cheesecake filling or cherry pie filling to enhance the traditional Black Forest flavor.
- The water bath and foil wrapping help prevent cracks and ensure even baking.
- Letting the cheesecake cool gradually in the oven reduces the risk of surface cracking.
- Using room temperature ingredients results in a smoother batter and better texture.
Nutrition
- Serving Size: 1 slice (1/12 of cheesecake)
- Calories: 520
- Sugar: 34g
- Sodium: 280mg
- Fat: 38g
- Saturated Fat: 22g
- Unsaturated Fat: 14g
- Trans Fat: 0.5g
- Carbohydrates: 38g
- Fiber: 2g
- Protein: 8g
- Cholesterol: 140mg


