
If you’re anything like me, a chocolate and mint combo is pure magic. That’s why I’m thrilled to share this Andes Mint Cookies Recipe that’s become an absolute favorite in my kitchen. These cookies are rich, fudgy, and have that irresistible burst of minty goodness from the iconic Andes Mints right on top. I promise, once you try them, you’ll understand why my family literally goes crazy for these. Stick around because I’m going to walk you through every step with tips to get them perfectly chewy and beautifully minty.
Why You’ll Love This Recipe
- Deliciously fudgy texture: You’ll get that soft, chewy cookie that’s not too cakey or crumbly.
- Minty surprise every bite: The melted Andes Mint on top adds a fresh, cooling contrast that’s just perfect.
- Simple ingredients, big flavor: No complicated steps here — just classic pantry staples and your Andes Mints.
- Great for any occasion: From cookie swaps to cozy nights in, these cookies never disappoint.

Ingredients You’ll Need
These ingredients come together to make the ultimate mint-chocolate cookie experience. I love that you probably already have most on hand, plus those Andes Mints deliver that special touch you won’t find in any other cookie.
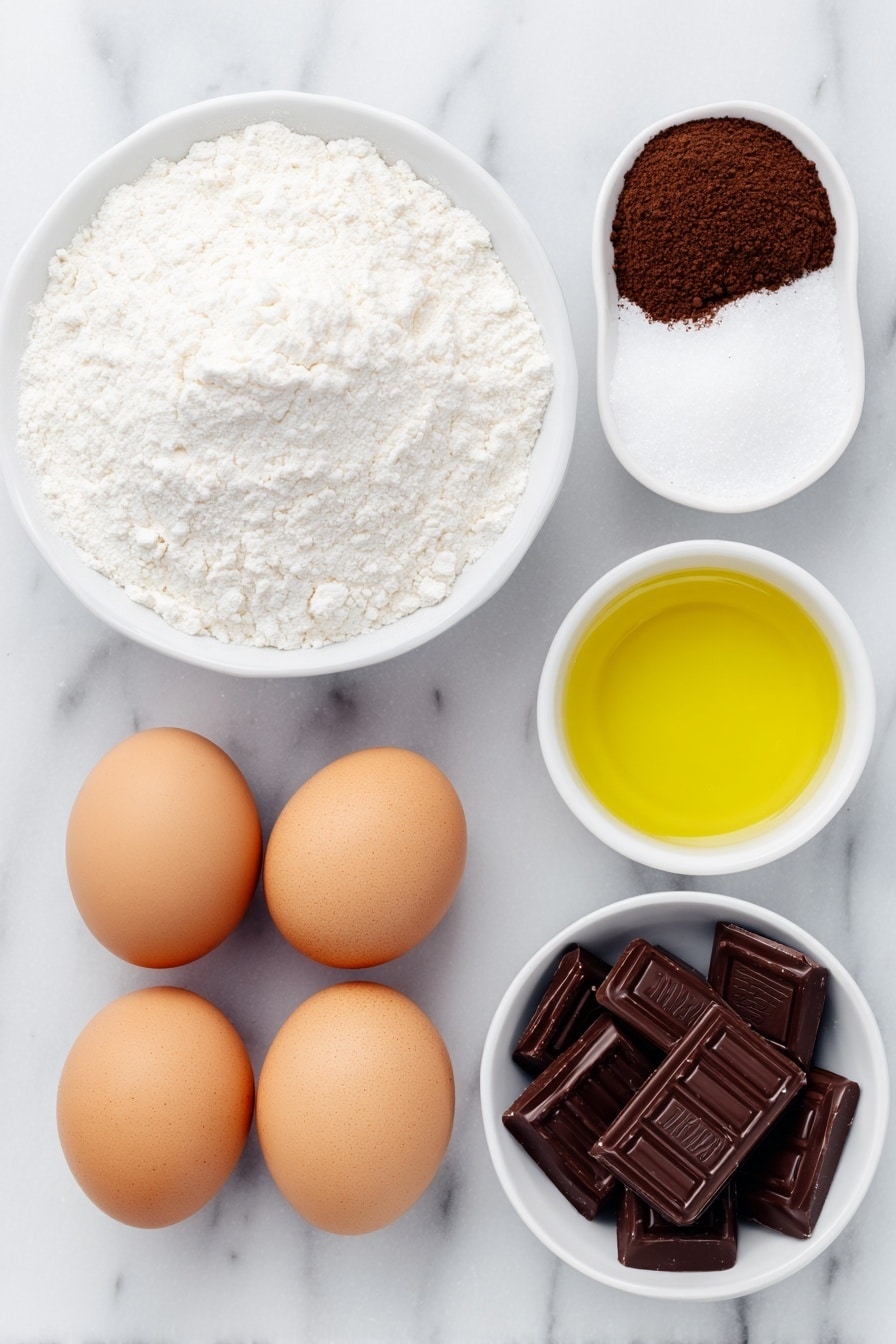
- All-purpose flour: Make sure to spoon and level your flour for accurate measurement, which ensures perfect cookie texture.
- Baking powder: Helps the cookies rise just enough without being cakey.
- Salt: A pinch to balance out sweetness and enhance the chocolate flavor.
- Granulated sugar: Provides sweetness and helps with that classic cookie chewiness.
- Unsweetened cocoa powder: This gives your cookies that rich chocolate base — don’t skimp on quality!
- Vegetable oil: Keeps the cookie moist and tender; I avoid butter here to maintain fudginess.
- Large eggs: Bind everything together and add richness.
- Vanilla extract: Essential for depth of flavor; pure vanilla makes a difference.
- Andes Mints Chocolates: The star of the show — unwrap them ahead of time so you’re ready when the cookies come out of the oven.
Variations
I love experimenting with this Andes Mint Cookies Recipe for different occasions. You can easily tweak the recipe to suit your mood or dietary needs. Personalizing your cookies makes them even more special — don’t be shy to try your favorite additions.
- Mint Lovers Double Down: Add a few drops of peppermint extract for an extra mint punch — just be cautious, a little goes a long way!
- Nutty Twist: Toss in chopped walnuts or pecans before chilling the dough for some crunchy texture; my family enjoys this variation on chilly evenings.
- Gluten-Free Version: Substitute all-purpose flour with a gluten-free blend and adjust baking time slightly. I tested this once and it worked wonderfully with a mix designed for baking.
- Mini Candy Surprise: Use chopped Andes Mint pieces mixed into the dough for minty pockets inside as well as melted tops.
How to Make Andes Mint Cookies Recipe
Step 1: Mix the Dry Ingredients
Start by whisking together the all-purpose flour, baking powder, and salt in a medium bowl. I like this step because it ensures everything is evenly distributed before adding wet ingredients. Set this bowl aside while you work on the chocolate base—it’s a small thing that makes a big difference to the texture.
Step 2: Combine Sugar, Cocoa, and Oil
Using your stand mixer fitted with the paddle attachment, blend the granulated sugar, unsweetened cocoa powder, and vegetable oil until they form a smooth, rich mixture. This took me a couple tries to get right — blending well here ensures the dry cocoa powder dissolves and the sugar doesn’t feel grainy.
Step 3: Add Eggs and Vanilla
One at a time, mix in the eggs and then vanilla extract, making sure everything is fully incorporated before moving on. Your mixture should now be glossy and thick, telling you you’re on the right track!
Step 4: Fold in the Dry Ingredients
Pour in the flour mixture and stir gently until the dough just comes together. Don’t over-mix here—scraping the sides of the bowl and folding ensures a tender yet chewy cookie. You’ll notice how thick and chocolatey the dough feels — yum!
Step 5: Chill the Dough
Scrape your dough up the sides of the bowl (this is a little trick I discovered to help it chill more evenly and quickly). Then pop it in the freezer for 45 to 60 minutes or until firm enough to handle. This step is key — chilled dough means your cookies won’t spread too thin, and the texture stays just right.
Step 6: Prep and Preheat
While your dough chills, preheat your oven to 350°F (about 175°C). This gives the oven time to reach temperature, so when your dough comes out chilled and ready, you’re set to bake perfectly.
Step 7: Shape and Bake the Cookies
Once chilled, scoop dough into 1-inch balls — I find about 22 grams each works well for consistent size and even baking. Place them on a parchment-lined baking sheet spaced about 2 inches apart. Flatten them gently halfway down with greased fingers or the bottom of a glass. Bake for 9 to 11 minutes, and trust me, they should look slightly under-baked when you pull them out — this keeps them chewy inside.
Step 8: Add Andes Mints and Finish
Right after taking the cookies out of the oven, gently press one unwrapped Andes Mint into the center of each cookie. Let them rest for about 5 minutes until the chocolate softens, then spread the melted mint topping over the surface. You can chill the cookies to set faster or leave them on a wire rack at room temperature. I usually do a bit of both, depending on how patient I’m feeling!
Pro Tips for Making Andes Mint Cookies Recipe
- Chill Like a Pro: Don’t skip freezing the dough—warm dough spreads too much and loses that chewy center.
- Timing the Bake: Pull cookies from the oven when edges are set but centers look slightly underdone; they’ll firm up as they cool.
- Gentle Mint Press: Press the Andes Mint chocolates in gently so you don’t tear the cookies.
- Wrap to Store: Keep your cookies in an airtight container to maintain softness and freshness longer.
How to Serve Andes Mint Cookies Recipe

Garnishes
I usually keep it simple with these cookies because the Andes Mints already give a gorgeous green swirl of color and sweetness. But when I’m feeling fancy, I sprinkle a pinch of flaky sea salt on top after the mint melts—it brings out the chocolate flavor even more beautifully.
Side Dishes
These cookies pair wonderfully with a cold glass of milk or a warm cup of coffee. I’ve also served them alongside peppermint hot chocolate at holiday parties — the flavors complement each other perfectly for a cozy treat.
Creative Ways to Present
For holiday gatherings, I like arranging these cookies on a festive platter garnished with fresh mint leaves and a dusting of powdered sugar. Sometimes I stack them into little towers tied with a ribbon for gifting — everyone loves that mint-chocolate surprise!
Make Ahead and Storage
Storing Leftovers
I store leftovers in an airtight container at room temperature for up to 4 days. I find that letting them breathe a bit before sealing keeps their texture soft, but you can also keep a small piece of bread inside the container to help maintain moisture.
Freezing
These Andes Mint Cookies freeze beautifully. I freeze the baked cookies in a single layer on a tray, then transfer them to a freezer bag. When you’re ready, thaw at room temperature and, if you want, pop them in a warm oven for a few minutes to get that fresh-baked feel.
Reheating
To revive the cookies, I heat them in the oven at 300°F for about 5 minutes or microwave for 15 seconds. This softens the mint topping and brings back that delightful just-baked warmth.
FAQs
-
Can I use chocolate chips instead of Andes Mints?
You can, but the Andes Mint adds a unique and refreshing minty flavor that regular chocolate chips don’t provide. If you want a minty twist, you might try mint-flavored chocolate chips or adding peppermint extract to the dough.
-
Why does the dough need to be chilled before baking?
Chilling the dough firms it up, which prevents the cookies from spreading too much during baking. This helps you achieve a thicker, chewier cookie texture instead of flat, crispy ones.
-
Can I make these cookies vegan or dairy-free?
Since the Andes Mints contain dairy, the cookie as currently designed isn’t vegan or dairy-free. However, you can substitute eggs with flax eggs and look for dairy-free mint chocolates to adapt the recipe accordingly.
-
How do I prevent the Andes Mints from melting into a mess?
Press the unwrapped chocolates gently onto the warm cookies right after removing them from the oven, then give them a few minutes to soften and spread. Avoid pressing too hard or too early—warm cookies help the chocolate melt slowly and evenly.
Final Thoughts
I absolutely love how this Andes Mint Cookies Recipe brings together simplicity and indulgence in one bite. When I first made these, I was amazed at how the mint topping transforms a regular chocolate cookie into a celebration of flavors. You’ll enjoy how approachable the recipe is but how special the result tastes, making it perfect for everyday treats or holiday celebrations. Trust me, once you try them, these cookies will become your go-to whenever you crave that perfect mix of chocolate and mint.
Print
Andes Mint Cookies Recipe
- Prep Time: 20 minutes
- Cook Time: 32 minutes
- Total Time: 52 minutes
- Yield: 48 cookies
- Category: Dessert
- Method: Baking
- Cuisine: American
- Diet: Vegetarian
Description
Delight in these rich and fudgy Andes Mint Cookies, combining a deep cocoa cookie base with the refreshing, creamy taste of Andes Mints. Perfect for chocolate and mint lovers, these cookies bake to a soft, slightly under-baked texture and are finished with a melted mint chocolate topping for an irresistible treat.
Ingredients
Dry Ingredients
- 2 1/4 cups (300g) all-purpose flour (spoon and level)
- 2 tsp baking powder
- 1/2 tsp salt
- 1 cup (85g) unsweetened cocoa powder (spoon and level)
Wet Ingredients
- 2 cups (400g) granulated sugar
- 3/4 cup (175ml) vegetable oil
- 4 large eggs
- 2 tsp vanilla extract
Topping
- 48 Andes Mints Chocolates, unwrapped (from two packages)
Instructions
- Combine Dry Ingredients: In a medium mixing bowl, whisk together the all-purpose flour, baking powder, and salt. Set this mixture aside for later use.
- Mix Sugar, Cocoa, and Oil: In the bowl of an electric stand mixer equipped with the paddle attachment, blend together the granulated sugar, unsweetened cocoa powder, and vegetable oil until fully combined and smooth.
- Add Eggs and Vanilla: Incorporate the four large eggs and vanilla extract into the cocoa mixture, mixing until the batter is uniform.
- Incorporate Dry Ingredients: Add the flour mixture to the wet ingredients and mix until just combined. Scrape the sides of the bowl and gently fold the dough to ensure even incorporation.
- Chill the Dough: Scrape the dough up the sides of the bowl to aid in faster, even chilling. Place the bowl in the freezer for 45 to 60 minutes until the dough is firm enough to handle.
- Preheat Oven: During the last 15 minutes of chilling, preheat your oven to 350°F (175°C).
- Shape Cookies: Scoop the dough and form into 1-inch balls (approximately 22 grams each). Place them on a baking sheet lined with parchment paper or a silicone baking mat, spacing each dough ball 2 inches apart.
- Flatten and Bake: Using greased hands or a cup, flatten each ball about halfway. Bake in the preheated oven for 9 to 11 minutes, aiming for a slightly under-baked appearance.
- Add Andes Mint Topping: While the cookies bake, unwrap the Andes Mints chocolates. Immediately after removing cookies from the oven, gently press one Andes Mint onto each cookie. Let them rest for about 5 minutes until the mint softens and can be spread over the cookie surface.
- Set Cookies: To set the topping faster, chill the cookies in the refrigerator, or place them on a wire rack and allow to set at room temperature.
Notes
- The cookie base recipe is adapted from Hershey’s classic chocolate cookie recipe.
- Flattening the dough balls helps to ensure even baking and a softer texture.
- Pressing the Andes Mint onto warm cookies allows the chocolates to soften and spread easily for a creamy topping.
- Cooling the cookies on a wire rack prevents sogginess by allowing air circulation.
- Use parchment paper or silicone baking mats to avoid sticking and for easy cleanup.
Nutrition
- Serving Size: 1 cookie
- Calories: 180
- Sugar: 18g
- Sodium: 90mg
- Fat: 9g
- Saturated Fat: 3g
- Unsaturated Fat: 5g
- Trans Fat: 0g
- Carbohydrates: 25g
- Fiber: 2g
- Protein: 2g
- Cholesterol: 30mg


