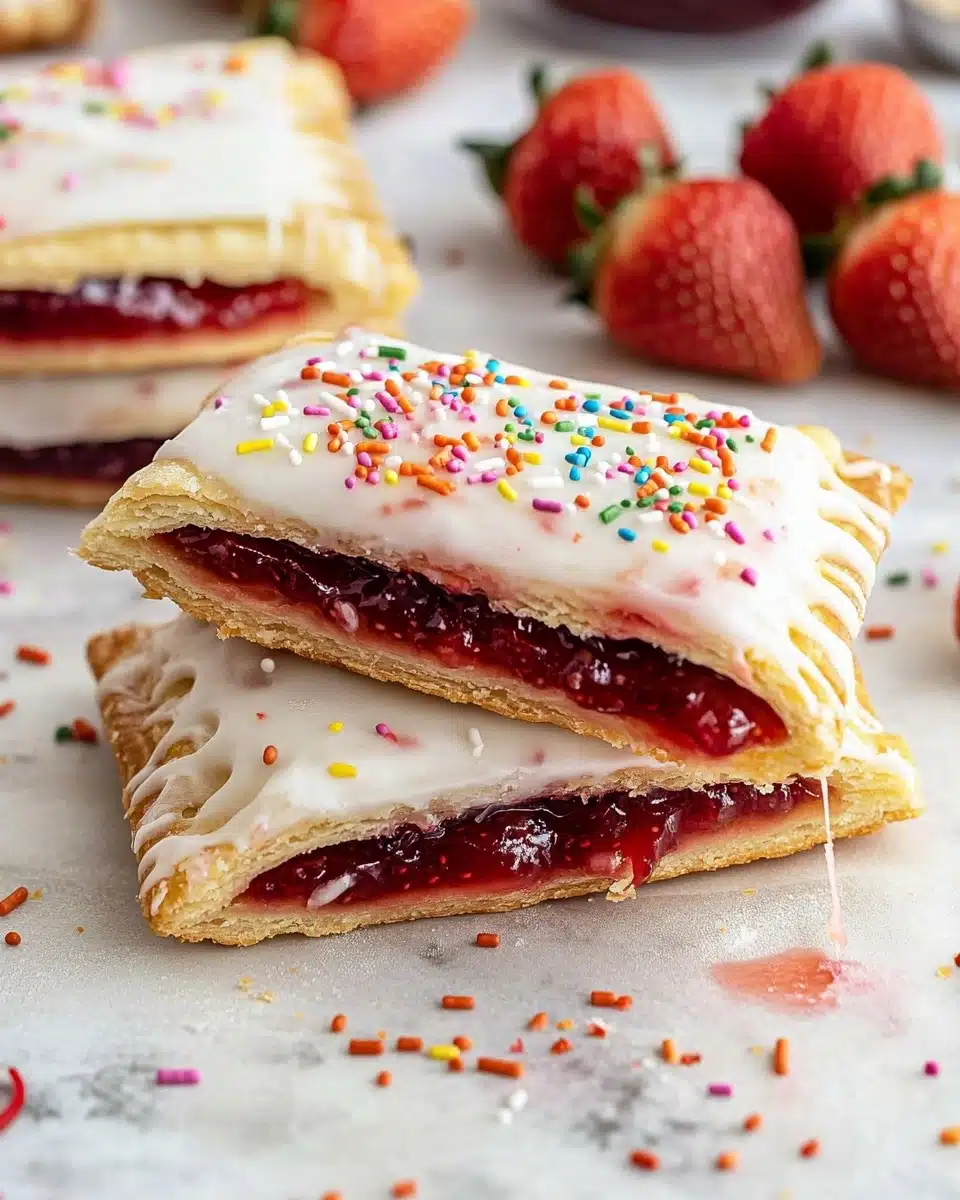
If you grew up dreaming of giant pop tarts, this Homemade Strawberry Sheet Pan Pop Tart is your sweet, nostalgic fantasy come to life—only better, because it’s flaky, fruity, and dressed up with heaps of icing and sprinkles. Every bite is both gorgeously crisp and melt-in-your-mouth tender, layered with real strawberry preserves and glazed to perfection. It’s a bake that’s fun to share, but honestly—once you try it, you might want to keep it all to yourself!
Why You’ll Love This Recipe
- A throwback favorite—supercharged: It captures that classic pop tart flavor, but with a golden, bakery-style crust and a luscious, real-fruit filling.
- Effortlessly impressive: You only need a handful of everyday ingredients to create a treat that looks like you bought it from an artisan bakery.
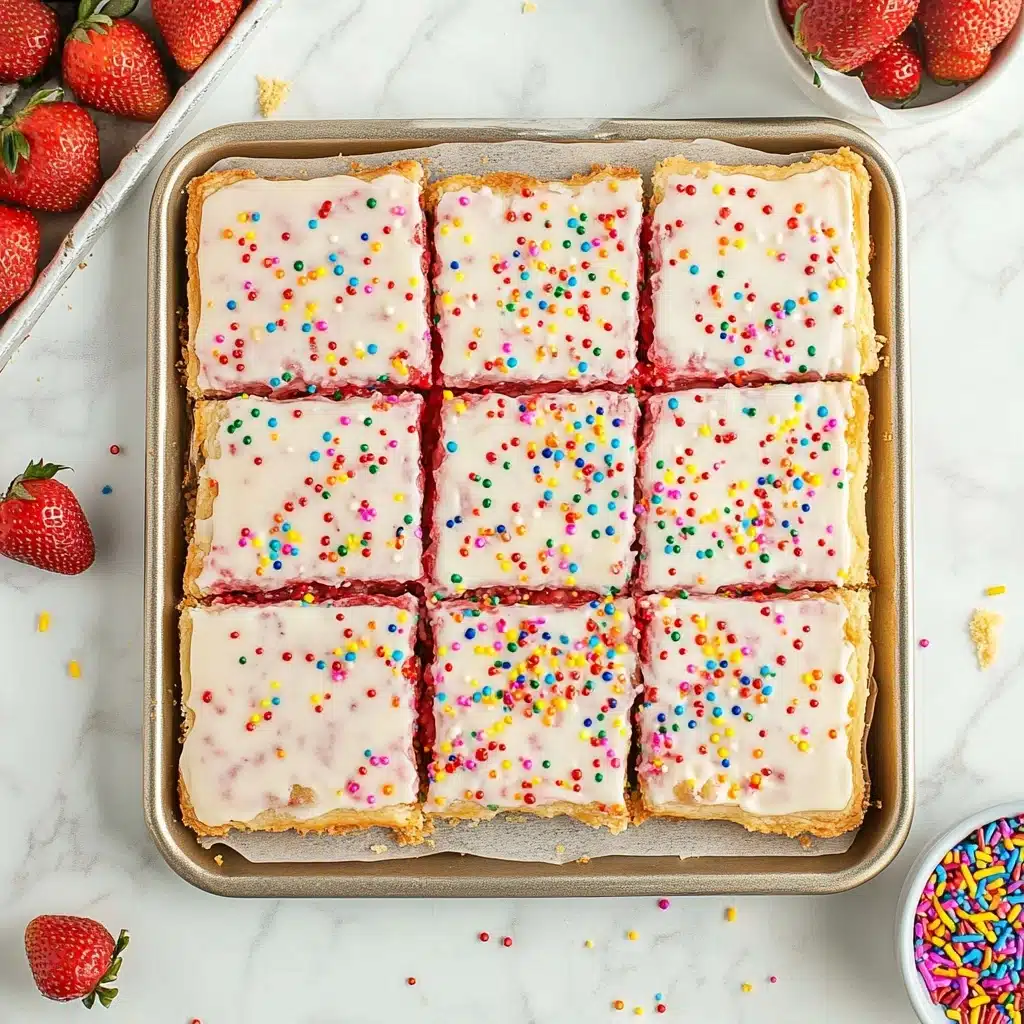
- Sheet pan magic: Baking one giant pop tart means there’s enough to feed a crowd—or fuel your inner child all week!
- Endless customization: From the filling to the icing and sprinkles, you can easily make it your own (or stick to strawberry because, well, it’s a total classic).

Ingredients You’ll Need
You’ll only need a small collection of staple ingredients for this Homemade Strawberry Sheet Pan Pop Tart, but each plays a crucial role in building that signature taste and texture—from the buttery crust to the vibrant jam. Don’t skip a single one—they’re the secret to pop tart perfection!
- 4 ready-to-bake pie crusts: These make for a quick, consistent, and delectably flaky base—opt for your favorite brand, or use homemade if you love making dough.
- 1 and 1/2 cups strawberry preserves: The filling star! Use a high-quality preserve for the brightest berry flavor, or even homemade jam for a personal touch.
- 3 tablespoons softened butter (for brushing): It helps create a glossy, golden finish and adds that rich bakery aroma.
- 2 cups powdered sugar (for icing): This gives the glaze its ultra-smooth sweetness and the perfect drizzly texture.
- 4 tablespoons milk (for icing): Thins out the icing until it glides beautifully over the crust.
- Sprinkles, for garnishing: Because pop tarts without sprinkles just aren’t as fun—customize the colors to fit any occasion or mood!
Variations
Want to make this Homemade Strawberry Sheet Pan Pop Tart uniquely yours? Get creative! This is a forgiving recipe, and you can swap flavors, fillings, or even crusts to adapt to your pantry, dietary needs, or current cravings.
- Berry blast: Swap out the strawberry preserves for raspberry, blueberry, or a mixture of your favorite fruit jams for a vibrant twist.
- Gluten-free option: Use a gluten-free pie crust if you’re baking for friends with dietary restrictions—just check the rolling and baking times as they can vary.
- Cream cheese swirl: Dollop small amounts of sweetened cream cheese over the strawberry layer for a cheesecake-inspired upgrade.
- Chocolate-drizzled: After glazing, drizzle with melted white or dark chocolate for a pop tart that feels a bit fancy and decadent.
How to Make Homemade Strawberry Sheet Pan Pop Tart
Step 1: Prep and Roll Out Your Crust
Preheat your oven to 375°F. On a large cutting board or clean surface, roll out two pie crusts together until they form one big rectangle, roughly 12×16 inches (or whatever shape fits your sheet pan best). If you want precise edges, trim with a knife or pastry wheel. Carefully roll up the crust and transfer it to your greased sheet pan—it’s easier and neater this way!
Step 2: Layer on the Strawberry Goodness
Spoon your strawberry preserves onto the crust, spreading it evenly but leaving about a 1-inch border all around the edge. This border helps you seal in the jam later so you don’t end up with any runaway filling in the oven.
Step 3: Add the Top Crust & Seal the Edges
Roll out the remaining two pie crusts just as before, making a matching rectangle. Drape this gently over the strawberry-filled base. Using your fingers, pinch the edges together all the way around, then go in with a fork to crimp and further secure the jammy filling. Don’t forget to poke holes in the center with a toothpick—this helps all the steam escape so the crust stays crisp, not soggy.
Step 4: Butter and Bake
Brush the entire surface (edges too!) with your softened butter. Slide the pan into your preheated oven and bake for about 25 minutes, rotating the tray halfway through so everything bakes up evenly. Watch for that dreamy golden crust—your kitchen will suddenly smell like a hybrid of a pie shop and your childhood Saturday mornings.
Step 5: Ice and Sprinkle (The Fun Part!)
Once the pop tart is golden and cool enough to handle, whisk together powdered sugar and milk for a glossy, pourable icing. Spread generously over the center of your Homemade Strawberry Sheet Pan Pop Tart, leaving the crimped edges exposed for that bakery shop look. Top with sprinkles—then slice, serve, and watch everyone’s eyes light up!
Pro Tips for Making Homemade Strawberry Sheet Pan Pop Tart
- Jam Quality Matters: Choose preserves over jelly for the richest, fruitiest filling that doesn’t run or water down your crust.
- Even Rolling Secret: Stack your two pie crusts and roll them out together—the layered dough is easier to manage and gives you a sturdier base, perfect for slicing.
- Don’t Skip the Venting: Those little holes in the top crust let steam escape and keep your Homemade Strawberry Sheet Pan Pop Tart from puffing up or getting soggy.
- Slice Once Iced: For the cleanest edges and prettiest slices, let the icing set for 10 minutes before cutting into squares (if you can wait that long!).
How to Serve Homemade Strawberry Sheet Pan Pop Tart
Garnishes
Glazing is just the beginning—this Homemade Strawberry Sheet Pan Pop Tart loves to be dressed up! Classic rainbow sprinkles are the nostalgic choice, but colored sanding sugar, white chocolate drizzle, or even tiny freeze-dried strawberries make it feel extra special for a birthday or brunch table. Don’t be afraid to decorate each square differently if you’re serving a crowd.
Side Dishes
Pair your pop tart slices with a creamy vanilla yogurt parfait, a chilled glass of milk, or fresh berries for breakfast. For a dessert spin, try a scoop of vanilla or strawberry ice cream—pure bliss on a warm slice!
Creative Ways to Present
Turn this sheet pan beauty into a party centerpiece by slicing it into tiny bar-sized pieces and serving on a pastel platter. Or, cut into generous rectangles, wrap in parchment and bakery twine, and tuck in lunchboxes or picnic baskets for an extra-sweet surprise. For birthdays, write a fun message in icing or arrange sprinkles in a celebratory pattern!
Make Ahead and Storage
Storing Leftovers
Keep any leftover Homemade Strawberry Sheet Pan Pop Tart covered tightly at room temperature for up to 2 days—it stays delightfully flaky and soft! For longer storage, pop leftovers in an airtight container in the fridge for up to 5 days. The icing might firm up, but it’ll still taste amazing.
Freezing
You can absolutely freeze slices of your pop tart for future cravings. Simply wrap individual pieces well in plastic wrap and foil, then stash in a freezer bag. Freeze for up to 2 months—just thaw at room temp or in the fridge overnight before enjoying.
Reheating
To bring back that just-baked taste, warm slices in a 300°F oven for 6–8 minutes or pop in the toaster oven for a few minutes. Avoid microwaving if you want to keep the pastry flaky (though a few seconds for a quick fix will work if you’re in a rush!).
FAQs
-
Can I use homemade pie crust instead of ready-to-bake?
Absolutely! A homemade crust brings even more melt-in-your-mouth flavor to your Homemade Strawberry Sheet Pan Pop Tart. Just use your favorite double pie crust recipe—roll, trim, and assemble as described. Make sure to chill the crust well so it’s easy to manage.
-
What if my jam starts leaking during baking?
If a little jam escapes, don’t panic! Place a sheet of foil or a larger pan underneath to catch any drips. Next time, ensure you’re leaving a generous border and really press and crimp those edges well to seal in all the tasty filling.
-
Can I use other flavors for the filling?
Yes! While strawberry is the classic (and so delicious), raspberry, blueberry, peach, or even apricot preserves will work beautifully in your sheet pan pop tart. You can also combine flavors for something new and exciting!
-
How do I keep the crust from getting soggy?
Poking holes in the top for venting is key, and make sure to avoid overloading the preserves—it should be evenly spread, not overflowing. Cooling the baked tart completely before glazing also helps you keep that gorgeous, crisp crust!
Final Thoughts
If you’re looking for a dose of cheerful nostalgia with a homemade twist, give this Homemade Strawberry Sheet Pan Pop Tart a try. It’s a show-stopper for breakfast, brunch, dessert, or anytime you’re craving a jammy treat that brings smiles to the table. Happy baking—and don’t forget the sprinkles!
Print
Homemade Strawberry Sheet Pan Pop Tart Recipe
- Prep Time: 15 minutes
- Cook Time: 25 minutes
- Total Time: 40 minutes
- Yield: 12+
- Category: Baking
- Method: Baking
- Cuisine: American
Description
This Homemade Strawberry Sheet Pan Pop Tart recipe is a delightful twist on the classic toaster pastry. With a flaky crust, sweet strawberry filling, and a creamy icing, these oversized pop tarts are perfect for sharing with a crowd.
Ingredients
Pie Crust:
- 4 ready-to-bake pie crusts
Strawberry Filling:
- 1 and 1/2 cups strawberry preserves
Butter for Brushing:
- 3 tablespoons softened butter
Icing:
- 2 cups powdered sugar
- 4 tablespoons milk
- Sprinkles, for garnishing
Instructions
- Preheat Oven: Preheat the oven to 375°F.
- Prepare Crust: Roll two pie crusts together on a cutting board, cut into a 12×16-inch rectangle, and transfer to a sheet pan.
- Add Filling: Spread strawberry preserves over the crust, leaving a border. Top with another rolled crust and seal the edges.
- Bake: Poke holes, brush with butter, and bake for about 25 minutes until golden.
- Make Icing: Whisk powdered sugar and milk for icing. Spread over the baked pop tart and add sprinkles.
- Serve: Slice and enjoy!
Nutrition
- Serving Size: 1 slice
- Calories: 280
- Sugar: 22g
- Sodium: 210mg
- Fat: 9g
- Saturated Fat: 4g
- Unsaturated Fat: 4g
- Trans Fat: 0g
- Carbohydrates: 48g
- Fiber: 1g
- Protein: 2g
- Cholesterol: 10mg


